Week 4.2 Reconcilers & Intro to React
In this lecture, Harkirat addresses the challenges encountered in vanilla JavaScript while building a Todo application. Focusing on the limitations of manual DOM manipulation and the lack of a centralized statethe discussion sets the context for transitioning to React. The session highlights the pain points faced during development and introduces React's declarative and component-based approach as a solution for more efficient and scalable web development.
Why React?
DOM manipulation, in its raw form, poses significant challenges for developers. Constructing dynamic websites using the basic primitives offered by the DOM—such as document.createElement, document.appendChild, element.setAttribute, and element.children—can be a complex and labor-intensive process. The inherent difficulty lies in orchestrating intricate interactions and updates within the document structure using these primitive tools.
Recognizing the intricacies involved, React, a JavaScript library, emerged as a powerful solution. React abstracts away much of the manual DOM manipulation complexity, providing developers with a declarative and component-based approach to building user interfaces. This abstraction not only enhances code readability and maintainability but also simplifies the creation of dynamic and interactive web applications.
However, before jumping directly into React, let’s us first try building a simple todo application using vanilla JavaScript. This exercise will serve a dual purpose—it will not only reinforce your JavaScript concepts but also allow you to grasp the problem statement, setting the stage to appreciate the elegance of React even more.
Todo Application Frontend
In today’s session, our focus shifts to constructing a straightforward todo application. Unlike the previous day’s example where we were overwriting the innerHTML to display results of calculateSum, today’s task involves a different approach. We aim to append elements instead of overwriting them, creating a more seamless user experience. The goal is to have all entered todos consistently displayed on the screen, eliminating the abrupt resetting of content and ensuring a continuous and fluid representation of the user’s input.
First, let’s take a comprehensive look at the entire code for building the frontend of a Todo Application in vanilla JavaScript. Later, we will delve deep into each line and component of the code to gain a thorough understanding of its workings.
<body><input type="text" id="title" placeholder="Todo title"></input> <br /><br /><input type="text" id="description" placeholder="Todo description"></input> <br /><br />
<button onclick="addTodo()">Add todo</button><br /> <br />
<div id="todos">
</div></body><script>let globalId = 1;
function markAsDone (todoId) { const parent = document.getElementById(todoId); parent.children[2].innerHTML = "Done!"}
function createChild(title, description, id) {  const child = document.createElement("div");
  const firstGrandParent = document.createElement("div");  firstGrandParent.innerHTML = title;
  const secondGrandParent = document.createElement("div");  secondGrandParent.innerHTML = description;
  const thirdGrandParent = document.createElement("button");  thirdGrandParent.innerHTML = "Mark as done";  thirdGrandParent.setAttribute("onclick", `markAsDone(${id})`);
  child.appendChild(firstGrandParent);  child.appendChild(secondGrandParent);  child.appendChild(thirdGrandParent);  child.setAttribute("id", id);
  return child;}
function addTodo() { const title = document.getElementById("title").value; const description = document.getElementById("description").value; const parent = document.getElementById("todos"); parent.appendChild(createChild(title, description, globalId++));}</script>Now, Let’s break down the JavaScript code step by step:
-
Global Variables:
let globalId = 1;globalIdis a variable initialized to 1. It is used to assign a unique identifier to each todo item.
-
markAsDoneFunction:function markAsDone(todoId) {const parent = document.getElementById(todoId);parent.children[2].innerHTML = "Done!";}markAsDoneis a function that marks a todo as done.- It takes the
todoIdas a parameter, which corresponds to the unique identifier of the todo item. - It finds the todo item using
document.getElementById(todoId)and then accesses its third child element (index 2) to update its HTML content to “Done!”.
-
createChildFunction:function createChild(title, description, id) {const child = document.createElement("div");const firstGrandParent = document.createElement("div");firstGrandParent.innerHTML = title;const secondGrandParent = document.createElement("div");secondGrandParent.innerHTML = description;const thirdGrandParent = document.createElement("button");thirdGrandParent.innerHTML = "Mark as done";thirdGrandParent.setAttribute("onclick", `markAsDone(${id})`);child.appendChild(firstGrandParent);child.appendChild(secondGrandParent);child.appendChild(thirdGrandParent);child.setAttribute("id", id);return child;}createChildis a function that generates a new todo item.- It takes
title,description, andidas parameters. - It creates three child elements (
firstGrandParent,secondGrandParent, andthirdGrandParent) representing the title, description, and “Mark as done” button, respectively. - These child elements are appended to the
childdiv, and the unique identifier (id) is set as the id attribute for the child div. - The function returns the generated child div.
-
addTodoFunction:function addTodo() {const title = document.getElementById("title").value;const description = document.getElementById("description").value;const parent = document.getElementById("todos");parent.appendChild(createChild(title, description, globalId++));}addTodois a function that adds a new todo item to the list.- It retrieves the values of the title and description from the corresponding input fields.
- It then gets the parent container (
todos) and appends a new todo item using thecreateChildfunction. - The
globalIdis passed as the unique identifier, and it is then incremented for the next todo.
This setup allows users to add todo items with a title, description, and a “Mark as done” button that, when clicked, updates the todo’s status to “Done!”.
The Current Approach faces Several Challenges:
- Difficulty in Adding and Removing Elements: The process of adding and removing elements becomes intricate with the existing setup. Direct manipulation of the DOM for such operations can lead to complex and error-prone code.
- Lack of Central State: The absence of a centralized state management system poses issues. With each function managing its own state, maintaining consistency across the application becomes challenging.
- Integration with a Server: If there is a server where these todos are stored, the current structure lacks a mechanism to seamlessly integrate with it. Handling data from an external server requires a more organized approach.
- Mobile App Updates: Imagine updating a TODO item from a mobile app. When the updated list of TODOs arrives on the frontend, there is no provision for efficiently updating the DOM. The current structure lacks functions for updating or removing existing TODOs.
In essence, while there’s an addTodo function, the absence of updateTodo and removeTodo functions limits the flexibility and robustness of the application, especially in scenarios involving dynamic changes and external data sources.
What do we mean by State?
When we refer to state in the context of our todo application, we are essentially talking about the current representation of the todo data within the application. In a more structured format, the state might look something like this:
[ { id: 1, title: "Go to Gym", description: "Go to Gym from 7-9 PM" }, { id: 2, title: "Read a Book", description: "Read 'The Hitchhiker's Guide to the Galaxy'" }]Here, the state is a collection of todo items, each represented as an object with properties such as ‘id’, ‘title’, and ‘description’. This structured format allows us to organize and manage the current state of the application’s data.
In a real-world scenario, as the user interacts with the application—adding, updating, or removing todos—the state dynamically changes to reflect the most recent data. This concept of state management becomes crucial for maintaining a consistent and up-to-date representation of the todo list within the application.
Solution With a Blackbox Fn
Now, if we can write a function, that takes this state as an input and creates the output, that would be much more powerful than our original approach.
When we talk about a function that takes a state as input and creates the desired output, we are referring to a function that can dynamically generate the representation of our todo list based on the current state.
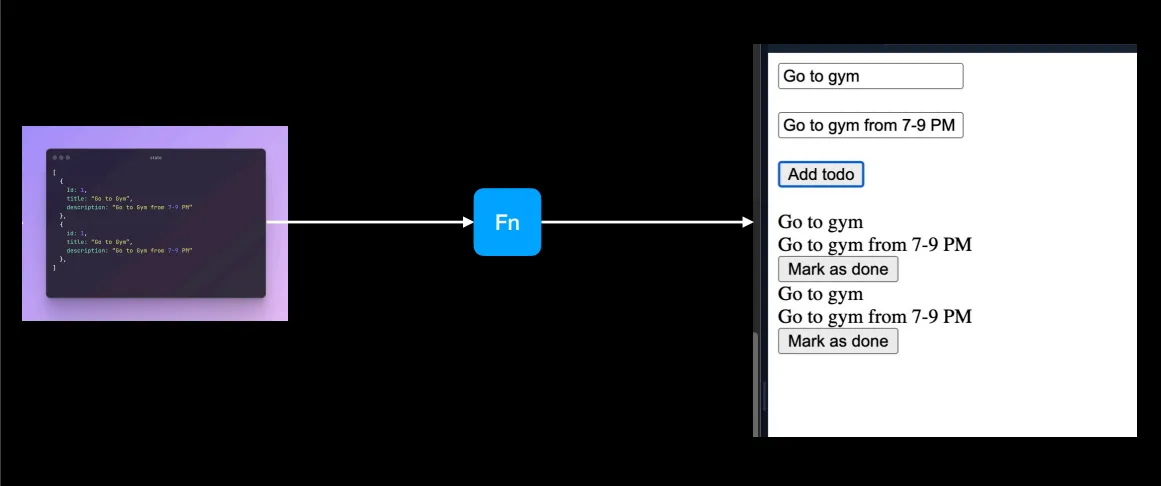
Now for a moment let us consider this function Fn — updateState() to be a black box. This boils down our todo application code to:
<!DOCTYPE html><html>
<head>  <script>    // Global variable to assign unique identifiers to each todo    let globalId = 1;
    // Function to add a new todo to the state    function addTodo() {      // Initialize an empty array to store todos      let todoState = [];
      // Get values from input fields      const title = document.getElementById("title").value;      const description = document.getElementById("description").value;
      // Add a new todo object to the state array      todoState.push({        title: title,        description: description,        id: globalId++      });
      // Call the function to update the state and render the todos      updateState(todoState);    }  </script></head>
<body>  <!-- Input fields for todo title and description -->  <input type="text" id="title" placeholder="Todo title"></input> <br /><br />  <input type="text" id="description" placeholder="Todo description"></input> <br /><br />
  <!-- Button to trigger the addTodo function -->  <button onclick="addTodo()">Add todo</button>
  <!-- Container to display the list of todos -->  <div id="todos"></div></body>
</html>
Explanation:
- The
addTodofunction is responsible for adding a new todo to the state. - It initializes an empty
todoStatearray to store todos. - It retrieves the values of the todo title and description from the corresponding input fields.
- A new todo object is created with a unique identifier (
id) using theglobalIdvariable. - The new todo object is pushed to the
todoStatearray. - The
updateStatefunction orFn(which is not provided in this code) is called to update the state and render the todos on the screen. - The HTML structure consists of input fields for the todo title and description, a button to add a new todo, and a container (
div) to display the list of todos.
The updateState() function
Now Let us focus on this blackbox Fn — the updateState() function
A Dumb way to constructing the updateState() function would be:
-
Clear the Parent Element:
Remove all child elements from the parent element.
-
Repopulate the DOM:
Call
addTodo()for each element in the state, effectively re-rendering all todos.
However, a more intelligent solution is to:
-
Avoid Clearing the DOM Upfront:
Instead of clearing the entire parent element and starting from scratch, maintain the existing DOM elements.
-
Update Based on Changes:
Update the DOM selectively based on what has changed in the state.
Question Arises:
- How does the application determine what has changed?
- Has a todo been marked as complete?
- Has a todo been removed from the backend?
Solution: Keep track of the old todos in a variable, essentially creating a “Virtual DOM.
Virtual DOM
The concept of a Virtual DOM comes into play when dealing with efficient updates to the actual DOM.
The Virtual DOM is a lightweight copy of the actual DOM. When updates are made to the state of an application, a new Virtual DOM is created with the changes. This Virtual DOM is then compared with the previous Virtual DOM to identify the differences (known as “diffing”).
In the context of a todo application:
- State Changes:
- If a todo has been marked as complete or removed from the backend, the state of the application changes.
- Virtual DOM Comparison:
- The new state is used to create a new Virtual DOM.
- This new Virtual DOM is compared with the previous Virtual DOM.
- Identifying Changes:
- The difference between the new and previous Virtual DOMs is determined.
- For example, if a todo has been marked as complete, the corresponding element in the Virtual DOM is updated to reflect this change.
- Efficient Updates:
- Instead of clearing the entire parent element and re-rendering everything, the Virtual DOM helps identify specifically what has changed.
- Selective DOM Manipulation:
- Only the elements that have changed are manipulated in the actual DOM.
- This process is more efficient than a naive approach of clearing and re-rendering the entire DOM.
By employing a Virtual DOM, React optimizes the process of updating the actual DOM, leading to better performance and a smoother user experience. This mechanism is a key feature of React and contributes to its popularity for building dynamic and responsive web applications.
Complete Solution of the Todo Application
Now, let us have a look at our final complete code and draw conclusions out of this exercise:
<!DOCTYPE html><html><head>  <script>    let globalId = 1;    let todoState = [];    let oldTodoState = [];
    function addTodo() {      const title = document.getElementById("title").value;      const description = document.getElementById("description").value;
      todoState.push({        title: title,        description: description,        id: globalId++      });
      updateState(todoState);    }
    function removeTodo(todo) {      const element = document.getElementById(todo.id);      element.parentElement.removeChild(element);    }
    function updateTodo(oldTodo, newTodo) {      const element = document.getElementById(newTodo.id);      element.children[0].innerHTML = newTodo.title;      element.children[1].innerHTML = newTodo.description;      element.children[2].innerHTML = newTodo.completed ? "Mark as done" : "Done";    }

    function updateState(newTodos) {      // Calculate the difference between newTodos and oldTodos.      // More specifically, find out what todos are -      // 1. added      // 2. deleted      // 3. updated      const added = newTodos.filter(newTodo => !oldTodoState.some(oldTodo => oldTodo.id === newTodo.id));      const deleted = oldTodoState.filter(oldTodo => !newTodos.some(newTodo => newTodo.id === oldTodo.id));      const updated = newTodos.filter(newTodo => oldTodoState.some(oldTodo => oldTodo.id === newTodo.id));
      // Call addTodo, removeTodo, updateTodo functions on each of the elements      added.forEach(newTodo => addTodoElement(newTodo));      deleted.forEach(oldTodo => removeTodoElement(oldTodo));      updated.forEach(newTodo => updateTodoElement(newTodo));
      oldTodoState = [...newTodos];    }
    function addTodoElement(newTodo) {      const title = document.getElementById("title").value;      const description = document.getElementById("description").value;
      todoState.push({        title: title,        description: description,        id: globalId++      });
      updateState(todoState);    }
  </script></head><body>  <input type="text" id="title" placeholder="Todo title"><br><br>  <input type="text" id="description" placeholder="Todo description"><br><br>  <button onclick="addTodo()">Add todo</button><br><br>  <div id="todos"></div></body></html>
Conclusions
To build a dynamic frontend website in the easiest way possible we need 3 things.
A function to :
- Update a state variable here
addTodo() - Delegate the task of figuring out difference in the DOM tree here
updateStateTodo() - Tell the hefty function how to add, update and remove elements here
updateTodo()andremoveTodo()
Now, creating a function to Update a state variable
addTodo()and a function to Update and Remove elementsupdateTodo()removeTodo()is the job of a frontend developer. While this task of a hefty function to figure out the difference in the DOM tree is done by React.
Challenges Faced Throughout
As we transition into React, it’s crucial to reflect on the challenges faced while building the Todo application using vanilla JavaScript.
- The manual manipulation of the DOM, appending and removing elements,
- lack of a centralized state, and
- the absence of efficient methods for handling updates posed significant hurdles.
The approach of overwriting the entire DOM or clearing elements upfront proved cumbersome, especially when dealing with dynamic changes such as marking a Todo as complete or removing items from the backend. React, as a declarative and component-based library, addresses these pain points directly.
Starting with React
By abstracting away the complexities of DOM manipulation, React provides a more efficient and maintainable way to handle state changes, updates, and dynamic rendering. The transition to React promises not only a cleaner and more organized code structure but also a streamlined approach to building interactive web applications. Let’s delve into React’s features and explore how it revolutionizes frontend development, simplifying the implementation of functionalities like updating Todos and managing state seamlessly.
Building our First Application in React
Let’s start a new React project using Vite, you can follow these steps:
- Open your terminal and run the following command to create a new Vite project:
npm create vite@latest- Follow the prompts to set up your project. You can choose the default settings for now.
- Once the project is created, navigate to the project directory using:
cd your-project-name- Open the project in your code editor.
Now, let’s build a simple React component with a button that increases the count dynamically on clicks using useState. Update the src/App.jsx file with the following code:
import React, { useState } from 'react';
function App() {  // State variable 'count' and the function 'setCount' to update it  const [count, setCount] = useState(0);
  // Function to handle button click and update the count  const handleButtonClick = () => {    setCount(count + 1);  };
  return (    <div>      <h1>Count: {count}</h1>      <button onClick={handleButtonClick}>Increase Count</button>    </div>  );}
export default App;
Explanation:
- We import
Reactand theuseStatehook from the ‘react’ package. - Inside the
Appcomponent, we declare a state variablecountand a functionsetCountto update it usinguseState(0). The initial value ofcountis set to0. - We define a function
handleButtonClickthat increases thecountby 1 when the button is clicked. We use thesetCountfunction to update the state. - The JSX returned by the component displays the current count and a button. The
onClickattribute of the button is set to thehandleButtonClickfunction.
Now, save the file and run your project using:
npm run devVisit http://localhost:3000 in your browser, and you should see your React app with a button that dynamically increases the count on each click.