Week 16.3 Auth JWT and Cookies
In this offline lecture, Harkirat covered authentication using JWT with localStorage, and authentication using cookies. He explained the implementation details, properties of cookies, and how the SameSite attribute helps mitigate CSRF attacks. Lastly, we see a fullstack implementation
What is Authentication?
Authentication is a crucial security process that allows users to securely access websites, applications, or systems by verifying their identities. It is the process of confirming that a user is who they claim to be, typically through the use of credentials such as a username and password or other authentication methods.

The authentication process typically involves the following steps:
- User Identification: The user provides their unique identifier, such as a username, email address, or other identifying information.
- Credential Verification: The user submits their credentials, such as a password, biometric data (e.g., fingerprint or facial recognition), or other authentication factors.
- Credential Validation: The system compares the provided credentials against the stored credentials in a secure database or authentication server.
- Access Granted or Denied: If the provided credentials match the stored credentials, the user is authenticated, and access is granted. If the credentials do not match, access is denied, and the user may be prompted to try again or follow additional authentication steps.
Authentication can be implemented using various methods, including:
- Username and Password: This is the most common form of authentication, where users provide a unique username and a corresponding password.
- Single Sign-On (SSO): SSO allows users to access multiple applications or services with a single set of credentials, eliminating the need to log in separately for each application.
- Multi-Factor Authentication (MFA): MFA adds an extra layer of security by requiring users to provide additional authentication factors beyond just a username and password, such as a one-time code sent to their mobile device or a biometric factor like a fingerprint or facial recognition.
- Passwordless Authentication: This method eliminates the need for traditional passwords by using alternative authentication factors like magic links, push notifications, or biometric data.
Auth using JWT & Localstorage
1. Signup
The signup process typically involves the following steps:
a. The client (e.g., a web application) sends a POST request to the server with the user’s registration details, such as username, email, and password.
b. The server validates the provided information and creates a new user account in the database.
c. Upon successful registration, the server generates a JWT containing the user’s information (e.g., user ID, email) and signs it with a secret key.
d. The server sends the generated JWT back to the client.
e. The client stores the received JWT in the browser’s localStorage or another secure storage mechanism.
Example code snippet (server-side):
// Assuming you have a User model and a JWT utility functionconst newUser = await User.create({ username, email, password });const token = generateJWT({ userId: newUser.id, email: newUser.email });res.json({ token });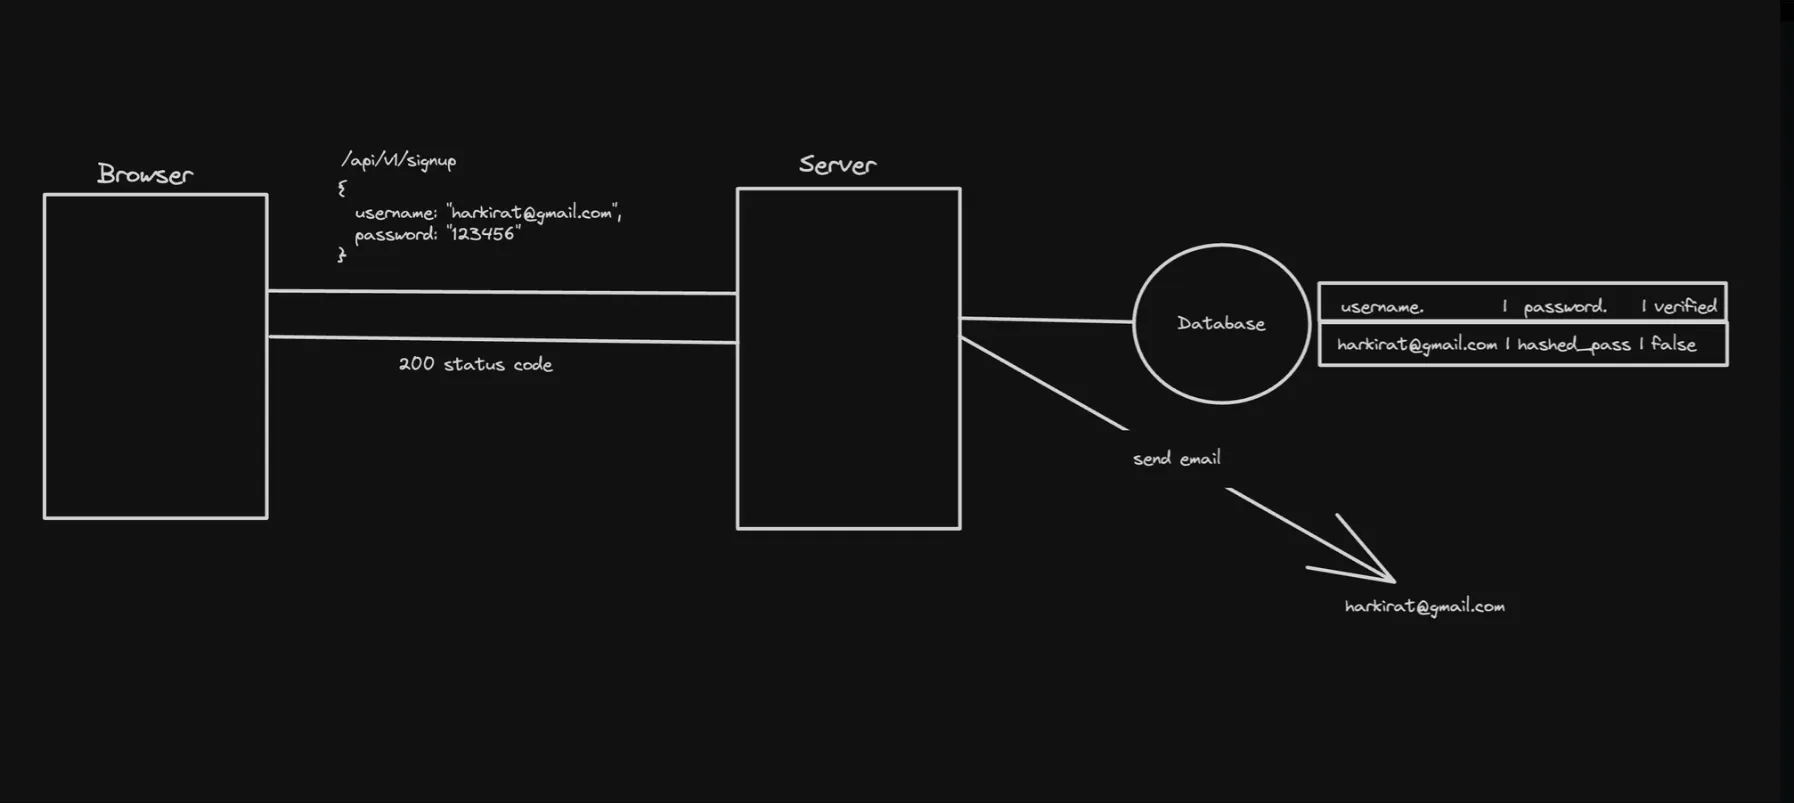
2. Signin
The signin process typically involves the following steps:
a. The client sends a POST request to the server with the user’s credentials (e.g., email and password).
b. The server verifies the provided credentials against the stored user information in the database.
c. If the credentials are valid, the server generates a new JWT containing the user’s information and signs it with a secret key.
d. The server sends the generated JWT back to the client.
e. The client stores the received JWT in the browser’s localStorage or another secure storage mechanism.
Example code snippet (server-side):
// Assuming you have a User model and a JWT utility functionconst user = await User.findOne({ email });if (!user || !user.validatePassword(password)) { return res.status(401).json({ error: 'Invalid credentials' });}const token = generateJWT({ userId: user.id, email: user.email });res.json({ token });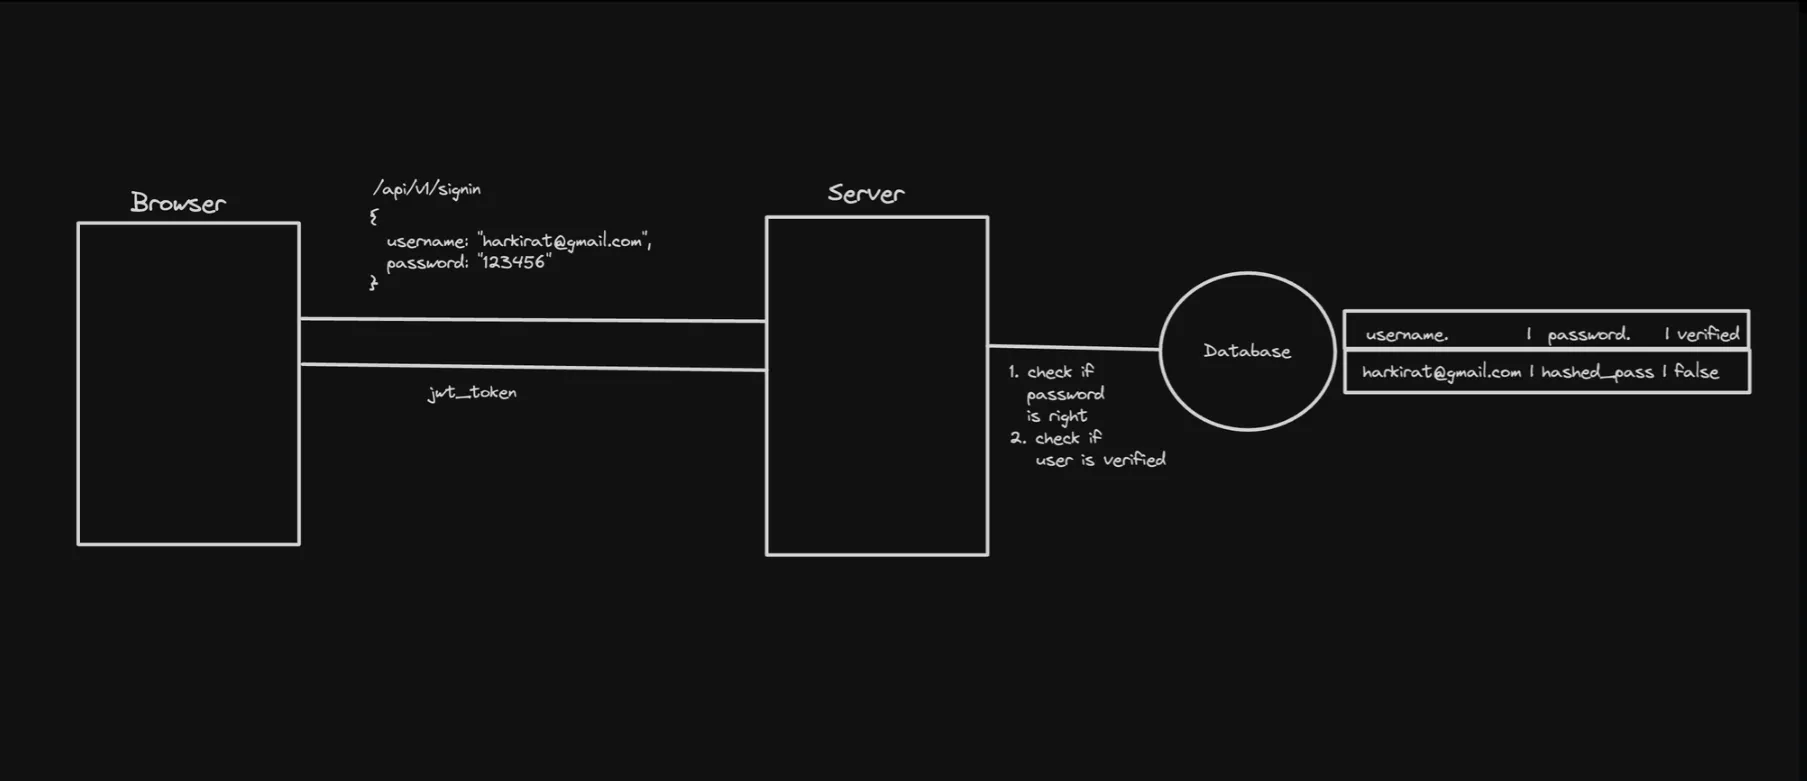
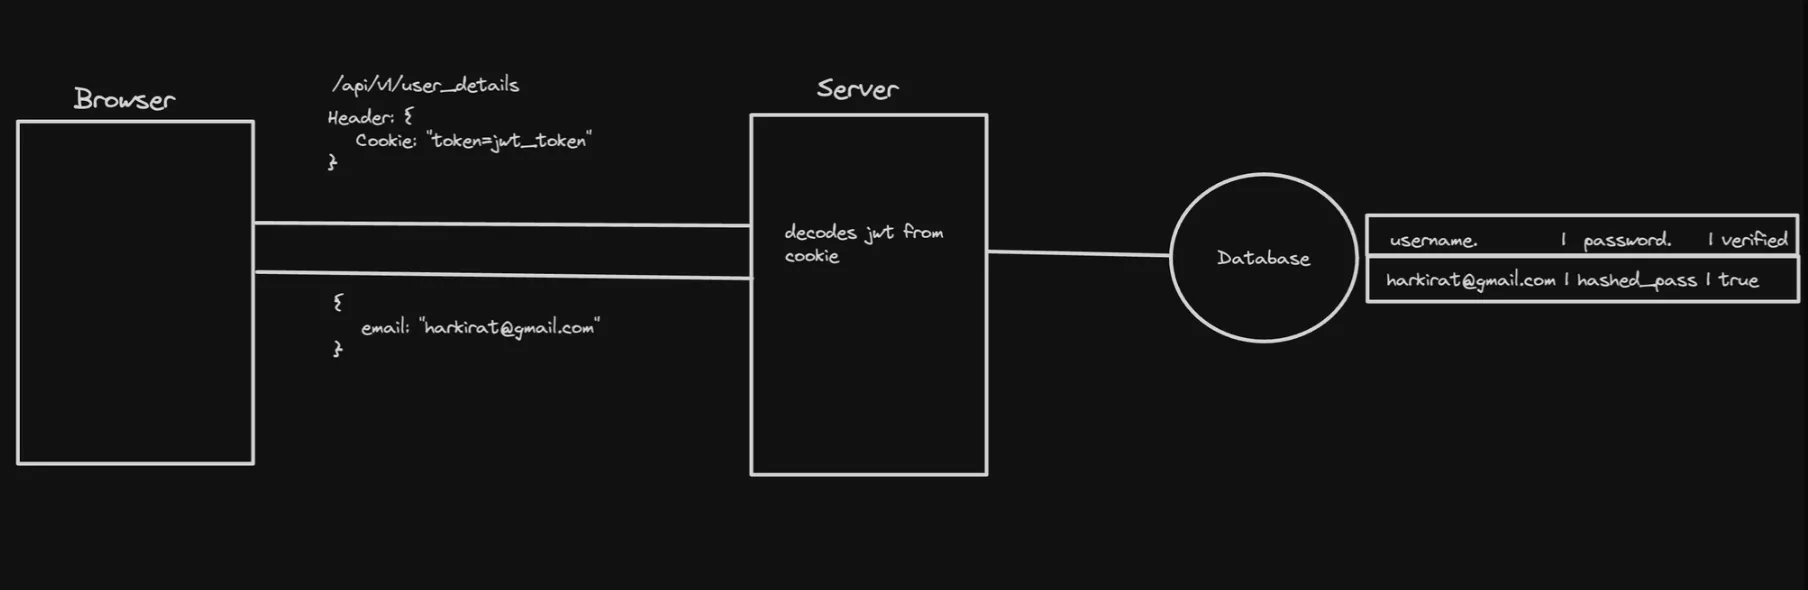
3. Auth Requests
For authenticated requests, the client includes the JWT in the Authorization header of the request.
Example code snippet (client-side):
const token = localStorage.getItem('token');fetch('/protected-route', { headers: { 'Authorization': `Bearer ${token}` }}) .then(response => response.json()) .then(data => { // Handle the response data }) .catch(error => { // Handle the error });On the server-side, the JWT is verified and decoded to extract the user’s information. If the JWT is valid, the server processes the request; otherwise, it returns an unauthorized error.
Example code snippet (server-side):
// Assuming you have a JWT utility functionconst token = req.headers.authorization.split(' ')[1];try { const decoded = verifyJWT(token); // Attach the user information to the request object req.user = decoded; // Proceed with the request next();} catch (err) { res.status(401).json({ error: 'Invalid token' });}
Using JWT and localStorage for authentication has several advantages, such as stateless authentication (no server-side session management) and the ability to securely transmit user information in the JWT payload. However, it’s important to handle JWT expiration, revocation, and secure storage on the client-side to mitigate potential security risks.
Auth Using Cookies
What are Cookies?
Cookies are small pieces of data sent from a website and stored on the user’s computer by the user’s web browser while the user is browsing. They are designed to be a reliable mechanism for websites to remember information about the user’s session or preferences.
Cookies serve several purposes in web development, including:
- Session Management: Cookies allow websites to identify users and track their individual session states across multiple pages or visits. This is particularly useful for maintaining user authentication and ensuring a seamless browsing experience.
- Personalization: Websites use cookies to personalize content and advertisements based on the user’s preferences or browsing history.
- Tracking: Cookies can track users across websites, providing insights into browsing behavior. This information can be used for analytics purposes, to improve website functionality, or for targeted advertising.
- Security: Secure cookies can be used to enhance the security of a website by ensuring that the transmission of information is only done over an encrypted connection, helping to prevent unauthorized access to user data.
In the context of authentication, we will be focusing on the security aspect of cookies (point 4).
Why not use localStorage?
While both cookies and localStorage provide ways to store data on the client-side, they serve different purposes and have different characteristics.
The key difference is that cookies are automatically sent with every request to the website by the browser, whereas localStorage data needs to be explicitly included in the request headers.
This automatic inclusion of cookies with every request becomes particularly important in frameworks like Next.js, where we’ll explore its significance later.
Here’s an example from the provided source code (frontend/src/pages/SendMoney.jsx):
const res = await fetch(`${process.env.NEXT_PUBLIC_API_URL}/send-money`, { method: "POST", headers: { "Content-Type": "application/json", }, body: JSON.stringify({ amount, receiver }), credentials: "include", // This line is important for cookies});In this example, the credentials: "include" option is used to ensure that cookies are included in the request sent to the server. This is crucial for cookie-based authentication, as the server relies on the presence of the authentication cookie to verify the user’s identity.
Additional Characteristics of Cookies
Cookies have some additional characteristics that make them suitable for authentication purposes:
- Expiry: Cookies can have an expiry date or duration attached to them, allowing for session management and automatic logout after a certain period of inactivity.
- Restrictions: Cookies can be restricted to only work over HTTPS connections and to specific domains, enhancing security and preventing unauthorized access.
While cookies are commonly used for authentication purposes, it’s important to note that they should be used in conjunction with other security measures, such as HTTPS encryption and secure cookie flags, to ensure the protection of sensitive user data.
In the subsequent sections, we will explore the implementation details of cookie-based authentication, including server-side session management and client-side handling of authentication cookies.
Auth Cookies Implementation
1. Signup
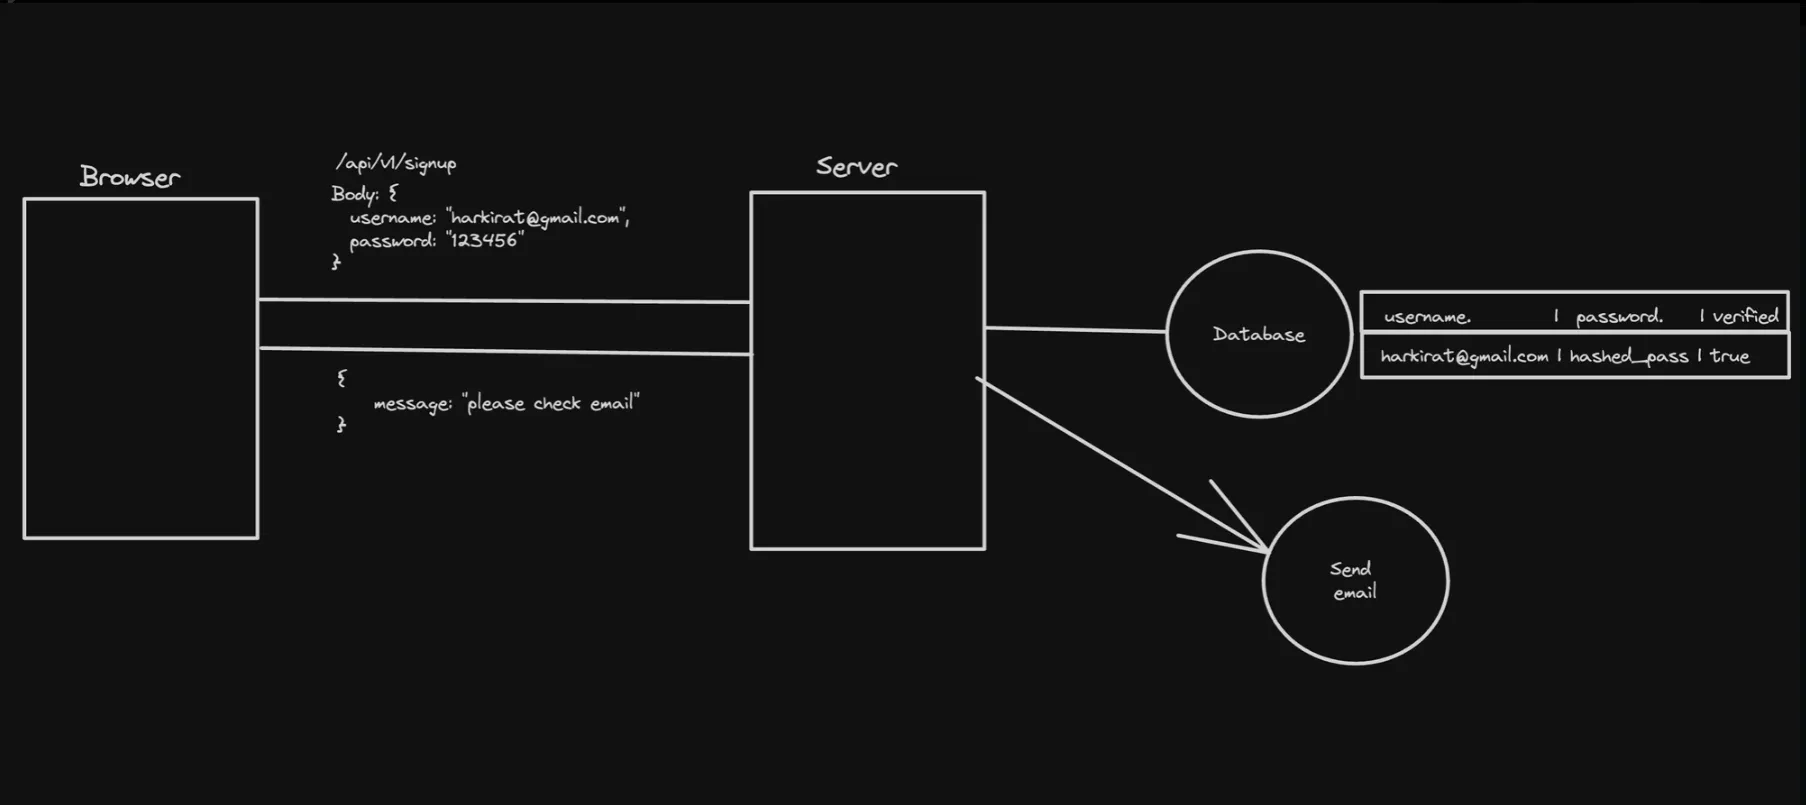
During the signup process, the server typically performs the following steps:
a. The client sends a POST request to the server with the user’s registration details, such as username, email, and password. b. The server validates the provided information and creates a new user account in the database. c. Upon successful registration, the server generates a session ID or token that represents the authenticated user. d. The server sets an HTTP cookie with the session ID or token in the response headers. e. The client’s browser receives the response and stores the cookie for future requests.
Example server-side code (using Express.js):
app.post('/signup', async (req, res) => {  const { username, email, password } = req.body;
  // Create a new user in the database  const newUser = await User.create({ username, email, password });
  // Generate a session ID or token  const sessionId = generateSessionId();
  // Set the session ID or token as a cookie  res.cookie('sessionId', sessionId, { httpOnly: true, secure: true });
  res.status(201).json({ message: 'User registered successfully' });});
2. Signin
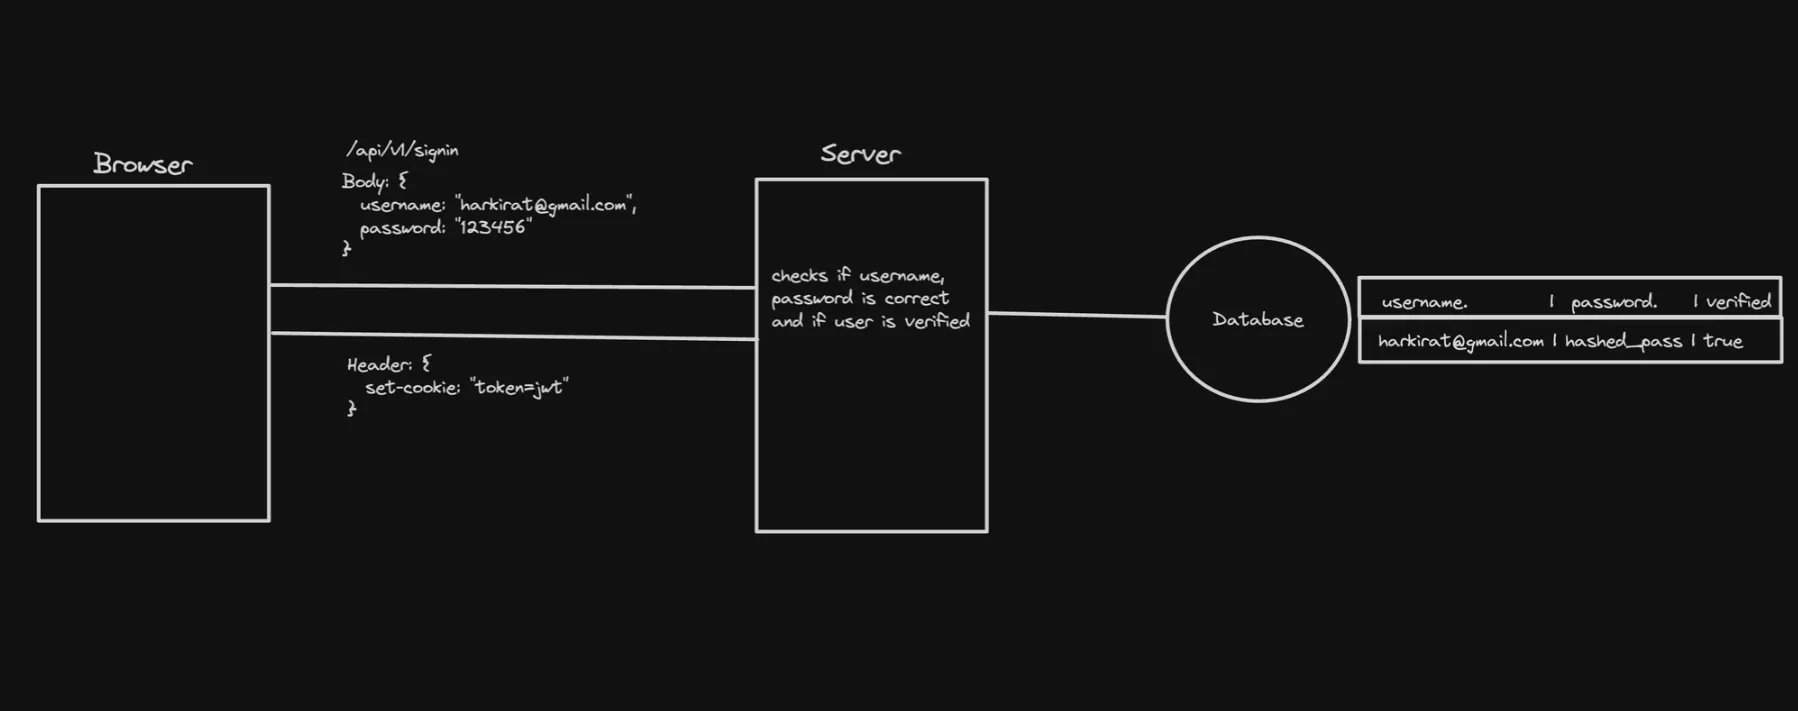
During the signin process, the server typically performs the following steps:
a. The client sends a POST request to the server with the user’s credentials (e.g., email and password). b. The server verifies the provided credentials against the stored user information in the database. c. If the credentials are valid, the server generates a new session ID or token that represents the authenticated user. d. The server sets an HTTP cookie with the new session ID or token in the response headers. e. The client’s browser receives the response and updates or creates a new cookie with the provided session ID or token.
Example server-side code (using Express.js):
app.post('/signin', async (req, res) => {  const { email, password } = req.body;
  // Find the user in the database  const user = await User.findOne({ email });
  // Verify the password  if (!user || !user.validatePassword(password)) {    return res.status(401).json({ error: 'Invalid credentials' });  }
  // Generate a new session ID or token  const sessionId = generateSessionId();
  // Set the session ID or token as a cookie  res.cookie('sessionId', sessionId, { httpOnly: true, secure: true });
  res.status(200).json({ message: 'User signed in successfully' });});
3. Auth Endpoints
For authenticated endpoints, the server typically performs the following steps:
a. The client sends a request to the server, including the cookie with the session ID or token. b. The server receives the request and extracts the session ID or token from the cookie. c. The server verifies the session ID or token against the stored session data (e.g., in a database or in-memory store). d. If the session ID or token is valid, the server processes the request and returns the appropriate response. e. If the session ID or token is invalid or expired, the server returns an unauthorized error.
Example server-side code (using Express.js):
app.get('/protected', async (req, res) => {  const sessionId = req.cookies.sessionId;
  // Verify the session ID or token  const session = await Session.findOne({ sessionId });
  if (!session) {    return res.status(401).json({ error: 'Unauthorized' });  }
  // Process the request and return the response  res.status(200).json({ message: 'Protected data' });});
Automatic Cookie Handling
One of the advantages of using cookies for authentication is that the browser automatically includes the cookie in every request to the server. This means you don’t need to explicitly set the cookie header in the client-side code (e.g., fetch requests or Axios requests).
The browser automatically handles the inclusion of cookies based on the server’s response headers and the cookie settings (e.g., domain, path, and expiration).
This automatic cookie handling simplifies the client-side code and ensures that the authentication cookie is always included in requests to the server, without the need for additional client-side logic.
Properties of Cookies
Types of Cookies
- Persistent Cookies: These cookies remain stored on the user’s device even after the browser is closed. They have an expiration date or a maximum age set, and they persist until that date or until the user manually clears them.
- Session Cookies: These cookies are temporary and are deleted when the user closes the browser or the browsing session ends. They are typically used for storing session-related data and are not stored permanently on the user’s device.
Properties of Cookies
- Secure: When this property is set, the cookie is only sent over secure, encrypted connections (HTTPS). This helps prevent the cookie from being intercepted during transmission.
- HttpOnly: When this property is set, the cookie cannot be accessed or modified by client-side scripts (e.g., JavaScript). This helps mitigate cross-site scripting (XSS) attacks, where an attacker might try to steal or manipulate the cookie’s value.
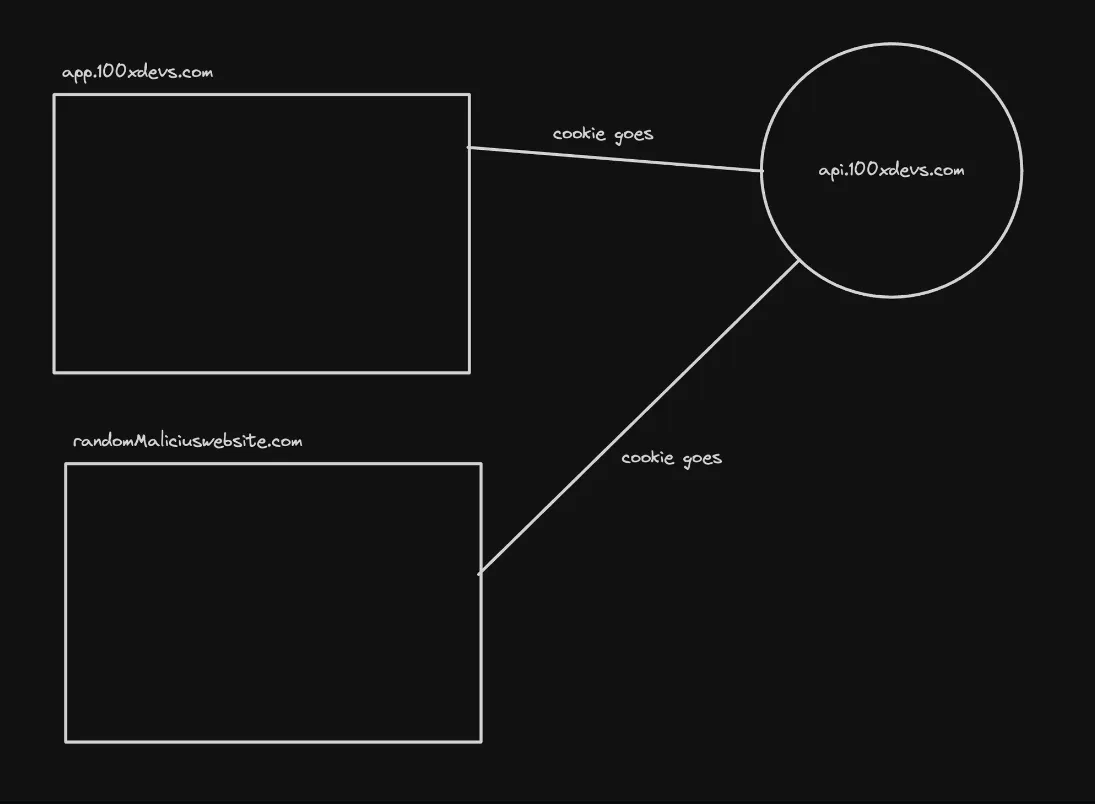
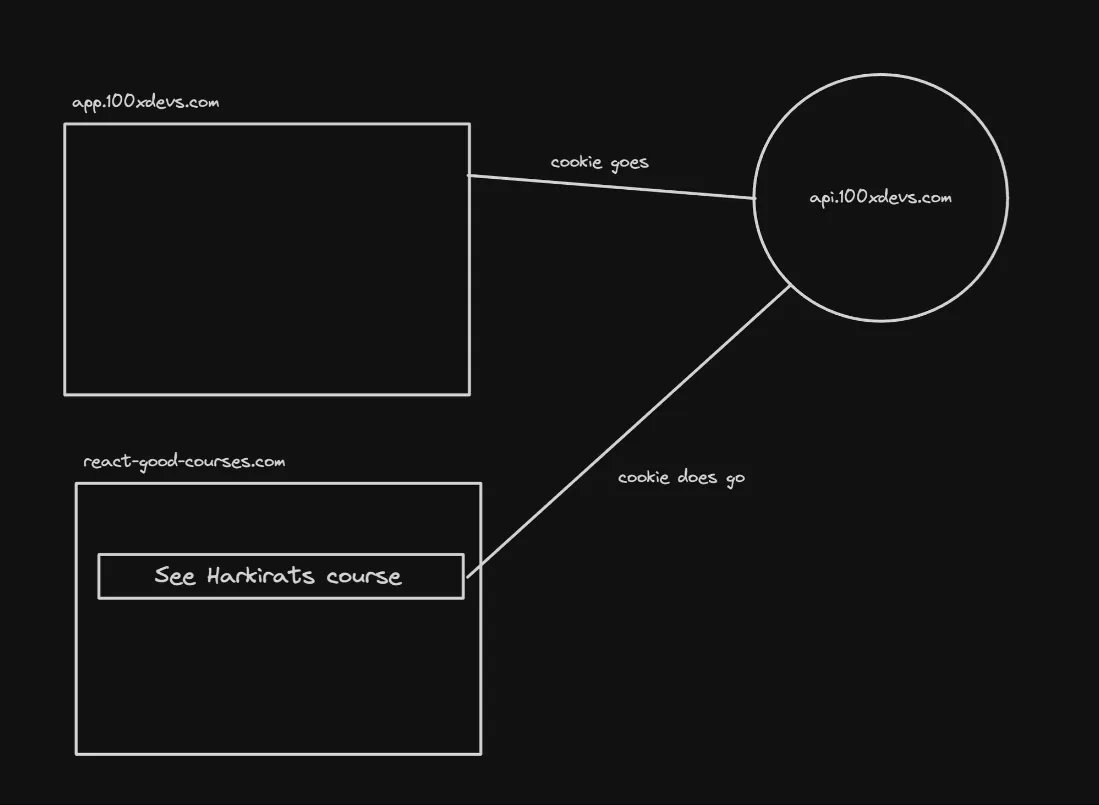
- SameSite: This property controls when a cookie should be sent in cross-site requests. It helps mitigate cross-site request forgery (CSRF) attacks by restricting cookies from being sent in certain cross-origin scenarios. The possible values are:
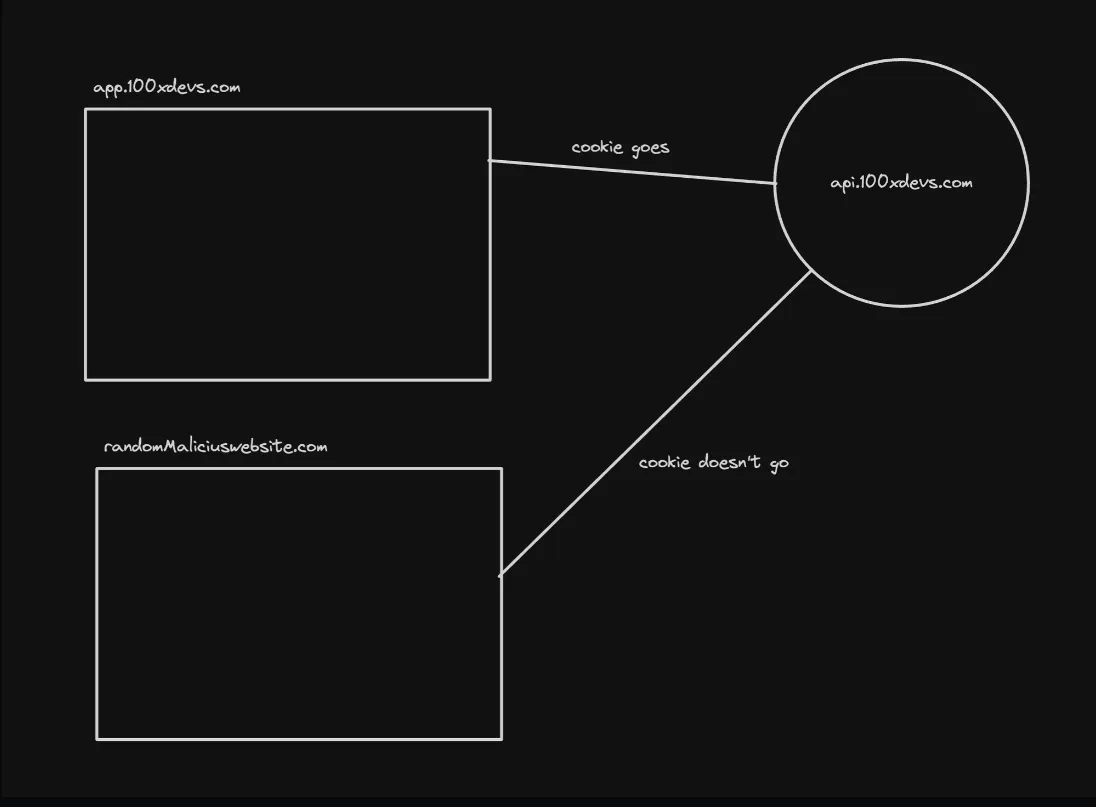
- Strict: The cookie is only sent in requests originating from the same site (same origin).
- Lax: The cookie is sent in cross-site requests, but only if the request is a top-level navigation (e.g., clicking a link) or a GET request.
- None: The cookie is sent in all cross-site requests, regardless of the request method or origin.
- Domain: This property specifies the domain(s) for which the cookie should be sent. By default, cookies are only sent to the domain that set them, but you can specify a broader domain to allow the cookie to be sent to subdomains as well.
CSRF Attacks and SameSite
Cross-Site Request Forgery (CSRF) attacks were a common issue before the introduction of the SameSite attribute. These attacks exploit the fact that cookies are automatically sent with requests, even if those requests originate from a different site.
Let’s explore a few scenarios with different SameSite values:
- SameSite: none:
- In this case, the cookie is sent with all cross-site requests, regardless of the request method or origin.
- This setting makes the application vulnerable to CSRF attacks, as an attacker can potentially trigger unwanted actions on the target site by inducing the victim’s browser to send a request with the cookie.
- SameSite: Strict:
- With this setting, the cookie is only sent in requests originating from the same site (same origin).
- This effectively mitigates CSRF attacks, as the cookie is not sent in cross-site requests, preventing the attacker from leveraging the victim’s authenticated session.
Problem
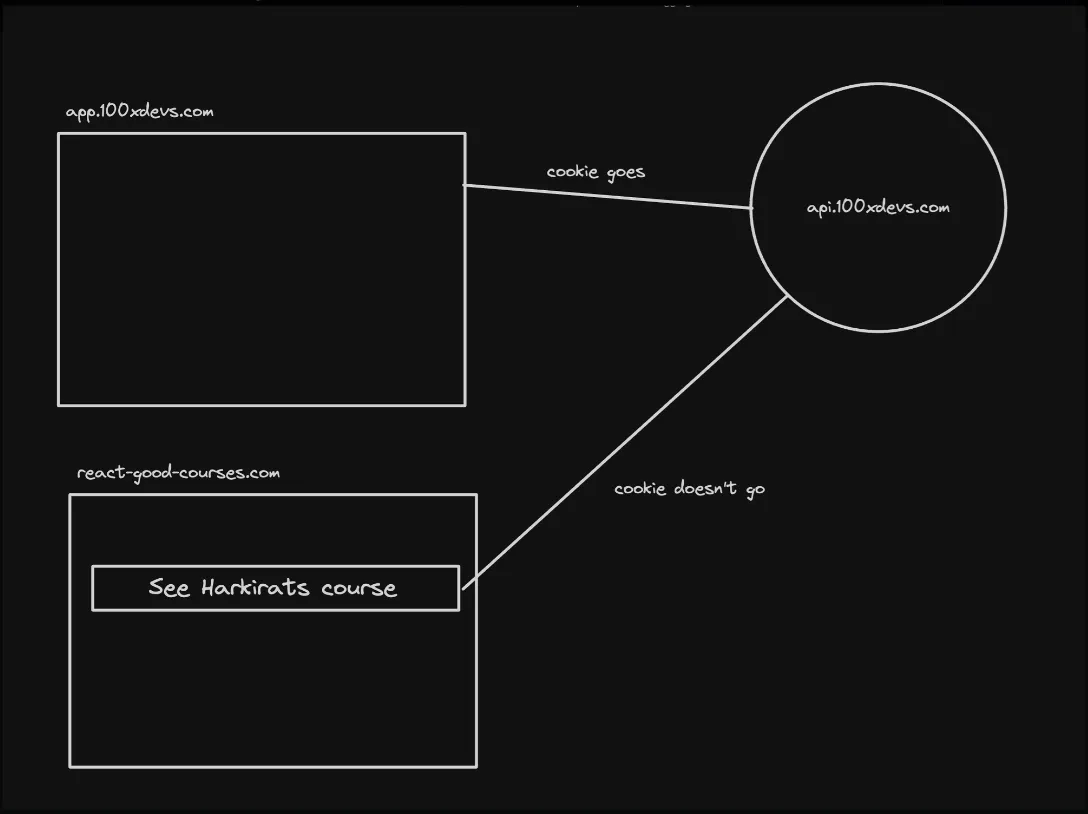
- SameSite: Lax:
- In this case, the cookie is sent in cross-site requests, but only if the request is a top-level navigation (e.g., clicking a link) or a GET request.
- This setting provides some protection against CSRF attacks, as the cookie is not sent in cross-site POST requests, which are commonly used to trigger state-changing actions on the target site.
However, there’s a potential problem with the “Lax” setting. While it mitigates CSRF attacks involving POST requests, it still allows the cookie to be sent in cross-site GET requests initiated by top-level navigations. This means that an attacker could potentially exploit CSRF vulnerabilities by inducing the victim to click on a link that triggers a cross-site GET request with the cookie.
Example in express (Backend)
- Initialize an empty TS project
npm init -ynpx tsc --init- Update rootDir and outDir
"roodDir": "./src""outDir": "./dist"- Add required libraries
import express from "express";import cookieParser from "cookie-parser";import cors from "cors";import jwt, { JwtPayload } from "jsonwebtoken";import path from "path";- Initialize express app, add middlewares
const app = express();app.use(cookieParser());app.use(express.json());app.use(cors({ credentials: true, origin: "http://localhost:5173"}));- Add a dummy signin endpoint
app.post("/signin", (req, res) => { const email = req.body.email; const password = req.body.password; // do db validations, fetch id of user from db const token = jwt.sign({ id: 1 }, JWT_SECRET); res.cookie("token", token); res.send("Logged in!");});- Add a protected backend route
app.get("/user", (req, res) => { const token = req.cookies.token; const decoded = jwt.verify(token, JWT_SECRET) as JwtPayload; // Get email of the user from the database res.send({ userId: decoded.id })});- Add a logout route
app.post("/logout", (req, res) => { res.cookie("token", "ads"); res.json({ message: "Logged out!" })});- Listen on port 3000
app.listen(3000);Code - https://github.com/100xdevs-cohort-2/week-16-auth-1
Frontend in React
- Initialize an empty react project
- Add a
signinpage
import { useState } from "react"import { BACKEND_URL } from "../config"import axios from "axios"
export const Signin = () => {    const [username, setUsername] = useState("")    const [password, setPassword] = useState("")
return <div> <input onChange={(e) => { setUsername(e.target.value); }} type="text" placeholder="username" /> <input onChange={(e) => { setPassword(e.target.value); }} type="password" placeholder="password" /> <button onClick={async () => { await axios.post(`${BACKEND_URL}/signin`, { username, password }, { withCredentials: true, }); alert("you are logged in") }}>Submit</button> </div>}- Add a
userpage
import axios from "axios";import { useEffect, useState } from "react"import { BACKEND_URL } from "../config";
export const User = () => {    const [userData, setUserData] = useState();
    useEffect(() => {        axios.get(`${BACKEND_URL}/user`, {            withCredentials: true,          })            .then(res => {                setUserData(res.data);            })    }, []);
return <div> You're id is {userData?.userId} <br /><br /> <button onClick={() => { axios.post(`${BACKEND_URL}/logout`, {}, { withCredentials: true, }) }}>Logout</button> </div>}- Add routing
import './App.css'
import { BrowserRouter, Route, Routes } from "react-router-dom";import { Signup } from './components/Signup';import { Signin } from './components/Signin';import { User } from './components/User';
function App() {  return (    <BrowserRouter>      <Routes>        <Route path={"/signup"} element={<Signup />} />        <Route path={"/signin"} element={<Signin />} />        <Route path={"/user"} element={<User />} />      </Routes>    </BrowserRouter>  )}
export default App
Code - https://github.com/100xdevs-cohort-2/week-16-auth-1
Frontend from express
- Add an index.html file in src folder of backend
<!DOCTYPE html><html lang="en"><head>    <meta charset="UTF-8">    <meta name="viewport" content="width=device-width, initial-scale=1.0">    <title>Login Page</title>    <script src="https://cdn.jsdelivr.net/npm/axios/dist/axios.min.js"></script></head><body>
<input id="username" type="text" placeholder="username" /><input id="password" type="password" placeholder="password" /><button id="loginButton">Submit</button><button id="logoutButton">Logout</button><div id="userData"></div>
<script>
    document.getElementById('loginButton').addEventListener('click', async () => {        const username = document.getElementById('username').value;        const password = document.getElementById('password').value;
        try {            await axios.post(`/signin`, {                username,                password            });            alert("You are logged in");        } catch (error) {            console.error('Login failed:', error);            alert("Login failed");        }    });
    document.getElementById('logoutButton').addEventListener('click', () => {        axios.post(`/logout`, {}, {            withCredentials: true,        }).then(() => {            console.log('Logged out successfully.');        }).catch(error => {            console.error('Logout failed:', error);        });    });
    function fetchUserData() {        axios.get(`/user`, {            withCredentials: true,        }).then(response => {            const userData = response.data;            displayUserData(userData);        }).catch(error => {            console.error('Failed to fetch user data:', error);        });    }
    function displayUserData(userData) {        const userDataDiv = document.getElementById('userData');        // Example: Assumes userData contains a 'name' and 'email'. Adapt based on your actual user data structure.        userDataDiv.innerHTML = `<p>Your id is: ${userData.userId}</p>`;    }    fetchUserData();</script>
</body></html>- Add a route that sends this html file
app.get("/", (req, res) => { res.sendFile(path.join(__dirname, "../src/index.html"))})- Remove
credentialsfrom cors
app.use(cors());