Week 28.1 Kubernates Part 3
In this lecture, Harkirat explores the practical aspects of deploying Kubernetes in different environments. He demonstrates how to run Kubernetes clusters locally and on cloud providers, highlighting the key differences and considerations for each approach. The lecture then addresses the limitations of Kubernetes Services, introducing Ingress as a solution for more advanced traffic routing. Harkirat delves into the concept of Ingress controllers, with a focus on installing and configuring the NGINX Ingress controller.
Kubernetes 2
In this lecture, we’ll build upon the foundational concepts of Kubernetes and explore more advanced topics. Let’s review what we’ve covered so far and what we’ll be learning today and in the upcoming sessions.
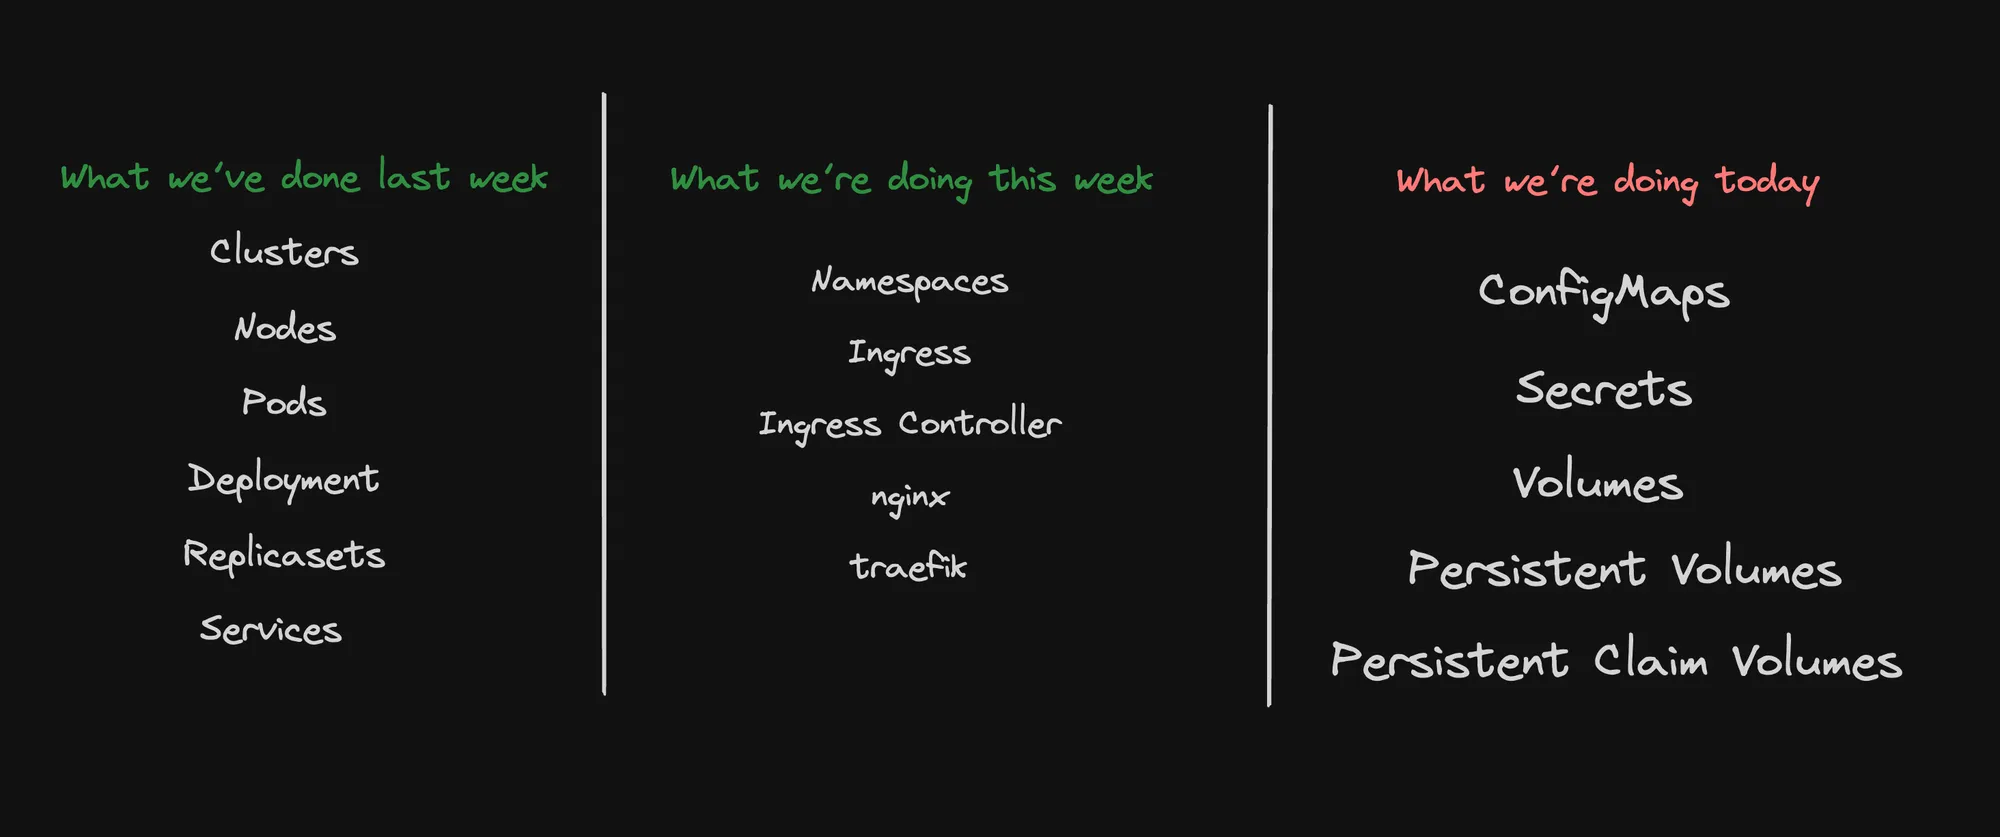
What We’ve Covered Already
- Clusters: The foundation of Kubernetes, comprising a set of nodes that run containerized applications.
- Nodes: The individual machines (physical or virtual) that make up a Kubernetes cluster.
- Pods: The smallest deployable units in Kubernetes, typically containing one or more containers.
- Deployments: Higher-level abstractions that manage ReplicaSets and provide declarative updates for Pods.
- ReplicaSets: Ensure a specified number of pod replicas are running at any given time.
Today’s Topics
- Namespaces:
- Virtual clusters within a physical cluster
- Used for organizing and isolating resources
- Ingress:
- An API object that manages external access to services in a cluster
- Typically HTTP
- Ingress Controllers:
- Implementation of Ingress
- We’ll cover two popular options: a. NGINX Ingress Controller b. Traefik
- ConfigMaps:
- API objects used to store non-confidential data in key-value pairs
- Can be consumed as environment variables, command-line arguments, or configuration files in a volume
- Secrets:
- Similar to ConfigMaps, but for storing sensitive information
- Encoded in base64 by default
Tomorrow’s Topics
- Cert Management:
- Automating the management and issuance of TLS certificates in Kubernetes
- Volumes and Persistent Volumes:
- Storage abstraction in Kubernetes
- Persistent Volumes provide a way to store data that outlives the lifetime of a pod
- Resource Management:
- Controlling and optimizing resource allocation for containers in a cluster
Future Topics (Offline Video)
- Horizontal Pod Autoscaling (HPA):
- Automatically adjusting the number of pods in a deployment or replicaset based on observed metrics
- Node Autoscaling:
- Automatically adjusting the number of nodes in a cluster based on resource demands
- Practical Labs:
- Applying Kubernetes concepts to a real codebase
As we progress, you’ll see how these components work together to create robust, scalable, and manageable containerized applications. Each of these topics builds on the foundational concepts we’ve already covered, providing you with a comprehensive understanding of Kubernetes and its ecosystem.
Remember, Kubernetes is a complex system with many interrelated parts. Don’t worry if you don’t grasp everything immediately – practice and hands-on experience are key to mastering these concepts.
Recapping Already Covered
Let’s review the key concepts we’ve covered in Kubernetes so far:
-
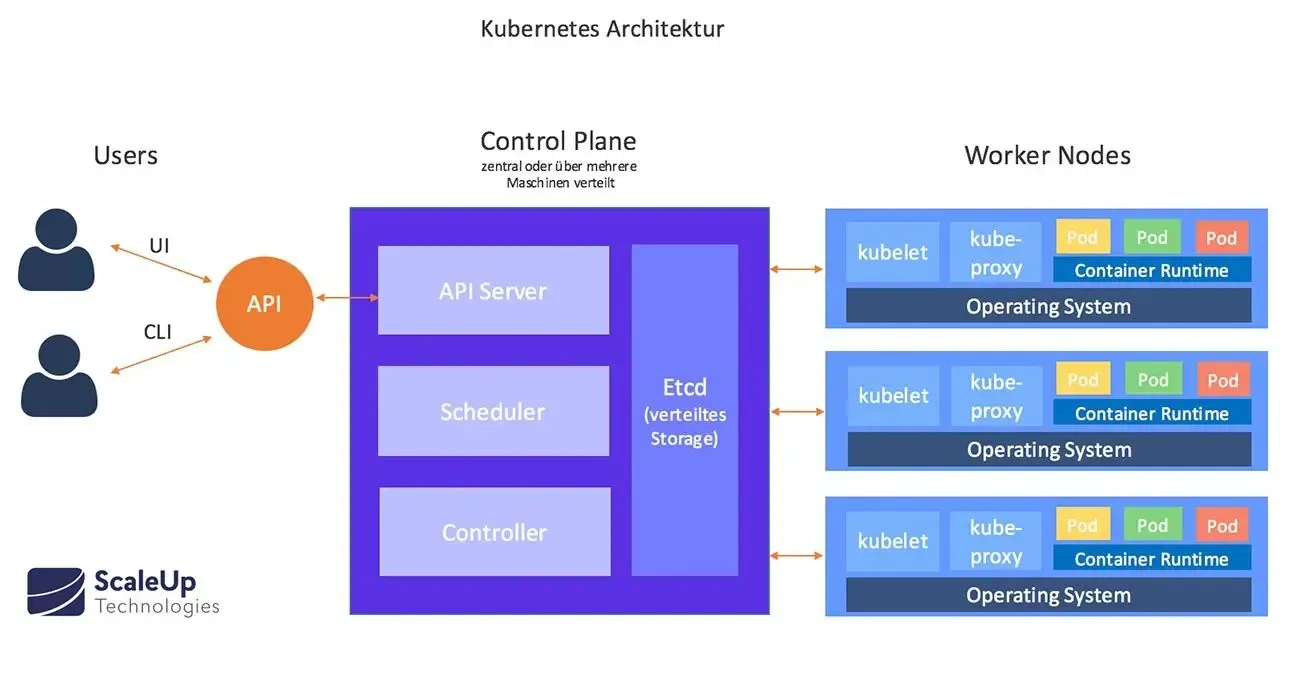
Cluster:
- A Kubernetes cluster is a set of machines working together to deploy applications.
- It consists of multiple nodes that collectively manage containerized workloads.
-
Nodes: There are two types of nodes in a Kubernetes cluster: a. Master Node (Control Plane):
- Exposes an API that developers use to deploy pods.
- Manages the overall state of the cluster. b. Worker Node:
- Actually runs the pods containing application containers.
-
Pods:
- The smallest executable unit in a Kubernetes cluster.
- Can run one or more containers.
- Represents a single instance of an application.
-
ReplicaSets:
- Allow creation of multiple pod replicas.
- Ensure a specified number of pod replicas are running.
- Handle pod failures by automatically replacing or restarting pods.
-
Deployments:
- A higher-level abstraction that manages ReplicaSets.
- Provides declarative updates for Pods and ReplicaSets.
- Enables easy rolling updates and rollbacks of applications.
-
Services: Services expose pods to other pods or to the internet. There are three types: a. ClusterIP:
- Exposes the service on an internal IP within the cluster.
b. NodePort:
- Exposes the service on each Node’s IP at a static port.
c. LoadBalancer:
- Creates an external load balancer in cloud providers that support it.
- Automatically creates a NodePort and ClusterIP services to which the external load balancer routes.
Recapping How to Run Kubernetes Locally
This section provides a step-by-step guide on setting up and running Kubernetes components locally using Kind (Kubernetes in Docker).
1] Creating a Cluster
- Create a
kind.ymlfile:
kind: ClusterapiVersion: kind.x-k8s.io/v1alpha4nodes:- role: control-plane extraPortMappings: - containerPort: 30007 hostPort: 30007- role: worker extraPortMappings: - containerPort: 30007 hostPort: 30008- role: worker- Create the cluster:
kind create cluster --config kind.yml --name local2- Verify cluster creation:
docker ps2] Creating a Pod
- Create
pod.yml:
apiVersion: v1kind: Podmetadata: name: nginxspec: containers: - name: nginx image: nginx ports: - containerPort: 80- Apply the pod manifest:
kubectl apply -f pod.yml- Verify pod creation:
kubectl get pods- Check pod logs:
kubectl logs -f nginx- Delete the pod:
kubectl delete pod nginx3] Creating a ReplicaSet
- Create
rs.yml:
apiVersion: apps/v1kind: ReplicaSetmetadata: name: nginx-replicasetspec: replicas: 3 selector: matchLabels: app: nginx template: metadata: labels: app: nginx spec: containers: - name: nginx image: nginx:latest ports: - containerPort: 80- Apply the ReplicaSet:
kubectl apply -f rs.yml- Verify pod creation:
kubectl get pods- Test self-healing by deleting a pod
- Delete the ReplicaSet:
kubectl delete rs nginx-replicaset4] Creating a Deployment
- Create
deployment.yml:
apiVersion: apps/v1kind: Deploymentmetadata: name: nginx-deploymentspec: replicas: 3 selector: matchLabels: app: nginx template: metadata: labels: app: nginx spec: containers: - name: nginx image: nginx:latest ports: - containerPort: 80- Apply the Deployment:
kubectl apply -f deployment.yml- Check ReplicaSets:
kubectl get rs- Check Pods:
kubectl get pods- Test with incorrect image:
-
Update
deployment.ymlwithimage: nginx2:latest -
Apply the updated deployment
-
Verify that old pods are still running:
Terminal window kubectl get pods
-
Key Takeaways
- Kind allows easy local Kubernetes cluster setup.
- Pods are the smallest deployable units.
- ReplicaSets ensure a specified number of pod replicas are running.
- Deployments manage ReplicaSets and provide declarative updates.
- Deployments maintain application availability during updates.
Remember to keep the deployment running for future exercises.
How to Run Kubernetes on a Cloud Provider
This section outlines the steps to deploy a Kubernetes cluster on a cloud platform and create a deployment.
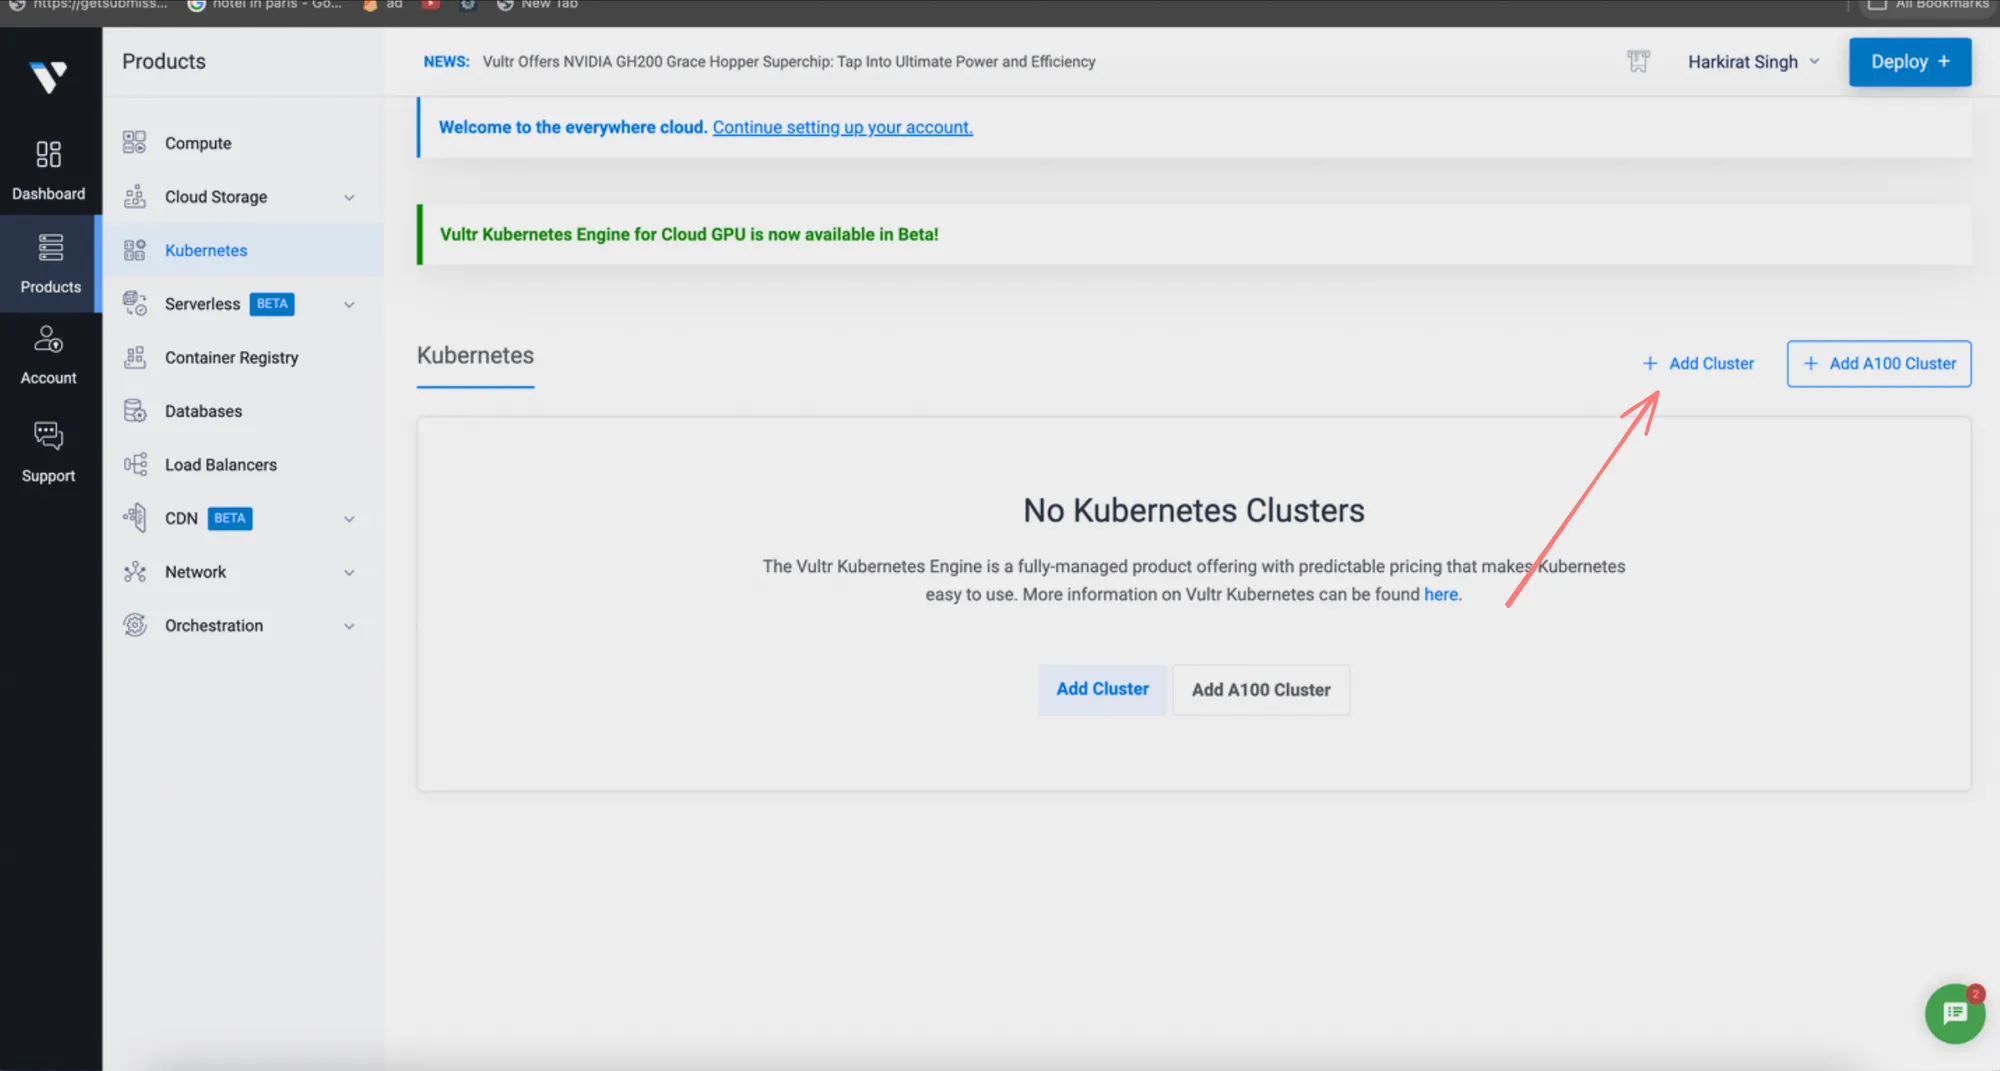
Step 1: Create a Kubernetes Cluster
- Choose a cloud provider:
- Amazon Web Services (AWS)
- Google Cloud Platform (GCP)
- Digital Ocean
- Vultr
- Navigate to the Kubernetes or container service section of your chosen provider.
- Create a new Kubernetes cluster:
- Specify the desired number of nodes
- Choose the node types/sizes
- Configure networking options
- Set up access controls
Step 2: Configure kubectl
-
After cluster creation, download the credentials file from your cloud provider’s dashboard.
-
Replace the contents of your local
~/.kube/configfile with the downloaded credentials:Terminal window mv ~/Downloads/kubeconfig ~/.kube/config
Step 3: Create a Deployment
- Create a file named
deployment.ymlwith the following content:
apiVersion: apps/v1kind: Deploymentmetadata: name: nginx-deploymentspec: replicas: 3 selector: matchLabels: app: nginx template: metadata: labels: app: nginx spec: containers: - name: nginx image: nginx2:latest ports: - containerPort: 80- Apply the deployment:
kubectl apply -f deployment.ymlKey Points
- Cloud Provider Selection: Choose a provider that best fits your needs in terms of pricing, features, and geographical availability.
- Cluster Configuration: Pay attention to node sizes and counts to ensure your cluster meets your application’s resource requirements.
- Security: Ensure your cluster is properly secured, including network policies and access controls.
- Credentials Management: Keep your kubeconfig file secure, as it contains sensitive information for cluster access.
- Image Availability: Ensure the container image specified in your deployment (in this case,
nginx2:latest) is available and accessible to your cluster. - Monitoring: Set up monitoring and logging solutions to keep track of your cluster’s health and performance.
Remember, running Kubernetes in the cloud offers scalability and managed services, but also requires careful consideration of costs and resource management.
Services in Kubernetes
Services in Kubernetes provide a way to expose your application to network traffic, either within the cluster or externally. Let’s explore two types of services: NodePort and LoadBalancer.
NodePort Service
NodePort exposes the service on each Node’s IP at a static port.
- Create a file named
service.ymlfor NodePort:
apiVersion: v1kind: Servicemetadata: name: nginx-servicespec: selector: app: nginx ports: - protocol: TCP port: 80 targetPort: 80 nodePort: 30007 # This port can be any valid port within the NodePort range type: NodePort- Apply the service:
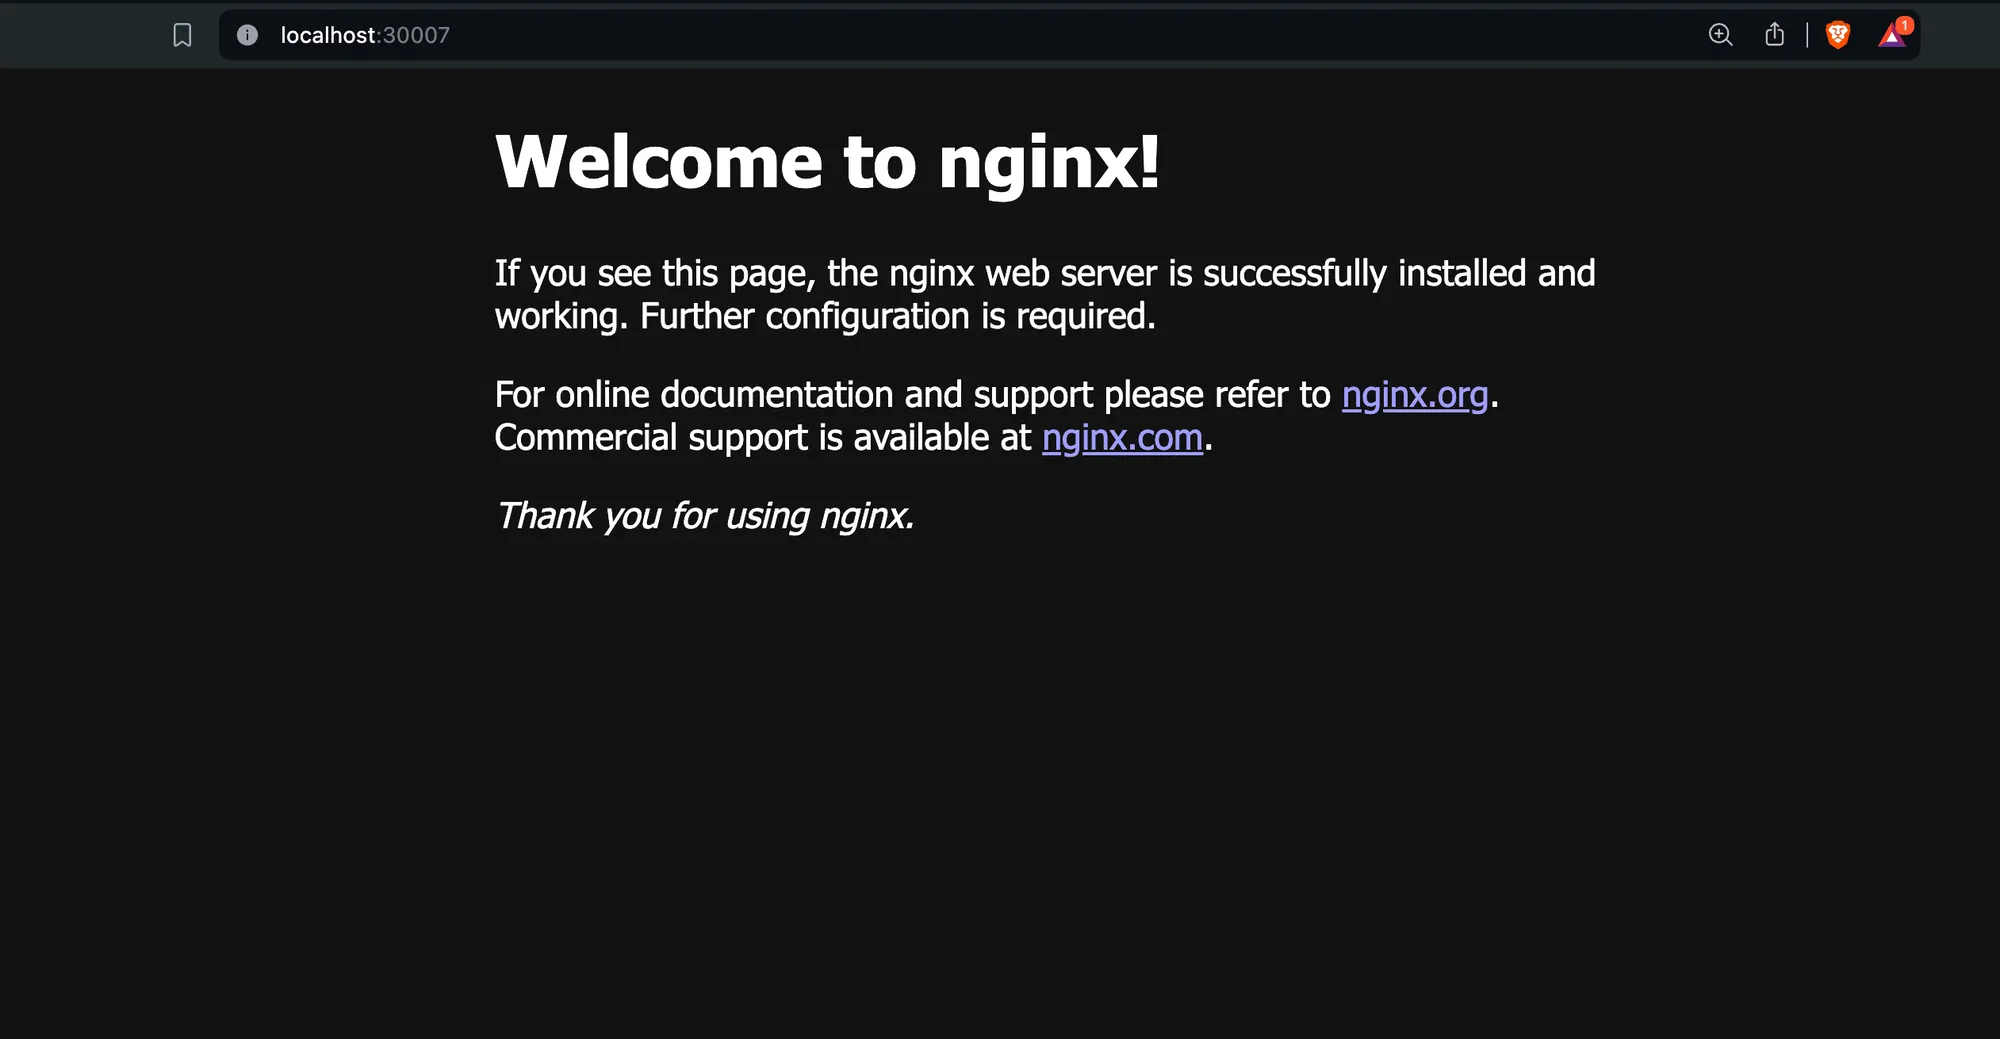
kubectl apply -f service.yml- Access the service:
- For local clusters (e.g., Kind):
http://localhost:30007/ - For cloud providers: Use the node’s public IP, e.g.,
http://<node-ip>:30007/
- For local clusters (e.g., Kind):
Note: This will only work if you’ve started your Kind cluster with the config from the previous section that maps the ports.
LoadBalancer Service
The LoadBalancer service type works with cloud providers to create an external load balancer that routes traffic to the service.
- Modify
service.ymlfor LoadBalancer:
apiVersion: v1kind: Servicemetadata: name: nginx-servicespec: selector: app: nginx ports: - protocol: TCP port: 80 targetPort: 80 type: LoadBalancer- Apply the updated service:
kubectl apply -f service.yml- Check the service status:
kubectl get servicesLook for the EXTERNAL-IP column. It may take a few minutes to provision.
- Access the service using the external IP provided by the cloud provider.
Key Points
- NodePort:
- Makes a service accessible on a static port on each Node.
- Useful for development and when you have direct access to node IPs.
- Limited to ports 30000-32767 by default.
- LoadBalancer:
- Creates an external load balancer in cloud providers.
- Automatically creates a NodePort and ClusterIP service to which it routes.
- Provides a single point of contact for external traffic.
- Only works fully on cloud providers that support external load balancers.
- Selector:
Both service types use
selectorto determine which pods to route traffic to. - Cloud Provider Integration: LoadBalancer services integrate with your cloud provider’s load balancing service, which may incur additional costs.
- Local vs. Cloud:
- NodePort works similarly in both local and cloud environments.
- LoadBalancer functionality is limited in local environments like Kind or Minikube.
- Security Considerations: When exposing services, ensure proper security measures are in place, such as firewalls and network policies.
Remember, the choice between NodePort and LoadBalancer often depends on your specific use case and environment. NodePort is often used for development or internal services, while LoadBalancer is typically used for production services that need to be accessible from the internet.
Downsides of Services
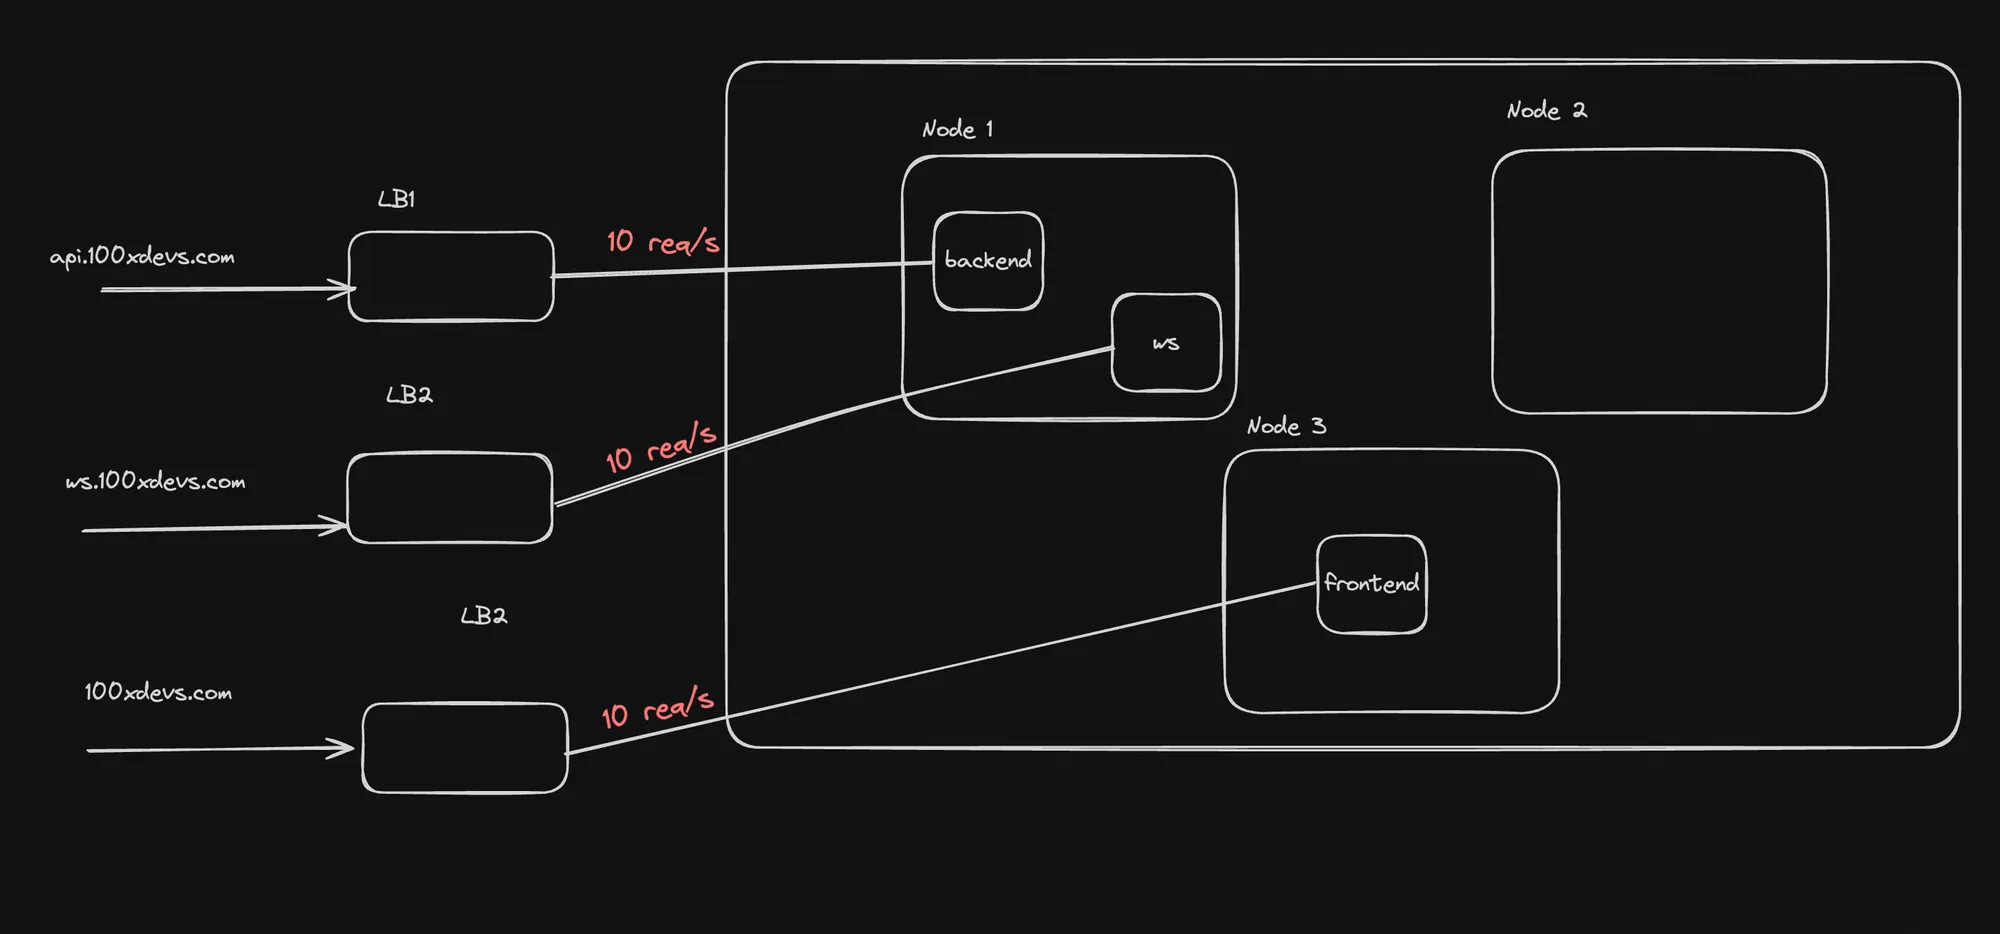
-
Scaling to Multiple Apps:
- Each app requires its own service, leading to multiple load balancers.
- No centralized traffic management or path-based routing.
- Cloud providers often limit the number of load balancers you can create.
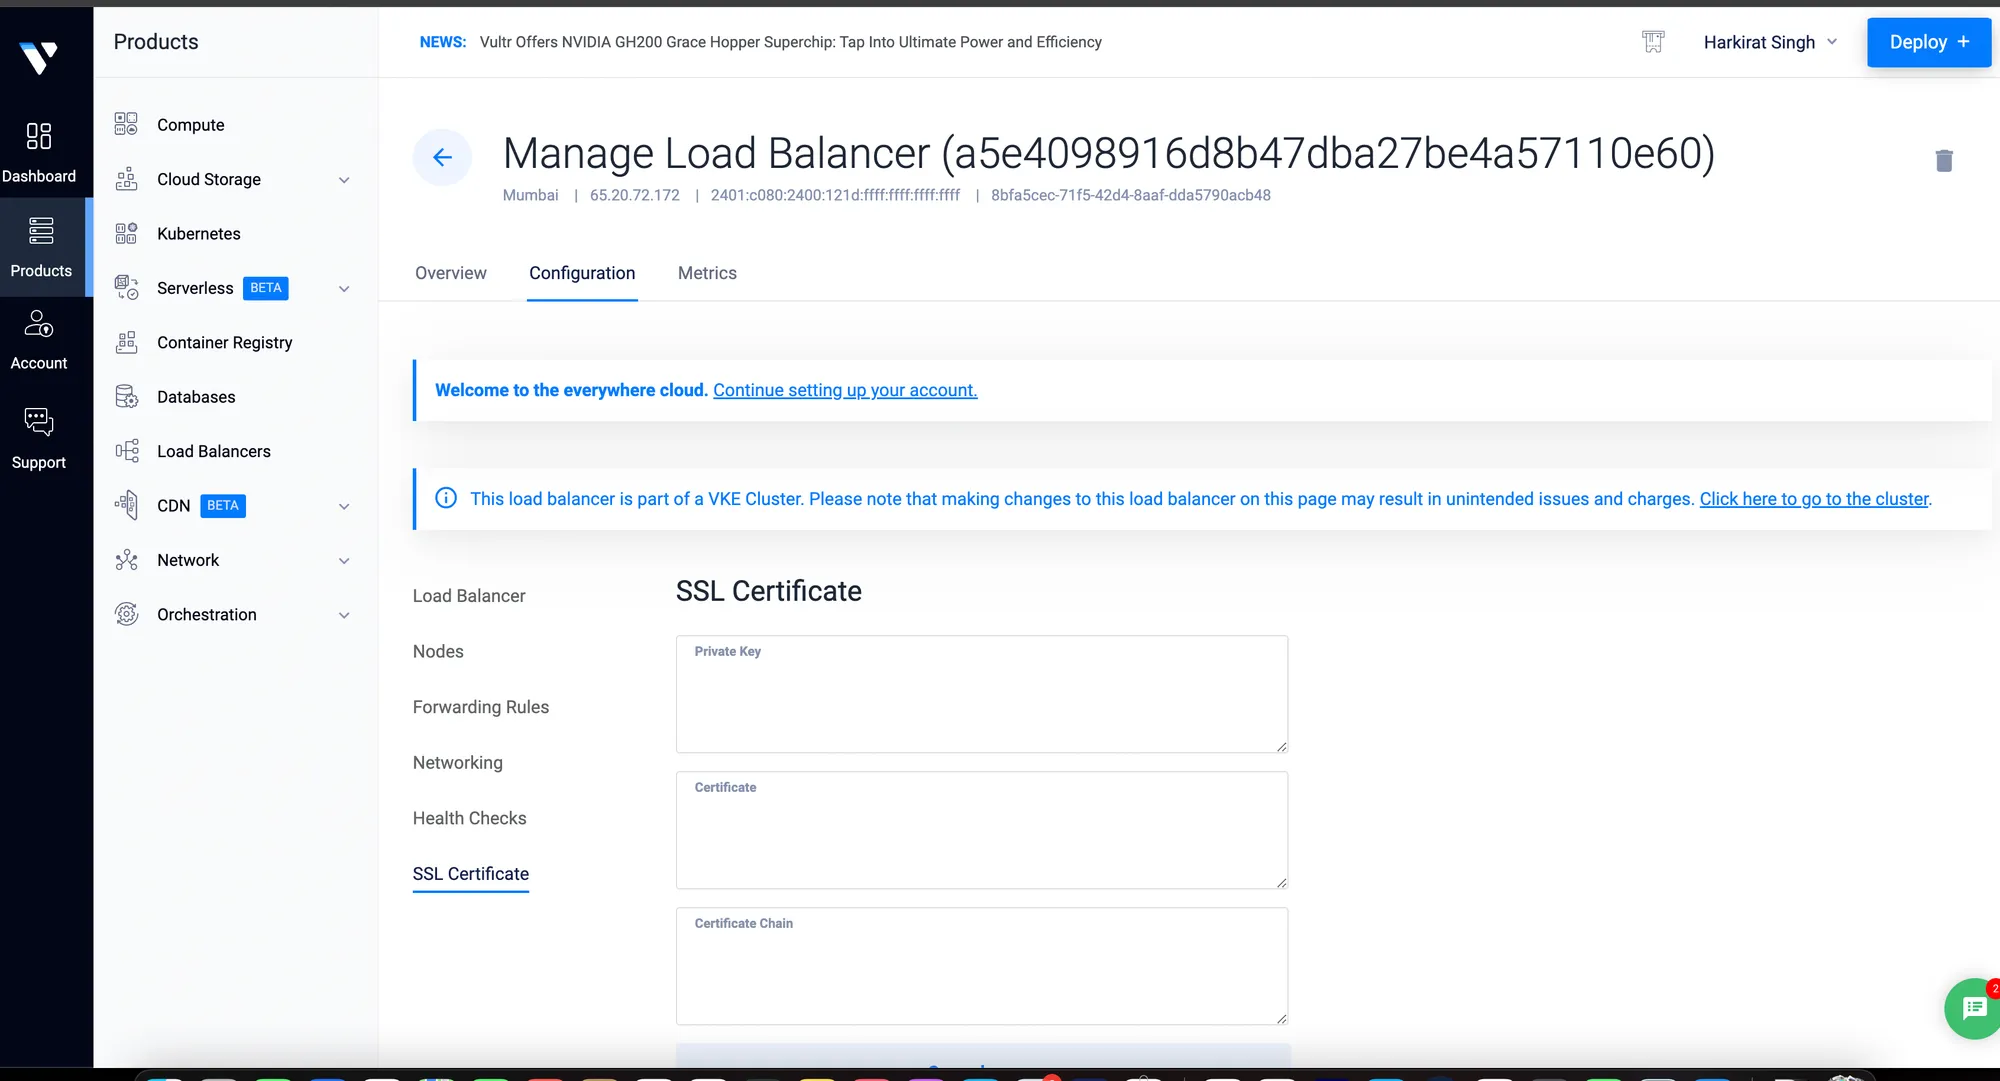
-
Certificate Management:
- Certificates for load balancers must be managed outside the cluster.
- Manual creation and updating of certificates.
- Separate certificates required for each service/route.
-
Lack of Centralized Rate Limiting:
- No unified rate limiting across all services.
- Each load balancer may have its own rate limits, but there’s no global control.
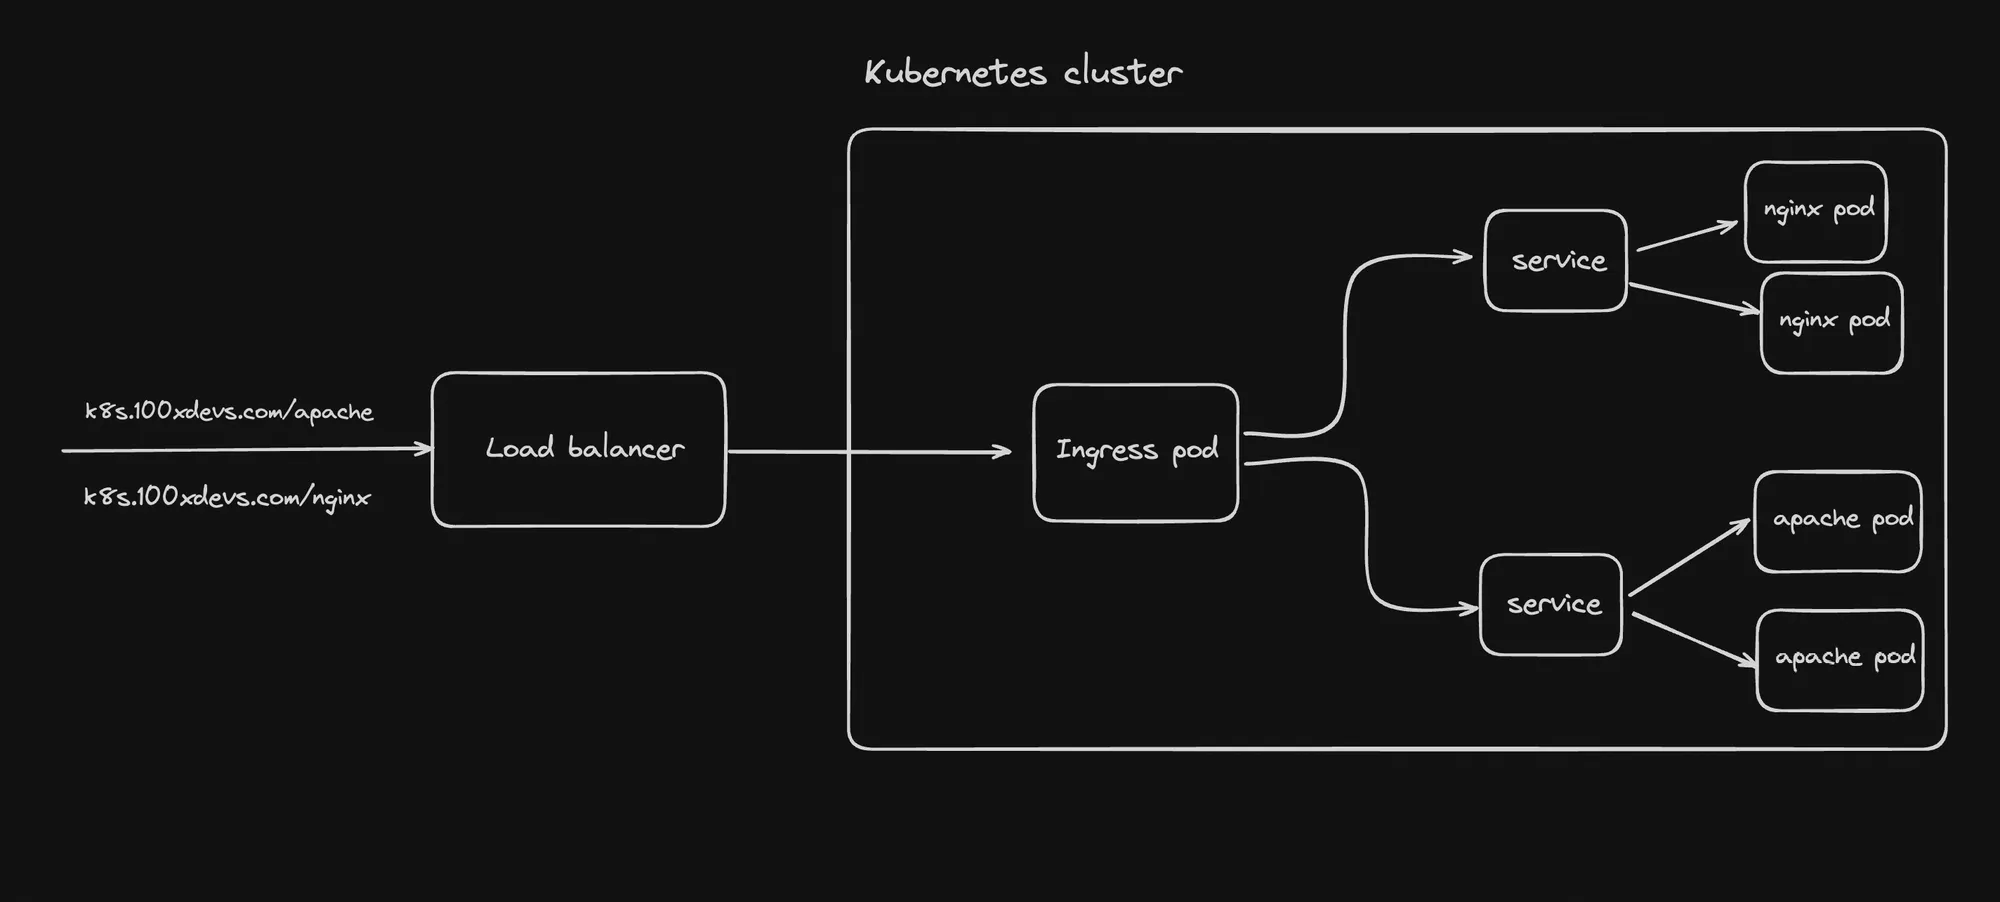
Practical Demonstration
Let’s create two deployments (NGINX and Apache) with their respective LoadBalancer services.
- Create a file named
manifest.ymlwith the following content:
apiVersion: apps/v1kind: Deploymentmetadata: name: nginx-deploymentspec: replicas: 2 selector: matchLabels: app: nginx template: metadata: labels: app: nginx spec: containers: - name: nginx image: nginx:alpine ports: - containerPort: 80---apiVersion: apps/v1kind: Deploymentmetadata: name: apache-deploymentspec: replicas: 2 selector: matchLabels: app: apache template: metadata: labels: app: apache spec: containers: - name: my-apache-site image: httpd:2.4 ports: - containerPort: 80---apiVersion: v1kind: Servicemetadata: name: nginx-servicespec: selector: app: nginx ports: - protocol: TCP port: 80 targetPort: 80 type: LoadBalancer---apiVersion: v1kind: Servicemetadata: name: apache-servicespec: selector: app: apache ports: - protocol: TCP port: 80 targetPort: 80 type: LoadBalancer- Apply the manifest:
kubectl apply -f manifest.yml- Verify the creation of services:
kubectl get servicesYou should see two LoadBalancer services created, one for NGINX and one for Apache.
Key Observations
- Multiple Load Balancers: This setup creates two separate load balancers, one for each service.
- Resource Utilization: Each load balancer consumes cloud resources and may incur additional costs.
- Separate Management: Each service and its associated load balancer need to be managed independently.
- No Shared Routing: There’s no built-in way to route traffic based on paths or other rules between these services.
- Certificate Challenges: If HTTPS is required, you’d need to manage certificates for each load balancer separately.
Potential Solutions
To address these limitations, Kubernetes offers more advanced resources:
- Ingress: Provides a way to manage external access to services, typically HTTP, allowing path-based routing and SSL termination.
- Ingress Controllers: Implement the Ingress resource, offering more advanced routing capabilities.
- Service Mesh: Platforms like Istio or Linkerd can provide advanced traffic management, security, and observability features.
- Custom Resource Definitions (CRDs): Allow for extending Kubernetes API to define resources that can manage complex routing and certificate management.
These solutions can help centralize traffic management, simplify certificate handling, and provide more granular control over routing and rate limiting across multiple services.
Ingress and Ingress Controller
Ingress is a crucial Kubernetes resource that manages external access to services within a cluster, primarily for HTTP traffic. Let’s explore the key aspects of Ingress and Ingress Controllers:
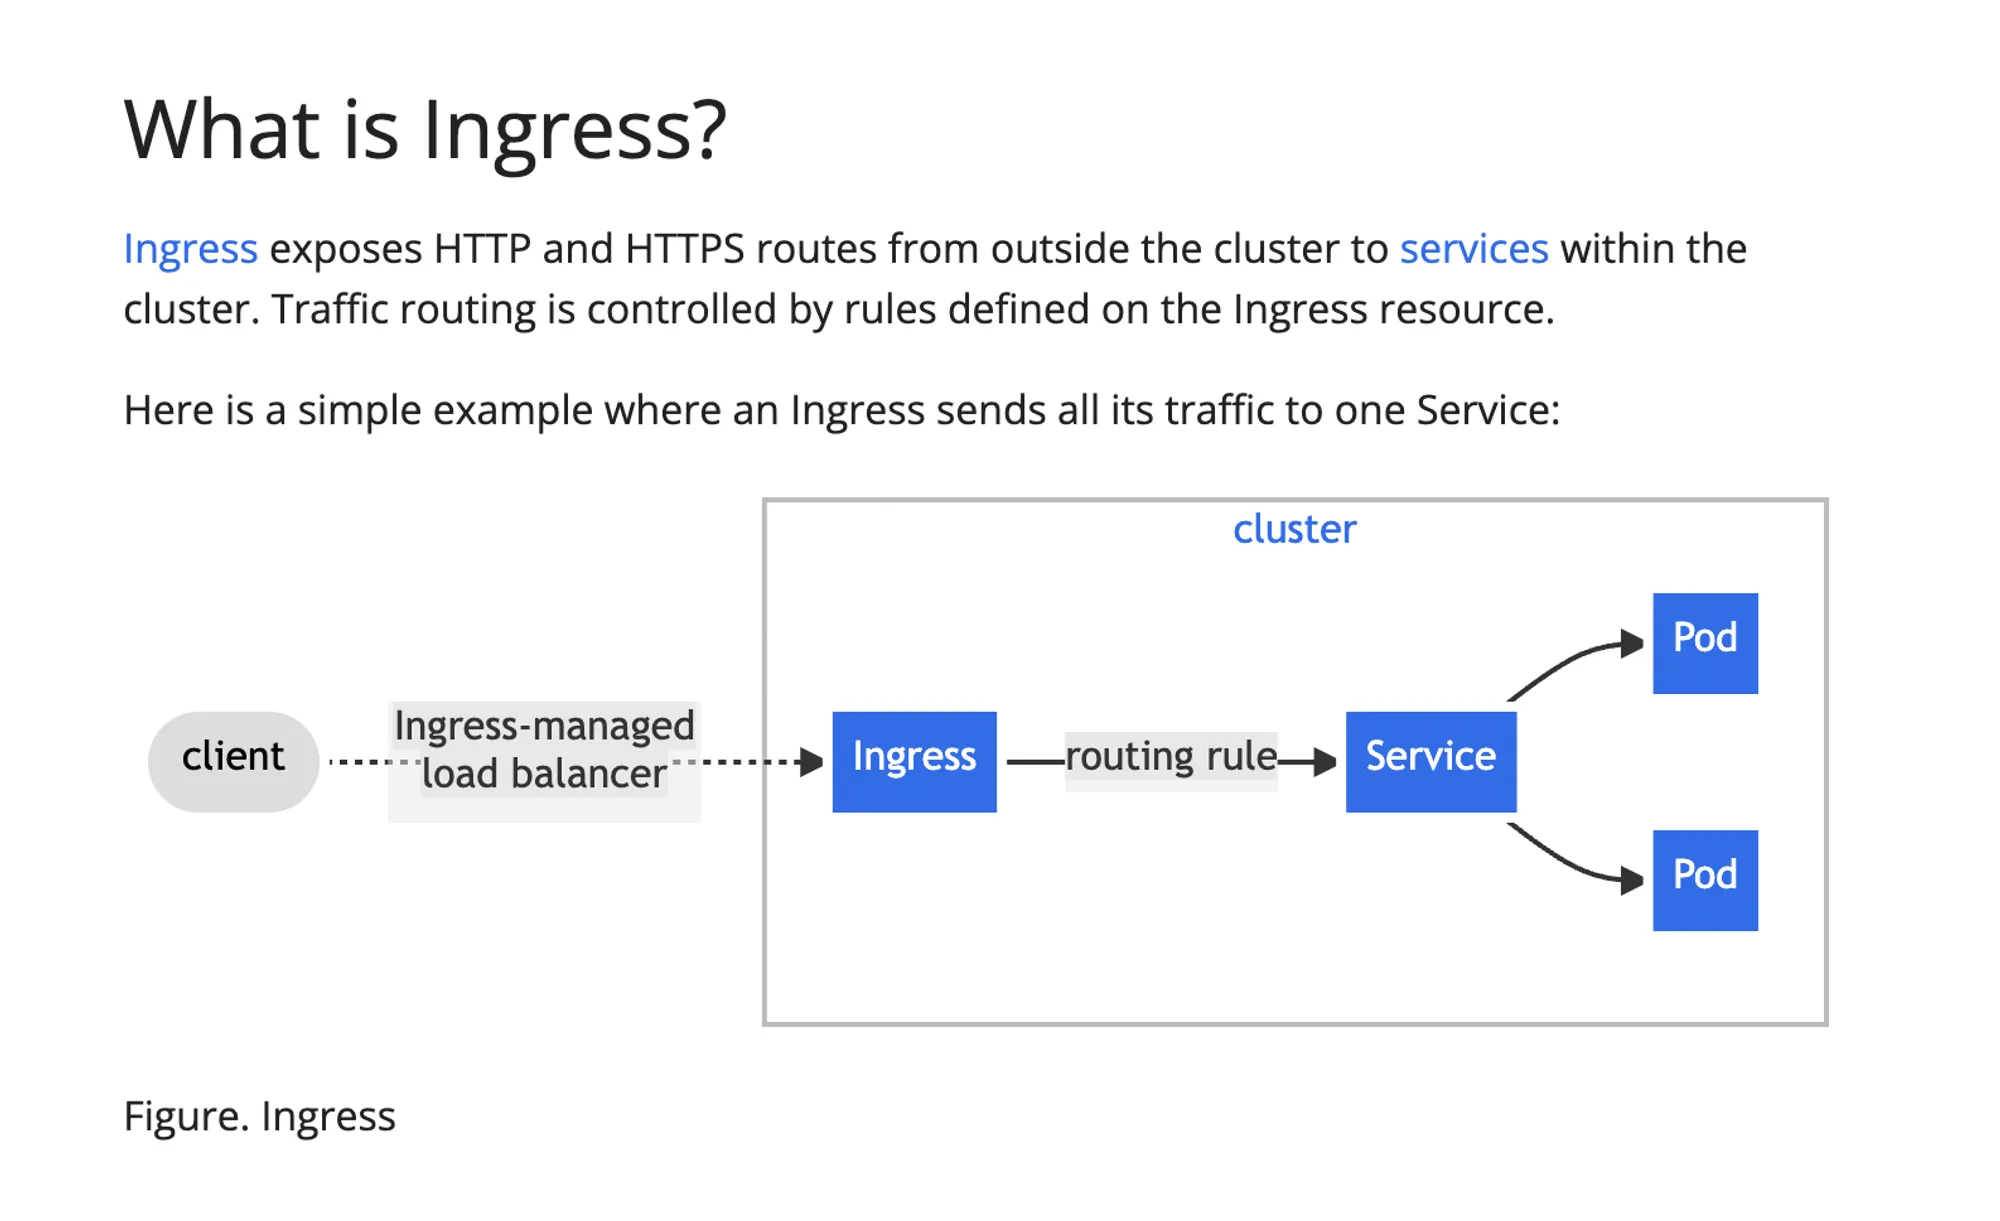
Ingress
- Definition:
- An API object that manages external access to services in a cluster.
- Typically used for HTTP traffic.
- Key Features:
- Provides load balancing
- Offers SSL/TLS termination
- Enables name-based virtual hosting
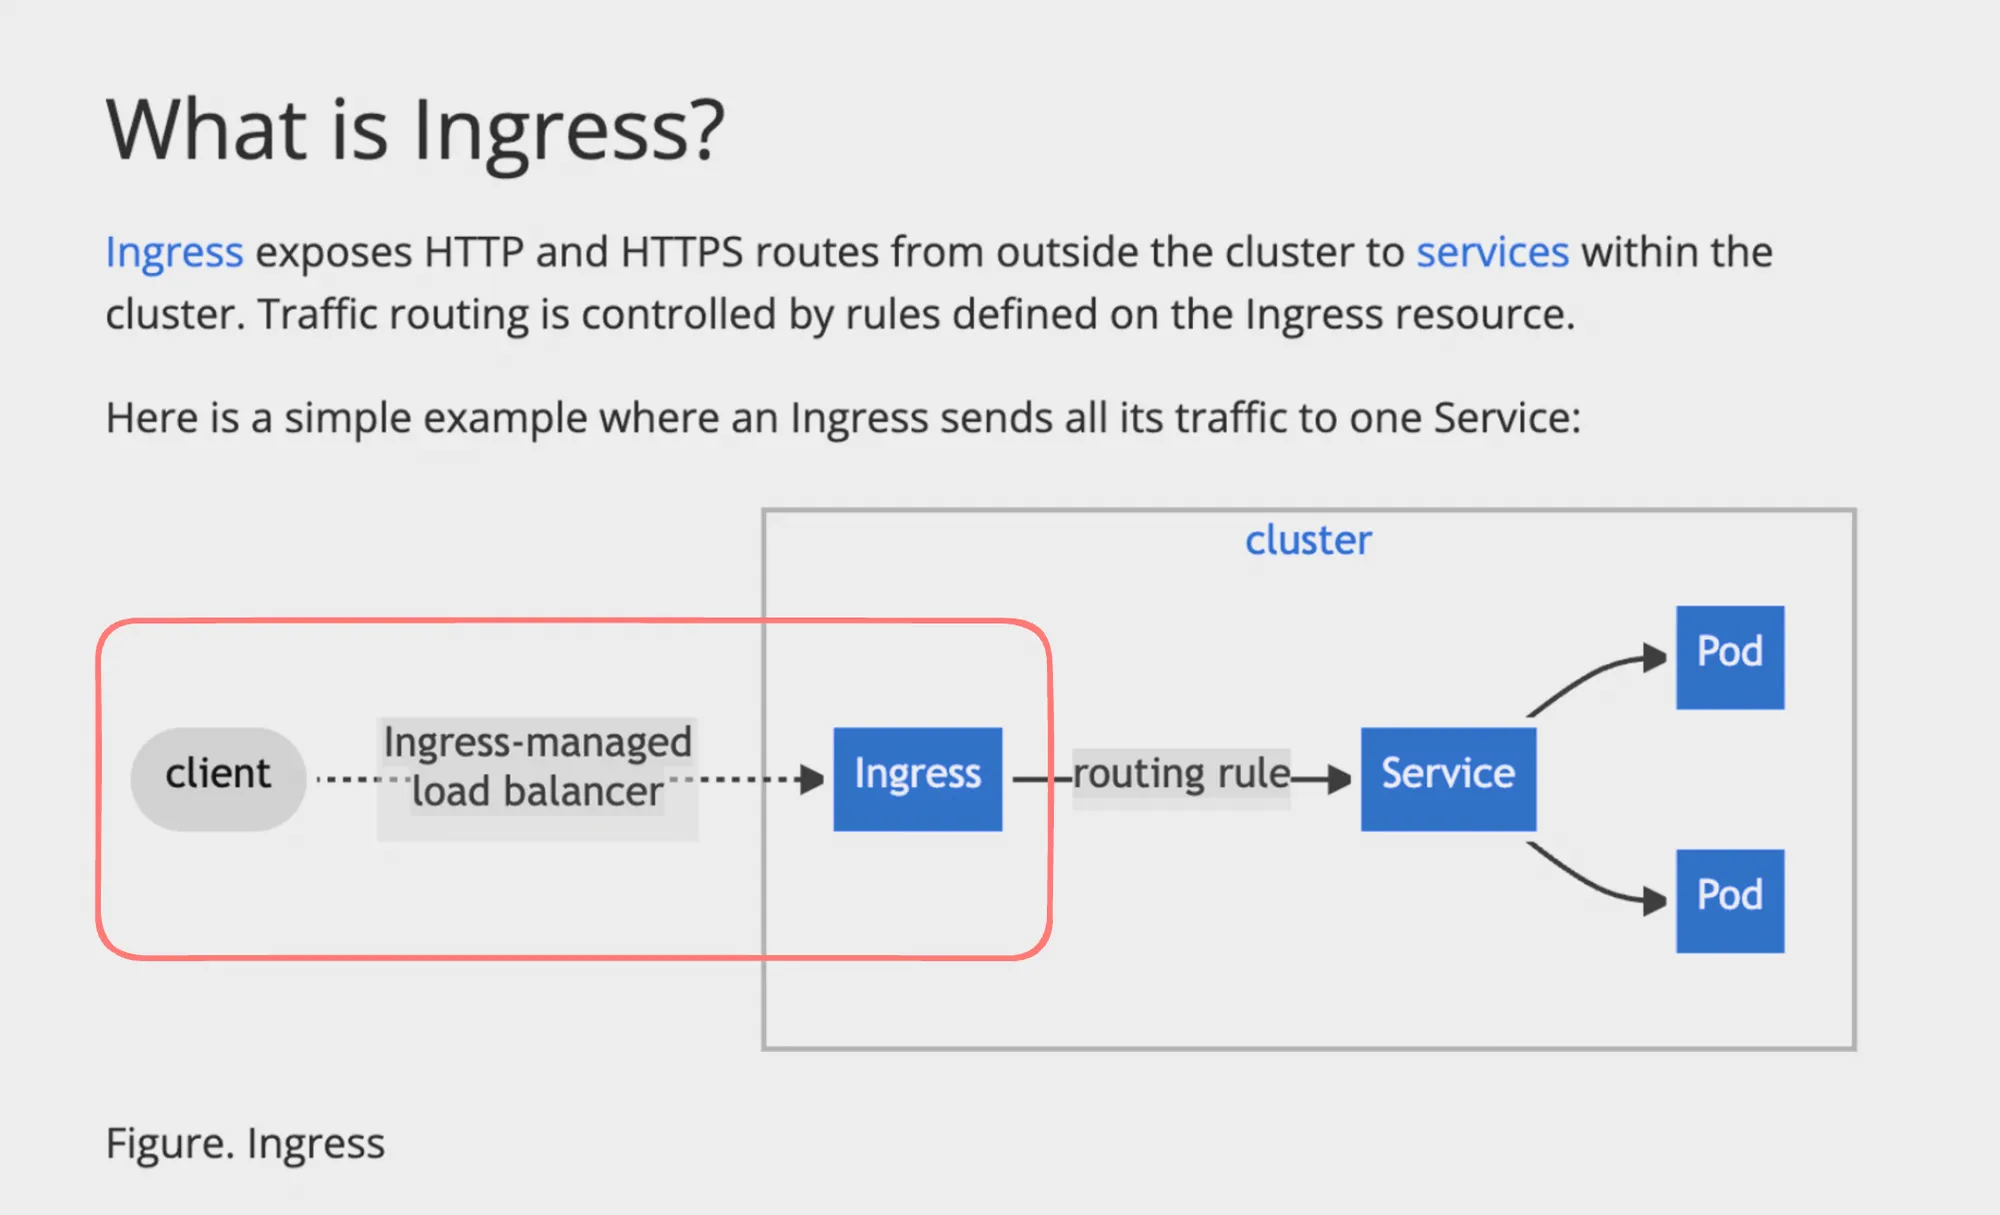
- Functionality:
- Acts as an entry point for your cluster
- Routes traffic to different services based on rules
- Limitations:
- Does not expose arbitrary ports or protocols
- Limited to HTTP and HTTPS traffic
Important Note:
For exposing services other than HTTP/HTTPS to the internet, you typically use:
Service.Type=NodePortService.Type=LoadBalancer
Ingress Controller
- Purpose:
- Implements the Ingress resource
- Responsible for fulfilling the Ingress rules
- Types:
- Various implementations available (e.g., NGINX, Traefik, HAProxy)
- Cloud providers often have their own implementations
- Functionality:
- Watches for Ingress resources and updates
- Configures the underlying load balancer or proxy
Key Benefits of Using Ingress
- Centralized Routing: Manage multiple services through a single entry point
- SSL/TLS Termination: Handle HTTPS traffic and certificate management
- Name-based Virtual Hosting: Route to different services based on the domain name
- Path-based Routing: Direct traffic to different services based on URL paths
- Reduced Cost: Can reduce the number of load balancers needed
Considerations
- Ingress Controller Selection: Choose based on your specific needs and environment
- Configuration Complexity: More complex to set up than simple Service exposures
- Security: Properly configure to avoid exposing sensitive services
- Monitoring: Important to monitor Ingress performance and behavior
Ingress provides a powerful way to manage external access to your Kubernetes services, offering more flexibility and features compared to simple NodePort or LoadBalancer service types. However, it requires careful configuration and management to ensure secure and efficient traffic routing.
Ingress Controllers

- Control Plane Components:
- The Kubernetes control plane includes a controller manager that runs various controllers.
- Examples include ReplicaSet controller and Deployment controller.
- Manual Installation Required:
- Ingress controllers are not included by default in Kubernetes.
- They need to be installed manually to add Ingress functionality to a cluster.
- Popular Ingress Controllers:
- NGINX Ingress Controller: Works with the NGINX webserver as a proxy.
- HAProxy Ingress: An Ingress controller for HAProxy.
- Traefik Kubernetes Ingress provider: An Ingress controller for the Traefik proxy.
- Variety of Options:
- There are many other Ingress controllers available for Kubernetes.
- A full list can be found in the Kubernetes documentation.
- Purpose:
- Ingress controllers implement the Ingress resource in Kubernetes.
- They manage external access to services within a cluster, typically for HTTP traffic.
- Flexibility:
- Different Ingress controllers can be chosen based on specific needs and preferences.
- They offer various features and integration options with different proxy technologies.
- Integration with Kubernetes:
- While not part of the core Kubernetes components, Ingress controllers integrate closely with the Kubernetes API and resources.
- Configuration:
- After installation, Ingress controllers typically require configuration to work with the cluster’s specific setup and requirements.
This information highlights the importance of Ingress controllers in extending Kubernetes’ networking capabilities, particularly for managing external access to services within the cluster.
Kubernetes Namespaces
Namespaces in Kubernetes provide a mechanism for isolating groups of resources within a single cluster. They are particularly useful in environments with multiple users, teams, or projects. Let’s explore how to work with namespaces:
Understanding Namespaces
- Purpose:
- Divide cluster resources between multiple users, teams, or projects.
- Useful for separating environments (e.g., development, staging, production).
- Default Behavior:
- When you run
kubectl get pods, it shows pods in the default namespace.
- When you run
Working with Namespaces
-
Creating a New Namespace:
Terminal window kubectl create namespace backend-team -
Listing All Namespaces:
Terminal window kubectl get namespaces -
Getting Pods in a Specific Namespace:
Terminal window kubectl get pods -n my-namespace
Creating Resources in a Namespace
-
Deployment Manifest with Namespace: Create a file
deployment-ns.yml:apiVersion: apps/v1kind: Deploymentmetadata:name: nginx-deploymentnamespace: backend-teamspec:replicas: 3selector:matchLabels:app: nginxtemplate:metadata:labels:app: nginxspec:containers:- name: nginximage: nginx:latestports:- containerPort: 80 -
Applying the Manifest:
Terminal window kubectl apply -f deployment-ns.yml -
Checking Deployments in the Namespace:
Terminal window kubectl get deployment -n backend-team -
Checking Pods in the Namespace:
Terminal window kubectl get pods -n backend-team
Changing Default Namespace
-
Set Default Namespace for Current Context:
Terminal window kubectl config set-context --current --namespace=backend-team -
Verify (now
kubectl get podswill show pods in backend-team namespace):Terminal window kubectl get pods -
Reverting to Default Namespace:
Terminal window kubectl config set-context --current --namespace=default
Key Points
- Isolation: Namespaces provide a scope for names, allowing you to use the same resource names in different namespaces.
- Resource Quotas: You can use namespaces to divide cluster resources between users or teams.
- Access Control: Namespaces can be used with role-based access control (RBAC) to restrict access to resources.
- Default Namespace: If not specified, operations are performed in the ‘default’ namespace.
- Cross-Namespace Communication: Services in one namespace can communicate with services in another namespace using fully qualified domain names.
- Not All Objects are Namespaced: Some Kubernetes resources (like nodes) are not in any namespace.
Namespaces are a powerful feature for organizing and isolating resources within a Kubernetes cluster, especially useful in multi-tenant environments or for separating different stages of development.
Installing the NGINX Ingress Controller
The detailed steps for installation of the NGINX Ingress Controller using Helm are as follows:
1. Install Helm
Helm is a package manager for Kubernetes. If you haven’t installed it yet:
- Visit the official Helm website: https://helm.sh/
- Follow the installation instructions: https://helm.sh/docs/intro/install/
2. Add and Update the ingress-nginx Repository
helm repo add ingress-nginx <https://kubernetes.github.io/ingress-nginx>helm repo update3. Install NGINX Ingress Controller
helm install nginx-ingress ingress-nginx/ingress-nginx --namespace ingress-nginx --create-namespaceThis command:
- Installs the NGINX Ingress Controller
- Creates a new namespace called
ingress-nginx - Names the release
nginx-ingress
4. Verify the Installation
Check if the Ingress Controller pods are running:
kubectl get pods -n ingress-nginxYou should see at least one pod running for the NGINX Ingress Controller.
5. Check the Created LoadBalancer Service
Helm automatically creates a LoadBalancer service for the Ingress Controller:
kubectl get services --all-namespacesLook for a service in the ingress-nginx namespace with type LoadBalancer.
Key Points
- Default LoadBalancer: The Helm chart automatically creates a LoadBalancer service, which routes all incoming traffic to the NGINX Ingress Controller pod(s).
- Ingress Controller Pod: This pod is responsible for routing traffic based on Ingress rules you’ll define later.
- Namespace Isolation: The Ingress Controller is installed in its own namespace (
ingress-nginx) for better resource management and isolation. - Cloud Integration: On cloud providers, the LoadBalancer service will provision an external IP or hostname for accessing your cluster.
- Next Steps: With the Ingress Controller installed, you’re now ready to define Ingress resources to route traffic to your services.
- Customization: The Helm installation can be customized with various options. Refer to the NGINX Ingress Controller documentation for advanced configurations.
- Monitoring: It’s important to monitor the Ingress Controller pods and the associated LoadBalancer service for proper functioning.
Setting Up Ingress Routing
Ingress routing in Kubernetes is a mechanism for managing external access to services within a cluster. This comprehensive guide walks through the process of setting up Ingress routing for NGINX and Apache services in a Kubernetes cluster. Let’s break it down step-by-step:
1. Clean Up Existing Resources
First, remove any existing deployments and services:
kubectl get deploymentskubectl delete deployment <deployment_name>
kubectl get serviceskubectl delete service <service_name>
Note: Don’t delete the default Kubernetes service.
2. Create Combined Manifest
Create a file named complete.yml with the following content:
apiVersion: apps/v1kind: Deploymentmetadata: name: nginx-deployment namespace: defaultspec: replicas: 2 selector: matchLabels: app: nginx template: metadata: labels: app: nginx spec: containers: - name: nginx image: nginx:alpine ports: - containerPort: 80---apiVersion: v1kind: Servicemetadata: name: nginx-service namespace: defaultspec: selector: app: nginx ports: - protocol: TCP port: 80 targetPort: 80 type: ClusterIP---apiVersion: apps/v1kind: Deploymentmetadata: name: apache-deployment namespace: defaultspec: replicas: 2 selector: matchLabels: app: apache template: metadata: labels: app: apache spec: containers: - name: my-apache-site image: httpd:2.4 ports: - containerPort: 80---apiVersion: v1kind: Servicemetadata: name: apache-service namespace: defaultspec: selector: app: apache ports: - protocol: TCP port: 80 targetPort: 80 type: ClusterIP---apiVersion: networking.k8s.io/v1kind: Ingressmetadata: name: web-apps-ingress namespace: default annotations: nginx.ingress.kubernetes.io/rewrite-target: /spec: ingressClassName: nginx rules: - host: your-domain.com http: paths: - path: /nginx pathType: Prefix backend: service: name: nginx-service port: number: 80 - path: /apache pathType: Prefix backend: service: name: apache-service port: number: 803. Apply the Manifest
Apply the combined manifest:
kubectl apply -f complete.yml4. Update Local Hosts File
Add an entry to your /etc/hosts file:
65.20.84.86 your-domain.comReplace 65.20.84.86 with the actual IP of your Ingress Controller’s LoadBalancer service.
5. Test the Setup
Visit your-domain.com/apache and your-domain.com/nginx in your web browser.
Key Components
- NGINX Deployment and Service: Deploys NGINX pods and creates a ClusterIP service for them.
- Apache Deployment and Service: Deploys Apache pods and creates a ClusterIP service for them.
- Ingress Resource:
- Defines routing rules for incoming HTTP traffic.
- Routes
/nginxto the NGINX service and/apacheto the Apache service. - Uses
your-domain.comas the host.
Important Notes
- ClusterIP Services: Both services are of type ClusterIP, making them only internally accessible.
- Ingress Controller: Assumes you have already installed the NGINX Ingress Controller.
- Rewrite Annotation: The
nginx.ingress.kubernetes.io/rewrite-target: /annotation ensures proper URL rewriting. - IngressClassName: Specifies
nginxas the Ingress class, linking it to the NGINX Ingress Controller. - Host-Based Routing: The Ingress is configured for a specific domain (
your-domain.com). - Path-Based Routing: Different paths (
/nginxand/apache) route to different services. - Local Testing: Modifying the hosts file allows for local testing without actual DNS configuration.
Conclusion
This setup demonstrates the power of Kubernetes Ingress:
- Single entry point for multiple services
- Path-based and host-based routing
- Simplified external access management
By using Ingress, you can efficiently manage external access to your services, reducing the need for multiple LoadBalancer services and providing more flexible routing options.
Trying Traefik’s Ingress Controller
Traefik’s Ingress Controller is a Kubernetes component that manages external access to services within a cluster. Traefik’s Ingress Controller offers a flexible and powerful solution for managing ingress traffic in Kubernetes environments, with features that make it suitable for both development and production use cases. Here are the key points about Traefik’s Ingress Controller:
1. Install Traefik Ingress Controller
Use Helm to install Traefik:
helm repo add traefik <https://helm.traefik.io/traefik>helm repo updatehelm install traefik traefik/traefik --namespace traefik --create-namespace2. Verify Installation
Check if the IngressClass for Traefik is created:
kubectl get IngressClassVerify that a LoadBalancer service is created for Traefik:
kubectl get svc -n traefik3. Create Traefik Ingress Resource
Create a file named traefik.yml with the following content:
apiVersion: networking.k8s.io/v1kind: Ingressmetadata: name: traefik-web-apps-ingress namespace: defaultspec: ingressClassName: traefik rules: - host: traefik-domain.com http: paths: - path: /nginx pathType: Prefix backend: service: name: nginx-service port: number: 80 - path: /apache pathType: Prefix backend: service: name: apache-service port: number: 80Apply this configuration:
kubectl apply -f traefik.yml4. Update Local Hosts File
Add an entry to your /etc/hosts file:
65.20.90.183 traefik-domain.comReplace 65.20.90.183 with the actual IP of your Traefik LoadBalancer service.
5. Test the Setup
Try accessing:
traefik-domain.com/nginxtraefik-domain.com/apache
Issue Identification
You might notice that you’re not seeing the expected content when accessing these URLs. The problem is likely due to path rewriting not being configured in the Traefik Ingress resource.

Assignment: Path Rewriting with Traefik
To fix this issue, you need to configure path rewriting for Traefik. Here’s a hint on how to do it:
- Traefik uses middleware for path manipulation.
- You’ll need to create a Middleware resource for path rewriting.
- Then, annotate your Ingress resource to use this middleware.
Try to implement this solution. Here’s a starting point:
apiVersion: traefik.containo.us/v1alpha1kind: Middlewaremetadata:  name: strip-prefixspec:  stripPrefix:    prefixes:      - /nginx      - /apache
---apiVersion: networking.k8s.io/v1kind: Ingressmetadata:  name: traefik-web-apps-ingress  annotations:    traefik.ingress.kubernetes.io/router.middlewares: default-strip-prefix@kubernetescrd  # ... rest of your Ingress spec
Key Points
- Traefik vs NGINX: Traefik offers a different approach to Ingress control compared to NGINX.
- IngressClass: Ensure you’re using the correct IngressClass (
traefikin this case). - Path Rewriting: Unlike NGINX, Traefik requires explicit configuration for path rewriting.
- Middleware: Traefik uses the concept of middleware for manipulating requests.
- Annotations: Traefik often uses annotations for advanced configurations.
By completing this assignment, you’ll gain a deeper understanding of how Traefik works as an Ingress Controller and how it differs from NGINX in terms of configuration and features.
Secrets and ConfigMaps
This section introduces two important Kubernetes resources for managing application configuration: ConfigMaps and Secrets. These resources allow you to decouple configuration details from container images and pods, following best practices for Kubernetes deployments.
Kubernetes Configuration Best Practices
- Use Deployments: Always create Deployments rather than standalone pods.
- YAML Over JSON: Write configuration files using YAML instead of JSON for better readability.
- Version Control: Store configuration files in version control before applying them to the cluster.
- Externalize Configuration: Use ConfigMaps and Secrets to store configuration outside of container images.
ConfigMaps and Secrets
Both ConfigMaps and Secrets are used to store configuration data, but they serve different purposes:
- ConfigMaps:
- Store non-sensitive configuration data.
- Can be used for environment variables, command-line arguments, or configuration files.
- Data is stored as plain text.
- Secrets:
- Store sensitive information like passwords, tokens, or keys.
- Similar to ConfigMaps but intended for confidential data.
- Data is base64 encoded (but not encrypted by default).
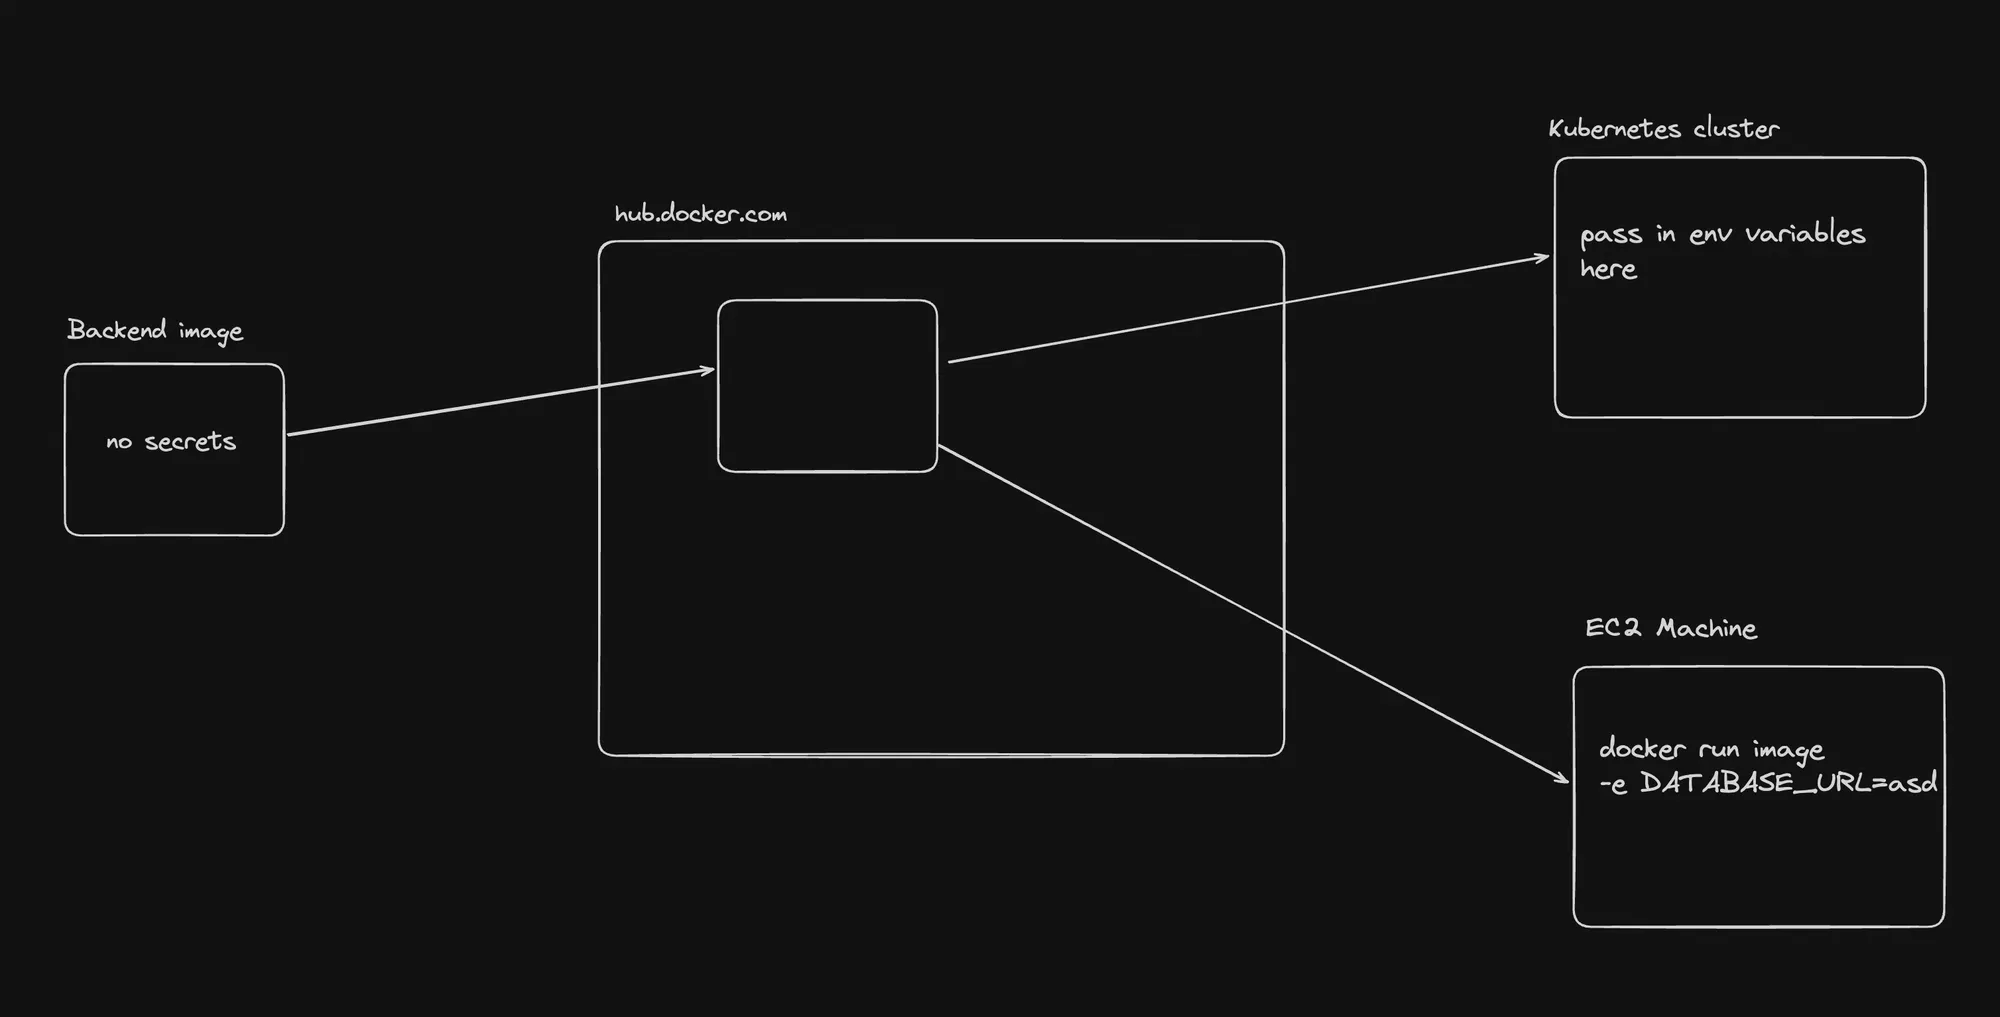
Key Rule: Externalize Secrets
A crucial rule of thumb in Kubernetes:
- Don’t bake application secrets into your Docker images.
- Instead, pass them as environment variables when starting containers.
Using ConfigMaps and Secrets
- As Environment Variables:
- Inject configuration data directly into container environments.
- As Files:
- Mount ConfigMaps or Secrets as volumes in pods.
- As Command-line Arguments:
- Use data to construct container command-line args.
Example: Creating and Using a ConfigMap
apiVersion: v1kind: ConfigMapmetadata: name: app-configdata: APP_COLOR: blue APP_MODE: prod---apiVersion: apps/v1kind: Deploymentmetadata: name: my-appspec: template: spec: containers: - name: my-app image: my-app:v1 envFrom: - configMapRef: name: app-configExample: Creating and Using a Secret
apiVersion: v1kind: Secretmetadata: name: app-secrettype: Opaquedata: DB_PASSWORD: base64encodedpassword---apiVersion: apps/v1kind: Deploymentmetadata: name: my-appspec: template: spec: containers: - name: my-app image: my-app:v1 env: - name: DATABASE_PASSWORD valueFrom: secretKeyRef: name: app-secret key: DB_PASSWORDBenefits of Using ConfigMaps and Secrets
- Separation of Concerns: Keep application code separate from configuration.
- Flexibility: Easily update configuration without changing container images.
- Security: Better management of sensitive data.
- Reusability: Use the same container image with different configurations.
By leveraging ConfigMaps and Secrets, you can create more secure, flexible, and maintainable Kubernetes deployments, adhering to best practices for configuration management in containerized environments.
ConfigMaps
This section covers the creation and usage of ConfigMaps in Kubernetes, demonstrating how to decouple configuration from application code.
What is a ConfigMap?
A ConfigMap is an API object used to store non-confidential data in key-value pairs. It allows you to decouple environment-specific configuration from container images, enhancing application portability.
Creating a ConfigMap
- Create a file named
cm.yml:
apiVersion: v1kind: ConfigMapmetadata: name: ecom-backend-configdata: database_url: "mysql://ecom-db:3306/shop" cache_size: "1000" payment_gateway_url: "<https://payment-gateway.example.com>" max_cart_items: "50" session_timeout: "3600"- Apply the ConfigMap:
kubectl apply -f cm.yml- Verify the ConfigMap:
kubectl describe configmap ecom-backend-configCreating an Express App with Environment Variables
- Create an Express app that exposes environment variables.
- Deploy the app to Docker Hub: 100xdevs/env-backend
- Test locally with Docker:
docker run -p 3003:3000 -e DATABASE_URL=asd 100xdevs/env-backend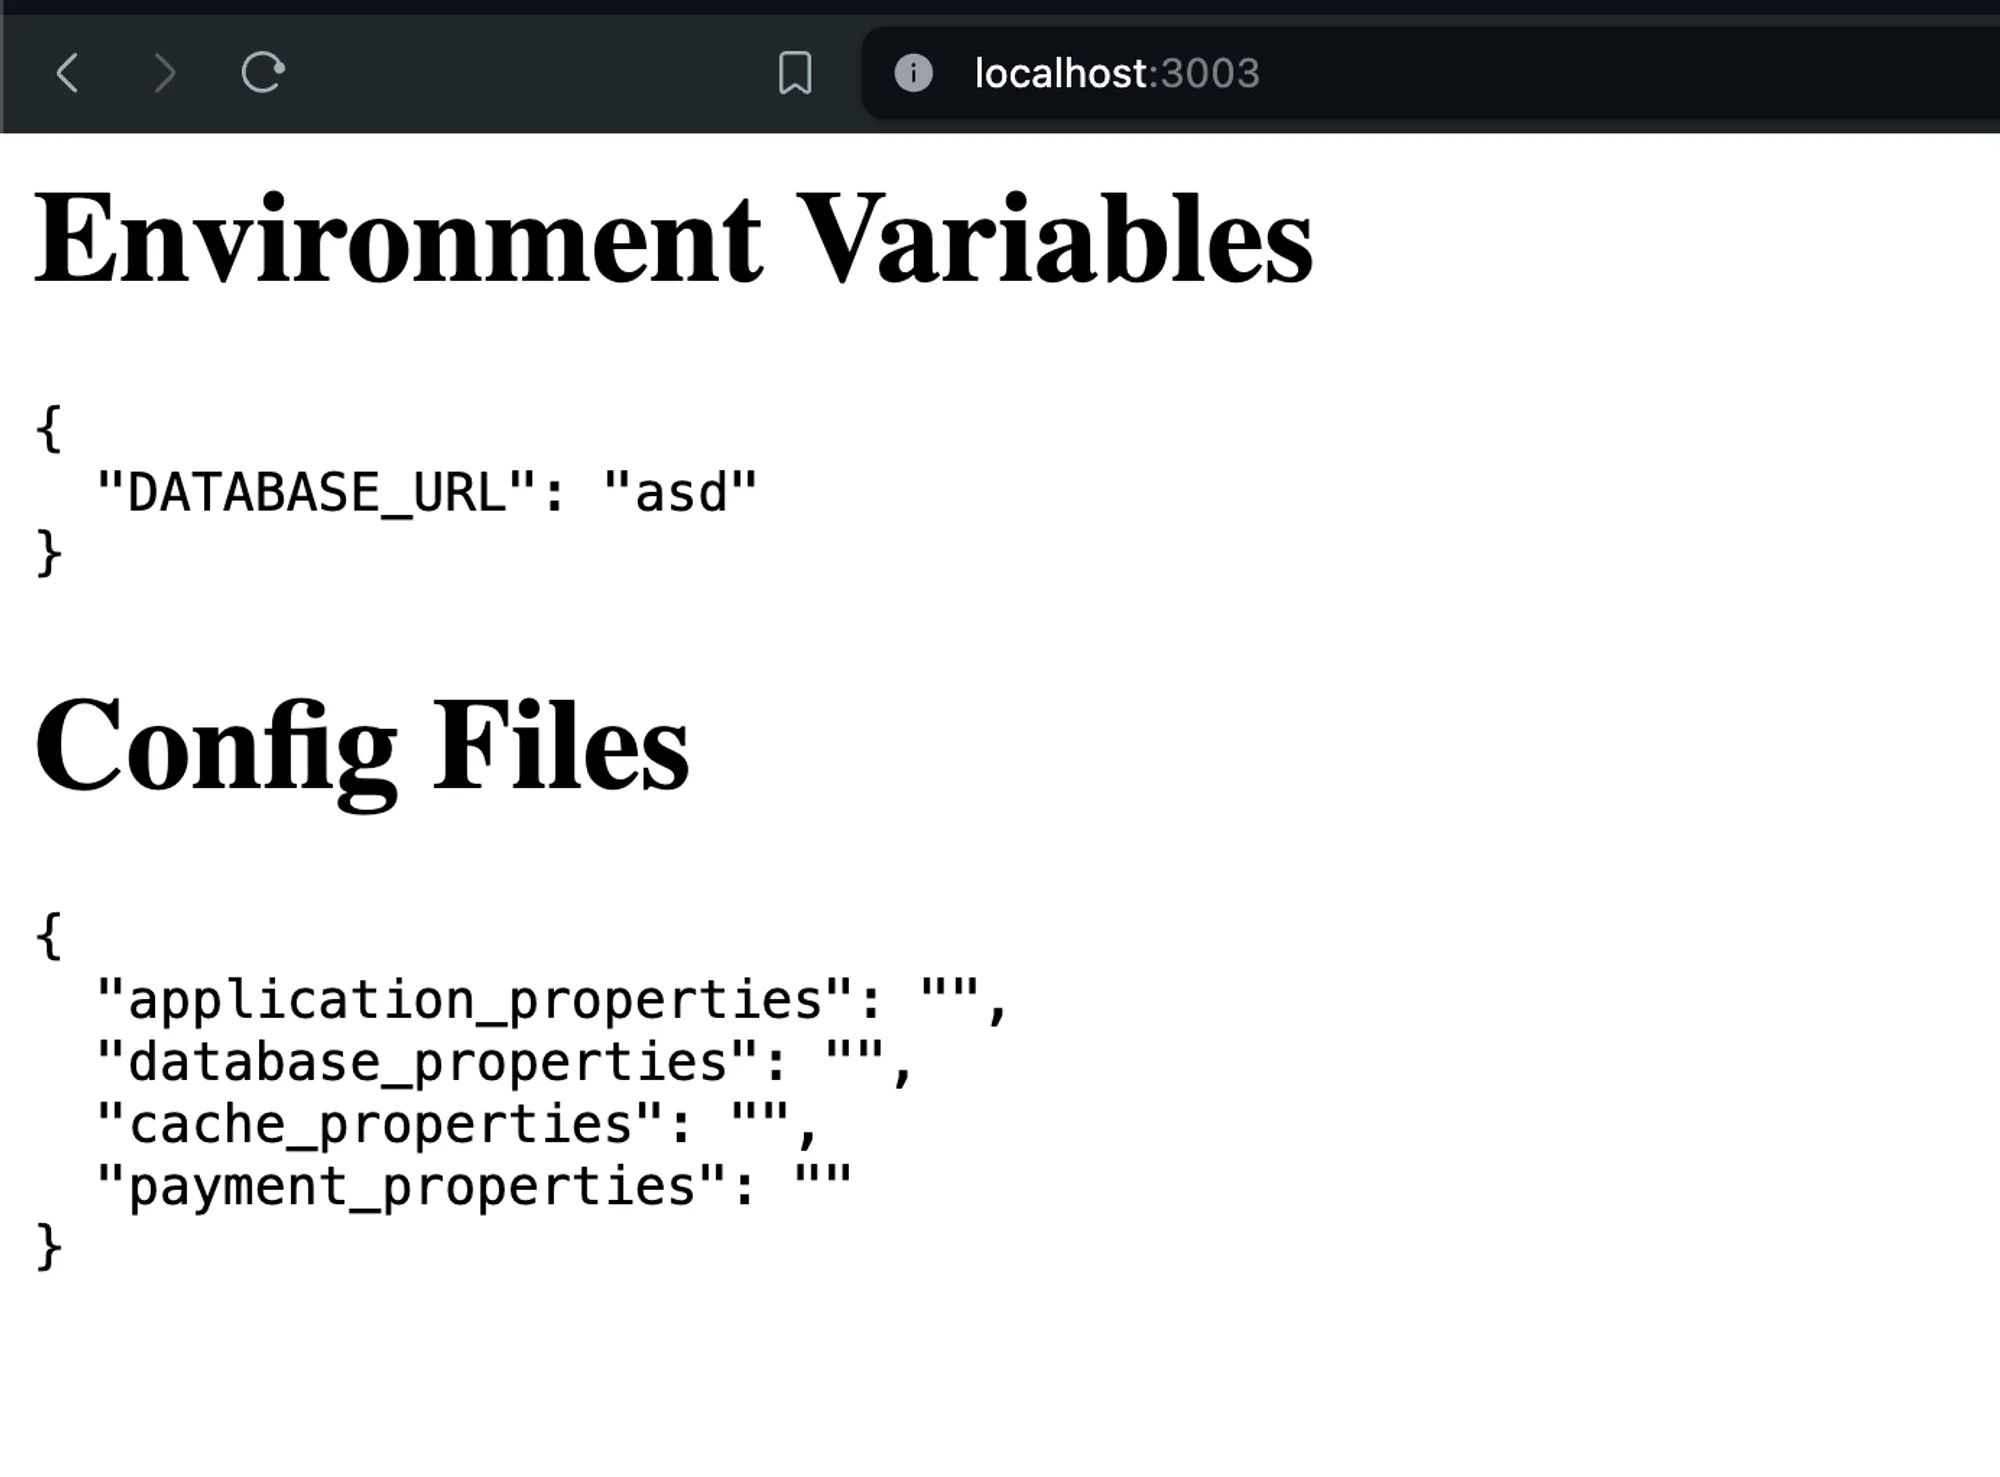
Deploying the Express App in Kubernetes
- Create a file named
express-app.yml:
apiVersion: apps/v1kind: Deploymentmetadata: name: ecom-backend-deploymentspec: replicas: 1 selector: matchLabels: app: ecom-backend template: metadata: labels: app: ecom-backend spec: containers: - name: ecom-backend image: 100xdevs/env-backend ports: - containerPort: 3000 env: - name: DATABASE_URL valueFrom: configMapKeyRef: name: ecom-backend-config key: database_url - name: CACHE_SIZE valueFrom: configMapKeyRef: name: ecom-backend-config key: cache_size - name: PAYMENT_GATEWAY_URL valueFrom: configMapKeyRef: name: ecom-backend-config key: payment_gateway_url - name: MAX_CART_ITEMS valueFrom: configMapKeyRef: name: ecom-backend-config key: max_cart_items - name: SESSION_TIMEOUT valueFrom: configMapKeyRef: name: ecom-backend-config key: session_timeout- Apply the Deployment:
kubectl apply -f express-app.yml
Creating a Service for the Express App
- Create a file named
express-service.yml:
apiVersion: v1kind: Servicemetadata: name: ecom-backend-servicespec: type: NodePort selector: app: ecom-backend ports: - port: 3000 targetPort: 3000 nodePort: 30007- Apply the Service:
kubectl apply -f express-service.ymlAccessing the Application
Visit the application using the NodePort (30007) on any of your cluster’s node IPs.
Key Points
- ConfigMap Usage: ConfigMaps store configuration data separately from application code.
- Environment Variables: The Deployment uses
configMapKeyRefto inject ConfigMap values as environment variables. - Portability: This approach allows for easy configuration changes without modifying the container image.
- NodePort Service: The NodePort service makes the application accessible outside the cluster.
- Separation of Concerns: Configuration, application code, and deployment specifications are all separated.
This setup demonstrates how to effectively use ConfigMaps to manage application configuration in Kubernetes, promoting better practices in configuration management and application deployment.