Week 24.2 Testing in MERN stack
In this lecture, Harkirat covers Testing in Node.js applications, with a focus on Express.js. He explores testing strategies for complex endpoints, including scenarios involving databases and external services. Harkirat demonstrates techniques for mocking dependencies and deep mocking, enabling isolated testing of individual components. Additionally, he provides best practices for writing maintainable and comprehensive tests, ensuring robust code quality and facilitating continuous integration and deployment.
Testing in Node.js + Express
Testing is a crucial aspect of software development, and it becomes even more important when working with complex applications like those built with the MERN (MongoDB, Express, React, Node.js) stack. In this section, we’ll explore various aspects of testing in Node.js and Express, which forms the backend component of the MERN stack.
Understanding Different Types of Tests
Before diving into the specifics of testing in Node.js and Express, it’s essential to understand the different types of tests commonly used in software development:
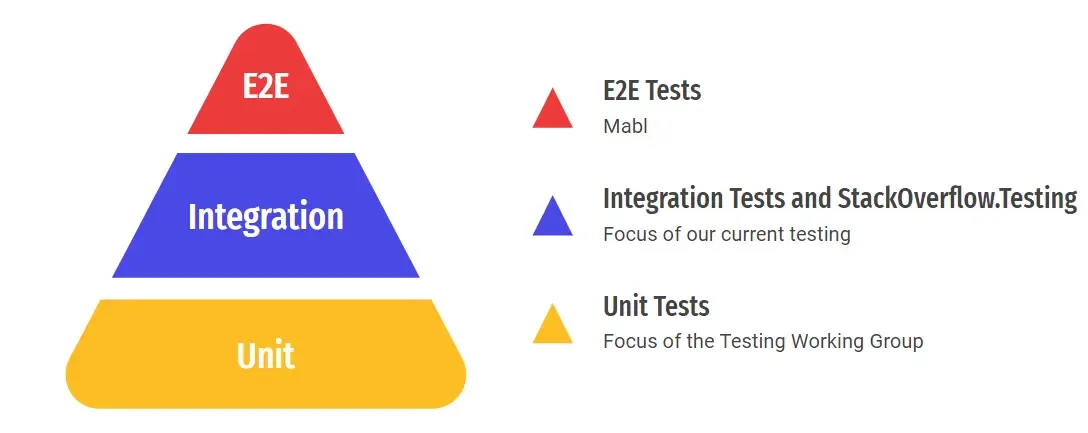
- Unit Tests: Unit tests are low-level tests that focus on testing individual units or components of your application in isolation. In the context of a Node.js + Express application, unit tests might cover individual functions, middleware, or utility modules.
- Integration Tests: Integration tests verify the interaction between different components or modules of your application. For example, in a Node.js + Express application, integration tests might test how different routes, controllers, and services work together.
- End-to-End (E2E) Tests: End-to-End tests simulate real-world user scenarios by testing the entire application flow, from the user interface to the backend services. In the context of a MERN stack application, E2E tests would involve testing the frontend (React) and backend (Node.js + Express) components together.
Testing an Express Backend
When it comes to testing an Express backend, there are several tools and libraries available to help you write and run tests effectively. Here are some common approaches:
- Jest: Jest is a popular JavaScript testing framework developed by Facebook. It provides a rich set of features for writing and running tests, including mocking, code coverage, and parallel test execution.
- Vitest: Vitest is a newer test runner built by the Vite team. It’s designed to be fast, lightweight, and compatible with Jest’s API, making it a great alternative for testing Node.js applications.
- Supertest: Supertest is a library that provides a high-level abstraction for testing HTTP servers, making it easy to test Express routes and middleware.
- Mocking and Spying: When testing Express applications, you often need to mock or spy on certain dependencies, such as databases, external APIs, or other services. Libraries like
jest.mockorsinoncan help you create mocks and spies for these dependencies.
Here’s an example of how you might test an Express route using Jest and Supertest:
const request = require('supertest');const app = require('./app'); // Your Express app
describe('GET /api/users', () => {  it('should return a list of users', async () => {    const response = await request(app).get('/api/users');    expect(response.status).toBe(200);    expect(response.body).toHaveLength(2); // Assuming there are 2 users  });});
In this example, we’re using Supertest to send a GET request to the /api/users route of our Express app and asserting that the response has a status code of 200 and contains an array of two users.
Integrating Testing and Coverage in CI/CD
Continuous Integration and Continuous Deployment (CI/CD) pipelines are essential for ensuring that your application is thoroughly tested and that any issues are caught early in the development process. Here are some steps you can take to integrate testing and coverage in your CI/CD pipeline:
- Configure a CI/CD Tool: Choose a CI/CD tool like GitHub Actions, CircleCI, or Jenkins, and configure it to run your tests whenever code is pushed to your repository.
- Run Tests: In your CI/CD pipeline, include a step to run your unit, integration, and end-to-end tests using the appropriate testing frameworks and tools.
- Generate Code Coverage Reports: Most testing frameworks, like Jest and Vitest, can generate code coverage reports that show which parts of your codebase are covered by tests. Configure your CI/CD pipeline to generate and store these reports.
- Set Code Coverage Thresholds: To ensure that your codebase maintains a certain level of test coverage, you can set code coverage thresholds in your CI/CD pipeline. If the coverage falls below these thresholds, the pipeline can fail, preventing untested code from being deployed.
- Integrate with Code Quality Tools: Consider integrating your CI/CD pipeline with code quality tools like SonarQube or CodeClimate, which can provide additional insights into code quality, technical debt, and potential issues.
By integrating testing and coverage in your CI/CD pipeline, you can catch issues early, ensure that your codebase is thoroughly tested, and maintain a high level of code quality throughout the development process.
The provided code repository (https://github.com/100xdevs-cohort-2/week-24-testing/) contains examples and exercises related to testing in Node.js and Express, which can help you further understand and practice these concepts.
Testing a Simple App
In this section, we’ll explore how to set up and write tests for a simple TypeScript application using Jest, a popular JavaScript testing framework.
Setting up the Project
- Initialize a new TypeScript project:
npm init -ynpx tsc --init- Update the
tsconfig.jsonfile to set therootDirandoutDirproperties:
"rootDir": "./src","outDir": "./dist",This configuration tells TypeScript to treat the src directory as the root directory for your source files and output the compiled JavaScript files to the dist directory.
- Create the
src/index.tsfile with a simplesumfunction:
export function sum(a: number, b: number) { return a + b;}Setting up Jest
- Install the required dependencies:
npm install --save-dev ts-jest @jest/globalsts-jestis a Jest transformer that allows you to write tests in TypeScript.@jest/globalsprovides type definitions for Jest’s global variables and functions.
- Initialize Jest configuration:
npx ts-jest config:initThis command creates a jest.config.ts file with the default Jest configuration for TypeScript projects.
- Update the
package.jsonfile to include a test script:
"scripts": { "test": "jest"},Writing Tests
- Create a new file
src/index.test.tsfor your tests:
import { describe, expect, test } from '@jest/globals';import { sum } from '../index';
describe('sum module', () => {  test('adds 1 + 2 to equal 3', () => {    expect(sum(1, 2)).toBe(3);  });});
In this example, we import the sum function from the index.ts file and write a test case that checks if sum(1, 2) returns 3.
describeis a Jest function that groups related tests together.test(orit) is a Jest function that defines an individual test case.expectis a Jest function that provides assertion utilities for testing.
Running Tests
To run the tests, execute the following command in your terminal:
npm run testJest will automatically find and run all files with the .test.ts or .spec.ts extension in your project. If the test passes, you should see output similar to the following:
 PASS  src/index.test.ts  sum module    ✓ adds 1 + 2 to equal 3 (2 ms)
Test Suites: 1 passed, 1 totalTests:       1 passed, 1 totalSnapshots:   0 totalTime:        0.185 s, estimated 1 sRan all test suites.
This example demonstrates how to set up a simple TypeScript project, configure Jest for testing, and write and run a basic unit test. As your application grows, you can continue adding more test files and test cases to ensure comprehensive test coverage for your codebase.
Testing an Express App
In this section, we’ll learn how to test an Express application using Jest and Supertest. We’ll create a simple Express server and write tests to ensure its functionality.
Setting up the Project
- Initialize a new TypeScript project:
npm init -ynpx tsc --init- Update the
tsconfig.jsonfile to set therootDirandoutDirproperties:
"rootDir": "./src","outDir": "./dist",- Install the required dependencies:
npm install --save-dev ts-jest @jest/globals @types/expressnpm install supertest @types/supertestnpm install expressts-jestand@jest/globals: Required for running Jest tests with TypeScript.@types/express: TypeScript type definitions for Express.supertest: A library for testing HTTP servers, including Express apps.@types/supertest: TypeScript type definitions for Supertest.express: The Express web framework.
- Initialize Jest configuration:
npx ts-jest config:init- Update the
package.jsonfile to include a test script:
"scripts": { "test": "jest"},Creating the Express Server
- Create a new file
src/index.tsand define a simple Express server:
import express from "express";
export const app = express();app.use(express.json());
app.post("/sum", (req, res) => {    const a = req.body.a;    const b = req.body.b;    const answer = a + b;
    res.json({        answer    });});
This Express server defines a single route /sum that accepts a POST request with two numbers a and b in the request body, calculates their sum, and returns the result as a JSON response.
Writing Tests
- Create a new file
src/tests/sum.test.tsfor your tests:
import { describe, expect, test, it } from '@jest/globals';import request from "supertest";import { app } from "../index";
describe("POST /sum", () => {    it("should return the sum of two numbers", async () => {        const res = await request(app).post("/sum").send({            a: 1,            b: 2        });        expect(res.statusCode).toBe(200);        expect(res.body.answer).toBe(3);    });
    it("should return the sum of two negative numbers", async () => {        const res = await request(app).post("/sum").send({            a: -1,            b: -2        });        expect(res.statusCode).toBe(200);        expect(res.body.answer).toBe(-3);    });
    it("should return the sum of two zero numbers", async () => {        const res = await request(app).post("/sum").send({            a: 0,            b: 0        });        expect(res.statusCode).toBe(200);        expect(res.body.answer).toBe(0);    });});
In this example, we use Supertest to send POST requests to the /sum route with different sets of input numbers. We then assert that the response status code is 200 (OK) and that the answer property in the response body matches the expected sum.
- Update the
jest.config.jsfile to specify the test file pattern:
/** @type {import('ts-jest').JestConfigWithTsJest} */module.exports = { preset: 'ts-jest', testEnvironment: 'node', testMatch: ["<rootDir>/src/tests/**/*.ts"]};This configuration tells Jest to look for test files in the src/tests directory and its subdirectories.
Running Tests
To run the tests, execute the following command in your terminal:
npm run testJest will automatically find and run all test files matching the specified pattern. If the tests pass, you should see output similar to the following:
 PASS  src/tests/sum.test.ts  POST /sum    ✓ should return the sum of two numbers (10 ms)    ✓ should return the sum of two negative numbers (1 ms)    ✓ should return the sum of two zero numbers
Test Suites: 1 passed, 1 totalTests:       3 passed, 3 totalSnapshots:   0 totalTime:        0.185 s, estimated 1 sRan all test suites.
This example demonstrates how to test an Express application using Jest and Supertest. By writing tests for your routes and middleware, you can ensure that your application behaves as expected and catch any regressions or issues early in the development process.
Slightly More Complex Endpoint
In this section, we’ll enhance our Express application by adding input validation using the Zod library. We’ll also add a new GET endpoint for the /sum route and write tests to ensure the correct behavior of both the POST and GET endpoints.
Setting up Zod
- Install the Zod library:
npm install zod- Update the
src/index.tsfile to include input validation using Zod:
import express from "express";import { z } from "zod";
export const app = express();app.use(express.json());
const sumInput = z.object({    a: z.number(),    b: z.number()});
app.post("/sum", (req, res) => {    const parsedResponse = sumInput.safeParse(req.body);
    if (!parsedResponse.success) {        return res.status(411).json({            message: "Incorrect inputs"        });    }
    const answer = parsedResponse.data.a + parsedResponse.data.b;
    res.json({        answer    });});
app.get("/sum", (req, res) => {    const parsedResponse = sumInput.safeParse({        a: Number(req.headers["a"]),        b: Number(req.headers["b"])    });
    if (!parsedResponse.success) {        return res.status(411).json({            message: "Incorrect inputs"        });    }
    const answer = parsedResponse.data.a + parsedResponse.data.b;
    res.json({        answer    });});
In this updated code, we define a Zod schema sumInput that validates the input data for the /sum route. For the POST endpoint, we use sumInput.safeParse(req.body) to validate the request body. For the GET endpoint, we use sumInput.safeParse({ a: Number(req.headers["a"]), b: Number(req.headers["b"]) }) to validate the input values from the request headers.
If the input data is invalid, we return a 411 (Length Required) status code with an error message. Otherwise, we calculate the sum and return it as a JSON response.
Updating Tests
Update the src/tests/sum.test.ts file to include tests for the new GET endpoint and the input validation:
import { describe, expect, test, it } from '@jest/globals';import request from "supertest";import { app } from "../index";
describe("POST /sum", () => {    it("should return the sum of two numbers", async () => {        const res = await request(app).post("/sum").send({            a: 1,            b: 2        });        expect(res.statusCode).toBe(200);        expect(res.body.answer).toBe(3);    });
    it("should return 411 if no inputs are provided", async () => {        const res = await request(app).post("/sum").send({});        expect(res.statusCode).toBe(411);        expect(res.body.message).toBe("Incorrect inputs");    });});
describe("GET /sum", () => {    it("should return the sum of two numbers", async () => {        const res = await request(app)            .get("/sum")            .set({                a: "1",                b: "2"            })            .send();        expect(res.statusCode).toBe(200);        expect(res.body.answer).toBe(3);    });
    it("should return 411 if no inputs are provided", async () => {        const res = await request(app)            .get("/sum").send();        expect(res.statusCode).toBe(411);    });});
In this updated test file, we add two new test cases for the GET /sum endpoint:
- The first test case sends a GET request with valid input values in the request headers and asserts that the response status code is 200 and the
answerproperty in the response body matches the expected sum. - The second test case sends a GET request without any input values and asserts that the response status code is 411 (Length Required) and the
messageproperty in the response body contains the expected error message.
We also add a new test case for the POST /sum endpoint that checks if the server returns a 411 status code and the correct error message when no input data is provided in the request body.
Running Tests
To run the tests, execute the following command in your terminal:
npm run testJest will automatically find and run all test files matching the specified pattern. If the tests pass, you should see output similar to the following:
 PASS  src/tests/sum.test.ts  POST /sum    ✓ should return the sum of two numbers (10 ms)    ✓ should return 411 if no inputs are provided (1 ms)  GET /sum    ✓ should return the sum of two numbers (1 ms)    ✓ should return 411 if no inputs are provided
Test Suites: 1 passed, 1 totalTests:       4 passed, 4 totalSnapshots:   0 totalTime:        0.185 s, estimated 1 sRan all test suites.
This example demonstrates how to add input validation to an Express application using the Zod library and how to write tests to ensure the correct behavior of the application, including handling invalid input data.
Moving from Jest to Vitest
Vitest is a relatively new testing framework that has gained popularity due to its tight integration with Vite, a modern and fast build tool. While Jest has been the de facto standard for testing in JavaScript and TypeScript projects, Vitest offers several advantages, especially for TypeScript projects. In this section, we’ll explore the reasons for moving from Jest to Vitest and the benefits it provides.
Benefits of Moving to Vitest
By moving from Jest to Vitest, you can enjoy the following benefits:
- Improved Performance: Vitest’s parallelization and tight integration with Vite can lead to significantly faster test execution times, improving your overall development workflow.
- Consistent Developer Experience: With Vitest, you can leverage the same configuration and plugins across your application and tests, providing a consistent developer experience.
- Better TypeScript Support: Vitest’s native TypeScript support eliminates the need for additional configuration or plugins, simplifying the setup process for TypeScript projects.
- Seamless Integration with Vite: If you’re already using Vite for your project, adopting Vitest ensures a seamless integration and a unified development experience.
- Future-proof: As Vite continues to evolve and gain popularity, Vitest’s alignment with Vite positions it as a future-proof testing solution for modern web development.
While Jest remains a powerful and widely adopted testing framework, Vitest’s advantages, especially for TypeScript projects and Vite-based workflows, make it a compelling alternative worth considering.
The provided links (
https://vitest.dev/andhttps://vitest.dev/guide/why.html) offer more detailed information about Vitest, its features, and the rationale behind its creation. These resources can help you better understand the benefits of moving to Vitest and guide you through the migration process if you decide to make the switch.
Simple Express Project with Vitest
In this section, we’ll set up a simple Express project and configure Vitest as our testing framework. We’ll also migrate the existing tests from Jest to Vitest, showcasing the compatibility between the two frameworks.
Setting up the Express Project
- Initialize a new Node.js project:
npm init -y- Install the required dependencies:
npm install express @types/express zod- Update the
tsconfig.jsonfile to set therootDirandoutDirproperties:
"rootDir": "./src","outDir": "./dist"- Create the
src/index.tsfile with a simple Express server:
import express from "express";import { z } from "zod";
export const app = express();app.use(express.json());
const sumInput = z.object({    a: z.number(),    b: z.number()});
app.post("/sum", (req, res) => {    const parsedResponse = sumInput.safeParse(req.body);
    if (!parsedResponse.success) {        return res.status(411).json({            message: "Incorrect inputs"        });    }
    const answer = parsedResponse.data.a + parsedResponse.data.b;
    res.json({        answer    });});
app.get("/sum", (req, res) => {    const parsedResponse = sumInput.safeParse({        a: Number(req.headers["a"]),        b: Number(req.headers["b"])    });
    if (!parsedResponse.success) {        return res.status(411).json({            message: "Incorrect inputs"        });    }
    const answer = parsedResponse.data.a + parsedResponse.data.b;
    res.json({        answer    });});
Note that we’re not calling app.listen here, as we don’t want the app to start when running tests. Usually, you would create a separate file (e.g., bin.ts or main.ts) that imports the app and starts the server.
Setting up Vitest
- Install Vitest as a development dependency:
npm install -D vitest- Add a test script to the
package.jsonfile:
"scripts": { "test": "vitest"},- Create a simple test file
test/index.test.ts:
import { expect, test } from 'vitest'
test('true === true', () => { expect(true).toBe(true)})- Run the test script:
npm run testYou should see output similar to the following:
 ✓ true === true (1ms)
Test Files  1 passed (1)     Tests  1 passed (1)      Time  0.08s (in thread 0ms, allocated 0b)
Migrating Tests from Jest to Vitest
Since Vitest is highly compatible with the Jest API, migrating existing tests is relatively straightforward. We’ll migrate the tests from the previous section to Vitest.
- Install the required dependencies:
npm install supertest @types/supertest- Update the
test/index.test.tsfile with the existing tests:
import { describe, expect, test, it } from 'vitest';import request from "supertest";import { app } from "../index";
describe("POST /sum", () => {    it("should return the sum of two numbers", async () => {        const res = await request(app).post("/sum").send({            a: 1,            b: 2        });        expect(res.statusCode).toBe(200);        expect(res.body.answer).toBe(3);    });
    it("should return 411 if no inputs are provided", async () => {        const res = await request(app).post("/sum").send({});        expect(res.statusCode).toBe(411);        expect(res.body.message).toBe("Incorrect inputs");    });});
describe("GET /sum", () => {    it("should return the sum of two numbers", async () => {        const res = await request(app)            .get("/sum")            .set({                a: "1",                b: "2"            })            .send();        expect(res.statusCode).toBe(200);        expect(res.body.answer).toBe(3);    });
    it("should return 411 if no inputs are provided", async () => {        const res = await request(app)            .get("/sum").send();        expect(res.statusCode).toBe(411);    });});
Notice that the only change required was updating the imports from @jest/globals to vitest. The rest of the test code remains the same, showcasing the compatibility between Jest and Vitest.
- Run the test script:
npm run testYou should see output similar to the following:
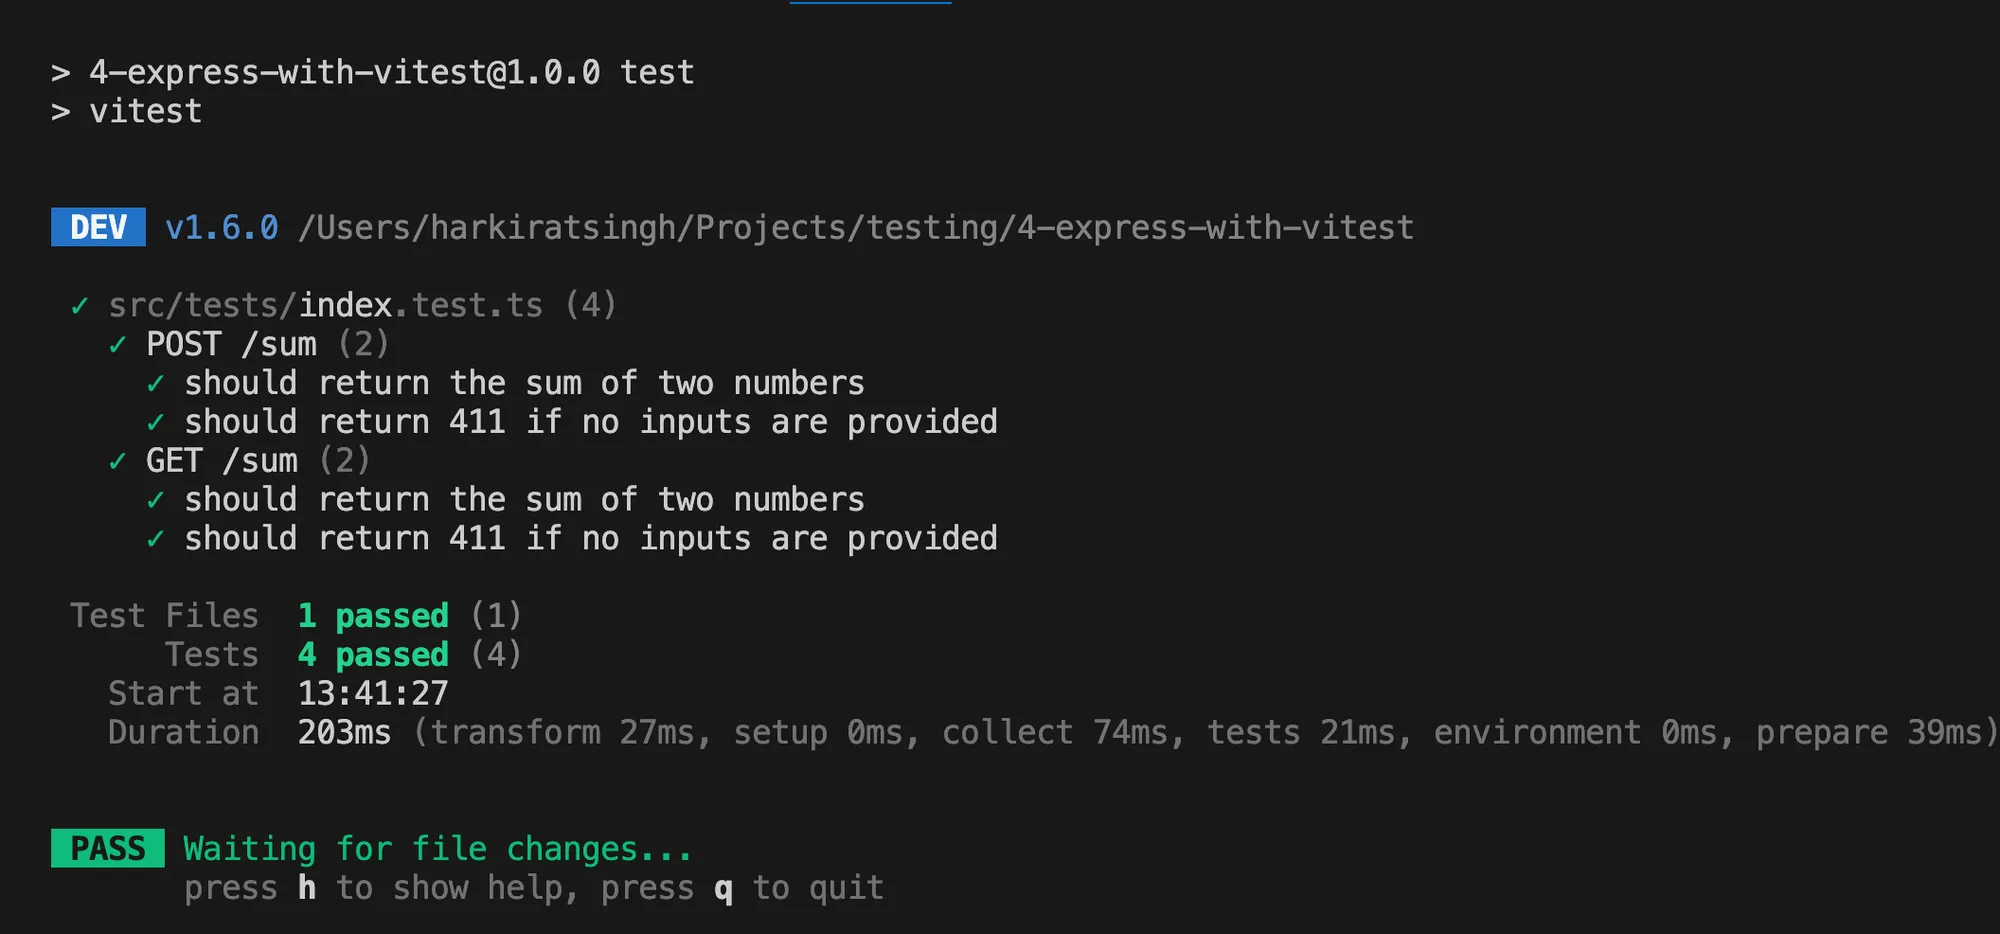
This example demonstrates how to set up a simple Express project, configure Vitest as the testing framework, and migrate existing tests from Jest to Vitest with minimal changes.
Adding a Database
When working with external services or databases in your backend application, there are two common approaches to testing:
- Mocking out the external service calls (unit tests): In this approach, you mock or stub the external service or database calls, allowing you to test your application’s logic without relying on the actual external dependencies.
- Starting the external services when the tests are running and stopping them after the tests end (integration/end-to-end tests): This approach involves setting up and running the actual external services or databases during the test execution, allowing you to test the integration between your application and these external dependencies.
In this section, we’ll explore the first approach by mocking out the database calls using Prisma.
Setting up Prisma
- Install Prisma:
npm install prisma- Initialize Prisma:
npx prisma initThis command creates a prisma directory and a schema.prisma file.
- Add a basic schema in
schema.prisma:
model Sum { id Int @id @default(autoincrement()) a Int b Int result Int}- Generate the Prisma client (we don’t need to migrate since we won’t be using an actual database):
npx prisma generate- Create a
src/db.tsfile to export the Prisma client:
import { PrismaClient } from "@prisma/client";export const prismaClient = new PrismaClient();Updating the Express Server
Update the src/index.ts file to store the requests in the database using Prisma:
import express from "express";import { z } from "zod";import { prismaClient } from "./db";
export const app = express();app.use(express.json());
const sumInput = z.object({    a: z.number(),    b: z.number()});
app.post("/sum", async (req, res) => {    const parsedResponse = sumInput.safeParse(req.body);
    if (!parsedResponse.success) {        return res.status(411).json({            message: "Incorrect inputs"        });    }
    const answer = parsedResponse.data.a + parsedResponse.data.b;
    await prismaClient.sum.create({        data: {            a: parsedResponse.data.a,            b: parsedResponse.data.b,            result: answer        }    });
    res.json({        answer    });});
app.get("/sum", (req, res) => {    const parsedResponse = sumInput.safeParse({        a: Number(req.headers["a"]),        b: Number(req.headers["b"])    });
    if (!parsedResponse.success) {        return res.status(411).json({            message: "Incorrect inputs"        });    }
    const answer = parsedResponse.data.a + parsedResponse.data.b;
    res.json({        answer    });});
In this updated code, we import the prismaClient from ./db.ts and use it to create a new record in the Sum table whenever a POST request is made to the /sum endpoint.
Mocking Dependencies
When writing unit tests, it’s a common practice to mock out external service calls or dependencies. This approach allows you to test the core logic of your application without relying on external services or databases, ensuring that your tests run quickly and consistently.
Mocking
Mocking, as the name suggests, means creating a fake or simulated version of a file, class, or variable during the test execution. This is particularly useful when dealing with external dependencies or services that are not directly related to the code being tested.
Creating a Mock
Vitest provides a utility function called vi.mock to create mocks. Here’s an example of how to create a mock:
vi.mock('./myModule', () => ({ myFunction: vi.fn(() => 'mocked value'),}));In this example, we’re mocking the myModule file and providing a mock implementation for the myFunction function within that module. The vi.fn function creates a mock function that can be configured to return a specific value or perform custom logic.
Mocking the prismaClient
To mock out the prismaClient instance from the db.ts file, you can add the following code to the top of index.test.ts:
vi.mock('../db', () => ({ prismaClient: { sum: { create: vi.fn() }}}));In this example, we’re mocking the db.ts file and providing a mock implementation for the prismaClient object. Specifically, we’re mocking the create function within the sum object, which is the function we’re calling in our application.
Since we know we’re only calling prismaClient.sum.create, we’ve mocked the implementation of that function. A mock function created with vi.fn() does nothing and returns undefined when the function call succeeds.
After adding this mock, running npm run test should succeed.
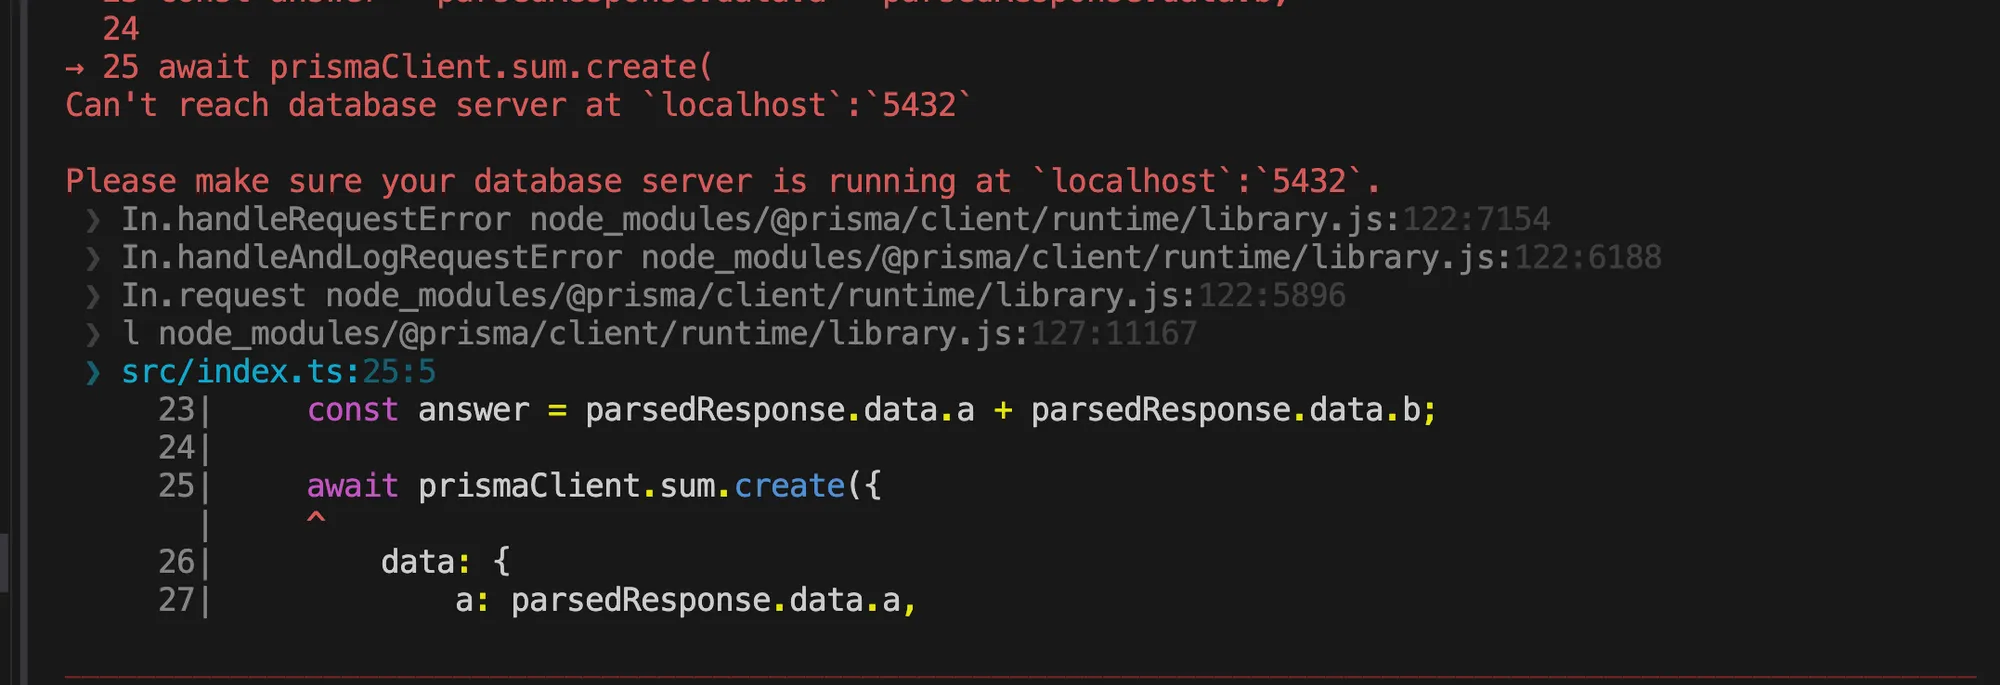
Problems
While the provided mocking approach works, there are two potential problems:
- Handling Return Values: Currently, the mocked
prismaClient.sum.createfunction returnsundefined. However, in a real database call, the function would return some actual data. If you need to test the logic that depends on the return value of the database call, you’ll need to configure the mock function to return the expected data. - Maintaining the Mock: As your application grows and you start using more functions or tables from the Prisma client, you’ll need to update the mock implementation accordingly. For example, if you start using the
findOnefunction or add a new table calledusers, you’ll need to update the mock to include these new functions or tables.
To address these problems, you can consider using a more robust mocking library or approach that allows you to create dynamic mocks or automatically generate mocks based on the actual implementation of the prismaClient. One such library is vitest-mock-extended, which provides additional utilities for creating and managing mocks in Vitest.
Deep Mocking
In the previous section, we mocked the prismaClient instance by manually specifying the functions we wanted to mock. However, as your application grows and you start using more functions or tables from the Prisma client, maintaining the mock implementation can become cumbersome.
Deep mocking is a technique that allows you to automatically mock all the properties and functions of an object, without having to specify them individually. This approach can simplify the mocking process and make it easier to maintain your tests as your application evolves.
Using vitest-mock-extended for Deep Mocking
The vitest-mock-extended library provides utilities for creating deep mocks in Vitest. Here’s how you can use it to mock the prismaClient instance:
- Install the
vitest-mock-extendedlibrary:
npm install -D vitest-mock-extended- Create a
__mocks__/db.tsfile:
import { PrismaClient } from '@prisma/client'import { beforeEach } from 'vitest'import { mockDeep, mockReset } from 'vitest-mock-extended'
export const prismaClient = mockDeep<PrismaClient>()
In this file, we’re using the mockDeep function from vitest-mock-extended to create a deep mock of the PrismaClient instance. This will automatically mock all the properties and functions of the prismaClient object.
- In your
index.test.tsfile, remove the previous mock implementation and replace it with a simplevi.mock('../db'):
vi.mock('../db');By using vi.mock('../db'), Vitest will automatically use the mocked version of the db.ts file from the __mocks__ directory.
- Run the tests:
npm run testThe tests should now pass, as the prismaClient instance is being mocked using the deep mock created with vitest-mock-extended.
Handling Return Values
In the previous example, the mocked prismaClient functions return undefined by default. However, if you need to test the logic that depends on the return value of a database call, you’ll need to configure the mock function to return the expected data.
Here’s an updated version of the src/index.ts file that returns the id of the created record in the response:
import express from "express";import { z } from "zod";import { prismaClient } from "./db";
export const app = express();app.use(express.json());
const sumInput = z.object({    a: z.number(),    b: z.number()});
app.post("/sum", async (req, res) => {    const parsedResponse = sumInput.safeParse(req.body);
    if (!parsedResponse.success) {        return res.status(411).json({            message: "Incorrect inputs"        });    }
    const answer = parsedResponse.data.a + parsedResponse.data.b;
    const response = await prismaClient.sum.create({        data: {            a: parsedResponse.data.a,            b: parsedResponse.data.b,            result: answer        }    });
    res.json({        answer,        id: response.id    });});
app.get("/sum", async (req, res) => {    const parsedResponse = sumInput.safeParse({        a: Number(req.headers["a"]),        b: Number(req.headers["b"])    });
    if (!parsedResponse.success) {        return res.status(411).json({            message: "Incorrect inputs"        });    }
    const answer = parsedResponse.data.a + parsedResponse.data.b;
    const response = await prismaClient.sum.create({        data: {            a: parsedResponse.data.a,            b: parsedResponse.data.b,            result: answer        }    });
    res.json({        answer,        id: response.id    });});
To handle the return value from the prismaClient.sum.create function, you can configure the mock in your __mocks__/db.ts file:
import { PrismaClient } from '@prisma/client'import { beforeEach } from 'vitest'import { mockDeep, mockReset } from 'vitest-mock-extended'
const mockedPrismaClient = mockDeep<PrismaClient>()
beforeEach(() => {  mockReset(mockedPrismaClient)  mockedPrismaClient.sum.create.mockImplementation(({ data }) => ({    id: 1, // or any other value you want to return    ...data,  }))})
export const prismaClient = mockedPrismaClient
In this updated code, we’re using the mockImplementation function to provide a custom implementation for the prismaClient.sum.create function. In this case, we’re returning an object with an id property set to 1 and spreading the data object passed to the create function.
With this configuration, your tests should now pass, and you can assert the id property in the response.
Deep mocking with
vitest-mock-extendedsimplifies the mocking process and makes it easier to maintain your tests as your application grows. By automatically mocking all the properties and functions of an object, you can focus on configuring the mock behavior for the specific functions you need, without having to manually specify each function to be mocked.
Mocking Return Values
In the previous section, we learned how to create deep mocks using vitest-mock-extended. However, in some cases, you may need to mock the return values of specific functions to test the logic that depends on those values.
Vitest provides several utilities for mocking return values, including mockResolvedValue, mockRejectedValue, and mockImplementation. In this section, we’ll focus on using mockResolvedValue to mock the return value of the prismaClient.sum.create function.
Using mockResolvedValue
- Update the
index.test.tsfile to import the mockedprismaClientfrom the__mocks__/dbfile:
import { prismaClient } from '../__mocks__/db';- In the test cases where you need to mock the return value of
prismaClient.sum.create, usemockResolvedValueto provide the expected return value:
prismaClient.sum.create.mockResolvedValue({ id: 1, a: 1, b: 1, result: 3});This line mocks the prismaClient.sum.create function to resolve with the provided object, which represents the expected return value from the database.
- Here’s the updated
index.test.tsfile with the mocked return values:
import { describe, expect, test, it, vi } from 'vitest';import request from "supertest";import { app } from "../index";import { prismaClient } from '../__mocks__/db';
vi.mock('../db');
describe("POST /sum", () => {  it("should return the sum of two numbers", async () => {    prismaClient.sum.create.mockResolvedValue({      id: 1,      a: 1,      b: 1,      result: 3    });
    const res = await request(app).post("/sum").send({      a: 1,      b: 2    });    expect(res.statusCode).toBe(200);    expect(res.body.answer).toBe(3);  });
  it("should return 411 if no inputs are provided", async () => {    const res = await request(app).post("/sum").send({});    expect(res.statusCode).toBe(411);    expect(res.body.message).toBe("Incorrect inputs");  });});
describe("GET /sum", () => {  it("should return the sum of two numbers", async () => {    prismaClient.sum.create.mockResolvedValue({      id: 1,      a: 1,      b: 1,      result: 3    });
    const res = await request(app)      .get("/sum")      .set({        a: "1",        b: "2"      })      .send();    expect(res.statusCode).toBe(200);    expect(res.body.answer).toBe(3);  });
  it("should return 411 if no inputs are provided", async () => {    const res = await request(app)      .get("/sum").send();    expect(res.statusCode).toBe(411);  });});
In this updated code, we’re mocking the prismaClient.sum.create function to resolve with an object containing the expected id, a, b, and result properties. This allows us to test the logic that depends on the return value of the database call.
Note that we only need to mock the return value in the test cases where the control flow reaches the point where the id is needed. In the test cases where no inputs are provided, the control flow never reaches the point where the id is used, so we don’t need to mock the return value in those cases.
By using
mockResolvedValue, you can easily mock the return values of specific functions and test the logic that depends on those values. This approach helps you write more comprehensive tests and ensure that your application behaves correctly under different scenarios.