Week 16.4 Next Auth
In this lecture, Harkirat covers NextAuth.js, a library for authentication in Next.js apps. He explains the rationale behind using it, setting up catch-all routes, adding OAuth providers like Google and GitHub, implementing custom credential providers, and creating custom sign-in pages
NextAuth
What is NextAuth?
NextAuth is a popular authentication library specifically designed for Next.js applications. It provides a comprehensive solution for implementing authentication in your Next.js projects, making it easier to handle user sign-in, sign-up, and session management.

Can you do authentication without NextAuth?
Yes, it is possible to implement authentication in a Next.js application without using NextAuth. However, doing so requires you to handle various aspects of authentication manually, such as managing user sessions, implementing secure cookie handling, and integrating with different authentication providers (e.g., OAuth, email/password, etc.).
Should you implement authentication without NextAuth?
While it is technically possible to implement authentication without NextAuth, it is generally not recommended, especially for larger or more complex applications. NextAuth simplifies the authentication process by providing a well-structured and secure approach, saving you from reinventing the wheel and potentially introducing security vulnerabilities.
Popular Choices for Authentication
When it comes to implementing authentication in web applications, there are several popular choices available:
- External Authentication Providers:
- Auth0 (https://auth0.com/): Auth0 is a popular identity management platform that offers a comprehensive suite of authentication and authorization services. It supports various authentication methods, including social logins, enterprise connections, and custom databases.
- Clerk (https://clerk.com/): Clerk is another authentication and user management solution that provides embeddable UIs, flexible APIs, and admin dashboards for managing users in your application.
- Firebase Authentication: Firebase, a comprehensive app development platform by Google, includes a robust authentication service. It supports various authentication methods, including email/password, social logins, and phone authentication.
- In-house Authentication Using Cookies: Some developers choose to implement authentication in-house by managing user sessions using cookies. This approach requires handling session management, secure cookie handling, and integrating with different authentication providers manually.
- NextAuth: As mentioned earlier, NextAuth is a popular choice for implementing authentication in Next.js applications. It provides a streamlined and secure approach to handling authentication, offering built-in support for various authentication providers and session management strategies.
While external authentication providers like Auth0 and Clerk offer comprehensive solutions with additional features like user management and multi-factor authentication, they may come with additional costs or complexity. Firebase Authentication, on the other hand, is a part of the broader Firebase platform and may be a suitable choice if you’re already using other Firebase services.
Implementing authentication in-house using cookies can be a viable option for smaller projects or when you have specific requirements not met by existing solutions. However, it requires a significant amount of effort and careful consideration of security best practices.
NextAuth strikes a balance between ease of use and flexibility, making it a popular choice for Next.js applications. It provides a well-structured and secure approach to authentication while allowing integration with various authentication providers and customization options.
Why Not JWT + localStorage
The decision to not use JWT (JSON Web Tokens) with localStorage for authentication in Next.js applications is primarily due to the architectural differences between traditional Express apps and Next.js apps.
Express App
In a typical Express app, the server and client are separate entities. The server handles API requests, and the client (often a single-page application) communicates with the server via API calls. In this scenario, using JWT with localStorage is a common approach for authentication:
- The client sends authentication credentials (e.g., username and password) to the server.
- The server verifies the credentials and generates a JWT containing user information and signs it with a secret key.
- The server sends the JWT back to the client.
- The client stores the JWT in localStorage or another client-side storage mechanism.
- For subsequent authenticated requests, the client includes the JWT in the request headers (typically the
Authorizationheader).
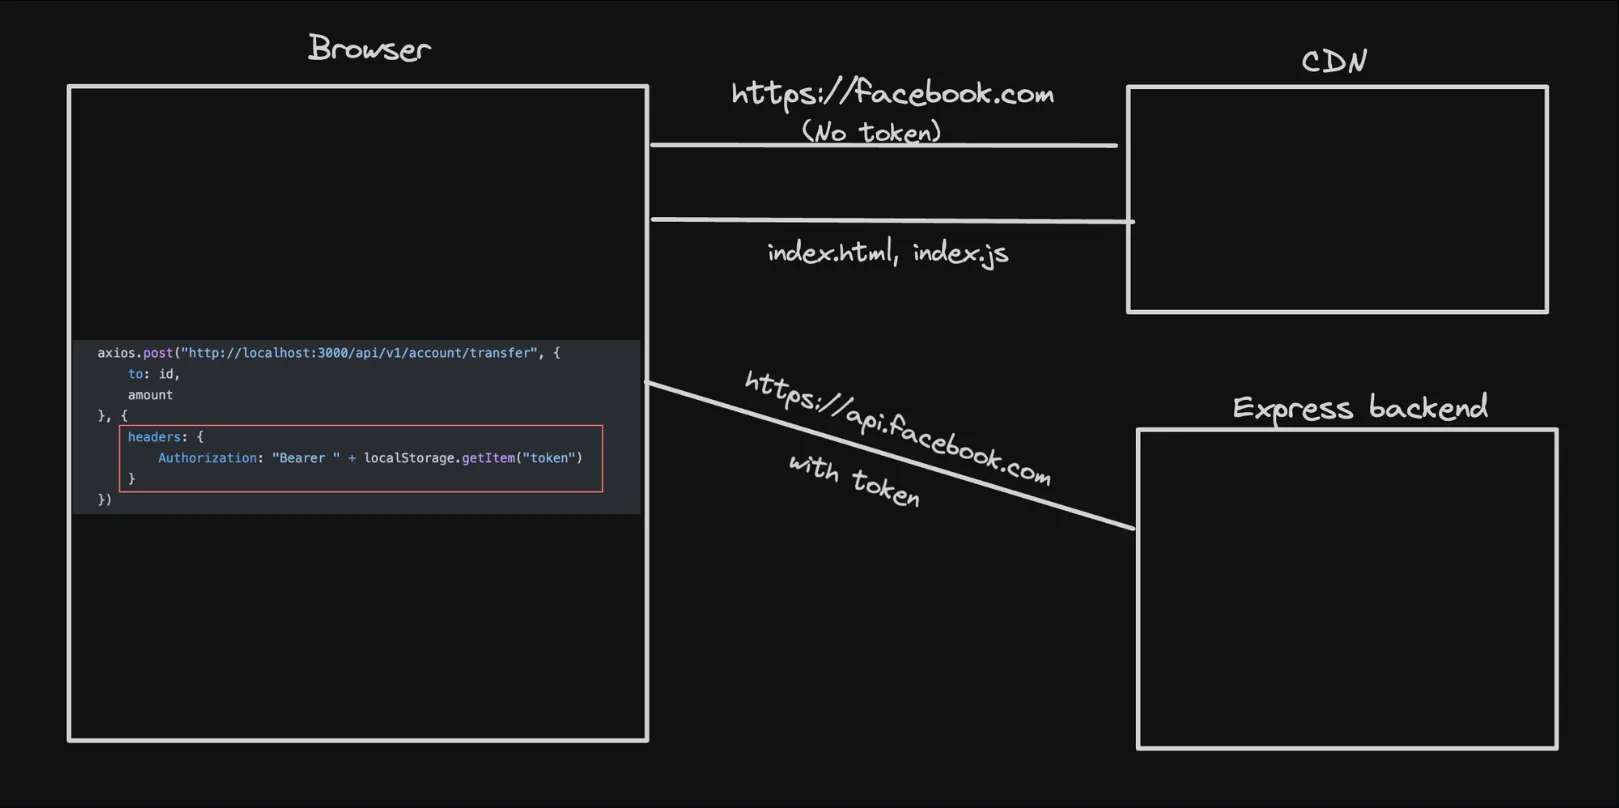
This approach works well in traditional client-server architectures because the client and server are separate entities, and the client needs a way to securely transmit authentication information with each request.
Next.js App
In a Next.js application, the server and client are more tightly coupled. Next.js applications can leverage server-side rendering (SSR) and API routes, which run on the server. This architectural difference introduces a few considerations:
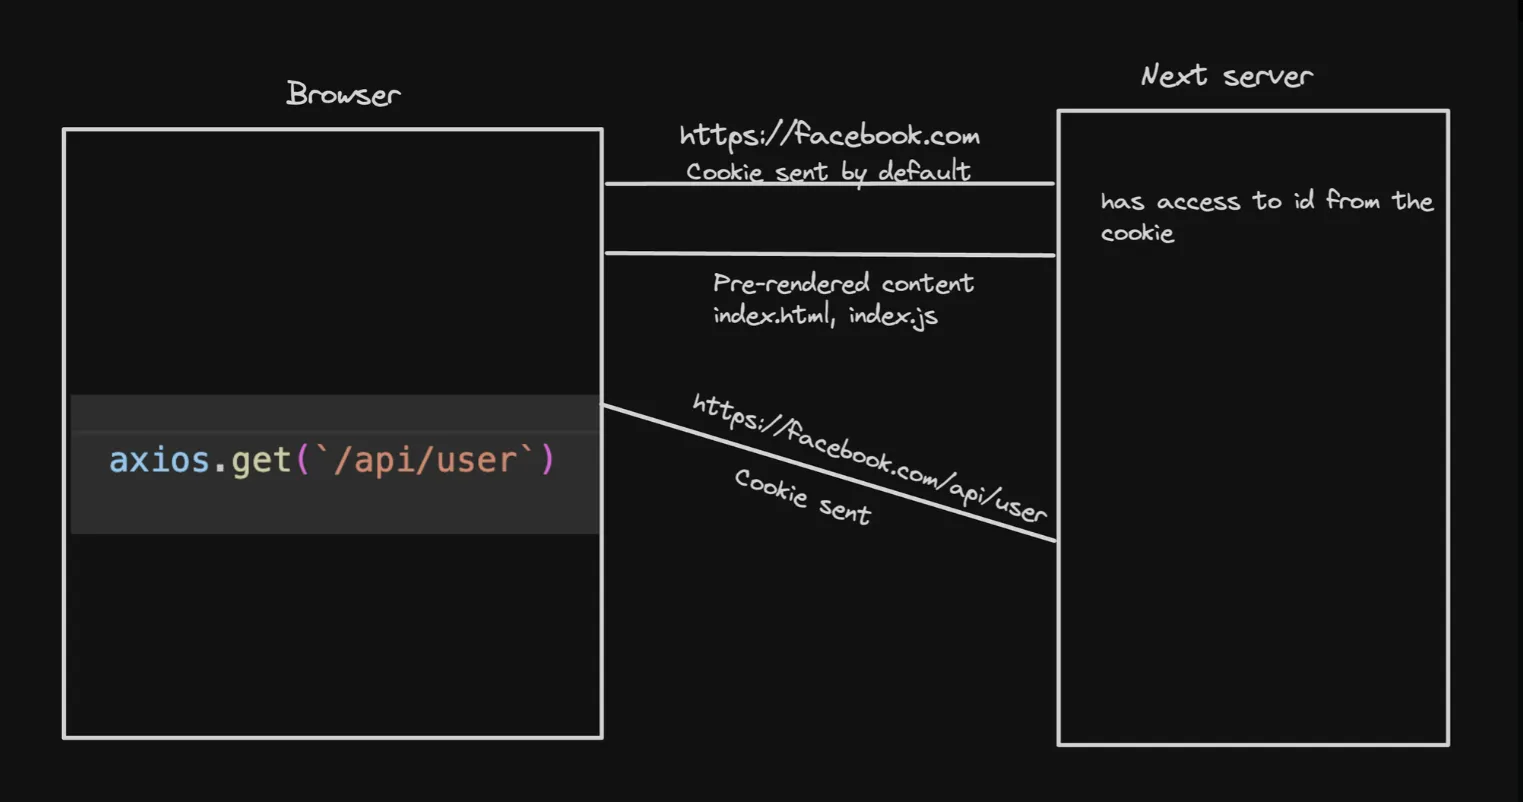
- Server-Side Rendering (SSR): With SSR, the initial page load is rendered on the server, and subsequent page navigations can be handled on the client-side. This means that authentication information needs to be available on the server for SSR to work correctly.
- API Routes: Next.js provides a built-in way to create API routes that run on the server. These API routes can handle authentication and other server-side logic directly, without the need for a separate Express server.
- Cookies: Next.js applications can use cookies to store and transmit authentication information between the server and client. Cookies are automatically included in requests sent from the client to the server, eliminating the need to manually include authentication tokens in request headers.
Using JWT with localStorage in a Next.js application can lead to potential issues and complexities:
- Server-Side Rendering (SSR) Challenges: To perform SSR correctly, the server needs access to the authentication information stored in localStorage, which is not possible due to the client-side nature of localStorage.
- Redundancy: Since Next.js provides built-in API routes and server-side rendering capabilities, using JWT with localStorage can introduce redundancy and unnecessary complexity.
Conclusion
Instead of using JWT with localStorage, Next.js applications often leverage cookies for authentication. Cookies are automatically included in requests sent from the client to the server, making it easier to handle authentication on both the client and server sides.
Next.js also provides authentication libraries like NextAuth.js, which simplify the process of implementing authentication with cookies, handling sessions, and integrating with various authentication providers (e.g., OAuth, email/password, etc.).
While it is possible to use JWT with localStorage in a Next.js application, it may not be the most efficient or recommended approach due to the architectural differences between Next.js and traditional client-server applications. Leveraging cookies and built-in authentication libraries like NextAuth.js can provide a more streamlined and secure authentication experience in Next.js applications.
NextAuth
NextAuth is a popular authentication library specifically designed for Next.js applications. It provides a comprehensive solution for implementing authentication in your Next.js projects, making it easier to handle user sign-in, sign-up, and session management.
Supported Providers
One of the key features of NextAuth is its support for various authentication providers. It allows you to integrate different authentication methods into your Next.js application, including:
- Email/Password Authentication: NextAuth provides built-in support for email and password-based authentication. Users can sign up and sign in using their email addresses and passwords.
- OAuth Providers (Social Login): NextAuth supports integration with popular OAuth providers, allowing users to sign in using their existing accounts from services like Google, Facebook, Twitter, GitHub, and more. This feature is commonly referred to as “social login.”
- Custom Providers: In addition to the built-in providers, NextAuth allows you to create and integrate custom authentication providers. This flexibility enables you to support authentication methods specific to your application’s requirements.
Customization and Extensibility
While NextAuth provides a robust set of features out of the box, it also allows for customization and extensibility. You can tailor the authentication process to your specific requirements, such as adding additional authentication providers, customizing the user interface, or implementing advanced features like multi-factor authentication or social sign-in with additional providers.
By leveraging NextAuth, you can streamline the authentication process in your Next.js application, providing a secure and user-friendly experience for your users. Whether you need email/password authentication, social login, or custom authentication methods, NextAuth offers a comprehensive solution tailored specifically for Next.js applications.
Catch All Routes
In Next.js, catch-all routes allow you to create a single route handler that can handle multiple routes with dynamic segments. This is particularly useful when you want to handle routes that share a common prefix but have varying path segments.
Creating a Catch-all Route
To create a catch-all route in Next.js, you need to use the [...slug] syntax in your route file name. Here’s an example of how to set up a catch-all route for handling authentication-related routes:
- Create a new Next.js app:
npx create-next-app@latest- Create a new file
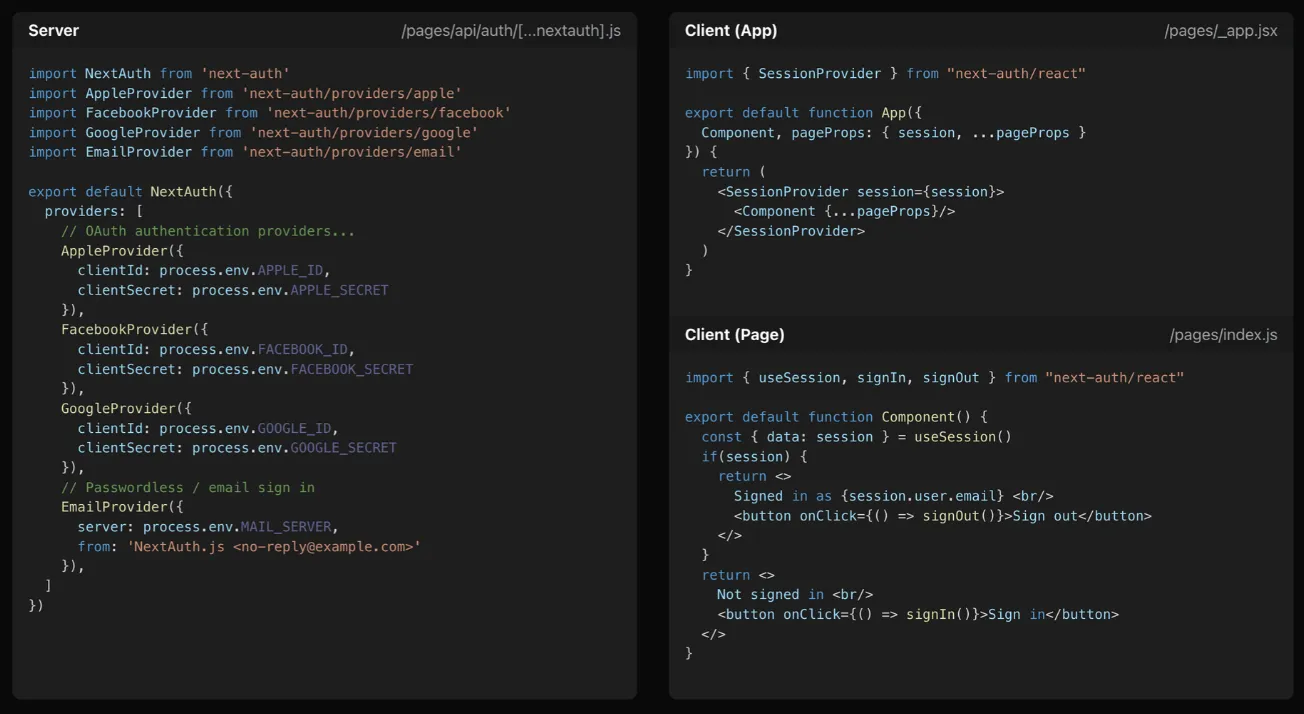
app/api/auth/[...nextauth]/route.tswith the following content:
import { NextRequest, NextResponse } from "next/server";
export function GET(req: NextRequest) {  return NextResponse.json({    message: "Handler",  });}
This catch-all route will handle all routes that start with /api/auth/, such as /api/auth/signin, /api/auth/123, /api/auth/random/random2, and so on.
Accessing Dynamic Route Segments
In a catch-all route, you can access the dynamic route segments using the params object passed to the route handler function. Here’s an example of how to log the dynamic route segment:
import { NextRequest, NextResponse } from "next/server";
export function GET(  req: NextRequest,  { params }: { params: { nextauth: string[] } }) {  console.log(params.nextauth[0]); // Logs the first dynamic segment  return NextResponse.json({    message: "Handler",  });}
In this example, params.nextauth is an array containing the dynamic route segments. params.nextauth will log the first dynamic segment after /api/auth/.
Testing the Catch-all Route
To test the catch-all route, start the Next.js development server:
npm run devThen, you can visit the following URLs in your browser or make requests to them using tools like cURL or Postman:
http://localhost:3000/api/auth/signinhttp://localhost:3000/api/auth/123http://localhost:3000/api/auth/random/random2
All of these routes will be handled by the same catch-all route handler, and you should see the { message: "Handler" } response in your browser or the console.
Catch-all routes in Next.js provide a convenient way to handle multiple routes with a single route handler, simplifying your routing logic and making it easier to manage routes with dynamic segments. They are particularly useful for handling routes related to authentication, user profiles, or any other routes that share a common prefix but have varying path segments.
Give NextAuth Access to a Catch-all
To give NextAuth access to a catch-all route in Next.js 13, you need to create a file inside the app/api/auth directory with the naming convention [...nextauth].ts or [...nextauth].js. This catch-all route will handle all authentication-related requests.
Here are the steps to set up the catch-all route:
- Create the file
app/api/auth/[...nextauth]/route.ts(orroute.jsif you prefer JavaScript). - Install the
next-authpackage by running the following command:
npm install next-auth- Inside the
route.tsfile, import theNextAuthfunction from thenext-authpackage and create a handler:
import NextAuth from "next-auth";
const handler = NextAuth({  // NextAuth configuration options go here});
export { handler as GET, handler as POST };
In this code snippet, we import the NextAuth function and create a handler by calling NextAuth with the desired configuration options. We then export the handler as both GET and POST handlers, as NextAuth requires access to both HTTP methods.
By setting up the catch-all route and exporting the handler, you’ve given NextAuth access to handle authentication-related requests in your Next.js 13 application.
Adding Authentication Providers
NextAuth supports three broad types of authentication providers:
- OAuth Providers: These providers allow users to sign in using their existing accounts from services like Google, Facebook, Twitter, GitHub, and more. This is commonly referred to as “social login.”
- Email Provider: This provider enables passwordless email login, where users receive a one-time password (OTP) or a magic link via email to sign in.
- Credentials Provider: This provider allows you to implement your own custom authentication strategy, such as authenticating users against a username/password database or integrating with an existing authentication system.
To add authentication providers, you need to import them and configure them within the NextAuth options object. Here’s an example of how you might add a Google OAuth provider:
import GoogleProvider from "next-auth/providers/google";
const handler = NextAuth({  providers: [    GoogleProvider({      clientId: process.env.GOOGLE_CLIENT_ID,      clientSecret: process.env.GOOGLE_CLIENT_SECRET,    }),    // Add other providers here  ],  // Other NextAuth configuration options});
export { handler as GET, handler as POST };
In this example, we import the GoogleProvider from next-auth/providers/google and configure it with the required clientId and clientSecret values, which should be stored as environment variables.
You can add multiple providers by including them in the providers array within the NextAuth options object.
Credentials provider
This lets you create your own authentication strategy
For example
- Email + Password
- Phone number
- Login with Metamask
Steps to follow
- Add a credentials provider
import NextAuth from "next-auth"import CredentialsProvider from 'next-auth/providers/credentials';
const handler = NextAuth({  providers: [    CredentialsProvider({        name: 'Credentials',        credentials: {          username: { label: 'email', type: 'text', placeholder: '' },          password: { label: 'password', type: 'password', placeholder: '' },        },        async authorize(credentials: any) {
            return {                id: "user1"            };        },      })  ],  secret: process.env.NEXTAUTH_SECRET})
export { handler as GET, handler as POST }- Add NEXTAUTH_URL to
.env
NEXTAUTH_URL=http://localhost:3000NEXTAUTH_SECRET=password_nextauth- Update
App.tsxto have a simple Appbar
"use client";import { signIn, signOut } from "next-auth/react"
export const Appbar = () => { return <div> <button onClick={() => signIn()}>Signin</button> <button onClick={() => signOut()}>Sign out</button> </div>}Click- Add
providers.tsx
'use client';import React from 'react';import { SessionProvider } from 'next-auth/react';
export const Providers = ({ children }: { children: React.ReactNode }) => { return ( <SessionProvider> {children} </SessionProvider> );};- Wrap
layoutwithProviders
import { Providers } from "./provider";
export default function RootLayout({ children,}: Readonly<{ children: React.ReactNode;}>) { return ( <html lang="en"> <body className={inter.className}> <Providers> {children} </Providers> </body> </html> );}- Get the user details in the top level
page.tsx(client component)
"use client"
import { useSession } from "next-auth/react";
export default function Home() { const session = useSession(); return ( <div> {JSON.stringify(session.data?.user)} </div> );}- Get the user details on the server (server component)
import { getServerSession } from "next-auth"
async function getUser() {  const session = await getServerSession();  return session;}
export default async function Home() {  const session = await getUser();
return ( <div> {JSON.stringify(session?.user?.name)} </div> );}- Get user in an api route (/api/user)
import { getServerSession } from "next-auth"import { NextResponse } from "next/server";
export async function GET() {    const session = await getServerSession();
return NextResponse.json({ name: session?.user?.name })}- Persist more data (user id) (Ref https://next-auth.js.org/getting-started/example#using-nextauthjs-callbacks) (Ref https://next-auth.js.org/configuration/callbacks)
callbacks: { jwt: async ({ user, token }: any) => { if (user) { token.uid = user.id; } return token; }, session: ({ session, token, user }: any) => { if (session.user) { session.user.id = token.uid } return session } },- Move auth config to
lib/auth.tshttps://github.com/nextauthjs/next-auth/issues/7658#issuecomment-1683225019
import CredentialsProvider from 'next-auth/providers/credentials';
export const NEXT_AUTH_CONFIG = {    providers: [      CredentialsProvider({          name: 'Credentials',          credentials: {            username: { label: 'email', type: 'text', placeholder: '' },            password: { label: 'password', type: 'password', placeholder: '' },          },          async authorize(credentials: any) {
              return {                  id: "user1",                  name: "asd",                  userId: "asd",                  email: "ramdomEmail"              };          },        }),    ],    secret: process.env.NEXTAUTH_SECRET,    callbacks: {        jwt: async ({ user, token }: any) => {        if (user) {            token.uid = user.id;        }        return token;        },      session: ({ session, token, user }: any) => {          if (session.user) {              session.user.id = token.uid          }          return session      }    },  }
Final code -
https://github.com/100xdevs-cohort-2/week-16-auth-2
Adding Providers
1] Adding Google Provider
To add the Google provider, follow these steps:
- Import the
GoogleProviderfromnext-auth/providers/google:
import GoogleProvider from "next-auth/providers/google";- Configure the
GoogleProviderwith your Google client ID and client secret:
export default NextAuth({ providers: [ GoogleProvider({ clientId: process.env.GOOGLE_CLIENT_ID, clientSecret: process.env.GOOGLE_CLIENT_SECRET, }), // Add other providers here ], // Other NextAuth configuration options});Make sure to replace process.env.GOOGLE_CLIENT_ID and process.env.GOOGLE_CLIENT_SECRET with your actual Google client ID and client secret, respectively.
- Set up the authorized redirect URIs in the Google Cloud Console:
- For production:
https://{YOUR_DOMAIN}/api/auth/callback/google - For development:
http://localhost:3000/api/auth/callback/google
- For production:
- (Optional) Customize the Google provider options:
GoogleProvider({ clientId: process.env.GOOGLE_CLIENT_ID, clientSecret: process.env.GOOGLE_CLIENT_SECRET, authorization: { params: { prompt: "consent", access_type: "offline", response_type: "code", }, },});The authorization option forces Google to re-issue a refresh token on every sign-in, ensuring you have access to the refresh token and access token for the Google account.
2] Adding GitHub Provider
To add the GitHub provider, follow these steps:
- Import the
GithubProviderfromnext-auth/providers/github:
import GithubProvider from "next-auth/providers/github";- Configure the
GithubProviderwith your GitHub client ID and client secret:
export default NextAuth({ providers: [ GithubProvider({ clientId: process.env.GITHUB_ID, clientSecret: process.env.GITHUB_SECRET, }), // Add other providers here ], // Other NextAuth configuration options});Make sure to replace process.env.GITHUB_ID and process.env.GITHUB_SECRET with your actual GitHub client ID and client secret, respectively.
- Set up the authorized callback URL in the GitHub App settings:
- For production:
https://{YOUR_DOMAIN}/api/auth/callback/github - For development:
http://localhost:3000/api/auth/callback/github
- For production:
- (Optional) When creating a GitHub App, make sure to set the “Email addresses” account permission to read-only in order to access private email addresses on GitHub.
After configuring the Google and GitHub providers, users will be able to sign in to your Next.js application using their Google or GitHub accounts.
Custom Signup Page
Adding Pages to NextAuth
NextAuth.js allows you to customize the appearance and behavior of the authentication pages by providing your own React components. This can be achieved by creating pages in the app directory of your Next.js application.
- Create a new file
app/signin/page.tsx(orpage.jsxfor JavaScript):
"use client";import { signIn } from "next-auth/react";import { useRouter } from "next/navigation";
export default function SignInPage() {  const router = useRouter();
  return (    <div>      <button        onClick={async () => {          await signIn("google");        }}      >        Login with Google      </button>
      <br />      <button        onClick={async () => {          await signIn("github");        }}      >        Login with GitHub      </button>      <br />      <button        onClick={async () => {          const res = await signIn("credentials", {            username: "",            password: "",            redirect: false,          });          console.log(res);          router.push("/");        }}      >        Login with Email      </button>    </div>  );}
In this example, we create a SignInPage component that renders buttons for signing in with Google, GitHub, and email/password credentials.
- Import and use the
signInfunction fromnext-auth/reactto initiate the sign-in process for the desired provider. - For the email/password sign-in, we use the
signIn("credentials", { ... })method and pass the necessary credentials (username and password) as an object. We also setredirect: falseto prevent automatic redirection after sign-in. - After a successful sign-in, you can use the
useRouterhook fromnext/navigationto programmatically navigate to a different page (e.g.,router.push("/")to navigate to the home page).
Customizing the Sign-in Component
You can further customize the SignInPage component by adding your desired UI elements, styling, and additional functionality. For example, you can create a reusable SignIn component and import it into the SignInPage:
"use client";import { signIn } from "next-auth/react";import { useRouter } from "next/navigation";
export const SignIn = () => {  const router = useRouter();
return ( <div> {/* Sign-in buttons and form */} </div> );};"use client";import { SignIn } from "../components/SignIn";
export default function SignInPage() { return <SignIn />;}By separating the sign-in logic into a reusable component, you can easily customize and reuse it across different pages or components in your application.
Final Code
You can find the final code for the custom sign-in page in the provided GitHub repository: https://github.com/100xdevs-cohort-2/week-16-live-4