Week 19 CSR, SSR and SSG
In this lecture, Harkirat covers the three main rendering techniques in modern web development - client-side rendering (CSR), server-side rendering (SSR), and static site generation (SSG) - highlighting their respective advantages, trade-offs, and use cases for building performant and SEO-friendly web applications.
Client Side Rendering
Client-side rendering (CSR) is a modern web development technique where the rendering of a webpage is performed in the browser using JavaScript. Instead of the server sending a fully rendered HTML page to the client, the server sends an initial HTML file with minimal content, and the client-side JavaScript is responsible for rendering the actual content and updating the user interface dynamically.
Good Example of CSR: React
React is a popular JavaScript library that is widely used for building user interfaces and implementing client-side rendering. React allows developers to create reusable UI components and efficiently update and render them when the application’s state changes.
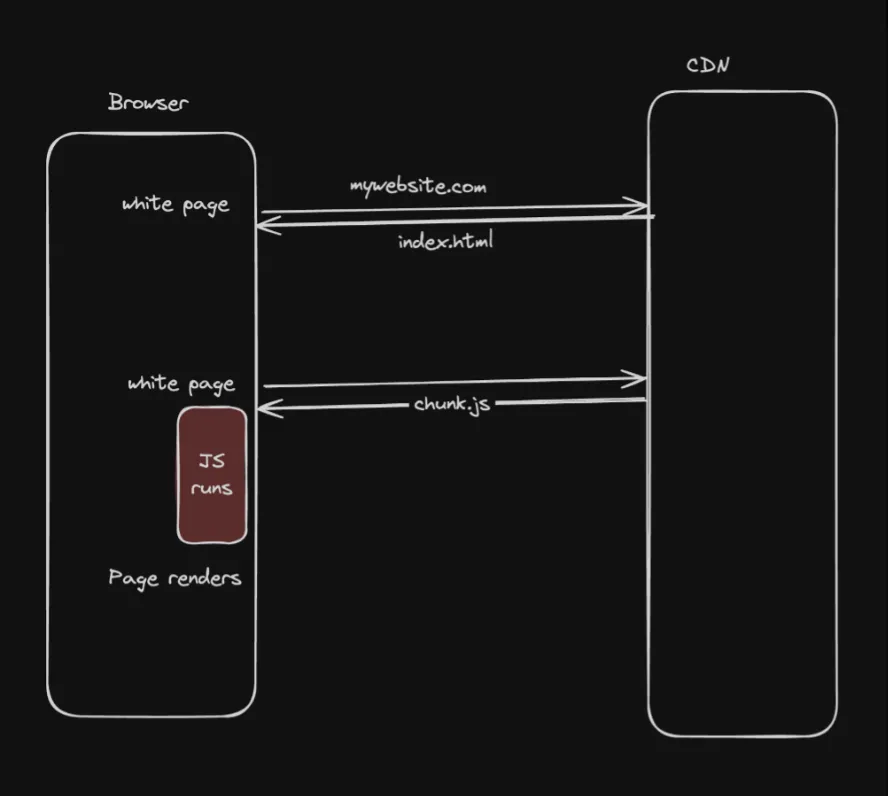
- Browser: This represents the user’s web browser, which is responsible for rendering the web page.
- White Page: This represents the initial HTML page that the browser receives from the website. It typically contains minimal content or placeholders.
- index.html: This is the main HTML file that the browser loads, which contains the structure and placeholders for the web page content.
- chunk.js: This represents the JavaScript file(s) that the browser downloads and executes to populate the web page with dynamic content. In a CSR scenario, the JavaScript code is responsible for rendering the content on the client-side, rather than the server.
- JS runs: This indicates that the JavaScript code (chunk.js) is executed in the browser, which triggers the rendering of the actual content on the page.
- Page renders: After the JavaScript code runs, the content is rendered on the page, updating the user interface dynamically.
- CDN: The Content Delivery Network (CDN) is a system that caches and serves the static assets (such as the JavaScript file) to the browser, improving the performance and responsiveness of the web application.
React Project in Action
To demonstrate client-side rendering with React, you can follow these steps:
- Initialize a React project: Use a tool like Vite or Create React App to initialize a new React project.
npm create vite@latest- Install dependencies: Install the required dependencies for the project.
npm install- Build the project: Build the project for production.
npm run build- Serve the project: Serve the built project using a static file server.
cd dist/serve- Open the network tab: Open the browser’s network tab and navigate to the served project. Notice that the initial HTML file doesn’t have any content, as the JavaScript code is responsible for rendering the content on the page.
- JavaScript renders the content: The JavaScript code runs and populates the page with the rendered content, updating the user interface dynamically.
Advantages and Downsides
React (and other CSR frameworks) make a developer’s life easier by allowing them to write reusable components, and the JavaScript code handles rendering them to the DOM.
However, client-side rendering also has some downsides:
- Not SEO optimized: Search engines may have difficulty indexing the content of a CSR application, as they typically crawl the initial HTML file, which may not contain the actual content.
- Flash of unstyled content: Users may experience a brief moment where the page appears unstyled or blank before the JavaScript code loads and renders the content.
- Waterfalling problem: If the JavaScript code is large or takes a long time to download, the page may appear blank or unresponsive until the code is fully loaded and executed.
To mitigate these downsides, developers often employ techniques like server-side rendering (SSR) or static site generation (SSG), which can improve SEO, performance, and the initial rendering experience for users.
Server Side Rendering
Server-side rendering (SSR) is a technique where the rendering process (converting JavaScript components to HTML) happens on the server, rather than on the client-side (browser). This means that the server generates the fully rendered HTML page and sends it to the client, instead of sending an empty HTML file and relying on the client-side JavaScript to render the content.
Why SSR?
There are several benefits to using server-side rendering:
- SEO Optimizations: SSR can significantly improve search engine optimization (SEO) by providing search engines with fully rendered HTML pages. This makes it easier for search engines to crawl and index the content, as they can see the complete rendered page instead of just an empty HTML file.
- Eliminates the “Waterfalling” Problem: In client-side rendering, the browser has to download and execute the JavaScript code before rendering the content, which can lead to a delay or “waterfalling” effect. With SSR, the user receives the fully rendered page immediately, improving the initial load time and user experience.
- No White Flash: In client-side rendering, users often experience a brief white flash or blank screen before the content is rendered. SSR eliminates this issue by serving the fully rendered page from the start.
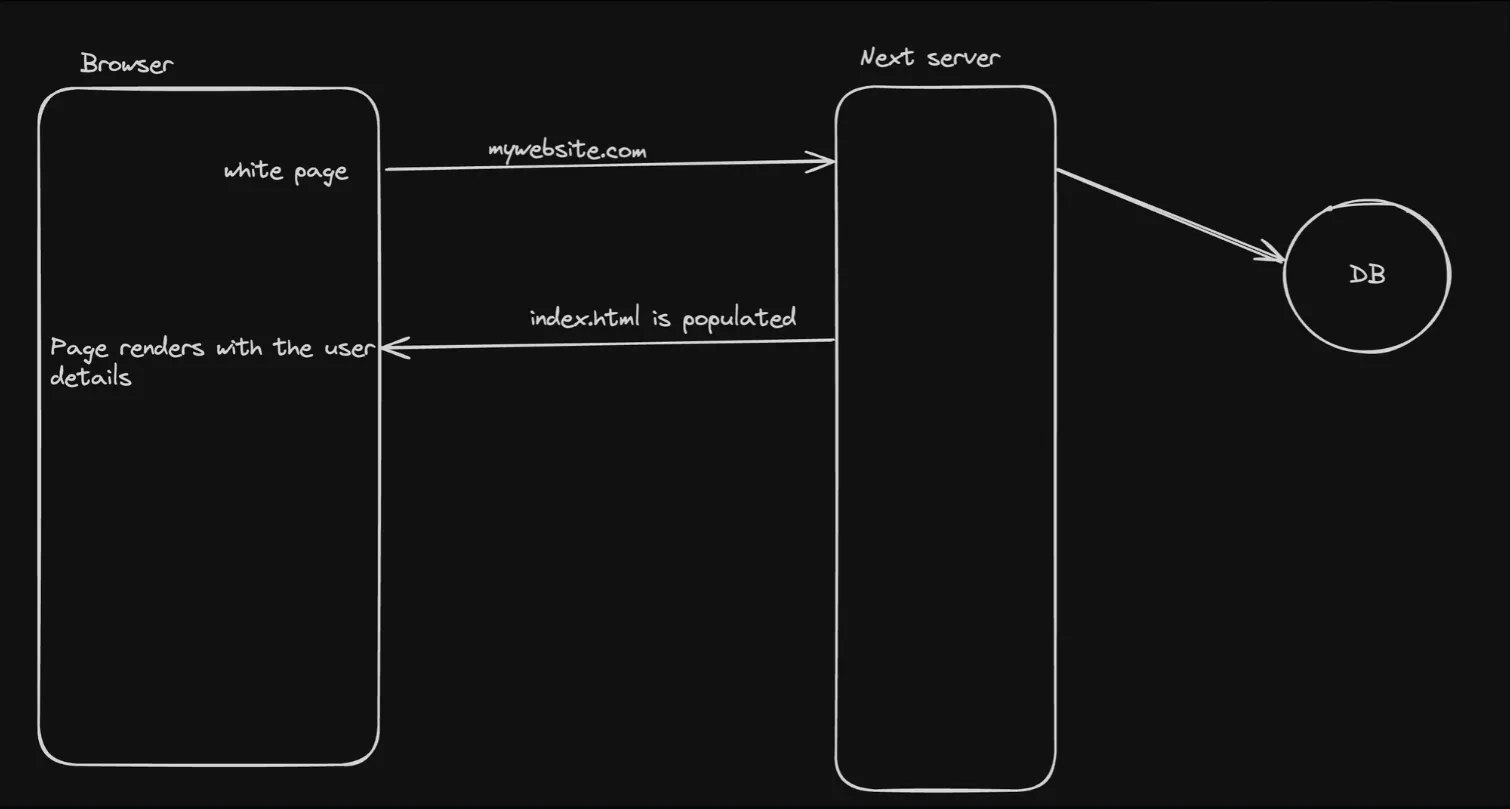
- Browser: This represents the user’s web browser, which sends a request to the website.
- White Page: Initially, the browser displays a blank or “white” page while waiting for the content to be loaded.
- my-website.com: This is the domain name of the website being accessed.
- Next Server: This represents the Next.js server, which is responsible for rendering the content and generating the HTML page.
- index.html is populated: On the server-side, the
index.htmlfile is populated with the rendered content before being sent to the browser. - DB: This represents a database or data source that the server interacts with to retrieve the necessary information for rendering the page.
- Page renders with the user details: Once the server sends the fully rendered HTML page to the browser, the page is displayed with the user’s details or content.
Try Creating a Next.js App
To experience server-side rendering in action, you can follow these steps:
- Create a Next.js App: Use the
create-next-appcommand to create a new Next.js application.
npx create-next-app- Build the Project: Build the project for production.
npm run build- Start the Next.js Server: Start the Next.js server.
npm run start- Inspect the Initial HTML Page: Open the website in your browser and inspect the initial HTML page. You’ll notice that the HTML file is populated with the rendered content, unlike client-side rendering where the initial HTML is empty.
Downsides of SSR
While server-side rendering offers several benefits, it also has some downsides:
- Expensive: Since every request needs to be rendered on the server, SSR can be more resource-intensive and expensive compared to client-side rendering, especially for high-traffic websites.
- Harder to Scale: Scaling server-side rendering applications can be more challenging, as you can’t easily cache the rendered pages on Content Delivery Networks (CDNs) like you can with static assets.
To mitigate these downsides, developers often employ techniques like static site generation (SSG) or a hybrid approach that combines SSR and client-side rendering, depending on the specific requirements of their application.
Static Site Generation
Static Site Generation (SSG) is a technique in Next.js where the HTML pages of a website are generated at build time, rather than being generated dynamically on the server during each user request. This means that the HTML content is pre-rendered and can be cached by a Content Delivery Network (CDN), resulting in faster page load times for users.
Why Use Static Site Generation?
If you use static site generation, you can defer the expensive operation of rendering a page to the build time, so it only happens once. This provides several benefits:
- Improved Performance: Since the HTML is pre-rendered and cached, subsequent requests can be served directly from the CDN, resulting in faster page load times and reduced server load.
- Scalability: With static site generation, you can easily scale your application by leveraging the caching capabilities of CDNs, as the pre-rendered HTML pages can be served from multiple edge locations.
- Reduced Server Costs: By offloading the rendering process to the build time, you can reduce the computational resources required on the server, potentially lowering your hosting costs.
How to Implement Static Site Generation
Let’s consider an example where you have an endpoint that provides a list of global todos for an application. Since these todos are the same for all users, this page can be statically generated.
- Create a Fresh Next.js Project:
npx create-next-app static-site-generation- Create
todos/page.tsx:
export default async function Blog() {    const res = await fetch('<https://sum-server.100xdevs.com/todos>');
    const data = await res.json();    const todos = data.todos;
    console.log("todos", todos);    return <div>        {todos.map((todo: any) => <div key={todo.id}>            {todo.title}            {todo.description}        </div>)}    </div>}
In this example, we’re fetching the list of todos from the provided endpoint (https://sum-server.100xdevs.com/todos) during the server-side rendering process. The fetched data is then used to render the page content.
Updating and Revalidating the Cache
Next.js provides mechanisms to update and revalidate the cached pages, ensuring that your users always have access to the latest content.
- Clear Cache Every 10 Seconds:
const res = await fetch('<https://sum-server.100xdevs.com/todos>', { next: { revalidate: 10 }});By adding the revalidate option to the fetch request, you can instruct Next.js to revalidate the cached page every 10 seconds (or any other specified interval).\
- Clear Cache on a Next.js Action:
import { revalidateTag } from 'next/cache';
const res = await fetch('<https://sum-server.100xdevs.com/todos>', { next: { tags: ['todos'] } });'use server';
import { revalidateTag } from 'next/cache';
export default async function revalidate() { revalidateTag('todos');}In this example, we’re using the revalidateTag function from the next/cache module to invalidate the cache for pages tagged with the ‘todos’ tag. This can be useful when you need to manually trigger a cache revalidation, such as after updating the todo list.