Week 19.2 Queues, Pub Sub and Redis
In this lecture, Harkirat introduces the concepts of queues, publish-subscribe (pub/sub) systems, and Redis in the context of a LeetCode-like architecture. He explains how these technologies can be leveraged to build a scalable and efficient system for handling coding challenges and user submissions. Harkirat then provides practical implementations of these concepts using Node.js, demonstrating how they can be integrated into a real-world application to facilitate asynchronous processing, real-time communication, and caching.
Queues, Pub/Subs, and Redis
Queues, publish-subscribe (pub/sub) systems, and Redis are powerful tools used in modern backend architectures to handle asynchronous tasks, real-time communication, and data caching/storage, respectively. In the context of a platform like LeetCode, these technologies play a crucial role in ensuring scalability, reliability, and efficient processing of user submissions.
Vulnerabilities of Running User Code on the Primary Backend
Running untrusted user code directly on the primary backend server can pose significant security risks. Some potential vulnerabilities include:
- Infinite Loops: If a user submits a solution with an infinite loop, such as
while(1), it can consume excessive system resources, leading to performance degradation or even system crashes. - System Commands: Malicious users could attempt to execute system commands like
system("ls")or other harmful operations, potentially compromising the server’s integrity or exposing sensitive data. - Resource Exhaustion: Poorly written or inefficient code can consume excessive memory, CPU, or other system resources, impacting the overall performance and stability of the backend server.
- Denial of Service (DoS): Intentional or unintentional submission of resource-intensive tasks could lead to a Denial of Service (DoS) attack, rendering the backend server unresponsive or unavailable.
To mitigate these risks, it is crucial to isolate and delegate the execution of user code to separate worker processes or containers, ensuring that the primary backend server remains secure and unaffected by potential vulnerabilities.
Part 1: Queues
Queues are a fundamental concept in distributed systems, allowing for asynchronous processing of tasks or messages. In the context of a LeetCode-like platform, queues can be used to decouple the submission of user code from its execution, providing several benefits:
- Load Balancing: User submissions can be added to a queue and processed by available workers, distributing the workload across multiple nodes and preventing overload on the primary backend server.
- Scalability: As the number of user submissions increases, additional worker nodes can be dynamically added to process tasks from the queue, enabling horizontal scaling of the system.
- Fault Tolerance: If a worker node fails or becomes unavailable, tasks can be retried or processed by other available workers, ensuring reliable execution of user submissions.
- Asynchronous Processing: User submissions can be added to the queue and acknowledged immediately, allowing the primary backend server to remain responsive while the actual execution happens asynchronously on worker nodes.
The queue implementation typically involves a message broker or queue service, such as RabbitMQ, Apache Kafka, or Amazon SQS. These services provide reliable message delivery, persistence, and advanced features like message prioritization and dead-letter queues.
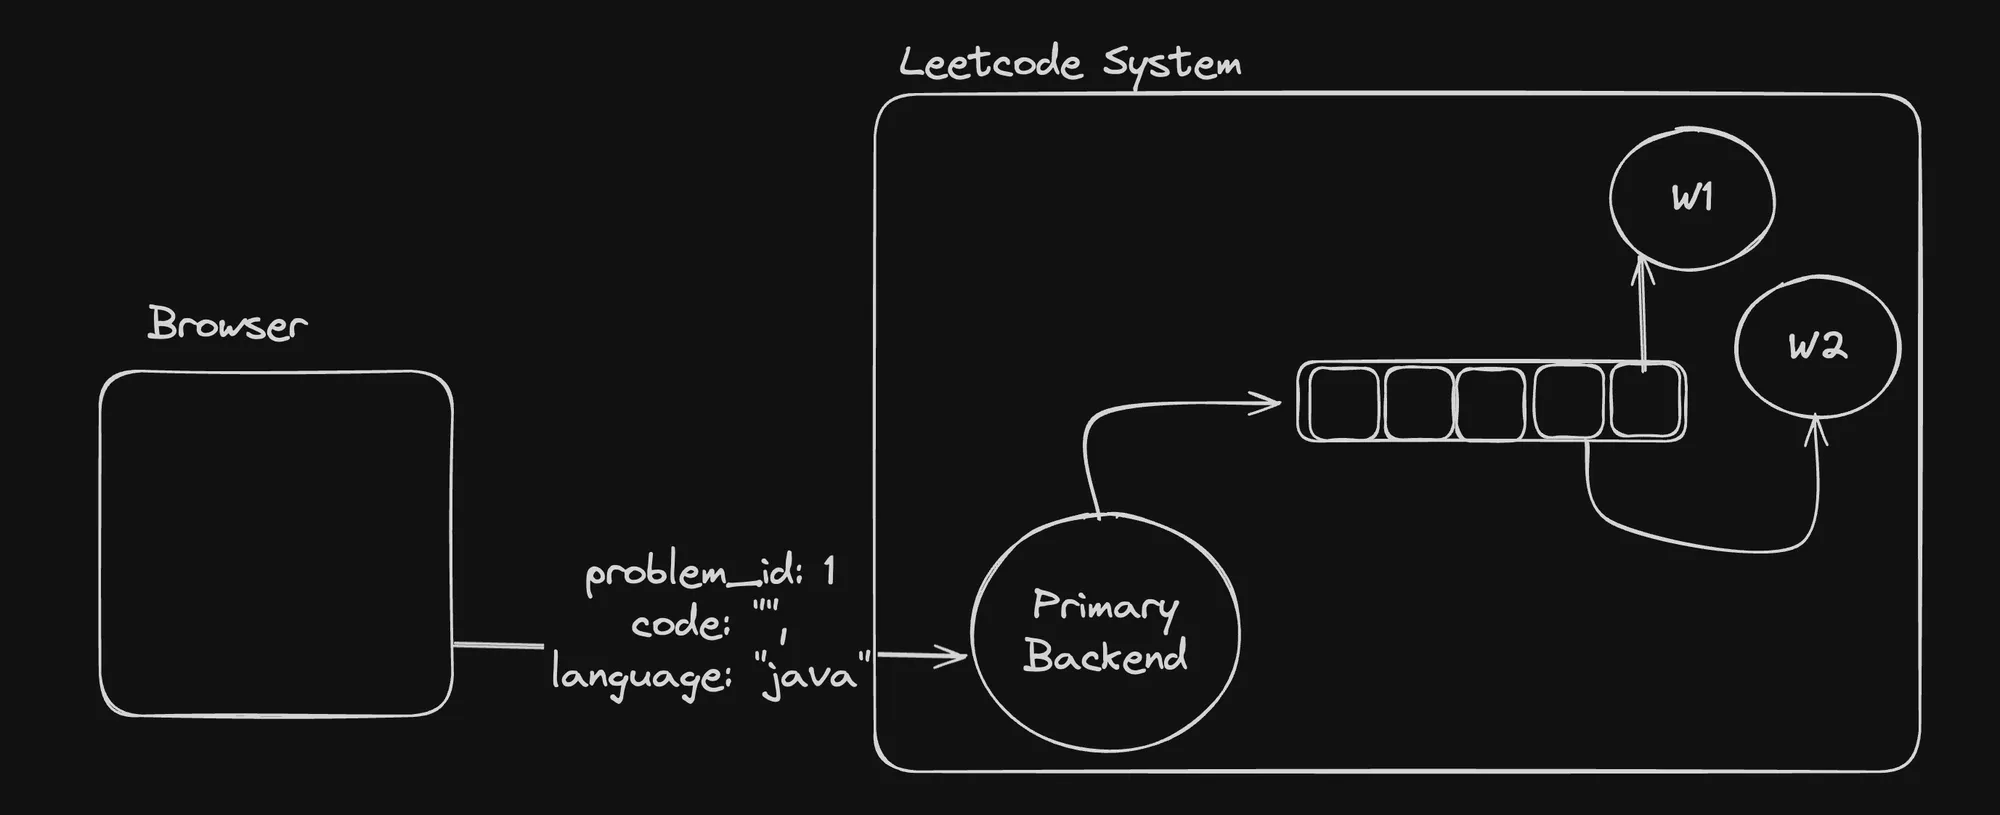
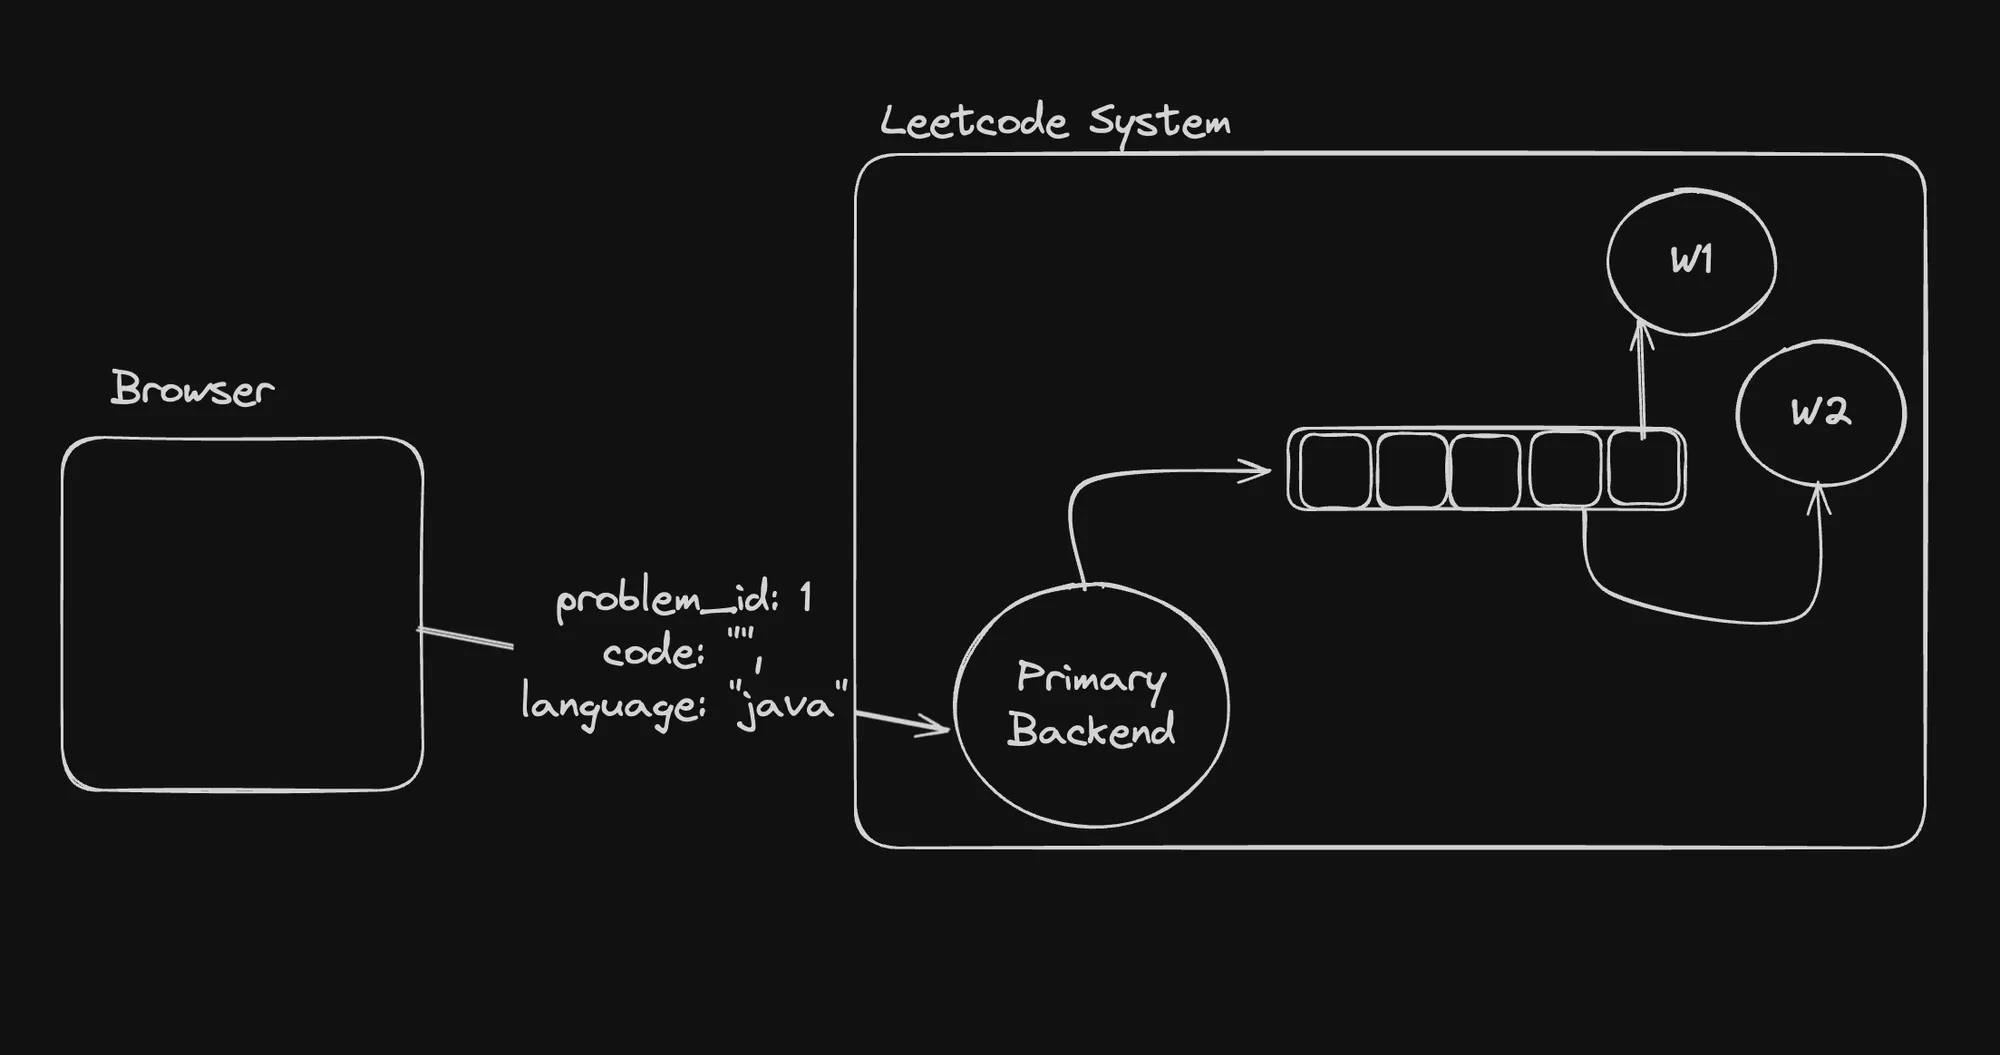
In the provided architecture diagram, the “Primary Backend” component receives user submissions (problem_id: 1, code: "java") and adds them to a queue. Worker nodes (W1, W2) consume tasks from the queue, execute the user code in isolated environments, and report the results back to the primary backend or other components for further processing or storage.
Part 2: Pub/Subs
Publish-subscribe (pub/sub) systems are another powerful tool for building scalable and decoupled architectures. In the context of a LeetCode-like platform, pub/sub can be used for real-time communication and event-driven architectures, enabling features like live coding sessions, collaborative coding, or real-time updates on submission statuses.
The pub/sub model involves publishers (producers) that generate events or messages, and subscribers (consumers) that receive and process these events based on their subscriptions. This decoupling between publishers and subscribers allows for greater flexibility, scalability, and loose coupling between components.
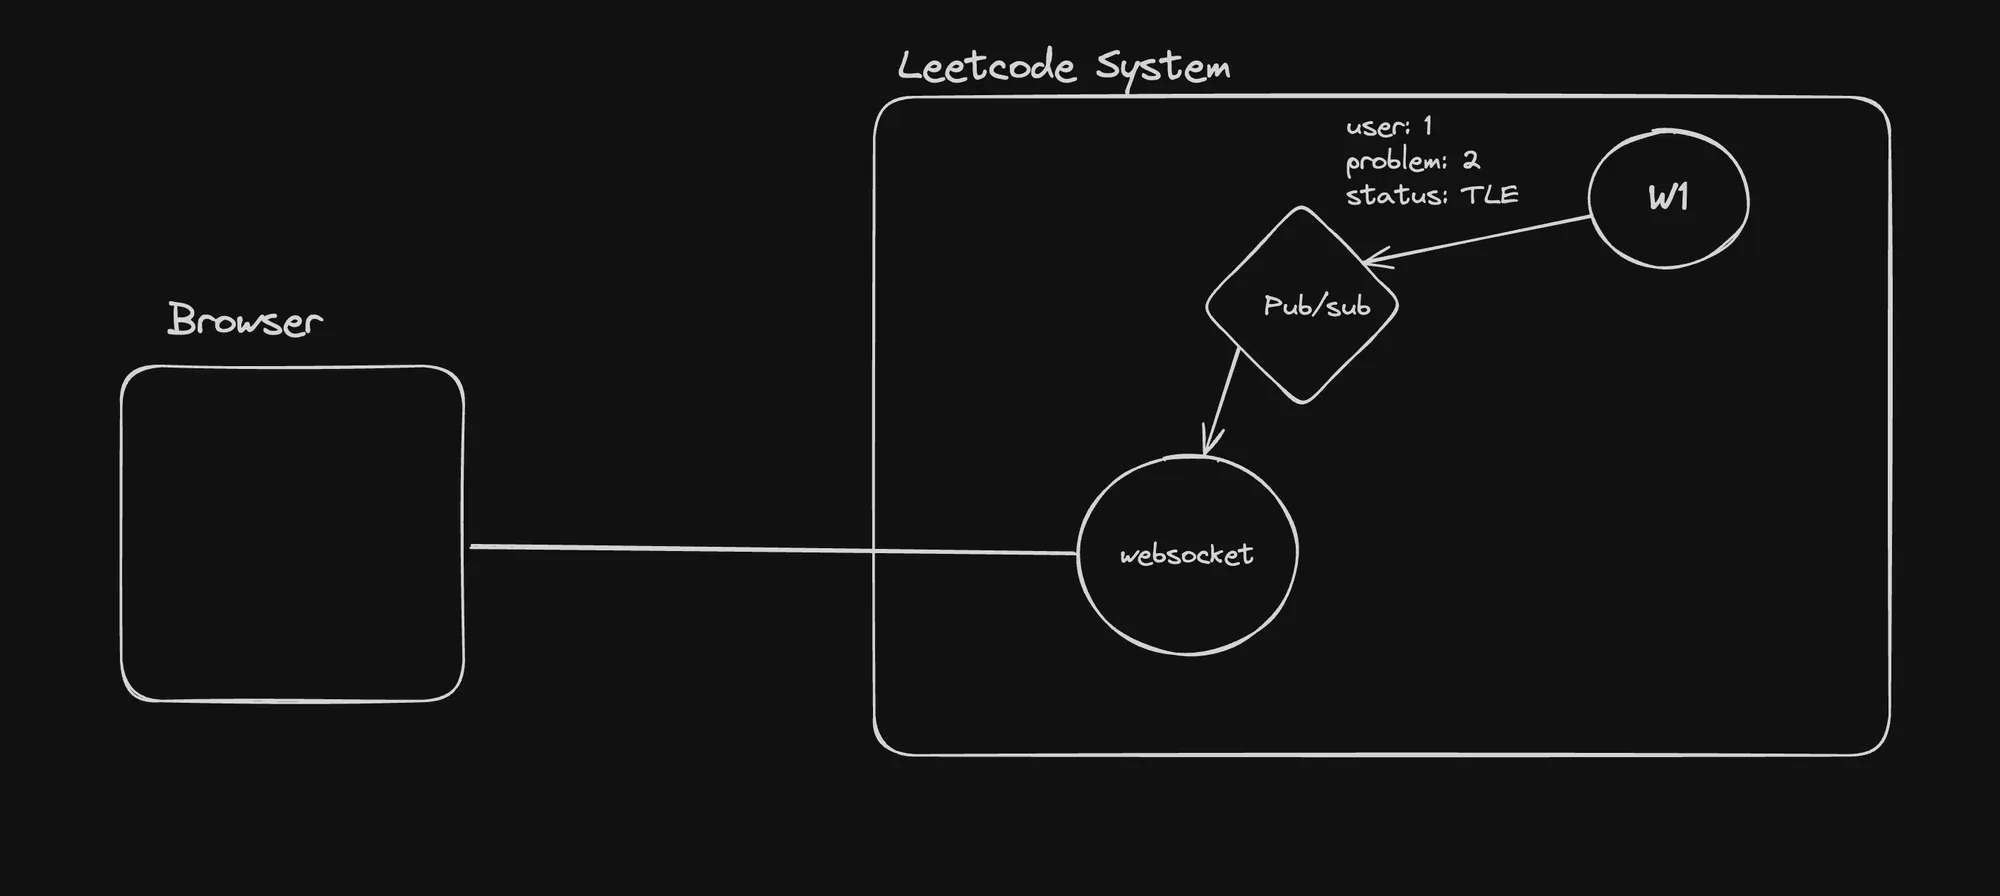
In the provided architecture diagram, the “pub/sub” component likely handles the publication and subscription of events related to user submissions, such as the “user 1 problem: 2 status: TLE” event. The “websocket” component facilitates real-time communication between the browser (client) and the backend system, enabling features like live coding sessions or real-time updates on submission statuses.
Understanding Redis
Redis is an open-source, in-memory data structure store that can be used as a database, cache, and message broker. In the context of a LeetCode-like platform, Redis can serve multiple purposes:
- Caching: Redis can be used to cache frequently accessed data, such as problem descriptions, test cases, or user submissions, improving response times and reducing the load on the primary database.
- Pub/Sub: Redis provides built-in pub/sub capabilities, allowing for efficient real-time communication between components within the system.
- Queuing: Redis can be used as a lightweight message queue, enabling asynchronous processing of tasks or user submissions.
- Leaderboards and Ranking: Redis’ sorted sets and other data structures can be leveraged to maintain real-time leaderboards and rankings based on user performance or submission metrics.
- Session Management: Redis can store and manage user sessions, enabling seamless user experiences across multiple servers or load-balanced instances.
In the final architecture diagram, Redis could be integrated as a caching layer, a pub/sub messaging system, or a lightweight queue for handling user submissions, depending on the specific requirements and design choices of the platform.
Final Architecture
The final architecture diagram combines the concepts of queues, pub/sub, and Redis to create a scalable and robust system for handling user submissions and real-time communication.
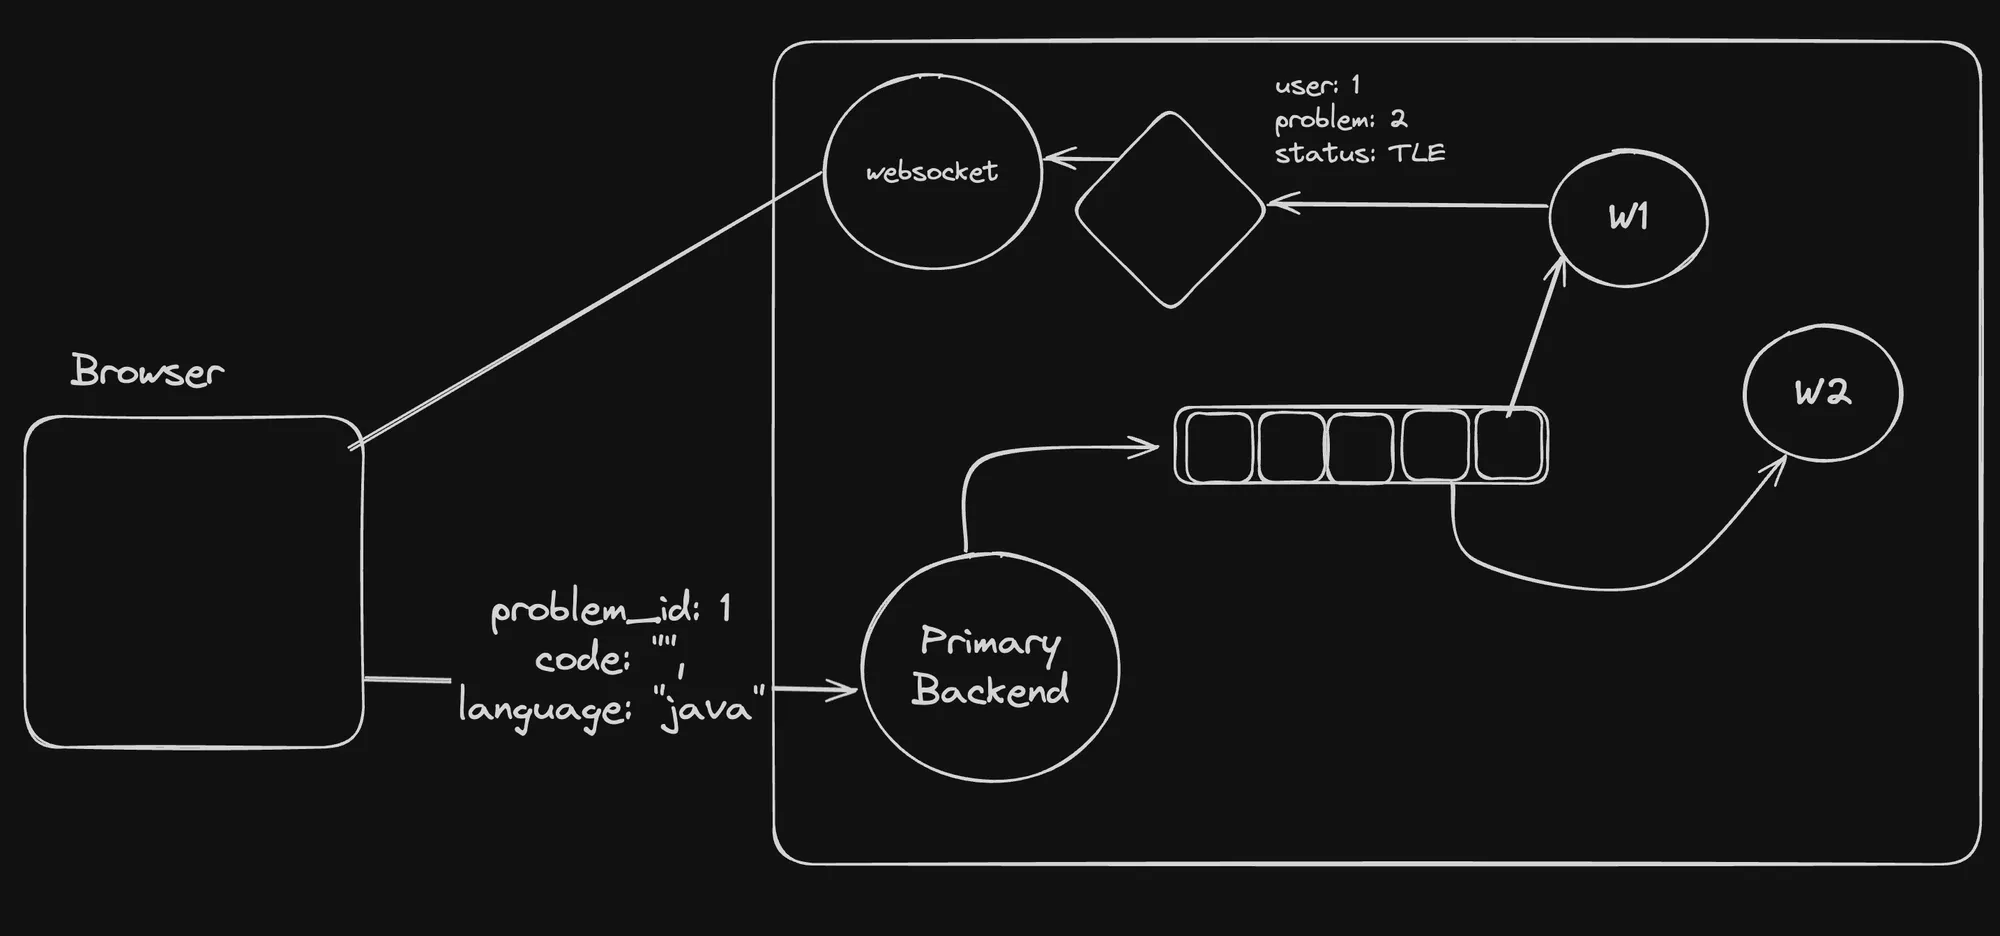
In this architecture, the “Browser” component represents the user interface where users submit their code solutions. The submissions are sent to the “Primary Backend” component, which acts as a gateway and load balancer.
Instead of executing the user code directly on the primary backend, the submissions are added to a queue (e.g., RabbitMQ, Apache Kafka) or stored in Redis. Worker nodes (W1, W2) consume tasks from the queue or retrieve submissions from Redis, executing the user code in isolated environments or containers.
The “pub/sub” component, potentially powered by Redis or a dedicated message broker like Apache Kafka, handles real-time communication and event distribution. Events related to user submissions, such as status updates (e.g., “user 1 problem: 2 status: TLE”), can be published and subscribed to by various components, including the “websocket” component responsible for real-time updates in the browser.
This architecture provides several benefits:
- Scalability: Additional worker nodes can be added to process more user submissions, and the pub/sub system can scale horizontally to handle increased event traffic.
- Isolation: User code execution is isolated from the primary backend, mitigating potential vulnerabilities and ensuring the stability of the core system.
- Real-time Communication: The pub/sub and websocket components enable real-time communication and updates, enhancing the user experience and enabling collaborative coding features.
- Caching and Performance: Redis can be used as a caching layer, improving response times and reducing the load on the primary database or backend components.
- Fault Tolerance: If a worker node fails, tasks can be retried or processed by other available workers, ensuring reliable execution of user submissions.
By leveraging queues, pub/sub systems, and Redis, this architecture provides a scalable, secure, and efficient solution for handling user submissions and real-time communication in a LeetCode-like platform.
Redis Deep Dive
Redis is an open-source, in-memory data structure store that can be used as a database, cache, and message broker. One of its key features is the ability to keep all data in memory, allowing for high performance and low latency access to data.
In-Memory Data Structure Store
Redis is very similar to a traditional database, but it stores all data in memory, which enables fast read and write operations. However, this does not mean that Redis lacks persistence mechanisms.
Persistence Options
Redis provides two main persistence options to ensure data durability:
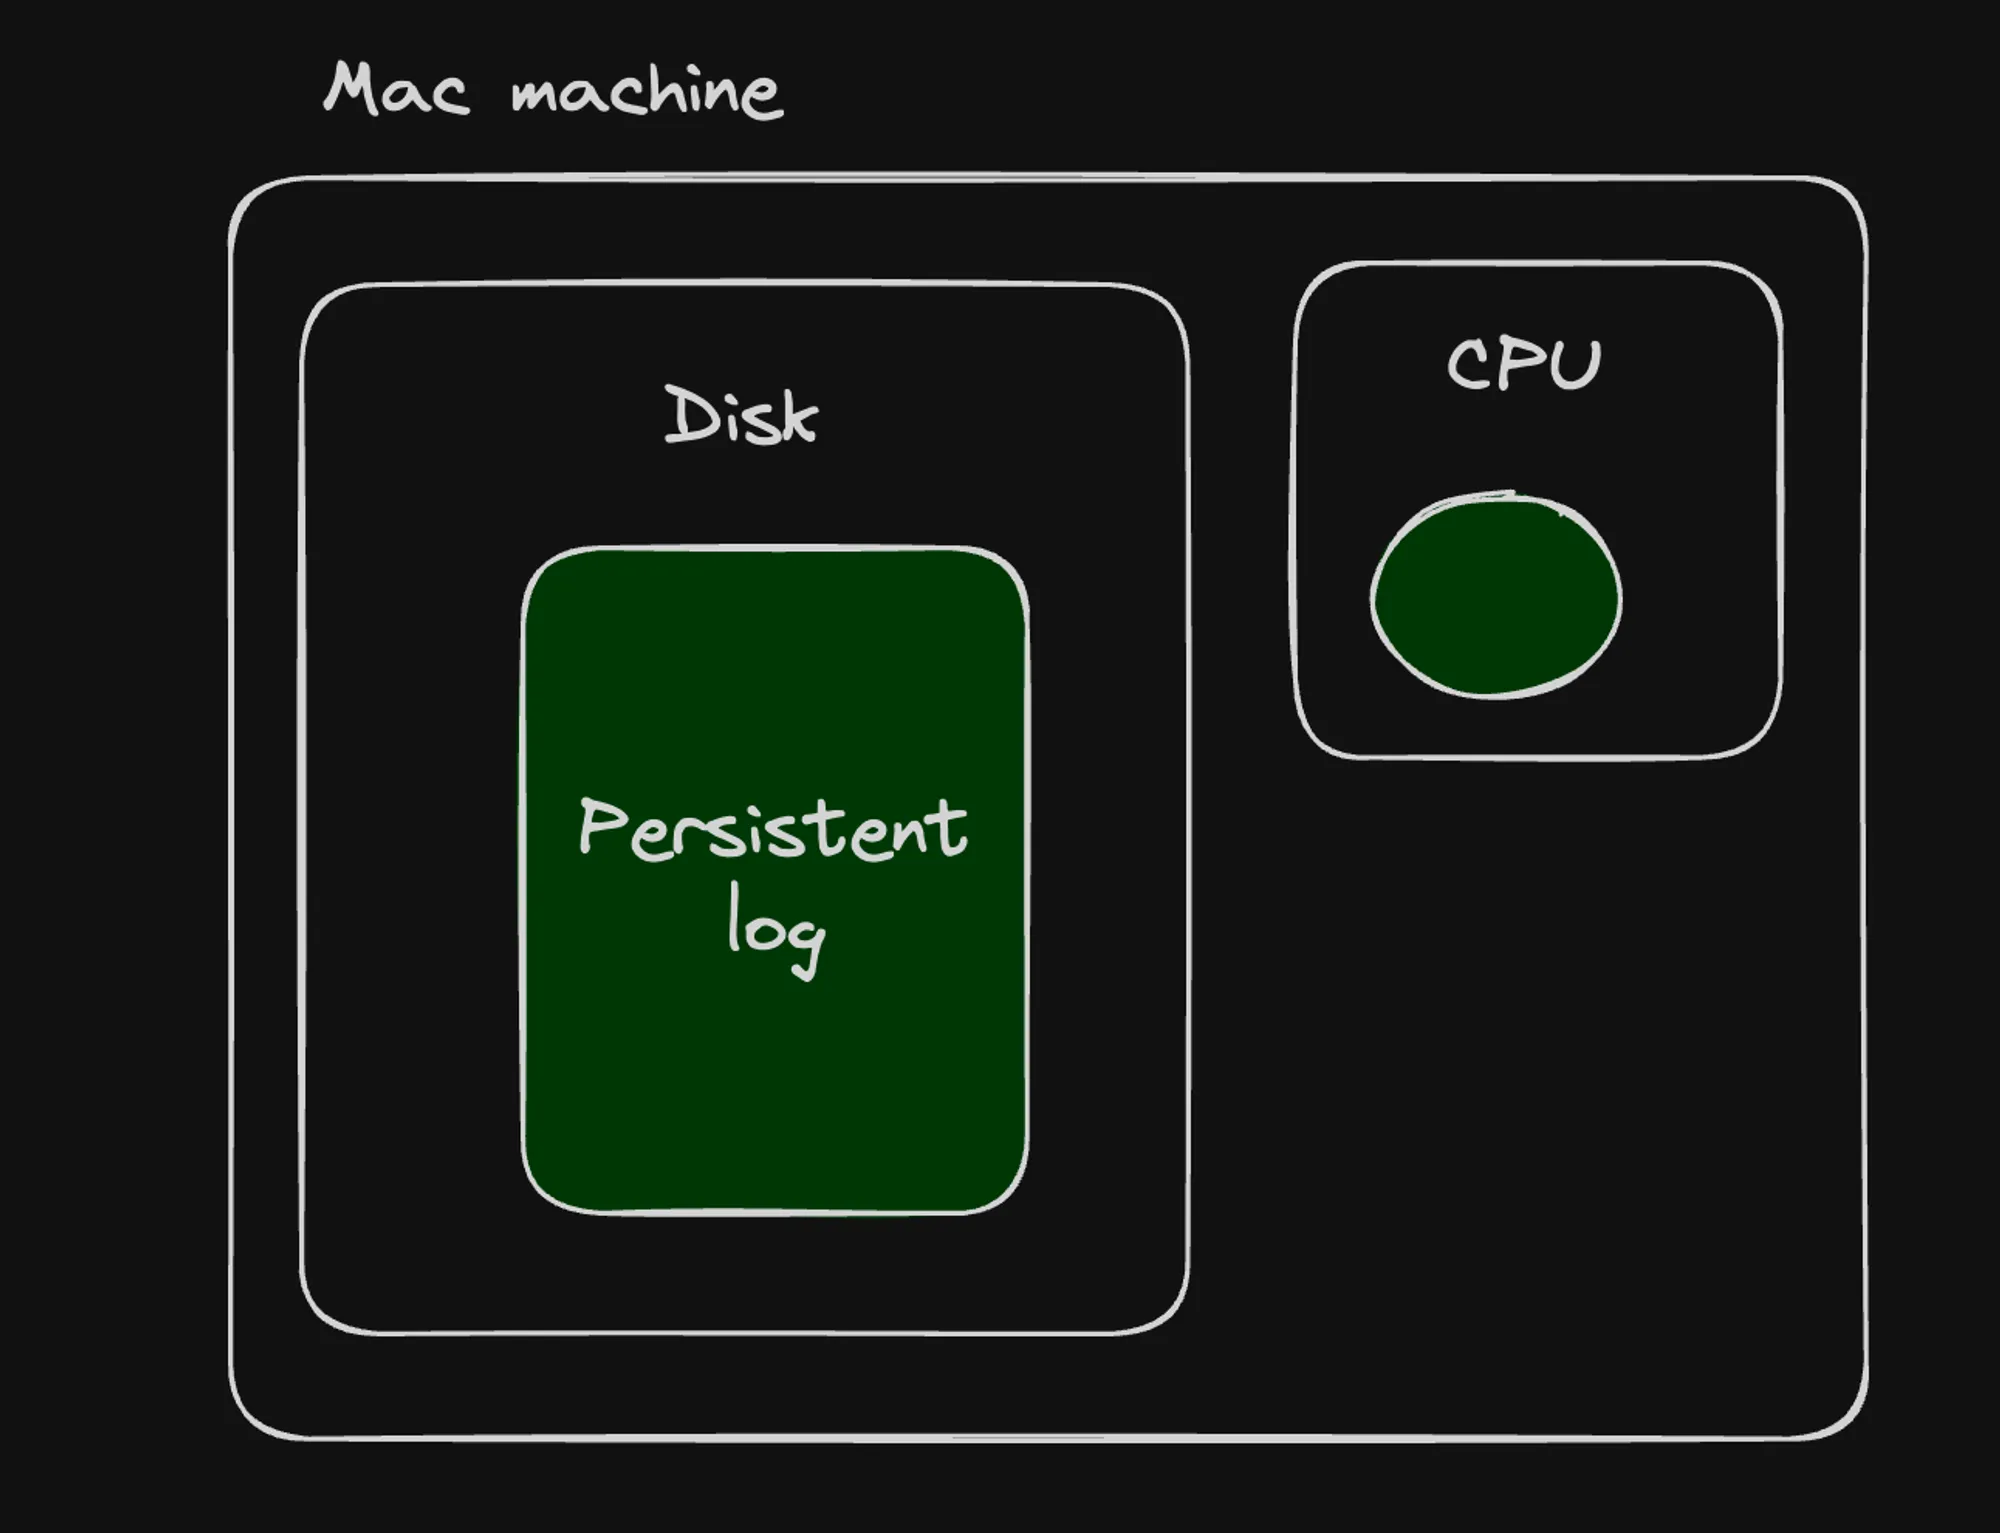
1] RDB (Redis Database File)
The RDB persistence performs point-in-time snapshots of your dataset at specified intervals. It creates a compact single-file representation of the entire Redis dataset. The snapshotting process can be configured to run at specified intervals, such as:
save 900 1 # Save the dataset every 900 seconds if at least 1 key changedsave 300 10 # Save the dataset every 300 seconds if at least 10 keys changedsave 60 10000 # Save the dataset every 60 seconds if at least 10000 keys changedThis allows you to balance the trade-off between data safety and performance based on your application’s requirements.[1][3]
2] AOF (Append Only File)
The AOF persistence logs every write operation received by the server, appending each operation to a file. This file can then be replayed on startup to reconstruct the dataset. The AOF persistence ensures that Redis can recover from a crash or restart without losing any data, providing a higher level of durability compared to RDB.[1][3]
Both RDB and AOF have their advantages and trade-offs, and Redis allows you to use either one or a combination of both, depending on your specific needs for data safety, performance, and storage requirements.
Starting Redis Locally
To start using Redis as a database locally, you can leverage Docker to quickly set up a Redis instance. Here are the steps:
- Start Redis Container:
docker run --name my-redis -d -p 6379:6379 redisThis command starts a new Docker container named “my-redis” in detached mode (-d) and maps the container’s Redis port 6379 to the host’s port 6379 (-p 6379:6379). The “redis” image is used to create the container.
- Connect to the Container:
docker exec -it my-redis /bin/bashThis command allows you to connect to the running Redis container named “my-redis” and open an interactive bash shell inside the container using the docker exec command.
- Connect to the Redis CLI:
redis-cliOnce inside the container, you can start the Redis command-line interface (CLI) by running the redis-cli command. This will connect you to the Redis server running inside the container, allowing you to interact with it and execute Redis commands.
Redis as a DB
Redis can be used as a database for storing and retrieving key-value pairs. Here are some common commands for working with data in Redis:
SET/GET/DEL
- Setting Data:
SET mykey "Hello"This command sets the value “Hello” to the key “mykey”.
- Getting Data:
GET mykeyThis command retrieves the value associated with the key “mykey”.
- Deleting Data:
DEL mykeyThis command deletes the key-value pair associated with the key “mykey”.
HSET/HGET/HDEL (Hashes)
Redis also supports more complex data structures like hashes, which can store multiple fields and values under a single key. Here’s an example:
HSET user:100 name "John Doe" email "user@example.com" age "30"HGET user:100 nameHGET user:100 emailIn this example, HSET is used to set multiple fields (name, email, age) and their respective values under the key “user:100”. HGET is then used to retrieve the values of specific fields.
It’s important to note that while Redis can be used as a database, it should not be used as your primary database due to its in-memory nature and potential data loss in case of system failures or restarts. Redis is often used as a cache or for storing transient data.
Redis as a Queue
Redis can also be used as a message queue or broker, allowing you to push items to a queue and pop them off for processing. This is particularly useful for asynchronous processing of tasks or events, such as handling LeetCode submissions.
Pushing to a Queue
LPUSH problems 1LPUSH problems 2The LPUSH command pushes values (in this case, problem IDs) to the left side of the “problems” list, effectively adding them to the queue.
Popping from a Queue
RPOP problemsRPOP problemsThe RPOP command pops (removes and returns) values from the right side of the “problems” list, retrieving items from the queue for processing.
Blocked Pop
BRPOP problems 0BRPOP problems 30The BRPOP command is a blocking operation that waits for new elements to be available in the queue. The last argument represents the timeout (in seconds) before the blocking operation should be stopped. In the examples above, 0 means no timeout (wait indefinitely), and 30 means wait for up to 30 seconds.
This blocking behavior is useful when you want to process items from the queue as soon as they become available, without constantly polling for new items.
The provided architecture diagram illustrates how Redis can be used as a queue in the context of a LeetCode-like system. The “Primary Backend” component receives user submissions (problem_id: 1, code: "java") and adds them to a Redis queue. Worker nodes (W1, W2) consume tasks from the queue, execute the user code, and report the results back to other components for further processing or storage.
Talking to redis via Node.js
Now, let us look at how we can interact with Redis from a Node.js application using a client library. The provided code snippets demonstrate a simple Express server and a worker service that communicate with Redis to handle problem submissions, similar to the LeetCode platform.
Talking to Redis via Node.js
There are various client libraries available for interacting with Redis from Node.js applications. One popular library is the redis package, which can be installed from npm:
npm install redisThe provided code sets up a simple Node.js Express server and a worker service to handle problem submissions and process them asynchronously using Redis as a message queue.
Express Server
The Express server code is located in the express-server/index.ts file. Here’s a breakdown of the code:
import express from "express";import { createClient } from "redis";
const app = express();app.use(express.json());
const client = createClient();client.on('error', (err) => console.log('Redis Client Error', err));
app.post("/submit", async (req, res) => {    const problemId = req.body.problemId;    const code = req.body.code;    const language = req.body.language;
    try {        await client.lPush("problems", JSON.stringify({ code, language, problemId }));        res.status(200).send("Submission received and stored.");    } catch (error) {        console.error("Redis error:", error);        res.status(500).send("Failed to store submission.");    }});
async function startServer() {    try {        await client.connect();        console.log("Connected to Redis");
        app.listen(3000, () => {            console.log("Server is running on port 3000");        });    } catch (error) {        console.error("Failed to connect to Redis", error);    }}
startServer();- The server sets up an Express application and creates a Redis client using
createClient(). - The server listens for a POST request to the
/submitendpoint, where it receives a problem submission (problem ID, code, and language). - The server then pushes the submission data (as a JSON string) to a Redis list named
"problems"usingclient.lPush(). - The server starts the server and connects to Redis in the
startServer()function.
Worker Service
The worker service code is located in the worker/index.ts file. Here’s a breakdown of the code:
import { createClient } from "redis";const client = createClient();
async function processSubmission(submission: string) {    const { problemId, code, language } = JSON.parse(submission);
    console.log(`Processing submission for problemId ${problemId}...`);    console.log(`Code: ${code}`);    console.log(`Language: ${language}`);    // Here you would add your actual processing logic
    // Simulate processing delay    await new Promise(resolve => setTimeout(resolve, 1000));    console.log(`Finished processing submission for problemId ${problemId}.`);}
async function startWorker() {    try {        await client.connect();        console.log("Worker connected to Redis.");
        // Main loop        while (true) {            try {                const submission = await client.brPop("problems", 0);                // @ts-ignore                await processSubmission(submission.element);            } catch (error) {                console.error("Error processing submission:", error);                // Implement your error handling logic here.            }        }    } catch (error) {        console.error("Failed to connect to Redis", error);    }}
startWorker();- The worker also creates a Redis client using
createClient(). - The
processSubmissionfunction simulates processing a submission by logging the problem ID, code, and language, and introducing a 1-second delay. - The
startWorkerfunction connects to Redis and enters an infinite loop. - Inside the loop, the worker uses
client.brPop("problems", 0)to block and wait for new submissions in the “problems” list. When a submission is available, it is retrieved and passed to theprocessSubmissionfunction for processing. - The
// @ts-ignorecomment is used to suppress a TypeScript error related to the type ofsubmission.element. ThebrPopcommand returns an array with two elements: the list name and the popped value. Since TypeScript cannot infer the correct type, the@ts-ignorecomment is used to bypass the type checking for that line.
The provided architecture diagram illustrates how the Express server and worker service interact with Redis. The server receives problem submissions from the browser and pushes them to the “problems” list in Redis. The worker service continuously monitors this list and processes the submissions as they become available.
This setup demonstrates a basic implementation of using Redis as a message queue to decouple the submission process from the actual processing logic. In a real-world scenario, you would likely add more robust error handling, logging, and additional features to handle various edge cases and requirements.
Pub Subs Deep Dive
Publish-subscribe (pub-sub) is a messaging pattern where messages are published to a topic without the knowledge of what or if any subscribers there might be. Similarly, subscribers listen for messages on topics of interest without knowing which publishers are sending them. This decoupling of publishers and subscribers allows for highly scalable and flexible communication systems.
In the context of a LeetCode-like system, the pub/sub pattern can be used for real-time communication and event-driven architectures, enabling features like live coding sessions, collaborative coding, or real-time updates on submission statuses.
Subscribe to a Topic
To receive messages from a topic, a subscriber needs to subscribe to that topic. In Redis, you can subscribe to a topic using the SUBSCRIBE command:
SUBSCRIBE problems_doneThis command instructs Redis to start listening for messages published to the “problems_done” topic. When a message is published to this topic, Redis will forward it to the subscriber.
Publishing to a Topic
Publishers can send messages to a topic using the PUBLISH command in Redis. For example:
PUBLISH problems_done "{id: 1, ans: 'TLE'}"This command publishes a message with the JSON payload {id: 1, ans: 'TLE'} to the “problems_done” topic. Any subscribers listening on this topic will receive the message.
The provided architecture diagrams illustrate how the pub/sub pattern can be integrated into a LeetCode-like system. The “Pub/sub” component likely handles the publication and subscription of events related to user submissions, such as the “user 1 problem: 2 status: TLE” event shown in the diagram.
The “websocket” component facilitates real-time communication between the browser (client) and the backend system, enabling features like live coding sessions or real-time updates on submission statuses. When a submission status changes, the backend can publish a message to the appropriate topic, which is then forwarded to the subscribed clients via the websocket connection.
Pub subs in Node.js
Let us now look at the demonstration of how to implement a publish-subscribe mechanism in a Node.js application using Redis as the message broker. The provided code snippet updates the worker code to publish the final submission status to a Redis pub/sub channel.
Here’s the updated worker/index.ts file:
import { createClient } from "redis";const client = createClient();
async function processSubmission(submission: string) {    const { problemId, code, language } = JSON.parse(submission);
    console.log(`Processing submission for problemId ${problemId}...`);    console.log(`Code: ${code}`);    console.log(`Language: ${language}`);    // Here you would add your actual processing logic
    // Simulate processing delay    await new Promise(resolve => setTimeout(resolve, 1000));    console.log(`Finished processing submission for problemId ${problemId}.`);    client.publish("problem_done", JSON.stringify({ problemId, status: "TLE" }));}
async function startWorker() {    try {        await client.connect();        console.log("Worker connected to Redis.");
        // Main loop        while (true) {            try {                const submission = await client.brPop("problems", 0);                // @ts-ignore                await processSubmission(submission.element);            } catch (error) {                console.error("Error processing submission:", error);                // Implement your error handling logic here. For example, you might want to push                // the submission back onto the queue or log the error to a file.            }        }    } catch (error) {        console.error("Failed to connect to Redis", error);    }}
startWorker();
The main change in this code is the addition of the client.publish("problem_done", JSON.stringify({ problemId, status: "TLE" })); line inside the processSubmission function. This line publishes a message to the “problem_done” channel in Redis, containing the problem ID and the submission status (in this case, “TLE” for “Time Limit Exceeded”).
By publishing the submission status to a Redis pub/sub channel, other components or services in the system can subscribe to this channel and receive real-time updates on the submission status. This allows for decoupled and event-driven communication between different parts of the system.
To subscribe to the “problem_done” channel and receive the published messages, you can use the Redis command-line interface (redis-cli) and execute the following command:
SUBSCRIBE problem_doneThis command will make the redis-cli client subscribe to the “problem_done” channel. Any messages published to this channel will be displayed in the redis-cli output.
You can test this by running the worker service, which will simulate processing submissions and publishing their statuses to the “problem_done” channel. In the redis-cli, you should see the published messages appear, similar to the following:
1) "subscribe"2) "problem_done"3) (integer) 11) "message"2) "problem_done"3) "{\\"problemId\\":1,\\"status\\":\\"TLE\\"}"