Week 13.1 Building Medium
Up until now, our discussions have primarily revolved around theoretical concepts. In this lecture, Harkirat takes a practical approach by guiding us through the hands-on process of building a Medium like application
We’ll be applying the knowledge we’ve gained so far, specifically focusing on implementing the frontend using React and the backend using Cloudflare Workers — creating a modern fullstack application.
While there are
no specific notesprovided for this section, a mini guide is outlined below to assist you in navigating through the process of building the application. Therefore, it is stronglyadvised to actively follow alongduring the lecture for a hands-on learning experience.
Step 1 — The stack
We’ll be building medium in the following stack
- React in the frontend
- Cloudflare workers in the backend
- zod as the validation library, type inference for the frontend types
- Typescript as the language
- Prisma as the ORM, with connection pooling
- Postgres as the database
- jwt for authentication (Cookies approach explained in the end as well)
Step 2 - Initialize the backend
Whenever you’re building a project, usually the first thing you should do is initialise the project’s backend.
Create a new folder called medium
mkdir mediumcd mediumInitialize a hono based cloudflare worker app
npm create hono@latestTarget directory › backend
Which template do you want to use? - cloudflare-workers
Do you want to install project dependencies? … yes Which package manager do you want to use? › npm (or yarn or bun, doesnt matter)
💡
Reference https://hono.dev/top
Step 3 - Initialize handlers
To begin with, our backend will have 4 routes
- POST
/api/v1/signup - POST
/api/v1/signin - POST
/api/v1/blog - PUT
/api/v1/blog - GET
/api/v1/blog/:id
💡
Solution
import { Hono } from 'hono';
// Create the main Hono appconst app = new Hono();
app.post('/api/v1/signup', (c) => {  return c.text('signup route')})
app.post('/api/v1/signin', (c) => {  return c.text('signin route')})
app.get('/api/v1/blog/:id', (c) => {  const id = c.req.param('id')  console.log(id);  return c.text('get blog route')})
app.post('/api/v1/blog', (c) => {
  return c.text('signin route')})
app.put('/api/v1/blog', (c) => {  return c.text('signin route')})
export default app;
Step 4 - Initialize DB (prisma)
1. Get your connection url from neon.db or aieven.tech
postgres://avnadmin:password@host/db2. Get connection pool URL from Prisma accelerate
https://www.prisma.io/data-platform/accelerate
prisma://accelerate.prisma-data.net/?api_key=eyJhbGciOiJIUzI1NiIsInR5cCI6IkpXVCJ9.eyJhcGlfa2V5IjoiNTM2M2U5ZjEtNmNjMS00MWNkLWJiZTctN2U4NzFmMGFhZjJmIiwidGVuYW50X2lkIjoiY2I5OTE2NDk0MzFkNWZmZWRmNmFiYzViMGFlOTIwYzFhZDRjMGY5MTg1ZjZiNDY0OTc3MzgyN2IyMzY2OWIwMiIsImludGVybmFsX3NlY3JldCI6Ijc0NjE4YWY2LTA4NmItNDM0OC04MzIxLWMyMmY2NDEwOTExNyJ9.HXnE3vZjf8YH71uOollsvrV-TSe41770FPG_O8IaVgs3. Initialize prisma in your project
Make sure you are in the backend folder
npm i prismanpx prisma initReplace DATABASE_URL in .env
DATABASE_URL="postgres://avnadmin:password@host/db"Add DATABASE_URL as the connection pool url in wrangler.toml
name = "backend"compatibility_date = "2023-12-01"
[vars]DATABASE_URL = "prisma://accelerate.prisma-data.net/?api_key=eyJhbGciOiJIUzI1NiIsInR5cCI6IkpXVCJ9.eyJhcGlfa2V5IjoiNTM2M2U5ZjEtNmNjMS00MWNkLWJiZTctN2U4NzFmMGFhZjJmIiwidGVuYW50X2lkIjoiY2I5OTE2NDk0MzFkNWZmZWRmNmFiYzViMGFlOTIwYzFhZDRjMGY5MTg1ZjZiNDY0OTc3MzgyN2IyMzY2OWIwMiIsImludGVybmFsX3NlY3JldCI6Ijc0NjE4YWY2LTA4NmItNDM0OC04MzIxLWMyMmY2NDEwOTExNyJ9.HXnE3vZjf8YH71uOollsvrV-TSe41770FPG_O8IaVgs"
💡
You should not have your prod URL committed either in .env or in wrangler.toml to github wranger.toml should have a dev/local DB url .env should be in .gitignore
4. Initialize the schema
generator client {  provider = "prisma-client-js"}
datasource db {  provider = "postgresql"  url      = env("DATABASE_URL")}
model User {  id       String   @id @default(uuid())  email    String   @unique  name     String?  password String  posts    Post[]}
model Post {  id        String   @id @default(uuid())  title     String  content   String  published Boolean  @default(false)  author    User     @relation(fields: [authorId], references: [id])  authorId  String}
5. Migrate your database
npx prisma migrate dev --name init_schema💡
You might face issues here, try changing your wifi if that happens
6. Generate the prisma client
npx prisma generate --no-engine7. Add the accelerate extension
npm install @prisma/extension-accelerate8. Initialize the prisma client
import { PrismaClient } from '@prisma/client/edge'import { withAccelerate } from '@prisma/extension-accelerate'
const prisma = new PrismaClient({    datasourceUrl: env.DATABASE_URL,}).$extends(withAccelerate())
Step 5 - Create routes
1. Simple Signup route
Add the logic to insert data to the DB, and if an error is thrown, tell the user about it
Solution
app.post('/api/v1/signup', async (c) => {  const prisma = new PrismaClient({    datasourceUrl: c.env?.DATABASE_URL,  }).$extends(withAccelerate());  const body = await c.req.json();  try {    const user = await prisma.user.create({      data: {        email: body.email,        password: body.password      }    });
return c.text('jwt here') } catch(e) { return c.status(403); }})const app = new Hono<{ Bindings: { DATABASE_URL: string }}>();2. Add JWT to signup route
Also add the logic to return the user a jwt when their user id encoded.
This would also involve adding a new env variable JWT_SECRET to wrangler.toml
Solution
import { PrismaClient } from '@prisma/client/edge'import { withAccelerate } from '@prisma/extension-accelerate'import { Hono } from 'hono';import { sign } from 'hono/jwt'
// Create the main Hono appconst app = new Hono<{  Bindings: {    DATABASE_URL: string,    JWT_SECRET: string,  }}>();
app.post('/api/v1/signup', async (c) => {  const prisma = new PrismaClient({    datasourceUrl: c.env?.DATABASE_URL  ,  }).$extends(withAccelerate());
  const body = await c.req.json();  try {    const user = await prisma.user.create({      data: {        email: body.email,        password: body.password      }    });    const jwt = await sign({ id: user.id }, c.env.JWT_SECRET);    return c.json({ jwt });  } catch(e) {    c.status(403);    return c.json({ error: "error while signing up" });  }})
3. Add a signin route
Solution
app.post('/api/v1/signin', async (c) => {  const prisma = new PrismaClient({    datasourceUrl: c.env?.DATABASE_URL  ,  }).$extends(withAccelerate());
  const body = await c.req.json();  const user = await prisma.user.findUnique({    where: {      email: body.email    }  });
  if (!user) {    c.status(403);    return c.json({ error: "user not found" });  }
  const jwt = await sign({ id: user.id }, c.env.JWT_SECRET);  return c.json({ jwt });})
Step 6 - Middlewares
Creating a middleware in hono is well documented - https://hono.dev/guides/middleware
1. Limiting the middleware
To restrict a middleware to certain routes, you can use the following -
app.use('/message/*', async (c, next) => { await next()})In our case, the following routes need to be protected -
app.get('/api/v1/blog/:id', (c) => {})
app.post('/api/v1/blog', (c) => {})
app.put('/api/v1/blog', (c) => {})
So we can add a top level middleware
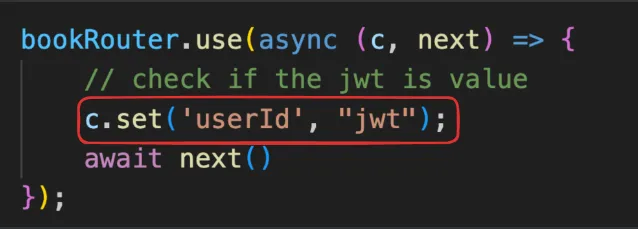
app.use('/api/v1/blog/*', async (c, next) => { await next()})2. Writing the middleware
Write the logic that extracts the user id and passes it over to the main route.
-
How to pass data from middleware to the route handler?
Using the context - https://hono.dev/api/context
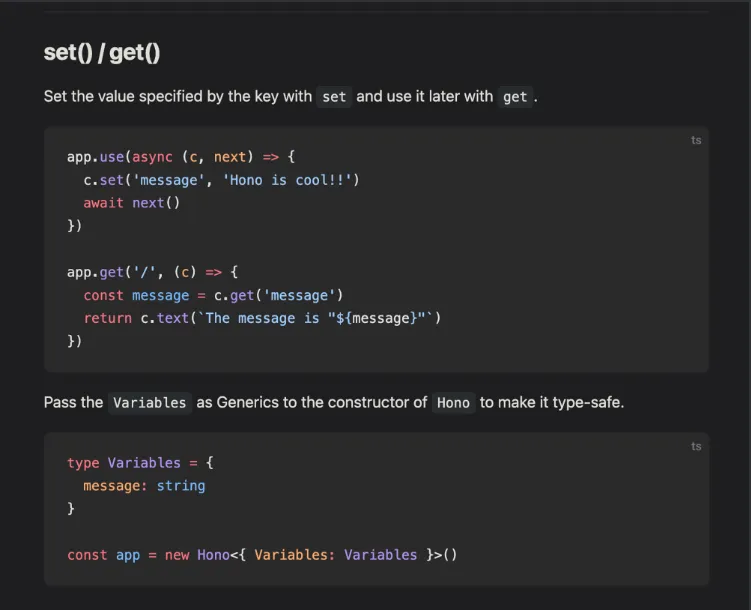
-
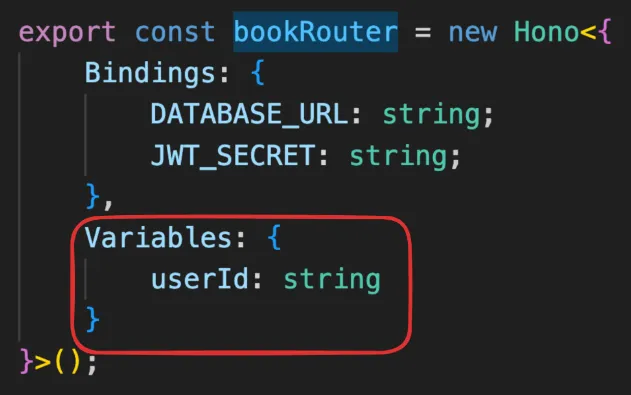
How to make sure the types of
variablesthat are being passed is correct?const app = new Hono<{Bindings: {DATABASE_URL: string,JWT_SECRET: string,},Variables : {userId: string}}>(); -
Solution
app.use('/api/v1/blog/*', async (c, next) => {const jwt = c.req.header('Authorization');if (!jwt) {c.status(401);return c.json({ error: "unauthorized" });}const token = jwt.split(' ')[1];const payload = await verify(token, c.env.JWT_SECRET);if (!payload) {c.status(401);return c.json({ error: "unauthorized" });}c.set('userId', payload.id);await next()})
3. Confirm that the user is able to access authenticated routes
app.post('/api/v1/blog', (c) => { console.log(c.get('userId')); return c.text('signin route')})Send the Header from Postman and ensure that the user id gets logged on the server
app.use(”*”, (c) => { const prisma = new PrismaClient({ datasourceUrl: c.env.DATABASE_URL, }).$extends(withAccelerate()); c.set(”prisma”, prisma);})Ref https://stackoverflow.com/questions/75554786/use-cloudflare-worker-env-outside-fetch-scope
Step 7 - Blog routes and better routing
Better routing
https://hono.dev/api/routing#grouping
Hono let’s you group routes together so you can have a cleaner file structure.
Create two new files -
routes/user.ts
routes/blog.ts
and push the user routes to user.ts
-
index.ts
import { Hono } from 'hono'import { userRouter } from './routes/user';import { bookRouter } from './routes/blog';export const app = new Hono<{Bindings: {DATABASE_URL: string;JWT_SECRET: string;}}>();app.route('/api/v1/user', userRouter)app.route('/api/v1/book', bookRouter)export default app -
user.ts
import { PrismaClient } from "@prisma/client/edge";import { withAccelerate } from "@prisma/extension-accelerate";import { Hono } from "hono";import { sign } from "hono/jwt";export const userRouter = new Hono<{Bindings: {DATABASE_URL: string;JWT_SECRET: string;}}>();userRouter.post('/signup', async (c) => {const prisma = new PrismaClient({datasourceUrl: c.env.DATABASE_URL,}).$extends(withAccelerate());const body = await c.req.json();const user = await prisma.user.create({data: {email: body.email,password: body.password,},});const token = await sign({ id: user.id }, c.env.JWT_SECRET)return c.json({jwt: token})})userRouter.post('/signin', async (c) => {const prisma = new PrismaClient({//@ts-ignoredatasourceUrl: c.env?.DATABASE_URL ,}).$extends(withAccelerate());const body = await c.req.json();const user = await prisma.user.findUnique({where: {email: body.email,password: body.password}});if (!user) {c.status(403);return c.json({ error: "user not found" });}const jwt = await sign({ id: user.id }, c.env.JWT_SECRET);return c.json({ jwt });})
Blog routes
1. Create the route to initialize a blog/post
-
Solution
app.post('/', async (c) => {const userId = c.get('userId');const prisma = new PrismaClient({datasourceUrl: c.env?.DATABASE_URL ,}).$extends(withAccelerate());const body = await c.req.json();const post = await prisma.post.create({data: {title: body.title,content: body.content,authorId: userId}});return c.json({id: post.id});})
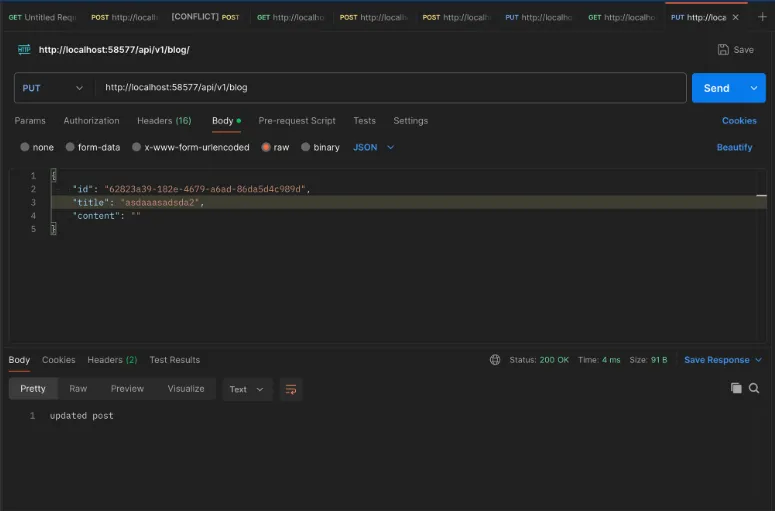
2. Create the route to update blog
-
Solution
app.put('/api/v1/blog', async (c) => {const userId = c.get('userId');const prisma = new PrismaClient({datasourceUrl: c.env?.DATABASE_URL ,}).$extends(withAccelerate());const body = await c.req.json();prisma.post.update({where: {id: body.id,authorId: userId},data: {title: body.title,content: body.content}});return c.text('updated post');});
3. Create the route to get a blog
-
Solution
app.get('/api/v1/blog/:id', async (c) => {const id = c.req.param('id');const prisma = new PrismaClient({datasourceUrl: c.env?.DATABASE_URL ,}).$extends(withAccelerate());const post = await prisma.post.findUnique({where: {id}});return c.json(post);})
Try to hit the routes via POSTMAN and ensure they work as expected
Step 8 - Understanding the types
Bindings
https://hono.dev/getting-started/cloudflare-workers#bindings
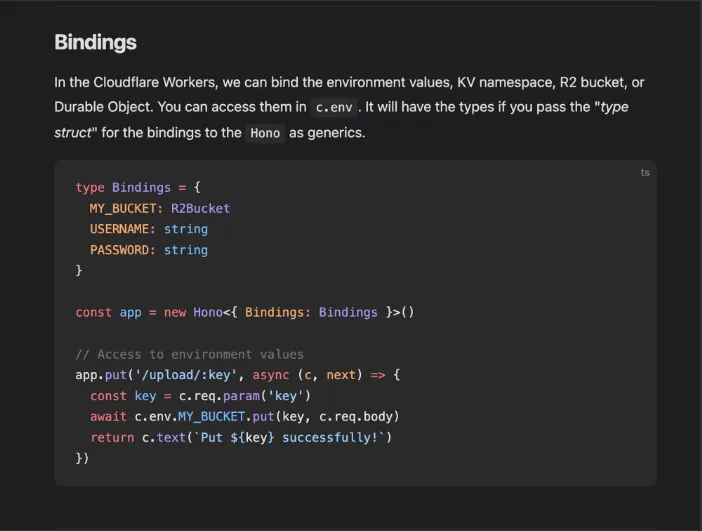
In our case, we need 2 env variables -
JWT_SECRET
DATABASE_URL

Variables
https://hono.dev/api/context#var
If you want to get and set values on the context of the request, you can use c.get and c.set
You need to make typescript aware of the variables that you will be setting on the context.
Step 9 - Deploy your app
npm run deployUpdate the env variables from cloudflare dashboard
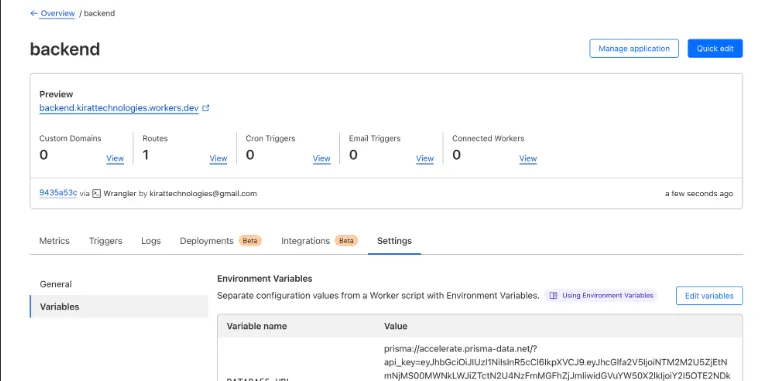
Test your production URL in postman, make sure it works
Step 10 - Zod validation
If you’ve gone through the video Cohort 1 - Deploying npm packages, Intro to Monorepos, you’ll notice we introduced type inference in Zod
https://zod.dev/?id=type-inference
This let’s you get types from runtime zod variables that you can use on your frontend
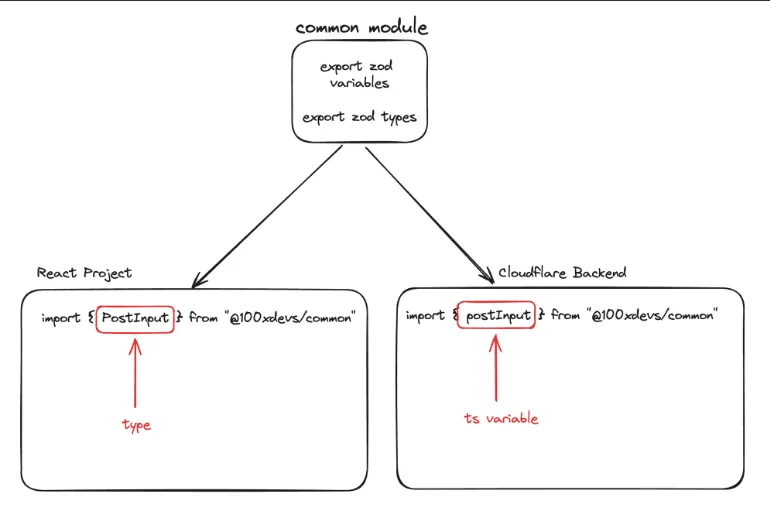
We will divide our project into 3 parts
- Backend
- Frontend
- common
common will contain all the things that frontend and backend want to share.
We will make common an independent npm module for now.
Eventually, we will see how monorepos make it easier to have multiple packages sharing code in the same repo
Step 11 - Initialise common
- Create a new folder called
commonand initialize an empty ts project in it
mkdir commoncd commonnpm init -ynpx tsc --init- Update
tsconfig.json
"rootDir": "./src","outDir": "./dist","declaration": true,- Sign up/login to npmjs.org
- Run
npm login - Update the
nameinpackage.jsonto be in your own npm namespace, Update main to bedist/index.js
{ "name": "@100xdevs/common-app", "version": "1.0.0", "description": "", "main": "dist/index.js", "scripts": { "test": "echo \"Error: no test specified\" && exit 1" }, "keywords": [], "author": "", "license": "ISC"}- Add
srcto.npmignore - Install zod
npm i zod- Put all types in
src/index.ts- signupInput / SignupInput
- signinInput / SigninInput
- createPostInput / CreatePostInput
- updatePostInput / UpdatePostInput
-
Solution
import z from "zod";export const signupInput = z.object({email: z.string().email(),password: z.string(),name: z.string().optional(),});export type SignupType = z.infer<typeof signupInput>;export const signinInput = z.object({email: z.string().email(),password: z.string(),});export type SigninType = z.infer<typeof signinInput>;export const createPostInput = z.object({title: z.string(),content: z.string(),});export type CreatePostType = z.infer<typeof createPostInput>;export const updatePostInput = z.object({title: z.string().optional(),content: z.string().optional(),});export type UpdatePostType = z.infer<typeof updatePostInput>;
tsc -bto generate the output- Publish to npm
npm publish --access public- Explore your package on npmjs
Step 12 - Import zod in backend
- Go to the backend folder
cd backend
- Install the package you published to npm
npm i your_package_name
- Explore the package
cd node_modules/your_package_name
- Update the routes to do zod validation on them
Solution
import { PrismaClient } from '@prisma/client/edge'import { withAccelerate } from '@prisma/extension-accelerate'import { Hono } from 'hono';import { sign, verify } from 'hono/jwt'import { signinInput, signupInput, createPostInput, updatePostInput } from "@100xdevs/common-app"
// Create the main Hono appconst app = new Hono<{ Bindings: { DATABASE_URL: string, JWT_SECRET: string, }, Variables : { userId: string }}>();
app.use('/api/v1/blog/*', async (c, next) => { const jwt = c.req.header('Authorization'); if (!jwt) { c.status(401); return c.json({ error: "unauthorized" }); } const token = jwt.split(' ')[1]; const payload = await verify(token, c.env.JWT_SECRET); if (!payload) { c.status(401); return c.json({ error: "unauthorized" }); } c.set('userId', payload.id); await next()})
app.post('/api/v1/signup', async (c) => { const prisma = new PrismaClient({ datasourceUrl: c.env?.DATABASE_URL , }).$extends(withAccelerate());
const body = await c.req.json(); const { success } = signupInput.safeParse(body); if (!success) { c.status(400); return c.json({ error: "invalid input" }); } try { const user = await prisma.user.create({ data: { email: body.email, password: body.password } }); const jwt = await sign({ id: user.id }, c.env.JWT_SECRET); return c.json({ jwt }); } catch(e) { c.status(403); return c.json({ error: "error while signing up" }); }})
app.post('/api/v1/signin', async (c) => { const prisma = new PrismaClient({ datasourceUrl: c.env?.DATABASE_URL , }).$extends(withAccelerate());
const body = await c.req.json(); const { success } = signinInput.safeParse(body); if (!success) { c.status(400); return c.json({ error: "invalid input" }); } const user = await prisma.user.findUnique({ where: { email: body.email } });
if (!user) { c.status(403); return c.json({ error: "user not found" }); }
const jwt = await sign({ id: user.id }, c.env.JWT_SECRET); return c.json({ jwt });})
app.get('/api/v1/blog/:id', async (c) => {  const id = c.req.param('id');  const prisma = new PrismaClient({    datasourceUrl: c.env?.DATABASE_URL  ,  }).$extends(withAccelerate());
  const post = await prisma.post.findUnique({    where: {      id    }  });
  return c.json(post);})
app.post('/api/v1/blog', async (c) => { const userId = c.get('userId'); const prisma = new PrismaClient({ datasourceUrl: c.env?.DATABASE_URL , }).$extends(withAccelerate());
const body = await c.req.json(); const { success } = createPostInput.safeParse(body); if (!success) { c.status(400); return c.json({ error: "invalid input" }); }
const post = await prisma.post.create({ data: { title: body.title, content: body.content, authorId: userId } }); return c.json({ id: post.id });})
app.put('/api/v1/blog', async (c) => { const userId = c.get('userId'); const prisma = new PrismaClient({ datasourceUrl: c.env?.DATABASE_URL , }).$extends(withAccelerate());
const body = await c.req.json(); const { success } = updatePostInput.safeParse(body); if (!success) { c.status(400); return c.json({ error: "invalid input" }); }
prisma.post.update({ where: { id: body.id, authorId: userId }, data: { title: body.title, content: body.content } });
return c.text('updated post');});
export default app;Step 13 - Init the FE project
- Initialise a react app
npm create vite@latest- Initialise tailwind https://tailwindcss.com/docs/guides/vite
npm install -D tailwindcss postcss autoprefixernpx tailwindcss init -p- Update tailwind.config.js
/** @type {import('tailwindcss').Config} */export default { content: [ "./index.html", "./src/**/*.{js,ts,jsx,tsx}", ], theme: { extend: {}, }, plugins: [],}- Update index.css
@tailwind base;@tailwind components;@tailwind utilities;- Empty up App.css
- Install your package
npm i your_package- Run the project locally
npm run devStep 14 - Add react-router-dom
-
Add react-router-dom
npm i react-router-dom -
Add routing (ensure you create the Signup, Signin and Blog components)
import { BrowserRouter, Route, Routes } from 'react-router-dom'import { Signup } from './pages/Signup'import { Signin } from './pages/Signin'import { Blog } from './pages/Blog'
function App() {
  return (    <>      <BrowserRouter>        <Routes>          <Route path="/signup" element={<Signup />} />          <Route path="/signin" element={<Signin />} />          <Route path="/blog/:id" element={<Blog />} />        </Routes>      </BrowserRouter>    </>  )}
export default App- Make sure you can import
typesfromyour_package