Week 29.1 Kubernates (volumes, PVC's)
In this lecture, Harkirat explores data persistence and scaling in containerized environments. He begins with volumes in Docker, then transitions to Kubernetes, covering both ephemeral and persistent volumes. The lecture delves into static persistent volumes and automated PV creation, demonstrating how to manage stateful applications effectively.
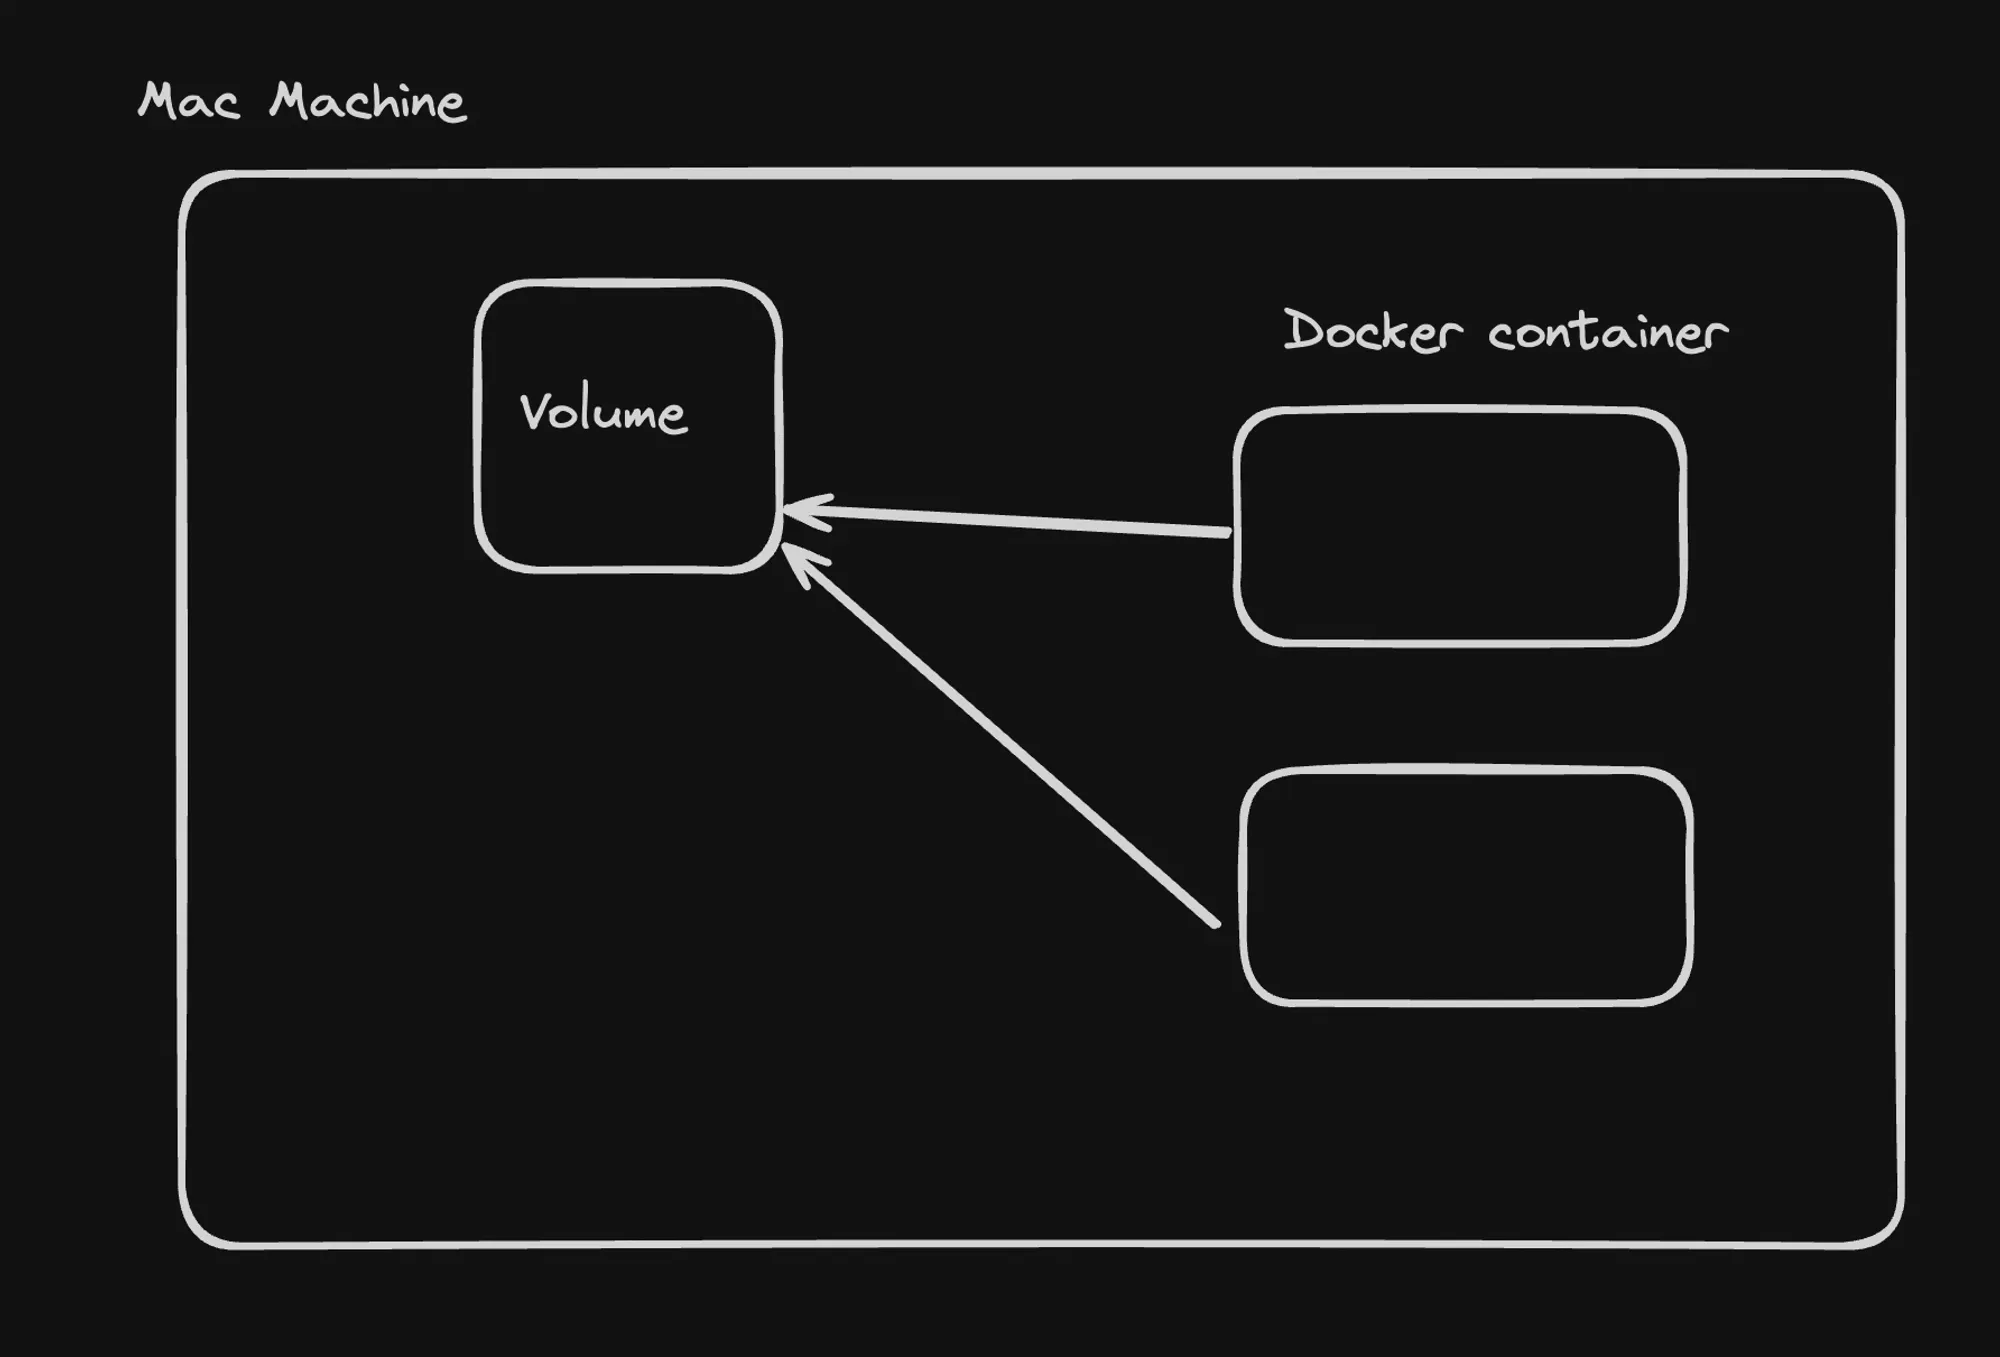
Volumes in Docker
Pretext: Sample Application
A Node.js application that periodically writes random data to a file is used as an example. The Docker image for this app is available at 100xdevs/write-random.
Key Points:
-
Ephemeral Storage in Docker:
- By default, data in Docker containers is ephemeral.
- Data is lost when the container is stopped or removed.
-
Running the Sample Container:
Terminal window docker run 100xdevs/write-random -
Inspecting Container Data:
Terminal window docker exec -it container_id /bin/bashcat randomData.txt -
Volumes in Docker:
- Used to persist data across container stops and starts.
- Two main types: Bind Mounts and Volume Mounts.
-
Bind Mounts:
-
Maps a host machine directory to a container directory.
-
Example:
Terminal window docker run -v /Users/harkiratsingh/Projects/100x/mount:/usr/src/app/generated 100xdevs/write-random
-
-
Volume Mounts:
-
Uses Docker-managed volumes for data persistence.
-
Creating a volume:
Terminal window docker volume create hello -
Using the volume:
Terminal window docker run -v hello:/usr/src/app/generated 100xdevs/write-random
-
-
Data Persistence:
- With both bind mounts and volume mounts, data persists even if the container is stopped.
Key Takeaways:
- Docker containers by default use ephemeral storage.
- Volumes provide a way to persist data beyond the container’s lifecycle.
- Bind mounts directly map host directories to container directories.
- Volume mounts use Docker-managed volumes for more portable and flexible data storage.
- Both methods ensure data persistence across container restarts or removals.
Understanding volumes is crucial for managing stateful applications in Docker environments, allowing for data persistence and easier management of application state.
Volumes in Kubernetes
Volumes in Kubernetes are directories, potentially containing data, that are accessible to containers within a pod. They serve several important purposes in container orchestration.
Why Volumes are Needed
- Inter-Container Data Sharing: Allows containers in the same pod to share data and filesystems.
- Data Persistence: Enables data to persist even when containers restart, crucial for databases and stateful applications.
- Temporary Storage: Provides extra space for execution needs like caching, without requiring persistence.
Types of Volumes
- Ephemeral Volumes
- Temporary storage shared among containers in a pod
- Lifecycle tied to the pod (destroyed when pod is deleted)
- Examples:
- ConfigMap
- Secret
- emptyDir
- Persistent Volumes (PV)
- Storage in the cluster provisioned by an administrator or dynamically via Storage Classes
- Lifecycle independent of any individual pod
- Can use various storage backends (NFS, iSCSI, cloud-provider storage)
- Persistent Volume Claims (PVC)
- User requests for storage
- Similar to how pods consume node resources, PVCs consume PV resources
- Can request specific size and access modes
Key Concepts
- Volumes solve the problem of data persistence in containerized environments
- They enable data sharing between containers and across pod restarts
- Kubernetes supports a wide variety of volume types to suit different needs
- PVs and PVCs provide a way to abstract storage details from pod specifications
Understanding and effectively using volumes is crucial for managing stateful applications and ensuring data persistence in Kubernetes environments.
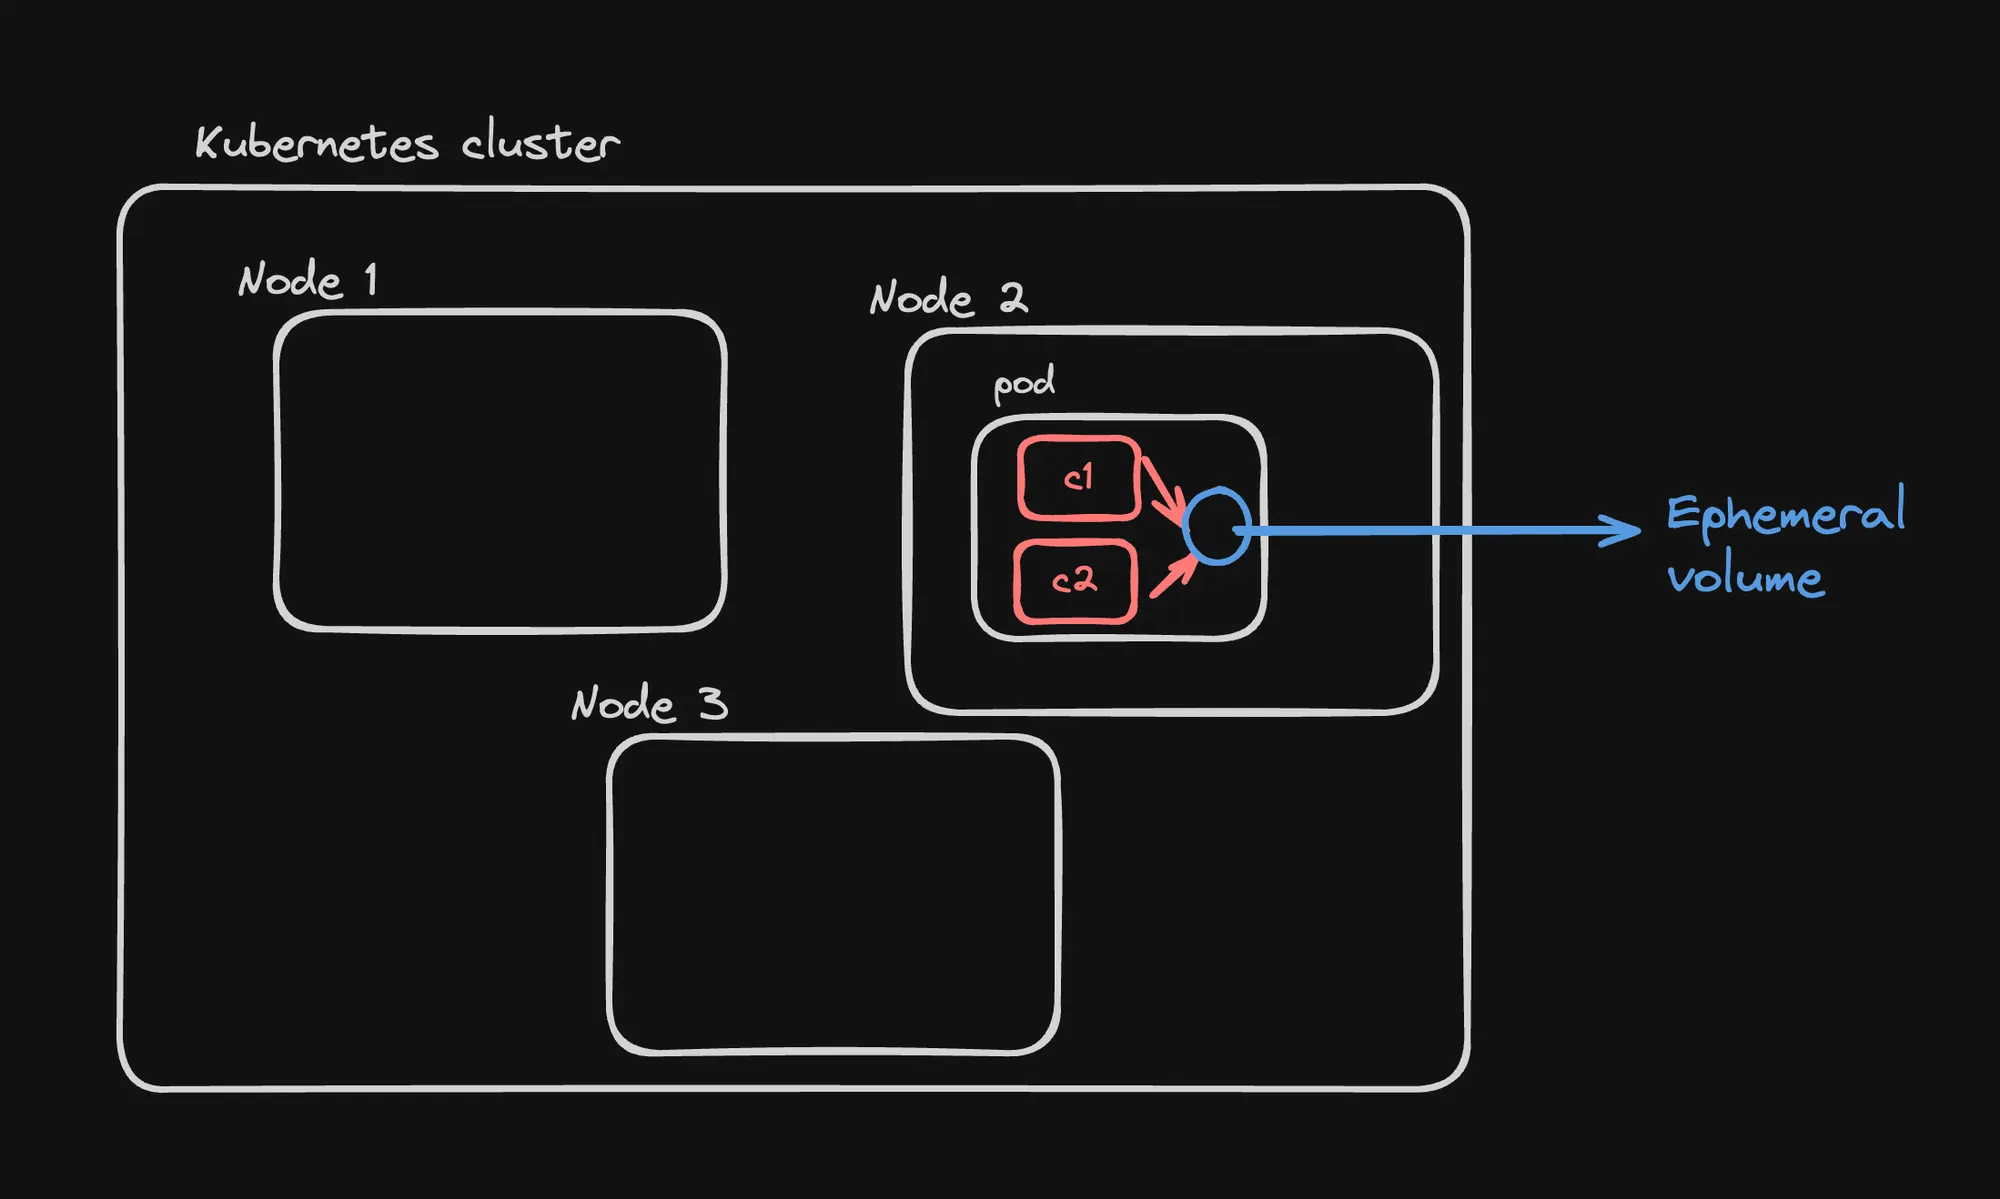
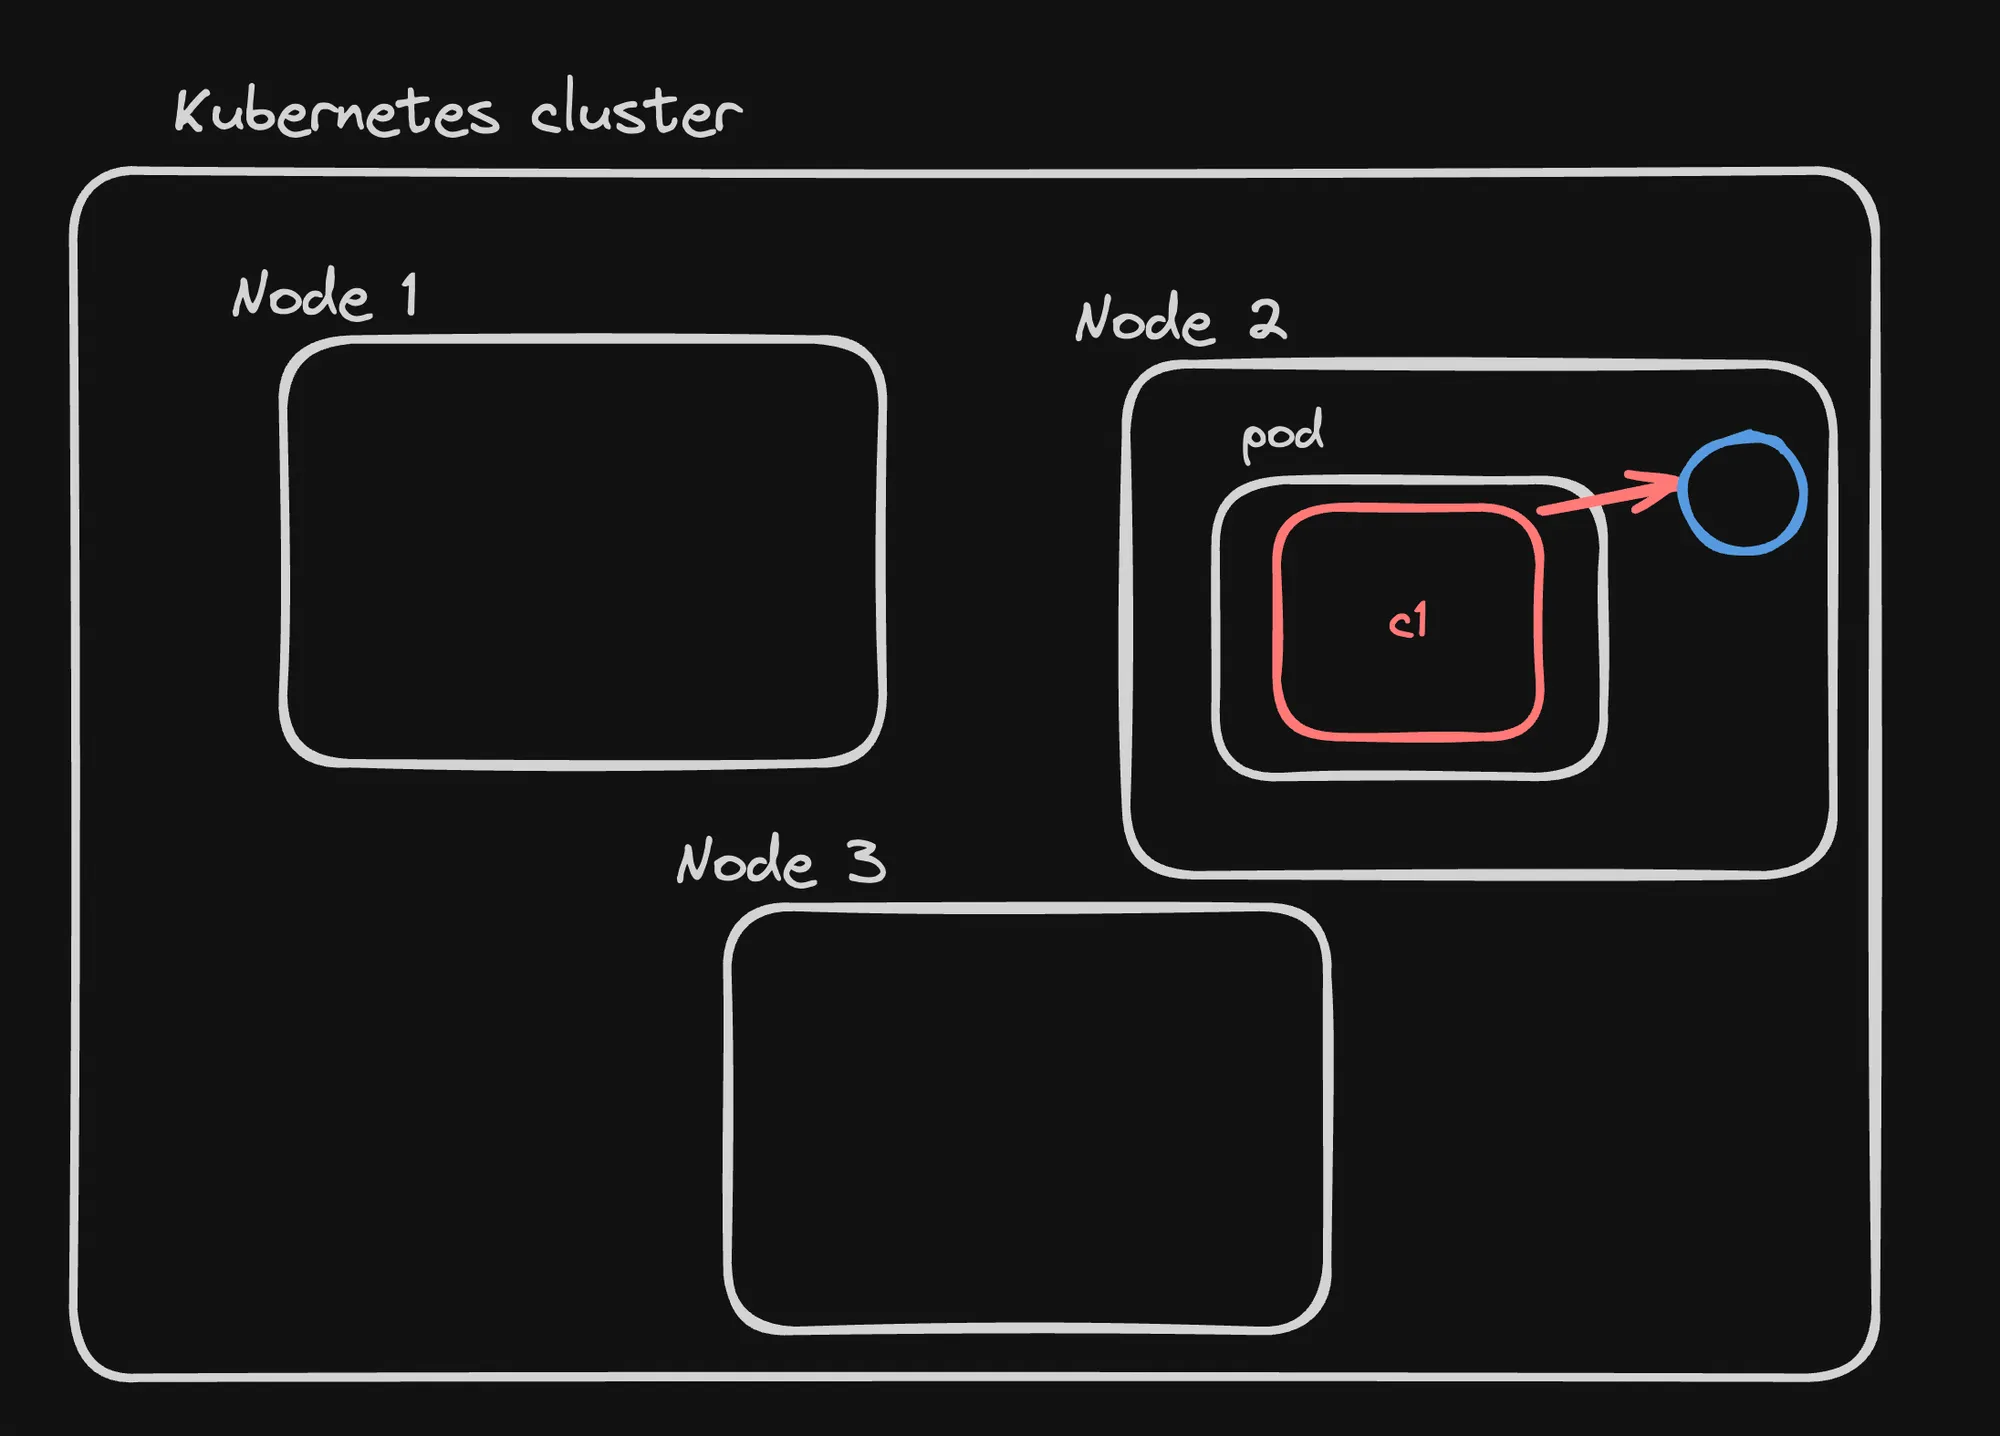
Ephemeral Volumes
Ephemeral volumes allow containers in the same pod to share data, but the data is lost when the pod is terminated.
Setup Example
-
Create a Manifest (kube.yml):
apiVersion: apps/v1kind: Deploymentmetadata:name: shared-volume-deploymentspec:replicas: 1selector:matchLabels:app: shared-volume-apptemplate:metadata:labels:app: shared-volume-appspec:containers:- name: writerimage: busyboxcommand: ["/bin/sh", "-c", "echo 'Hello from Writer Pod' > /data/hello.txt; sleep 3600"]volumeMounts:- name: shared-datamountPath: /data- name: readerimage: busyboxcommand: ["/bin/sh", "-c", "cat /data/hello.txt; sleep 3600"]volumeMounts:- name: shared-datamountPath: /datavolumes:- name: shared-dataemptyDir: {} -
Apply the Manifest:
Terminal window kubectl apply -f kube.yml -
Verify Data Sharing:
Terminal window kubectl exec -it shared-volume-deployment-74d67d6567-tcdsl --container reader sh
Key Points
- emptyDir Volume:
- Type of ephemeral volume used in this example.
- Created when a Pod is assigned to a node, exists as long as that Pod is running on that node.
- Initially empty.
- Data Sharing:
- Both containers (
writerandreader) mount the same volume at/data. writercontainer writes to the volume,readercontainer can read from it.
- Both containers (
- Lifecycle:
- Data in the volume persists across container restarts within the pod.
- Data is lost when the pod is deleted or rescheduled to a different node.
- Use Cases:
- Temporary scratch space.
- Sharing data between containers in a pod.
- Caching.
- Performance:
- Typically faster than network-based storage.
- Resides on the node’s filesystem.
- Limitations:
- Not suitable for persistent data storage.
- Data is lost if the pod is removed from the node.
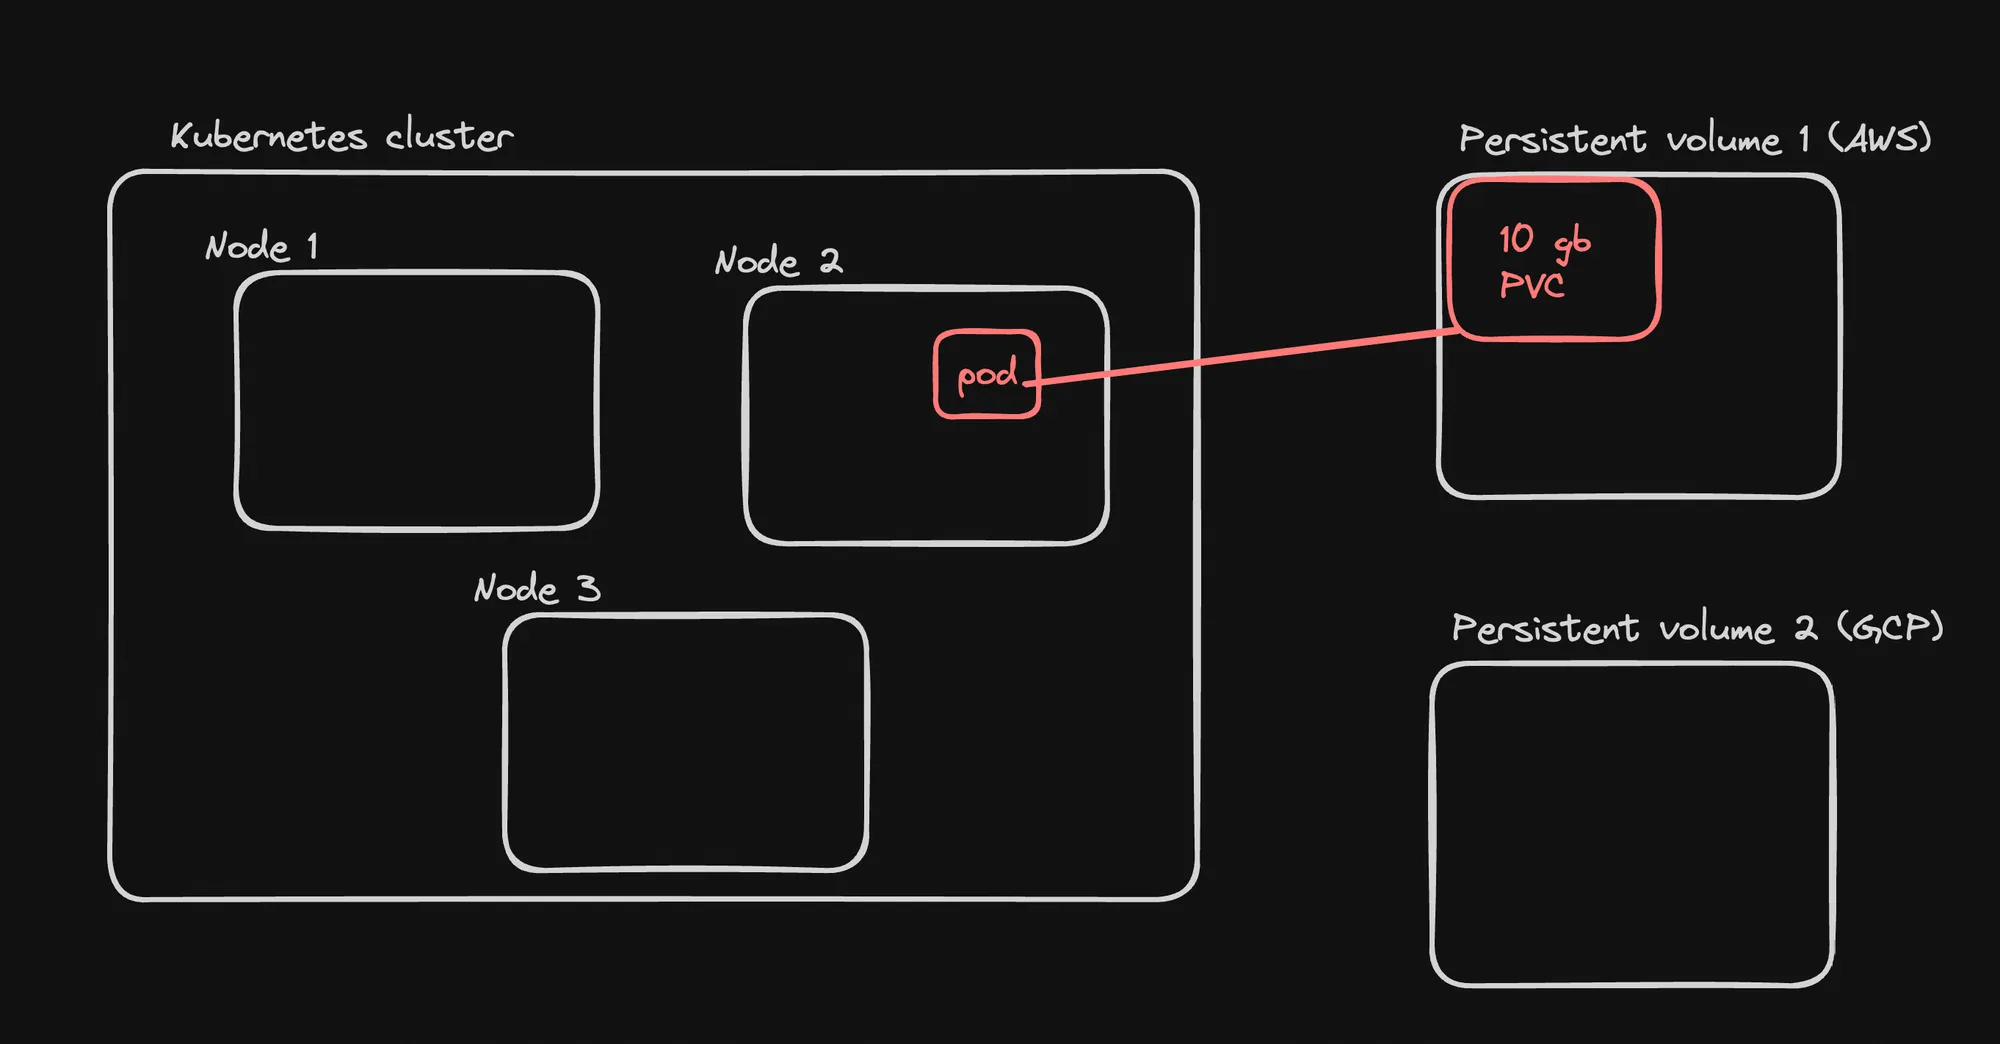
Persistent Volumes
Persistent Volumes provide a powerful abstraction for managing storage in Kubernetes. They allow for efficient use of storage resources, enable data persistence across pod lifecycles, and support both static and dynamic provisioning to meet various application needs.
Key Concepts
- Persistent Volumes (PVs):
- Pieces of storage in the cluster
- Provisioned by an administrator or dynamically using Storage Classes
- Exist independently of any pod
- Persistent Volume Claims (PVCs):
- Requests for storage by users
- Pods use PVCs to claim PV resources
- Storage Provisioning:
- Static: Admin pre-creates PVs
- Dynamic: PVs are created on-demand using Storage Classes
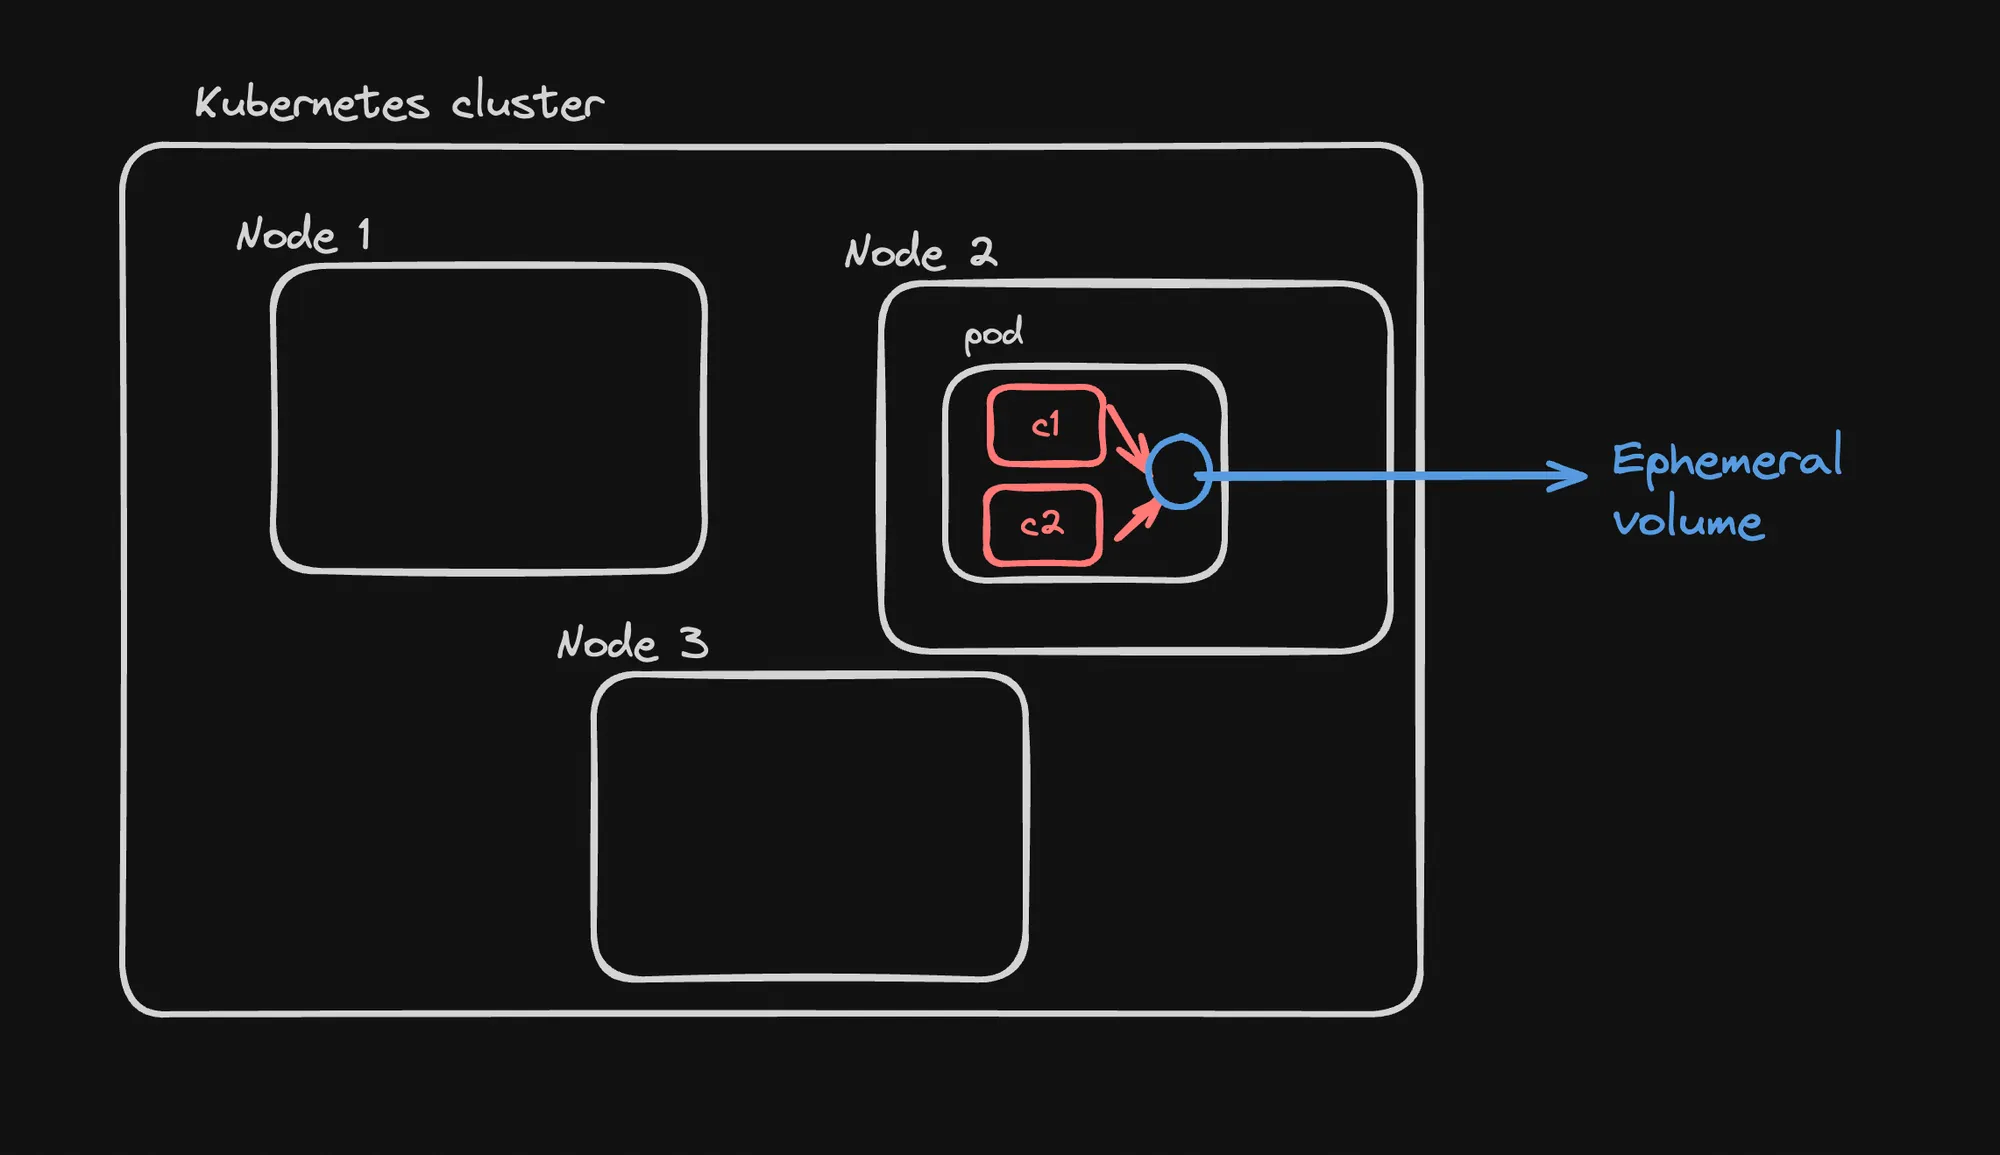
Visualization
The provided image illustrates:
- Kubernetes cluster with nodes for running pods
- Persistent Volumes as a separate resource pool
- Pods claiming storage from PVs
Key Points
- Separation of Concerns:
- PVs separate storage provisioning from pod deployment
- Allows for more flexible and scalable storage management
- Lifecycle Independence:
- PVs have a lifecycle independent of pods
- Data persists even when pods are deleted or rescheduled
- Storage Classes:
- Define different types of storage (e.g., SSD, HDD)
- Enable dynamic provisioning of PVs
- Access Modes:
- ReadWriteOnce (RWO): Read-write by a single node
- ReadOnlyMany (ROX): Read-only by many nodes
- ReadWriteMany (RWX): Read-write by many nodes
- Reclaim Policies:
- Retain: Keep data for manual cleanup
- Delete: Delete the volume and its data
- Recycle: Basic scrub (deprecated)
Use Cases
- Databases requiring persistent storage
- Shared file systems across multiple pods
- Long-term data storage in stateful applications
Best Practices
- Use Storage Classes for dynamic provisioning where possible
- Implement appropriate backup and disaster recovery strategies
- Monitor PV usage and capacity
- Use appropriate access modes and reclaim policies
Static Persistent Volumes
Setting up NFS Server
-
NFS Server Setup (on AWS): Note: Ensure port 2049 is open on your machine.
version: '3.7'services:nfs-server:image: itsthenetwork/nfs-server-alpine:latestcontainer_name: nfs-serverprivileged: trueenvironment:SHARED_DIRECTORY: /exportsvolumes:- ./data:/exports:rwports:- "2049:2049"restart: unless-stopped
Creating PV and PVC
-
Create PV and PVC:
apiVersion: v1kind: PersistentVolumemetadata:name: nfs-pvspec:capacity:storage: 10GiaccessModes:- ReadWriteManystorageClassName: nfsnfs:path: /exportsserver: 52.66.197.168---apiVersion: v1kind: PersistentVolumeClaimmetadata:name: nfs-pvcspec:accessModes:- ReadWriteManyresources:requests:storage: 10GistorageClassName: nfs
Creating a Pod with PV
-
Create Pod Using PVC:
apiVersion: v1kind: Podmetadata:name: mongo-podspec:containers:- name: mongoimage: mongo:4.4command: ["mongod", "--bind_ip_all"]ports:- containerPort: 27017volumeMounts:- mountPath: "/data/db"name: nfs-volumevolumes:- name: nfs-volumepersistentVolumeClaim:claimName: nfs-pvc
Testing Persistence
-
Insert Data:
Terminal window kubectl exec -it mongo-pod -- mongouse mydbdb.mycollection.insert({ name: "Test", value: "This is a test" })exit -
Delete and Recreate Pod:
Terminal window kubectl delete pod mongo-podkubectl apply -f mongo.yml -
Verify Data Persistence:
Terminal window kubectl exec -it mongo-pod -- mongouse mydbdb.mycollection.find()

Key Points
- NFS as PV: NFS is used as an example of a network storage solution for PVs.
- Static Provisioning: PV is manually created before the PVC.
- PV and PVC Binding: PVC binds to the PV based on storage class and access modes.
- Pod Volume Mount: The pod uses the PVC to mount the volume.
- Data Persistence: Data persists even when the pod is deleted and recreated.
Best Practices
- Ensure proper security measures for NFS server access.
- Use appropriate storage classes for different types of applications.
- Monitor PV usage and implement proper capacity planning.
- Implement backup strategies for data stored in PVs.
Static Persistent Volumes provide a way to use pre-provisioned storage in Kubernetes. This approach is useful when you have existing storage infrastructure or specific storage requirements. It allows for data persistence across pod lifecycles, which is crucial for stateful applications like databases.
Automative PV Creation
Here’s a summary of how to set up automatic Persistent Volume (PV) creation in Kubernetes using Vultr’s block storage.
- Create a Persistent Volume Claim (PVC):
- Use the
vultr-block-storage-hddstorage class - Request 40Gi of storage
- Use ReadWriteOnce access mode
- Use the
- Create a Pod that uses the PVC:
- Use a MongoDB container
- Mount the PVC to
/data/dbin the container
- Apply the configurations and verify:
- Check created PV, PVC, and Pod
- Test data persistence:
- Insert data into MongoDB
- Delete and recreate the Pod
- Verify that the data persists
Key steps:
- Create PVC:
apiVersion: v1kind: PersistentVolumeClaimmetadata: name: csi-pvcspec: accessModes: - ReadWriteOnce resources: requests: storage: 40Gi storageClassName: vultr-block-storage-hdd- Create Pod:
apiVersion: v1kind: Podmetadata: name: mongo-podspec: containers: - name: mongo image: mongo:4.4 command: ["mongod", "--bind_ip_all"] ports: - containerPort: 27017 volumeMounts: - name: mongo-storage mountPath: /data/db volumes: - name: mongo-storage persistentVolumeClaim: claimName: csi-pvc- Apply and verify:
kubectl get pvkubectl get pvckubectl get pods- Test data persistence:
kubectl exec -it mongo-pod -- mongouse mydbdb.mycollection.insert({ name: "Test", value: "This is a test" })exit
kubectl delete pod mongo-podkubectl apply -f mongo.yml
kubectl exec -it mongo-pod -- mongouse mydbdb.mycollection.find()
This process demonstrates automatic PV creation and data persistence in Kubernetes using Vultr’s storage solution.
Horizontal Pod Autoscaler
Horizontal Pod Autoscaler (HPA) in Kubernetes is an important feature for automatically scaling applications based on observed metrics. Here’s an elaboration on the key points:
- Definition and Purpose:
- HPA automatically adjusts the number of pod replicas in deployments, replica sets, or stateful sets.
- It scales based on observed metrics like CPU utilization or custom metrics.
- The goal is to handle varying loads efficiently by scaling out (adding pods) when demand increases and scaling in (reducing pods) when demand decreases.
- Horizontal Scaling:
- This refers to adding more pods to the cluster, rather than increasing resources of existing pods.
- It’s called “horizontal” because it expands the application laterally (more instances) rather than vertically (more resources per instance).
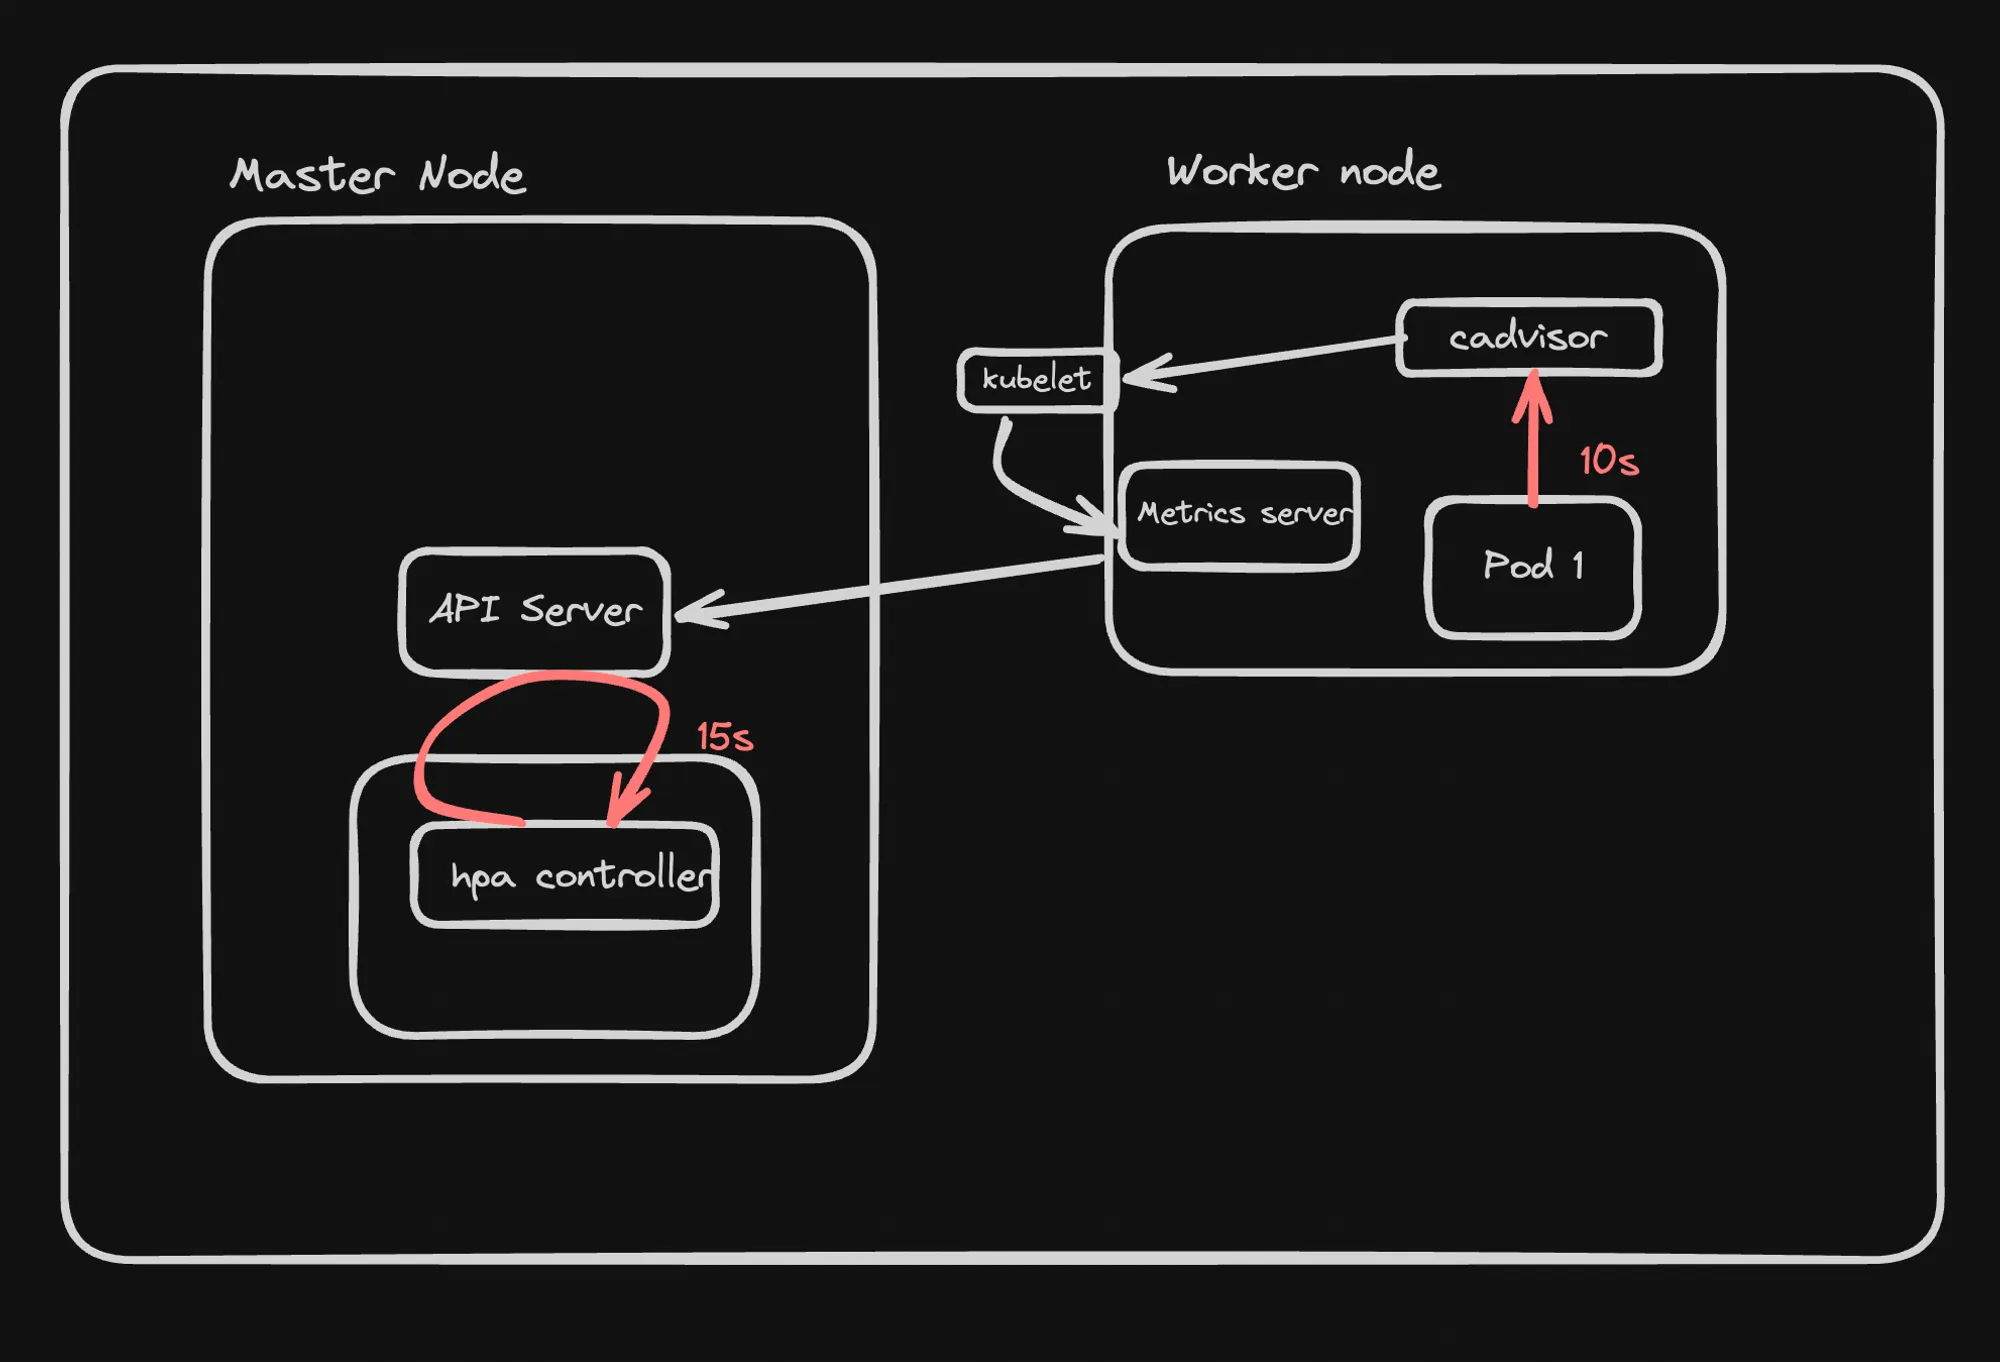
- Architecture:
- HPA operates as a control loop in Kubernetes.
- It runs intermittently, typically every 15 seconds, not continuously.
- Components:
- cAdvisor: A tool for collecting, aggregating, and exporting resource usage data from containers.
- Metrics Server: A lightweight, in-memory metrics storage system that collects resource usage data (CPU, memory) from kubelets and exposes it via the Kubernetes API.
- Installation and Usage:
-
The Metrics Server can be installed using kubectl:
Terminal window kubectl apply -f <https://github.com/kubernetes-sigs/metrics-server/releases/latest/download/components.yaml> -
Metrics can be viewed using commands like:
Terminal window kubectl top pod -n kube-systemkubectl top nodes -n kube-system
-
- HPA Controller Operation:
-
The HPA controller sends requests to the API server to fetch metrics.
-
A sample request might look like:
Terminal window GET https://[cluster-url]/apis/metrics.k8s.io/v1beta1/namespaces/default/pods
-
This setup allows Kubernetes to automatically adjust the number of running pods based on actual resource usage or custom metrics, ensuring efficient resource utilization and application performance under varying loads.