Week 3.5 Document Object Model (Laisha)
In this session, Laisha delves into the Document Object Model (DOM), demystifying the core structure that transforms plain HTML pages into dynamic, interactive web encounters through JavaScript. She also sheds light on NodeList and HTMLCollection, the essential tools for effectively handling clusters of elements.
DOM
You know how a remote control brings a television to life by letting you change channels and do cool things? Well, in the web world, JavaScript is like that remote control for your HTML page, making it active and dynamic. And the secret sauce behind this magic is the DOM – the Document Object Model.
What is DOM?
So, what’s this DOM thing? DOM stands for Document Object Model. It’s like the behind-the-scenes framework that JavaScript uses to talk to your browser. Imagine it as the language that JavaScript speaks with your web browser to make things happen on your HTML page.
Communication with the Browser
JavaScript and the browser communicate through a set of tools in this magical interface known as the DOM. These tools include properties, methods, and events. It’s like having a language to tell your browser what to do and when to do it.
Accessing the DOM
Okay, how do we get our hands on this DOM magic? Well, accessing the DOM is like reaching for that remote control. In JavaScript, you use commands to grab elements from your HTML page, change their content, or even create new elements. It’s like giving instructions to your browser using JavaScript.
Possibilities of DOM
Now, let’s talk about the possibilities the DOM opens up. With JavaScript and the DOM, you can:
- Change the content of your webpage dynamically.
- Update styles and layout on the fly.
- Respond to user interactions, like clicks or keyboard inputs.
- Add or remove elements, making your page super interactive.
Independence and Consistency
DOM doesn’t pick sides. It’s independent of any particular programming language. This means whether you’re using JavaScript, Python, or any other language, the DOM provides a consistent way to interact with your document. It’s like a universal remote that works with any TV.
In a Nutshell: So, the DOM is your backstage pass to making HTML pages come alive with JavaScript. It’s a set of rules and tools that allow you to control, change, and interact with your webpage dynamically. It’s like giving your webpage a personality and making it respond to your JavaScript commands.
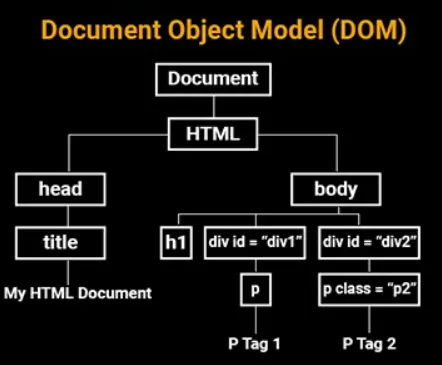
DOM Tree
The DOM tree, or The Document Object Model tree, is a hierarchical representation of the structure of a web document in the context of web development. It’s essentially a way to organize and navigate the elements of an HTML or XML document. Here’s a breakdown:
- Document Object: At the top of the tree is the Document Object, representing the entire web document.
- HTML Element: The HTML element comes next, serving as the container for the entire document.
- Head and Body Elements: Within the HTML element, there are two main sections: the Head and the Body. The Head typically contains meta-information, styles, and links to external resources, while the Body holds the primary content visible on the webpage.
- Further Nesting: Each of these main sections may contain further nested elements. For instance, the Head could include elements like title, meta, or link, while the Body could include paragraphs, images, buttons, and other content-related elements.
The DOM tree essentially forms a family tree-like structure, where elements are organized in a hierarchy based on their relationships with each other. Understanding the DOM tree is crucial for web developers because it provides a structured way to interact with and manipulate the content of a webpage using programming languages like JavaScript.
Implementing innerHTML
The below implementation consists of an input field that allows users to enter their name. Accompanying this, a button is present, equipped with an onclick attribute that invokes the displayGreeting function. Within this function, the entered name is acquired by accessing the value of the input field through document.getElementById("nameInput").value. Subsequently, the function utilizes innerHTML to dynamically alter the content of the <p> element identified by the id “greetingMessage,” facilitating the display of a personalized greeting message.
<!DOCTYPE html><html lang="en"><head>    <meta charset="UTF-8">    <meta name="viewport" content="width=device-width, initial-scale=1.0">    <title>Simple Name Greeting</title></head><body>
    <label for="nameInput">Enter Your Name:</label>    <input type="text" id="nameInput">    <button onclick="displayGreeting()">Submit</button>
    <p id="greetingMessage"></p>
    <script>        function displayGreeting() {            // Get the entered name from the input field            var enteredName = document.getElementById("nameInput").value;
            // Render the greeting message on the DOM using innerHTML            document.getElementById("greetingMessage").innerHTML = "Hello, " + enteredName + "!";        }    </script>
</body></html>
Difference Between HTMLCollection and NodeList:
Both HTMLCollections and NodeLists are collections of nodes in the Document Object Model (DOM) provided by JavaScript, but they have some key differences:
HTMLCollection:
- Live Collection:
- Live: An HTMLCollection is live, meaning it is automatically updated when the underlying document changes. If elements are added or removed, the HTMLCollection is automatically updated to reflect these changes.
- Accessing Elements:
- By Index: Elements in an HTMLCollection can be accessed using numerical indices, similar to an array.
- Methods:
- Limited Methods: HTMLCollections have a more limited set of methods compared to NodeLists.
- Specific to Elements:
- Element-Specific: HTMLCollections are typically used for collections of HTML elements, such as those returned by
getElementsByTagNameorgetElementsByClassName.
- Element-Specific: HTMLCollections are typically used for collections of HTML elements, such as those returned by
NodeList:
- Live or Static:
- Live or Static: A NodeList can be live or static. If it’s obtained using
querySelectorAll, it’s static and won’t automatically update. If it’s obtained by other means, likechildNodes, it might be live.
- Live or Static: A NodeList can be live or static. If it’s obtained using
- Accessing Elements:
- By Index or forEach: Like HTMLCollection, you can access elements by index. Additionally, NodeList supports the
forEachmethod for iteration.
- By Index or forEach: Like HTMLCollection, you can access elements by index. Additionally, NodeList supports the
- Methods:
- Richer Set of Methods: NodeLists typically have a broader set of methods compared to HTMLCollections.
- Not Limited to Elements:
- Node-Oriented: NodeLists can include various types of nodes, not just HTML elements. They might include text nodes, comment nodes, etc.
Practical Considerations:
- Common Methods:
- For general purpose, when using methods like
querySelectorAll, you will get a NodeList.
- For general purpose, when using methods like
- Live vs. Static:
- If you need a live collection that automatically updates, an HTMLCollection might be suitable.
- If you want a static collection that won’t change, or if you need a broader range of methods, a NodeList might be preferable.
- Usage:
- HTMLCollections are often associated with specific methods like
getElementsByClassNameorgetElementsByTagName. - NodeLists are often the result of more generic methods like
querySelectorAllor properties likechildNodes.
- HTMLCollections are often associated with specific methods like
In summary, the choice between HTMLCollection and NodeList depends on your specific needs, especially regarding the liveliness of the collection and the methods you require for manipulation.
HTMLCollection
Finding HTML Elements
By ID:
To find an HTML element by its ID, you can use the getElementById method.
var elementById = document.getElementById("yourElementId");By Tag Name:
To find HTML elements by their tag name, you can use the getElementsByTagName method.
var elementsByTagName = document.getElementsByTagName("yourTagName");By Class Name:
To find HTML elements by their class name, you can use the getElementsByClassName method.
var elementsByClassName = document.getElementsByClassName("yourClassName");By CSS Selector:
To find HTML elements using CSS selectors, you can use the querySelector or querySelectorAll methods.
var elementBySelector = document.querySelector("yourCSSSelector");var elementsBySelectorAll = document.querySelectorAll("yourCSSSelector");By HTML Object Collections:
To find HTML elements using HTML collections, you can use methods like getElementsByName or getElementsByName in specific cases.
var elementsByName = document.getElementsByName("yourElementName");These methods provide different ways to locate and interact with HTML elements in a document using JavaScript. Choose the appropriate method based on your specific needs and the structure of your HTML document.
Changing HTML Elements
Changing HTML elements dynamically is a fundamental aspect of web development, and JavaScript provides several methods to achieve this. Here are some commonly used methods for changing HTML elements:
innerHTML:-
Purpose: Changes the HTML content (including tags) of an element.
-
Example:
document.getElementById("myElement").innerHTML = "New content";
-
textContent:-
Purpose: Changes the text content of an element, excluding HTML tags.
-
Example:
document.getElementById("myElement").textContent = "New text content";
-
setAttribute:-
Purpose: Sets the value of an attribute on an element.
-
Example:
document.getElementById("myElement").setAttribute("class", "newClass");
-
style:-
Purpose: Modifies the inline styles of an element.
-
Example:
document.getElementById("myElement").style.color = "blue";
-
classList:-
Purpose: Provides methods to add, remove, or toggle CSS classes on an element.
-
Examples:
document.getElementById("myElement").classList.add("newClass");document.getElementById("myElement").classList.remove("oldClass");
-
appendChild:-
Purpose: Adds a new child element to an existing element.
-
Example:
var newElement = document.createElement("p");newElement.textContent = "New paragraph";document.getElementById("parentElement").appendChild(newElement);
-
removeChild:-
Purpose: Removes a child element from its parent.
-
Example:
var childToRemove = document.getElementById("childElement");document.getElementById("parentElement").removeChild(childToRemove);
-
setAttribute:-
Purpose: Sets or changes the value of an attribute on an HTML element.
-
Example:
document.getElementById("myElement").setAttribute("src", "new-image.jpg");
-
These methods provide a diverse set of tools for us —developers to manipulate HTML elements dynamically, whether it’s updating content, changing styles, or modifying attributes. The choice of method depends on the specific requirement and the nature of the change you want to apply.
Example - using setAttribute to change an input field to a button:
<!DOCTYPE html><html lang="en"><head>    <meta charset="UTF-8">    <meta name="viewport" content="width=device-width, initial-scale=1.0">    <title>Change Input to Button Example</title></head><body>
    <input type="text" id="myInput" value="Type Something">    <button onclick="changeToButton()">Change to Button</button>
    <script>        function changeToButton() {            // Get the input element            var inputElement = document.getElementById("myInput");
            // Create a new button element            var buttonElement = document.createElement("button");
            // Set attributes for the new button            buttonElement.setAttribute("type", "button");            buttonElement.setAttribute("onclick", "alert('Button Clicked!')");            buttonElement.innerHTML = "Click Me";
            // Replace the input with the new button            inputElement.parentNode.replaceChild(buttonElement, inputElement);        }    </script>
</body></html>
In this example, an input field with the id “myInput” is initially present, alongside a button labeled “Change to Button.” Clicking this button triggers the changeToButton function, wherein a new button is dynamically created using createElement. Key attributes (type and onclick) are set via setAttribute, and the input field is promptly replaced by this newly fashioned button using replaceChild. The outcome is a dynamic transformation, demonstrating the capability to swap an input field for a button upon clicking “Change to Button,” complete with an onclick attribute for interactive functionality.
Adding HTML Elements:
createElementMethod:-
Purpose: Creates a new HTML element.
-
Example:
var newElement = document.createElement("div");
-
appendChildMethod:-
Purpose: Appends a new child element to an existing element.
-
Example:
var parentElement = document.getElementById("parent");parentElement.appendChild(newElement);
-
insertBeforeMethod:-
Purpose: Inserts a new element before a specified existing element.
-
Example:
var existingElement = document.getElementById("existing");parentElement.insertBefore(newElement, existingElement);
-
innerHTMLProperty:-
Purpose: Sets or gets the HTML content inside an element.
-
Example:
parentElement.innerHTML = "<p>New content</p>";
-
insertAdjacentHTMLMethod:-
Purpose: Inserts HTML into a specified position relative to the element.
-
Example:
parentElement.insertAdjacentHTML("beforeend", "<p>New content</p>");
-
Deleting HTML Elements:
removeChildMethod:-
Purpose: Removes a child element from its parent.
-
Example:
var childElement = document.getElementById("child");parentElement.removeChild(childElement);
-
removeMethod (Modern Browsers):-
Purpose: Removes the element itself.
-
Example:
var elementToRemove = document.getElementById("toRemove");elementToRemove.remove();
-
replaceChildMethod:-
Purpose: Replaces a child element with a new element.
-
Example:
var newChildElement = document.createElement("span");parentElement.replaceChild(newChildElement, oldChildElement);
-
innerHTMLProperty (Setting to an Empty String):-
Purpose: Sets the HTML content inside an element to an empty string, effectively removing its content.
-
Example:
parentElement.innerHTML = "";
-
outerHTMLProperty:-
Purpose: Replaces an element with its HTML content.
-
Example:
var newHTML = "<p>New content</p>";parentElement.outerHTML = newHTML;
-
Query Selectors
Query Selectors allows developers to select and manipulate HTML elements in a document using CSS-like syntax. They provide a powerful and flexible way to target specific elements based on various criteria, such as element type, class, ID, or attribute.
Here are some common examples of using Query Selectors:
-
Selecting by Element Type:
var paragraphs = document.querySelectorAll('p'); -
Selecting by Class Name:
var elementsWithClass = document.querySelectorAll('.className'); -
Selecting by ID:
var elementWithId = document.querySelector('#elementId'); -
Selecting by Attribute:
var elementsWithAttribute = document.querySelectorAll('[data-custom]'); -
Combining Selectors:
var complexSelection = document.querySelectorAll('ul li.active');
Query Selectors return either a NodeList (for querySelectorAll) or a single element (for querySelector). NodeList is a collection of nodes, which can be iterated through using methods like forEach.
In summary, Query Selectors provide a concise and versatile way to interact with HTML elements in a document, making it easier for developers to manipulate the content and structure of a webpage dynamically.
DOM Node & Methods
The DOM (Document Object Model) is a programming interface that represents the structure of a document as a tree of objects, where each object corresponds to a part of the document. A DOM Node is a fundamental interface in the DOM hierarchy, representing a generic node in the tree structure. All elements, attributes, and text content in an HTML or XML document are nodes.
Here are some key points about DOM Nodes and their methods:
Key Points:
- Node Types:
- Nodes can have different types, such as elements, text nodes, attributes, comments, etc.
- The
nodeTypeproperty is used to determine the type of a node.
- Hierarchy:
- Nodes are organized in a hierarchical structure, forming a tree.
- The
parentNodeproperty allows you to access the parent node of a given node. - The
childNodesproperty provides a NodeList of child nodes.
- Traversal:
- The
nextSiblingandpreviousSiblingproperties allow traversal to adjacent nodes. - The
firstChildandlastChildproperties give access to the first and last child nodes.
- The
Types Of Nodes
In the DOM (Document Object Model), nodes represent different parts of an HTML or XML document, forming a tree structure. There are various types of nodes, each serving a specific purpose. Here are the common types of nodes in the DOM:
- Element Nodes:
-
Description: Represent HTML or XML elements.
-
Access: Accessed using methods like
getElementById,getElementsByTagName, orquerySelector. -
Example: The
<div>element is an example of an element node.<div id="example">This is an element node</div>
-
- Attribute Nodes:
-
Description: Represent attributes of an HTML or XML element.
-
Access: Attributes can be accessed through the
attributesproperty of an element node. -
Example: In this example,
srcandaltare attribute nodes of the<img>element.<img src="example.jpg" alt="Example Image">
-
- Text Nodes:
-
Description: Contain the text content within an HTML or XML element.
-
Access: Accessed through the
textContentorinnerTextproperty of an element node. -
Example: The text “This is a text node” is a text node within the
<p>element.<p>This is a text node</p>
-
- Comment Nodes:
-
Description: Represent comments within the HTML or XML document.
-
Access: Accessed through the
commentproperty of a comment node. -
Example: The content within
<!--and-->is a comment node.<!-- This is a comment -->
-
- Document Node:
-
Description: Represents the entire document.
-
Access: The document node is the entry point for accessing the DOM tree.
-
Example: The
<html>element serves as the document node in this example.<!DOCTYPE html><html><head><title>Document Node Example</title></head><body><p>This is the document node.</p></body></html>
-
- Document Type Node:
-
Description: Represents the document type declaration.
-
Access: Accessed through the
doctypeproperty of the document node. -
Example: The
<!DOCTYPE html>declaration is a document type node.<!DOCTYPE html>
-
DOM Events
DOM events are interactions or occurrences that take place in a web page, such as a user clicking a button, pressing a key, resizing the browser window, or the content of an input field changing. The HTML DOM (Document Object Model) allows JavaScript to respond to these events, enabling developers to create interactive and dynamic web applications. Here’s an overview of DOM events and how JavaScript can react to them:
Key Concepts:
- Event Types:
- Events can be triggered by various actions, such as mouse clicks (
click), keyboard presses (keydown,keyup), form submissions (submit), document loading (load), and more.
- Events can be triggered by various actions, such as mouse clicks (
- Event Targets:
- Events are associated with specific HTML elements, known as event targets. For example, a
clickevent might be associated with a button, and achangeevent might be associated with a form input.
- Events are associated with specific HTML elements, known as event targets. For example, a
- Event Handlers:
- JavaScript can respond to events by using event handlers. Event handlers are functions that get executed when a specific event occurs.
Reacting to Events:
-
Inline Event Handlers:
- You can define event handlers directly within HTML elements using inline attributes like
onclick,onmouseover, etc.
<button onclick="myFunction()">Click me</button> - You can define event handlers directly within HTML elements using inline attributes like
-
DOM Level 0 Event Handling:
- You can assign event handlers directly to JavaScript properties of DOM elements.
var button = document.getElementById("myButton");button.onclick = function() {// Handle the click event}; -
DOM Level 2 Event Handling:
- The
addEventListenermethod is used to attach event handlers to elements. This method provides more flexibility and allows multiple handlers for the same event.
var button = document.getElementById("myButton");button.addEventListener("click", function() {// Handle the click event}); - The
-
Event Object:
- Event handlers typically receive an event object that provides information about the event, such as the target element, mouse coordinates, key codes, etc.
button.addEventListener("click", function(event) {console.log("Button clicked!", event.target);});
Common Events:
- Click Event:
- Triggered when a mouse button is clicked.
- Keydown and Keyup Events:
- Fired when a key on the keyboard is pressed or released.
- Submit Event:
- Triggered when a form is submitted.
- Change Event:
- Fired when the value of an input field changes.
- Load Event:
- Occurs when a resource (like an image or script) and the entire page have finished loading.
Example:
<!DOCTYPE html><html lang="en"><head>    <meta charset="UTF-8">    <meta name="viewport" content="width=device-width, initial-scale=1.0">    <title>Event Handling Example</title></head><body>
    <button id="myButton">Click me</button>
    <script>        var button = document.getElementById("myButton");
        // Using DOM Level 2 event handling        button.addEventListener("click", function() {            alert("Button clicked!");        });    </script>
</body></html>
In this example, a click event handler is attached to a button using the addEventListener method. When the button is clicked, an alert is displayed.
Understanding DOM events and how to handle them is crucial for creating interactive and responsive web applications. Developers use events to capture user actions and trigger appropriate JavaScript functionality in response.
The onload and onunload functions:
The onload and onunload events are part of the HTML DOM (Document Object Model) and are used to execute JavaScript code when a document or a page finishes loading (onload) or unloading (onunload). These events are commonly used to perform actions when a user enters or leaves a webpage.
onload Event:
The onload event is triggered when a document or a webpage has finished loading. This event is often used to ensure that all resources, such as images and scripts, have been fully loaded before executing specific JavaScript code.
Example:
<!DOCTYPE html><html lang="en"><head> <meta charset="UTF-8"> <meta name="viewport" content="width=device-width, initial-scale=1.0"> <title>onload Event Example</title> <script> window.onload = function() { // Code to execute after the page has fully loaded alert("Page loaded!"); }; </script></head><body> <h1>Hello, World!</h1></body></html>In this example, the onload event is used to display an alert when the page has finished loading.
onunload Event:
The onunload event is triggered just before a document or a webpage is about to be unloaded, such as when the user navigates away from the page or closes the browser tab. This event is often used to perform cleanup tasks or prompt the user for confirmation before leaving the page.
Example:
<!DOCTYPE html><html lang="en"><head> <meta charset="UTF-8"> <meta name="viewport" content="width=device-width, initial-scale=1.0"> <title>onunload Event Example</title> <script> window.onunload = function() { // Code to execute before the page is unloaded alert("Goodbye! Come back soon."); }; </script></head><body> <h1>Thanks for visiting!</h1></body></html>In this example, the onunload event is used to display an alert just before the page is unloaded.
These events play a crucial role in managing the lifecycle of a web page and allow developers to execute code at specific points during the page’s existence.
DOM Event Listeners
DOM Event Listeners provide a more flexible and powerful way to handle events compared to traditional event attributes (e.g., onclick). Event Listeners allow you to attach multiple event handlers to a single event, making your code more modular and easier to maintain.
Using addEventListener:
The addEventListener method is used to attach an event listener to an HTML element. It takes three parameters: the event type, the function to be executed when the event occurs, and an optional third parameter indicating whether the event should be captured during the event propagation phase.
Syntax:
element.addEventListener(eventType, eventHandler, useCapture);eventType: A string representing the type of event (e.g., “click”, “keydown”, “change”).eventHandler: A function that will be called when the event occurs.useCapture: (Optional) A boolean value indicating whether to use the capturing phase (true) or the bubbling phase (false, default).
Example of Multiple Event Listeners:
Here’s a code snippet demonstrating the use of multiple event listeners on a button. In this example, we have a button that changes its color and displays a message when clicked, and it resets to its default state when the mouse leaves it:
<!DOCTYPE html><html lang="en"><head>    <meta charset="UTF-8">    <meta name="viewport" content="width=device-width, initial-scale=1.0">    <title>Multiple Event Listeners Example</title>    <style>        #myButton {            padding: 10px;            font-size: 16px;            cursor: pointer;        }    </style></head><body>
    <button id="myButton">Click me</button>
    <script>        // Get the button element        var button = document.getElementById("myButton");
        // Event listener for the "click" event        button.addEventListener("click", function() {            // Change the button color            button.style.backgroundColor = "green";            // Display a message            alert("Button clicked!");        });
        // Event listener for the "mouseenter" event        button.addEventListener("mouseenter", function() {            // Change the button color on mouse enter            button.style.backgroundColor = "yellow";        });
        // Event listener for the "mouseleave" event        button.addEventListener("mouseleave", function() {            // Reset the button color on mouse leave            button.style.backgroundColor = "";        });    </script>
</body></html>
In this example:
- Clicking the button changes its color to green and triggers an alert.
- Hovering over the button changes its color to yellow.
- Moving the mouse away from the button resets its color to the default state.
Using multiple event listeners allows you to handle different aspects of user interaction separately, promoting cleaner and more organized code.
Event Bubbling & Event Capturing
Event bubbling and event capturing are two phases of event propagation in the HTML DOM. When an event occurs on an HTML element, it goes through these two phases:
- Event Capturing (Capture Phase):
- In this phase, the event travels from the root of the DOM tree to the target element.
- Event handlers attached with
useCaptureset totrueare triggered during this phase.
- Event Bubbling (Bubbling Phase):
- In this phase, the event travels from the target element back up to the root of the DOM tree.
- Event handlers attached without specifying
useCaptureor withuseCaptureset tofalseare triggered during this phase.
Example of Event Capturing:
In the following example, we have a nested set of div elements, and we attach event listeners to the document capturing phase (useCapture set to true). When you click on the innermost div, you’ll see that the event handlers for the capturing phase are triggered from the root to the target:
<!DOCTYPE html><html lang="en"><head>    <meta charset="UTF-8">    <meta name="viewport" content="width=device-width, initial-scale=1.0">    <title>Event Capturing Example</title></head><body>
    <div id="outer" style="border: 1px solid red; padding: 10px;">        Outer        <div id="middle" style="border: 1px solid green; padding: 10px;">            Middle            <div id="inner" style="border: 1px solid blue; padding: 10px;">                Inner            </div>        </div>    </div>
    <script>        document.getElementById("outer").addEventListener("click", function() {            console.log("Outer Capturing");        }, true);
        document.getElementById("middle").addEventListener("click", function() {            console.log("Middle Capturing");        }, true);
        document.getElementById("inner").addEventListener("click", function() {            console.log("Inner Capturing");        }, true);    </script>
</body></html>
When you click on the “Inner” div, you’ll see in the console that the capturing phase event handlers are triggered in the order: Outer Capturing, Middle Capturing, Inner Capturing.
Example of Event Bubbling:
In this example, event listeners are attached without specifying useCapture or with useCapture set to false. When you click on the innermost div, the event handlers are triggered in the bubbling phase from the target back up to the root:
<!DOCTYPE html><html lang="en"><head>    <meta charset="UTF-8">    <meta name="viewport" content="width=device-width, initial-scale=1.0">    <title>Event Bubbling Example</title></head><body>
    <div id="outer" style="border: 1px solid red; padding: 10px;">        Outer        <div id="middle" style="border: 1px solid green; padding: 10px;">            Middle            <div id="inner" style="border: 1px solid blue; padding: 10px;">                Inner            </div>        </div>    </div>
    <script>        document.getElementById("outer").addEventListener("click", function() {            console.log("Outer Bubbling");        });
        document.getElementById("middle").addEventListener("click", function() {            console.log("Middle Bubbling");        });
        document.getElementById("inner").addEventListener("click", function() {            console.log("Inner Bubbling");        });    </script>
</body></html>
When you click on the “Inner” div, you’ll see in the console that the bubbling phase event handlers are triggered in the order: Inner Bubbling, Middle Bubbling, Outer Bubbling.
In practice, event bubbling is more commonly used, and the useCapture parameter is often omitted or set to false when attaching event listeners. Event capturing is less commonly used and is mainly applicable in specific scenarios where capturing is explicitly needed.