Week 12.5 Prisma Relationships
In today’s lecture, Harkirat provided a comprehensive Recap of Prisma, focusing on the framework’s approach to defining and managing relationships within a database schema. He also explains the significance of the Prisma Client in facilitating database operations and the role of Prisma's migration system in tracking and applying schema changes.
Relationships
In Prisma, relationships between tables are defined using a straightforward and expressive syntax within the Prisma schema file. These relationships are crucial for representing how data in one table is associated with data in another, and Prisma supports several types of relationships to model the various ways in which data can be interconnected.
Types of Relationships in Prisma
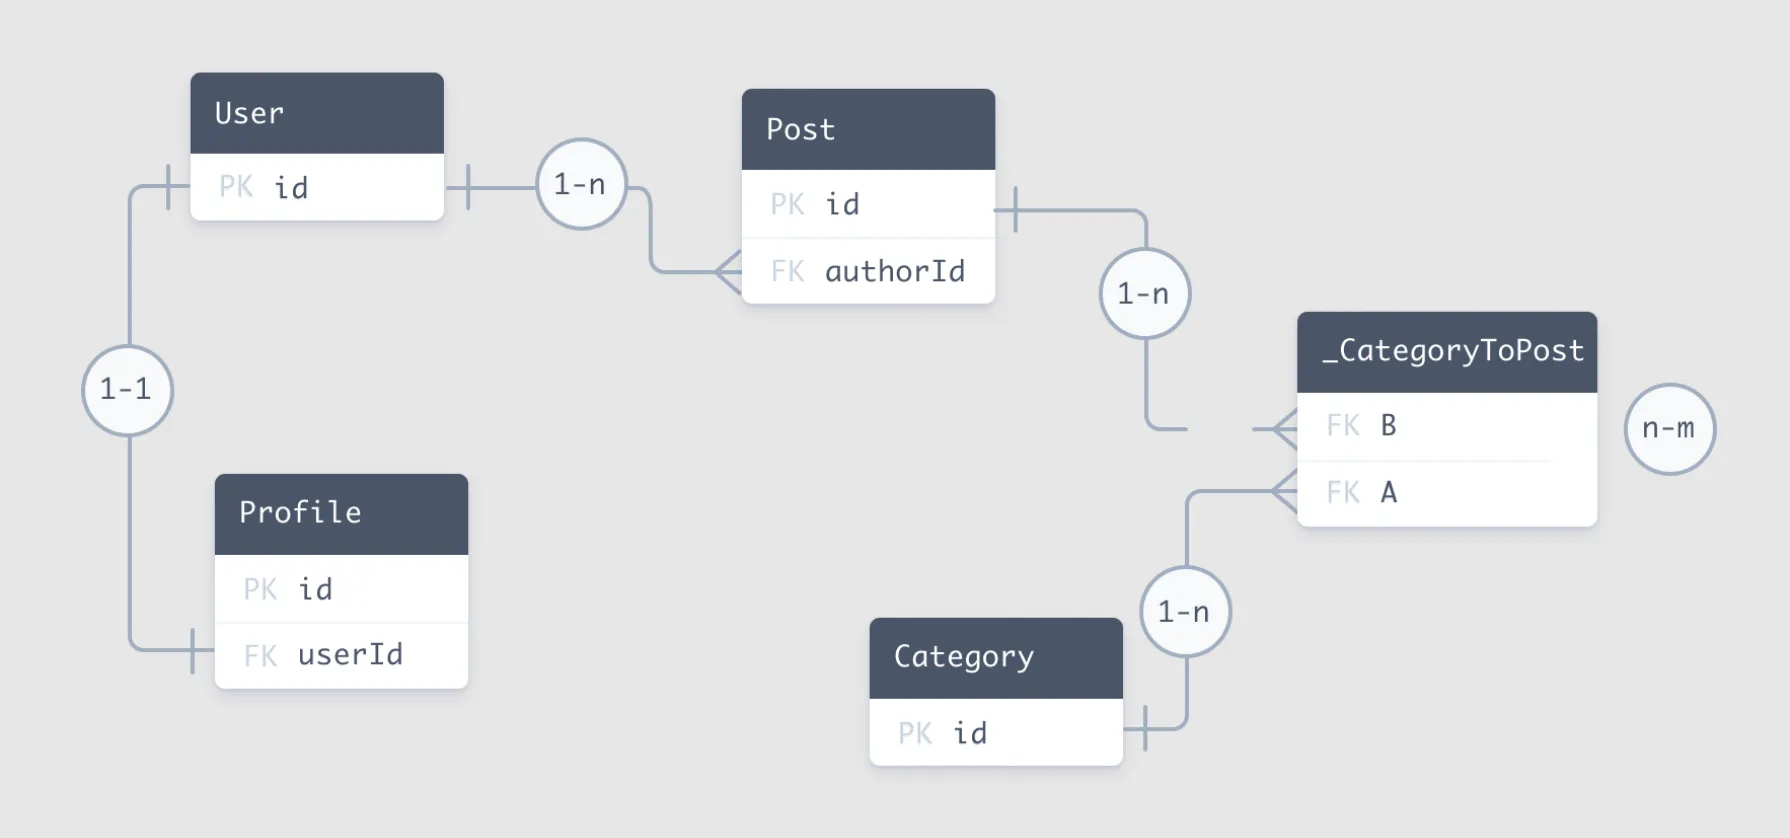
Prisma allows you to define the following types of relationships:
- One to One: A relationship where a single record in one table is linked to a single record in another table.
- One to Many: A relationship where a single record in one table is linked to multiple records in another table.
- Many to One: The inverse of one to many, where multiple records in one table are linked to a single record in another table.
- Many to Many: A relationship where multiple records in one table are linked to multiple records in another table.
One to Many Relationship in the TODO App
For the TODO app, there is a one-to-many relationship between the User and Todo models. This means that one user can have many todos, but each todo is associated with only one user.
Updating the Prisma Schema
To define a one-to-many relationship in Prisma, you update the schema.prisma file to include a reference from the Todo model to the User model. Here’s how the updated schema looks based on the provided image:
// This is your Prisma schema file,// learn more about it in the docs: <https://pris.ly/d/prisma-schema>
generator client {  provider = "prisma-client-js"}
datasource db {  provider = "postgresql"  url      = "postgresql://postgres:mysecretpassword@localhost:5432/postgres"}
model User {  id         Int      @id @default(autoincrement())  username   String   @unique  password   String  firstName  String  lastName   String  todos      Todo[]}
model Todo {  id          Int     @id @default(autoincrement())  title       String  description String  done        Boolean @default(false)  userId      Int  user        User    @relation(fields: [userId], references: [id])}
In this schema:
- The
Usermodel has atodosfield, which is an array ofTodoobjects. This represents the “many” side of the one-to-many relationship. - The
Todomodel has auserIdfield, which stores the reference to the associatedUser. It also has auserfield that establishes the relationship using the@relationattribute. Thefields: [userId]part specifies which field on theTodomodel is used to store the connection, andreferences: [id]part specifies which field on theUsermodel is being referred to.
Why do you need Prisma Client
The Prisma Client is an auto-generated and type-safe database client that allows developers to interact with their database in a comfortable and secure way. It is part of the Prisma ecosystem, which aims to make database access easy and robust.
import { PrismaClient } from '@prisma/client';
const prisma = new PrismaClient();
async function createTodoForUser(userId: number, title: string, description: string) {  const todo = await prisma.todo.create({    data: {      title,      description,      user: {        connect: { id: userId },      },    },  });  return todo;}
async function getUserWithTodos(userId: number) {  const userWithTodos = await prisma.user.findUnique({    where: { id: userId },    include: { todos: true },  });  return userWithTodos;}
*// Example usage*createTodoForUser(1, 'Prisma Client', 'Learn how to use Prisma Client').then(todo => {  console.log('Created new todo:', todo);});
getUserWithTodos(1).then(user => {  console.log('User with todos:', user);});
In this example, createTodoForUser creates a new Todo record associated with a User by their id The getUserWithTodos function retrieves a user and their related Todo items using Prisma Client’s findUnique method with the include option to fetch related records.
Updating the Database and the Prisma Client
After updating the schema, you need to apply the changes to your database and regenerate the Prisma Client to reflect the new relationship:
npx prisma migrate dev --name relationshipnpx prisma generateThe prisma migrate dev command creates a new migration file in the prisma/migrations folder, which includes the SQL statements necessary to update the database schema with the new relationship. The prisma generate command updates the Prisma Client to include the new relationship logic.
Exploring the Prisma Migrations Folder
When you explore the prisma/migrations folder after running the migration, you will see a new directory for the migration you just created. Inside this directory, there will be files that describe the changes made to the database schema, including the addition of foreign keys and any other constraints related to the new relationship.
Todo Functions
In the context of a Prisma-based application, you can create functions to interact with the database and perform CRUD operations on the Todo and User models. Below are detailed explanations and code snippets for creating todos, retrieving todos for a user, and fetching todos along with user details.
1. createTodo Function
The createTodo function allows you to insert a new todo into the database for a specific user.
Solution:
import { PrismaClient } from "@prisma/client";
const prisma = new PrismaClient();
async function createTodo(userId: number, title: string, description: string) {  const todo = await prisma.todo.create({    data: {      title,      description,      userId    },  });  console.log(todo);}
createTodo(1, "go to gym", "go to gym and do 10 pushups");
In this function, prisma.todo.create is used to create a new Todo record associated with a User by their userId. The data object contains the fields required for the Todo model.
2. getTodos Function
The getTodos function retrieves all todos associated with a specific user.
Solution:
import { PrismaClient } from "@prisma/client";
const prisma = new PrismaClient();
async function getTodos(userId: number) {  const todos = await prisma.todo.findMany({    where: {      userId: userId,    },  });  console.log(todos);}
getTodos(1);
Here, prisma.todo.findMany is used with a where clause to filter todos by the userId, returning all todos for that user.
3. getTodosAndUserDetails Function
The getTodosAndUserDetails function fetches todos along with the details of the user who created them. This is similar to performing a join in SQL.
Bad Solution (Separate Queries):
import { PrismaClient } from "@prisma/client";
const prisma = new PrismaClient();
async function getTodosAndUserDetails(userId: number) {  const user = await prisma.user.findUnique({    where: {      id: userId    }  });  const todos = await prisma.todo.findMany({    where: {      userId: userId,    }  });  console.log(user);  console.log(todos);}
getTodosAndUserDetails(1);
This approach uses two separate queries to fetch the user and their todos, which is less efficient.
Good Solution (Using Select):
import { PrismaClient } from "@prisma/client";
const prisma = new PrismaClient();
async function getTodosAndUserDetails(userId: number) {  const todos = await prisma.todo.findMany({    where: {      userId: userId,    },    select: {      title: true,      description: true,      done: true,      user: {        select: {          username: true,          firstName: true,          lastName: true        }      }    }  });  console.log(todos);}
getTodosAndUserDetails(1);
In this improved solution, a single query with a select statement is used to fetch todos and include the user details for each todo. The select statement specifies that we want to include the user object with only the username, firstName, and lastName fields for each todo.