Week 19.0 Middlewares in Next js
In this short offline lecture, Harkirat covers the concept of Middlewares in Next.js, their purpose, implementation, and provides hands-on examples of creating a request counter middleware and selectively running middlewares based on specific routes.
Middlewares
What are Middlewares?
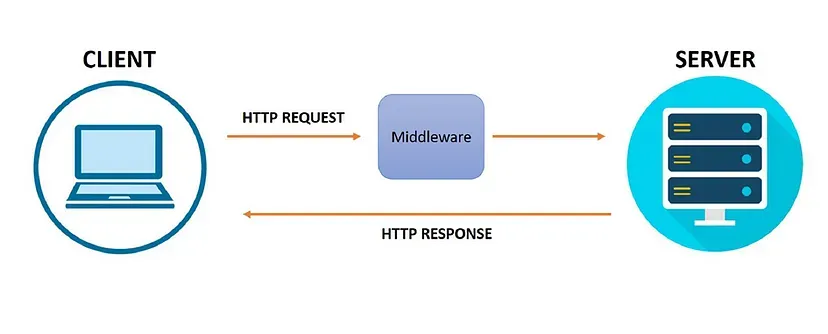
Middlewares in Next.js are functions that have access to the request object (req), the response object (res), and the next middleware function in the application’s request-response cycle. They can be used to perform tasks such as logging, parsing request bodies, adding response headers, and more.
Common Uses
- Analytics: Middlewares can be used to track and log information about incoming requests, such as the request method, URL, headers, and more. This data can be used for analytics purposes.
- Authentication: Middlewares can be used to authenticate users before allowing them to access certain routes or resources. This can be done by checking for the presence of an authentication token or other credentials in the request headers or cookies.
- Redirecting the User: Middlewares can be used to redirect users to different routes based on certain conditions, such as authentication status, user roles, or other factors.
Code Snippets
Here’s an example of a middleware that counts the number of requests made to the server:
import express from "express";
const app = express();
let requestCount = 0;
app.use(  function middleware(req, res, next) {    requestCount++;    next(); // Call the next middleware or route handler  });
app.get("/", (req, res) => {  res.send("Hello world");});
app.get("/requestCount", (req, res) => {  res.json({    requestCount  });});
app.listen(3000);
In this example, the middleware function is executed for every incoming request. It increments the requestCount variable and then calls the next() function to pass control to the next middleware or route handler. The /requestCount route returns the current value of requestCount.
Here’s an example of a middleware that authenticates users using JSON Web Tokens (JWT):
import express from "express";import jwt from "jsonwebtoken";
const app = express();
//@ts-ignoreasync function authMiddleware(req, res, next) {  const token = req.headers.authorization.split(" ")[1];  const decoded = jwt.verify(token, "secret");  if (decoded) {    next(); // Call the next middleware or route handler  } else {    res.status(401).send("Unauthorised");  }}
app.get("/", authMiddleware, (req, res) => {  res.send("You are logged in");});
app.listen(3000);
In this example, the authMiddleware function is executed before the route handler for the / route. It checks for the presence of an Authorization header in the request and verifies the JWT token using the jsonwebtoken library. If the token is valid, it calls the next() function to pass control to the route handler. If the token is invalid, it sends a 401 Unauthorized response.
Middlewares in Next.js can be added at various levels, including the application level, route level, or even nested within other middlewares. They provide a flexible and powerful way to modify the request-response cycle and add functionality to your Next.js application.
Middlewares + Next
Middlewares in Next.js are powerful functions that allow you to run code before a request is completed. They provide a flexible way to modify the response based on the incoming request, enabling various use cases such as authentication, redirection, header manipulation, and more.
Modifying the Response
With middlewares, you can modify the response in several ways:
- Rewriting: You can rewrite the incoming request path to a different route, enabling features like A/B testing, feature rollouts, or legacy path support.
- Redirecting: Middlewares allow you to redirect users to different routes based on specific conditions, such as locale, user role, or authentication status.
- Modifying Headers: You can modify the request or response headers, which is useful for tasks like setting cookies, adding security headers, or modifying caching behavior.
- Responding Directly: In some cases, you can respond directly from the middleware without involving the page or API route, providing a quick and efficient way to handle certain requests.
Use Cases
Integrating middlewares into your Next.js application can lead to significant improvements in performance, security, and user experience. Here are some common use cases where middlewares are particularly effective:
**1] Authentication and Authorization**:
- Ensure user identity by checking session cookies or authentication tokens before granting access to specific pages or API routes.
- Implement role-based access control by redirecting users based on their roles or permissions.
**2] Logging and Analytics**:
- Capture and analyze request data, such as headers, query parameters, and request bodies, before processing by the page or API route.
- Log relevant information for debugging, monitoring, or auditing purposes.
**3] Server-Side Redirects**:
- Redirect users at the server level based on conditions like locale, user role, or authentication status.
- Implement permanent or temporary redirects for SEO purposes or to handle legacy URLs.
**4] Caching**:
- Implement server-side caching strategies by checking cache headers or cache keys before rendering the page or executing the API route.
- Invalidate caches based on specific conditions or events.
Creating a Request Counter Middleware
- Bootstrap a Next.js Application
First, we need to create a new Next.js application using the create-next-app command:
npx create-next-app request-count-middlewareThis will create a new Next.js project with the name request-count-middleware.
- Create
middleware.tsin the Root Folder
Next, we need to create a new file called middleware.ts in the root folder of our project. This file will contain the middleware function that will track the number of requests.
- Add Code to Track the Number of Requests
In the middleware.ts file, we’ll add the following code:
import { NextResponse } from 'next/server'import type { NextRequest } from 'next/server'
let requestCount = 0;
export function middleware(request: NextRequest) {  requestCount++;  console.log("number of requests is " + requestCount);  return NextResponse.next();}
export const config = {  matcher: '/:path*',}
Let’s break down this code:
import { NextResponse } from 'next/server'andimport type { NextRequest } from 'next/server'import the necessary types and functions from the Next.js server API.let requestCount = 0;initializes a variable to keep track of the number of requests.export function middleware(request: NextRequest)is the middleware function that will be executed for each incoming request.- Inside the
middlewarefunction, we increment therequestCountvariable and log the current number of requests to the console usingconsole.log("number of requests is " + requestCount);. return NextResponse.next();tells Next.js to continue processing the request after the middleware has finished executing.export const config = { matcher: '/:path*' }configures the middleware to run for all routes in the application.
- Try Visiting the Website
Now, you can start the Next.js development server by running the following command in your terminal:
npm run devOnce the development server is running, you can visit your website at http://localhost:3000. Each time you refresh the page or navigate to a different route, you should see the request count incrementing in the console.
Here’s an example of what you might see in the console:
number of requests is 1number of requests is 2number of requests is 3Modifying Request Counter
Let us modify the existing middleware to track only requests that start with /api. We’ll also create a dummy API route to test the middleware.
- Create a Dummy API Route
First, let’s create a new file called route.ts inside the api/user directory. This file will contain a simple API route that returns a JSON response.
import { NextResponse } from "next/server";
export function GET() {  return NextResponse.json({    message: "Hi there"  });}
This API route will respond with a JSON object containing the message “Hi there” when a GET request is made to /api/user.
- Update
middleware.ts
Next, we’ll update the middleware.ts file to track only requests that start with /api. Here’s the updated code:
import { NextResponse } from 'next/server'import type { NextRequest } from 'next/server'
let requestCount = 0;export function middleware(request: NextRequest) {  if (request.nextUrl.pathname.startsWith('/api')) {    requestCount++;    console.log("number of requests is " + requestCount);  }  return NextResponse.next();}
// See "Matching Paths" below to learn moreexport const config = {  matcher: '/api/:path*',}
Let’s break down the changes:
- Inside the
middlewarefunction, we added anifstatement to check if the incoming request’s URL path starts with/api. If it does, we increment therequestCountvariable and log the current number of requests to the console. - We updated the
configobject to set thematcherproperty to/api/:path*. This tells Next.js to run the middleware only for requests that start with/api.
- Test the Middleware
Now, you can start the Next.js development server by running the following command in your terminal:
npm run devOnce the development server is running, you can visit your API route at http://localhost:3000/api/user. You should see the following response in your browser or API client:
{ "message": "Hi there"}Additionally, you should see the request count incrementing in the console:
number of requests is 1If you refresh the page or make another request to the /api/user route, you should see the request count incrementing accordingly.
However, if you visit any other route that doesn’t start with /api, such as http://localhost:3000, you won’t see the request count incrementing in the console. This is because the middleware is now configured to run only for requests that start with /api.
By updating the
matcherproperty in theconfigobject, you can control which routes the middleware should run for. This allows you to apply different middleware logic to different parts of your application, providing greater flexibility and control over the request-response cycle.
Selectively Running Middlewares
Let us take a look on how we can conditionally execute different middleware logic based on the incoming request’s URL path. This will allow us to apply specific middleware functionality to certain routes or parts of our application.
Here’s an explanation of the provided code:
import { NextResponse } from 'next/server'import type { NextRequest } from 'next/server'
export function middleware(request: NextRequest) {  console.log(request.nextUrl.pathname)
  if (request.nextUrl.pathname.startsWith('/admin')) {    return NextResponse.redirect(new URL('/signin', request.url))  }
  if (request.nextUrl.pathname.startsWith('/dashboard')) {    return NextResponse.next()  }}
export const config = { matcher: '/:path*',}console.log(request.nextUrl.pathname): This line logs the current request’s URL path to the console. It can be useful for debugging or logging purposes.if (request.nextUrl.pathname.startsWith('/admin')): This condition checks if the request’s URL path starts with/admin. If it does, the middleware will execute the following code block.return NextResponse.redirect(new URL('/signin', request.url)): If the request’s URL path starts with/admin, this line will redirect the user to the/signinroute. TheNextResponse.redirectfunction creates a new response object that redirects the user to the specified URL. In this case, it redirects to/signinwhile preserving the original request’s URL parameters and query string.if (request.nextUrl.pathname.startsWith('/dashboard')): This condition checks if the request’s URL path starts with/dashboard. If it does, the middleware will execute the following code block.return NextResponse.next(): If the request’s URL path starts with/dashboard, this line tells Next.js to continue processing the request and move on to the next middleware or route handler.export const config = { matcher: '/:path*' }: This configuration object tells Next.js to run the middleware for all routes in the application.
In this example, the middleware selectively applies different logic based on the incoming request’s URL path:
- If the request is for a path starting with
/admin, the user is redirected to the/signinroute. This could be useful for implementing authentication or authorization checks for admin-related routes. - If the request is for a path starting with
/dashboard, the middleware allows the request to proceed to the next middleware or route handler. - For all other routes, the middleware doesn’t perform any specific action and simply allows the request to continue.
By selectively running middlewares based on the request’s URL path, you can implement various functionality and behavior for different parts of your application. This could include authentication checks, access control, logging, caching, and more.