Week 21.2 Singleton Patterns and Pub Subs
In this lecture, Harkirat covers the concepts of stateful and stateless backends, exploring their differences and implications for application design. Later he elaborates on the singleton pattern, as well as the publish-subscribe (pub-sub) pattern and its implementation combined with the singleton.
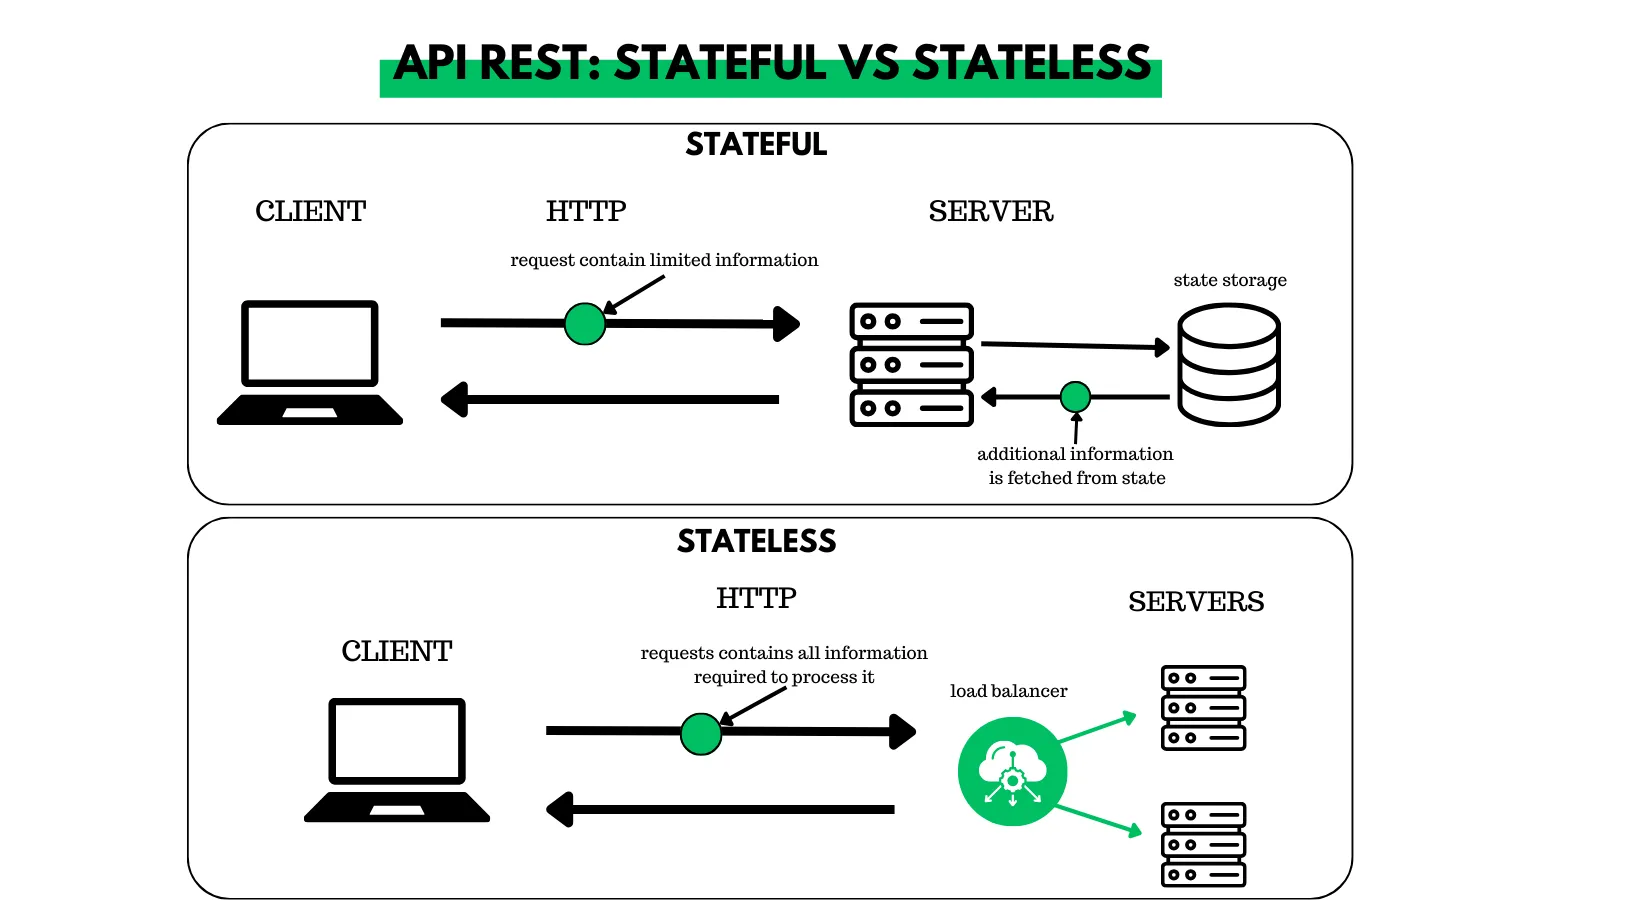
Stateful vs Stateless Backends
Understanding the difference between stateful and stateless backends is crucial for designing scalable and efficient systems. This section will elaborate on the key concepts, advantages, and use cases of both types of backends.
Common Interview Question
A common interview question in software engineering is to explain the difference between stateful and stateless servers. This question tests your understanding of backend architecture and your ability to design systems that can scale and handle various types of workloads.
Stateless Servers
Stateless servers do not hold any state in memory. When you write HTTP servers, they typically do not maintain any in-memory variables. Instead, they rely on external storage, such as a database, to manage state.
Advantages of Stateless Servers:
- No Need for Stickiness: Users can connect to any available server because there is no need to maintain a connection to a specific server. This makes load balancing straightforward.
- Easy Autoscaling: Stateless servers can easily scale up and down based on CPU usage. Traffic can be routed to any available server, making it simple to manage resources.
Diagram of Stateless Server:
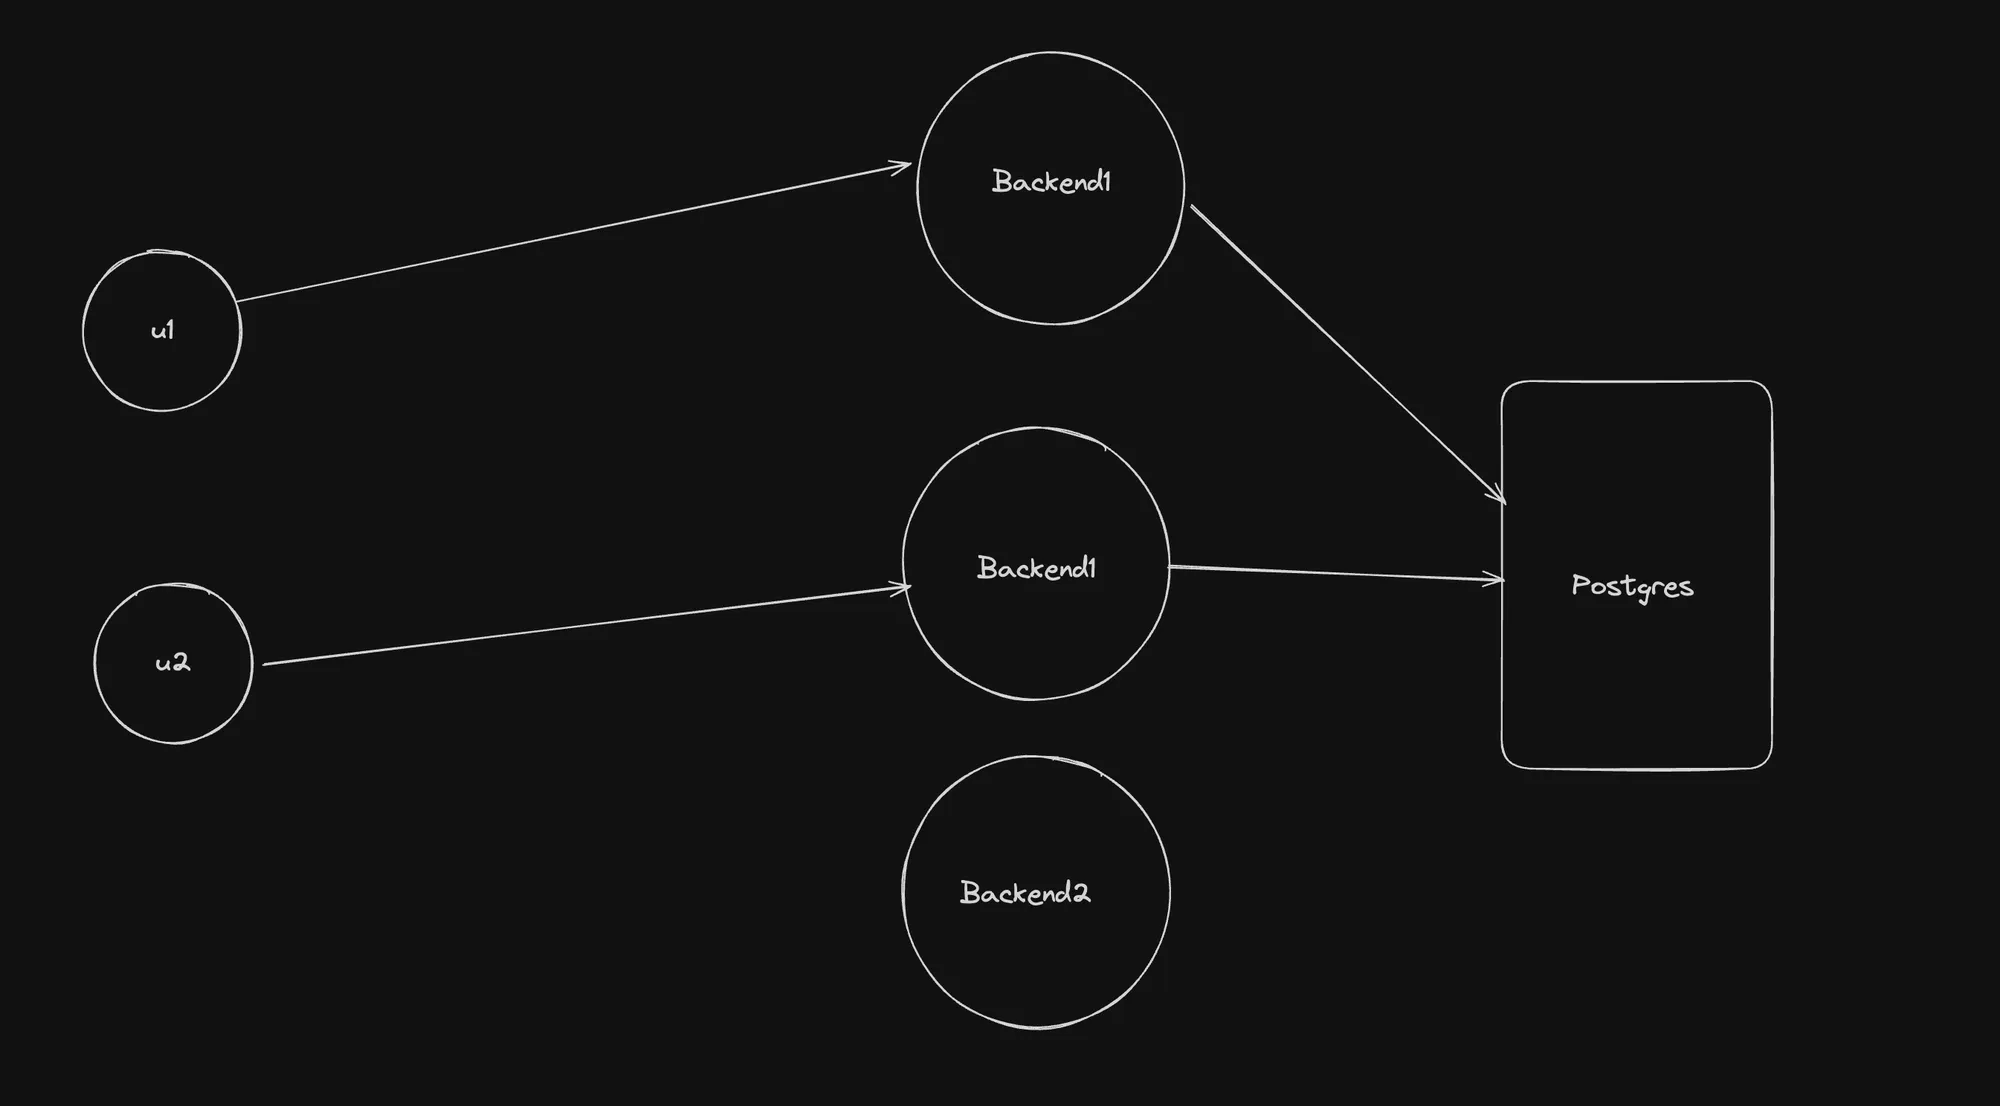
Stateless Server Diagram
In the diagram, users (u1 and u2) can connect to any instance of Backend1 or Backend2, which in turn interact with a Postgres database to manage state.
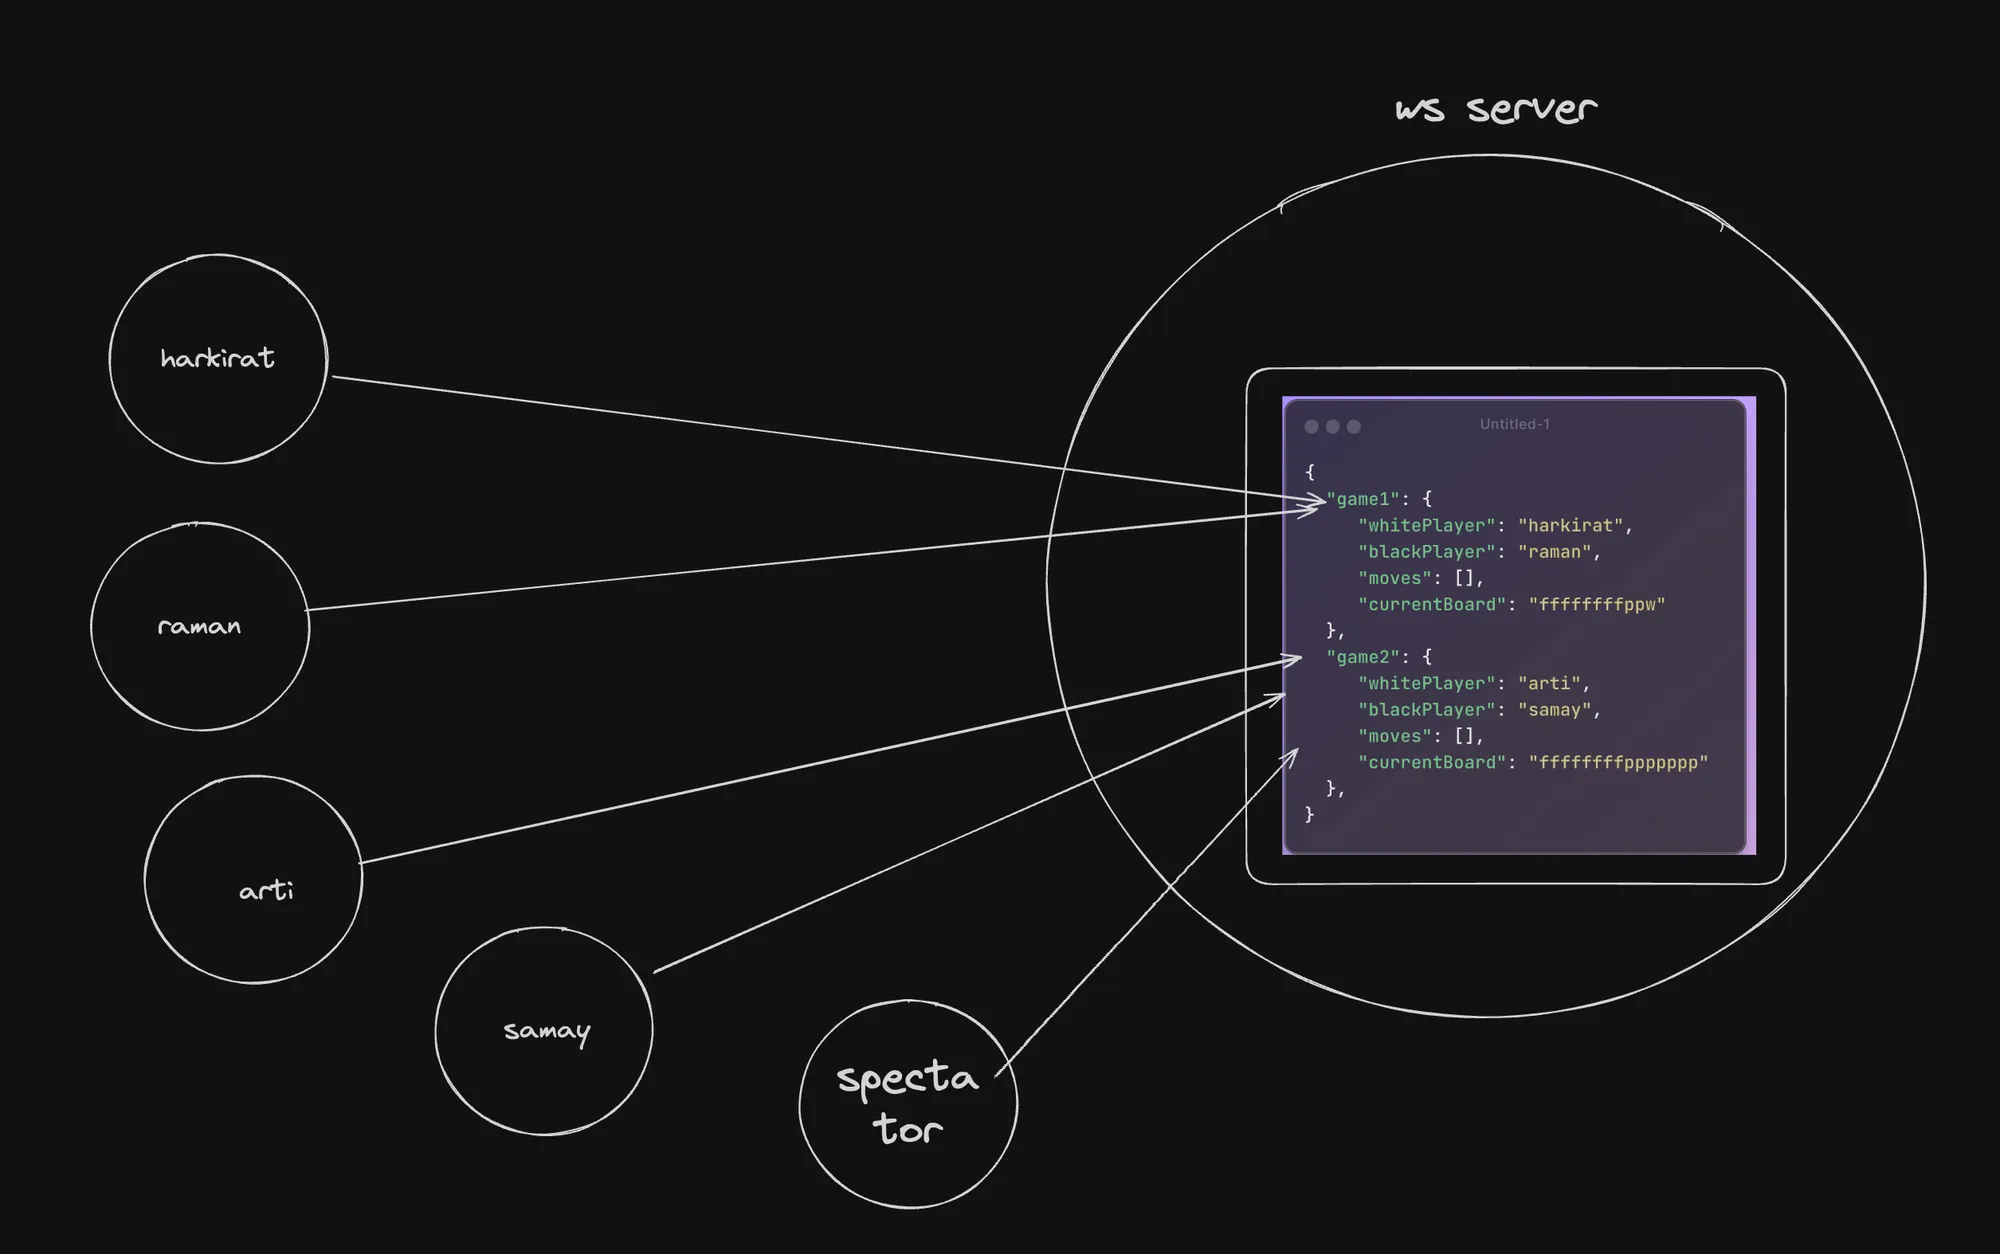
Stateful Servers
Stateful servers hold state within the server’s memory. This means that the server maintains in-memory variables that are used to manage the state of the application.
Examples of Stateful Servers:
- In-Memory Cache: Creating an in-memory cache to store frequently accessed data for improved performance. Example Code
- Real-Time Game State: Storing the state of a game in memory for real-time multiplayer games. Example Code
- Chat Application: Maintaining a list of the 10 most recent chat messages in memory for a chat application.
Stickiness:
In cases where the server holds state, there is a need for stickiness. Stickiness ensures that the user who is interested in a specific room or game state gets connected to the specific server that holds the relevant state.
Diagram of Stateful Server:
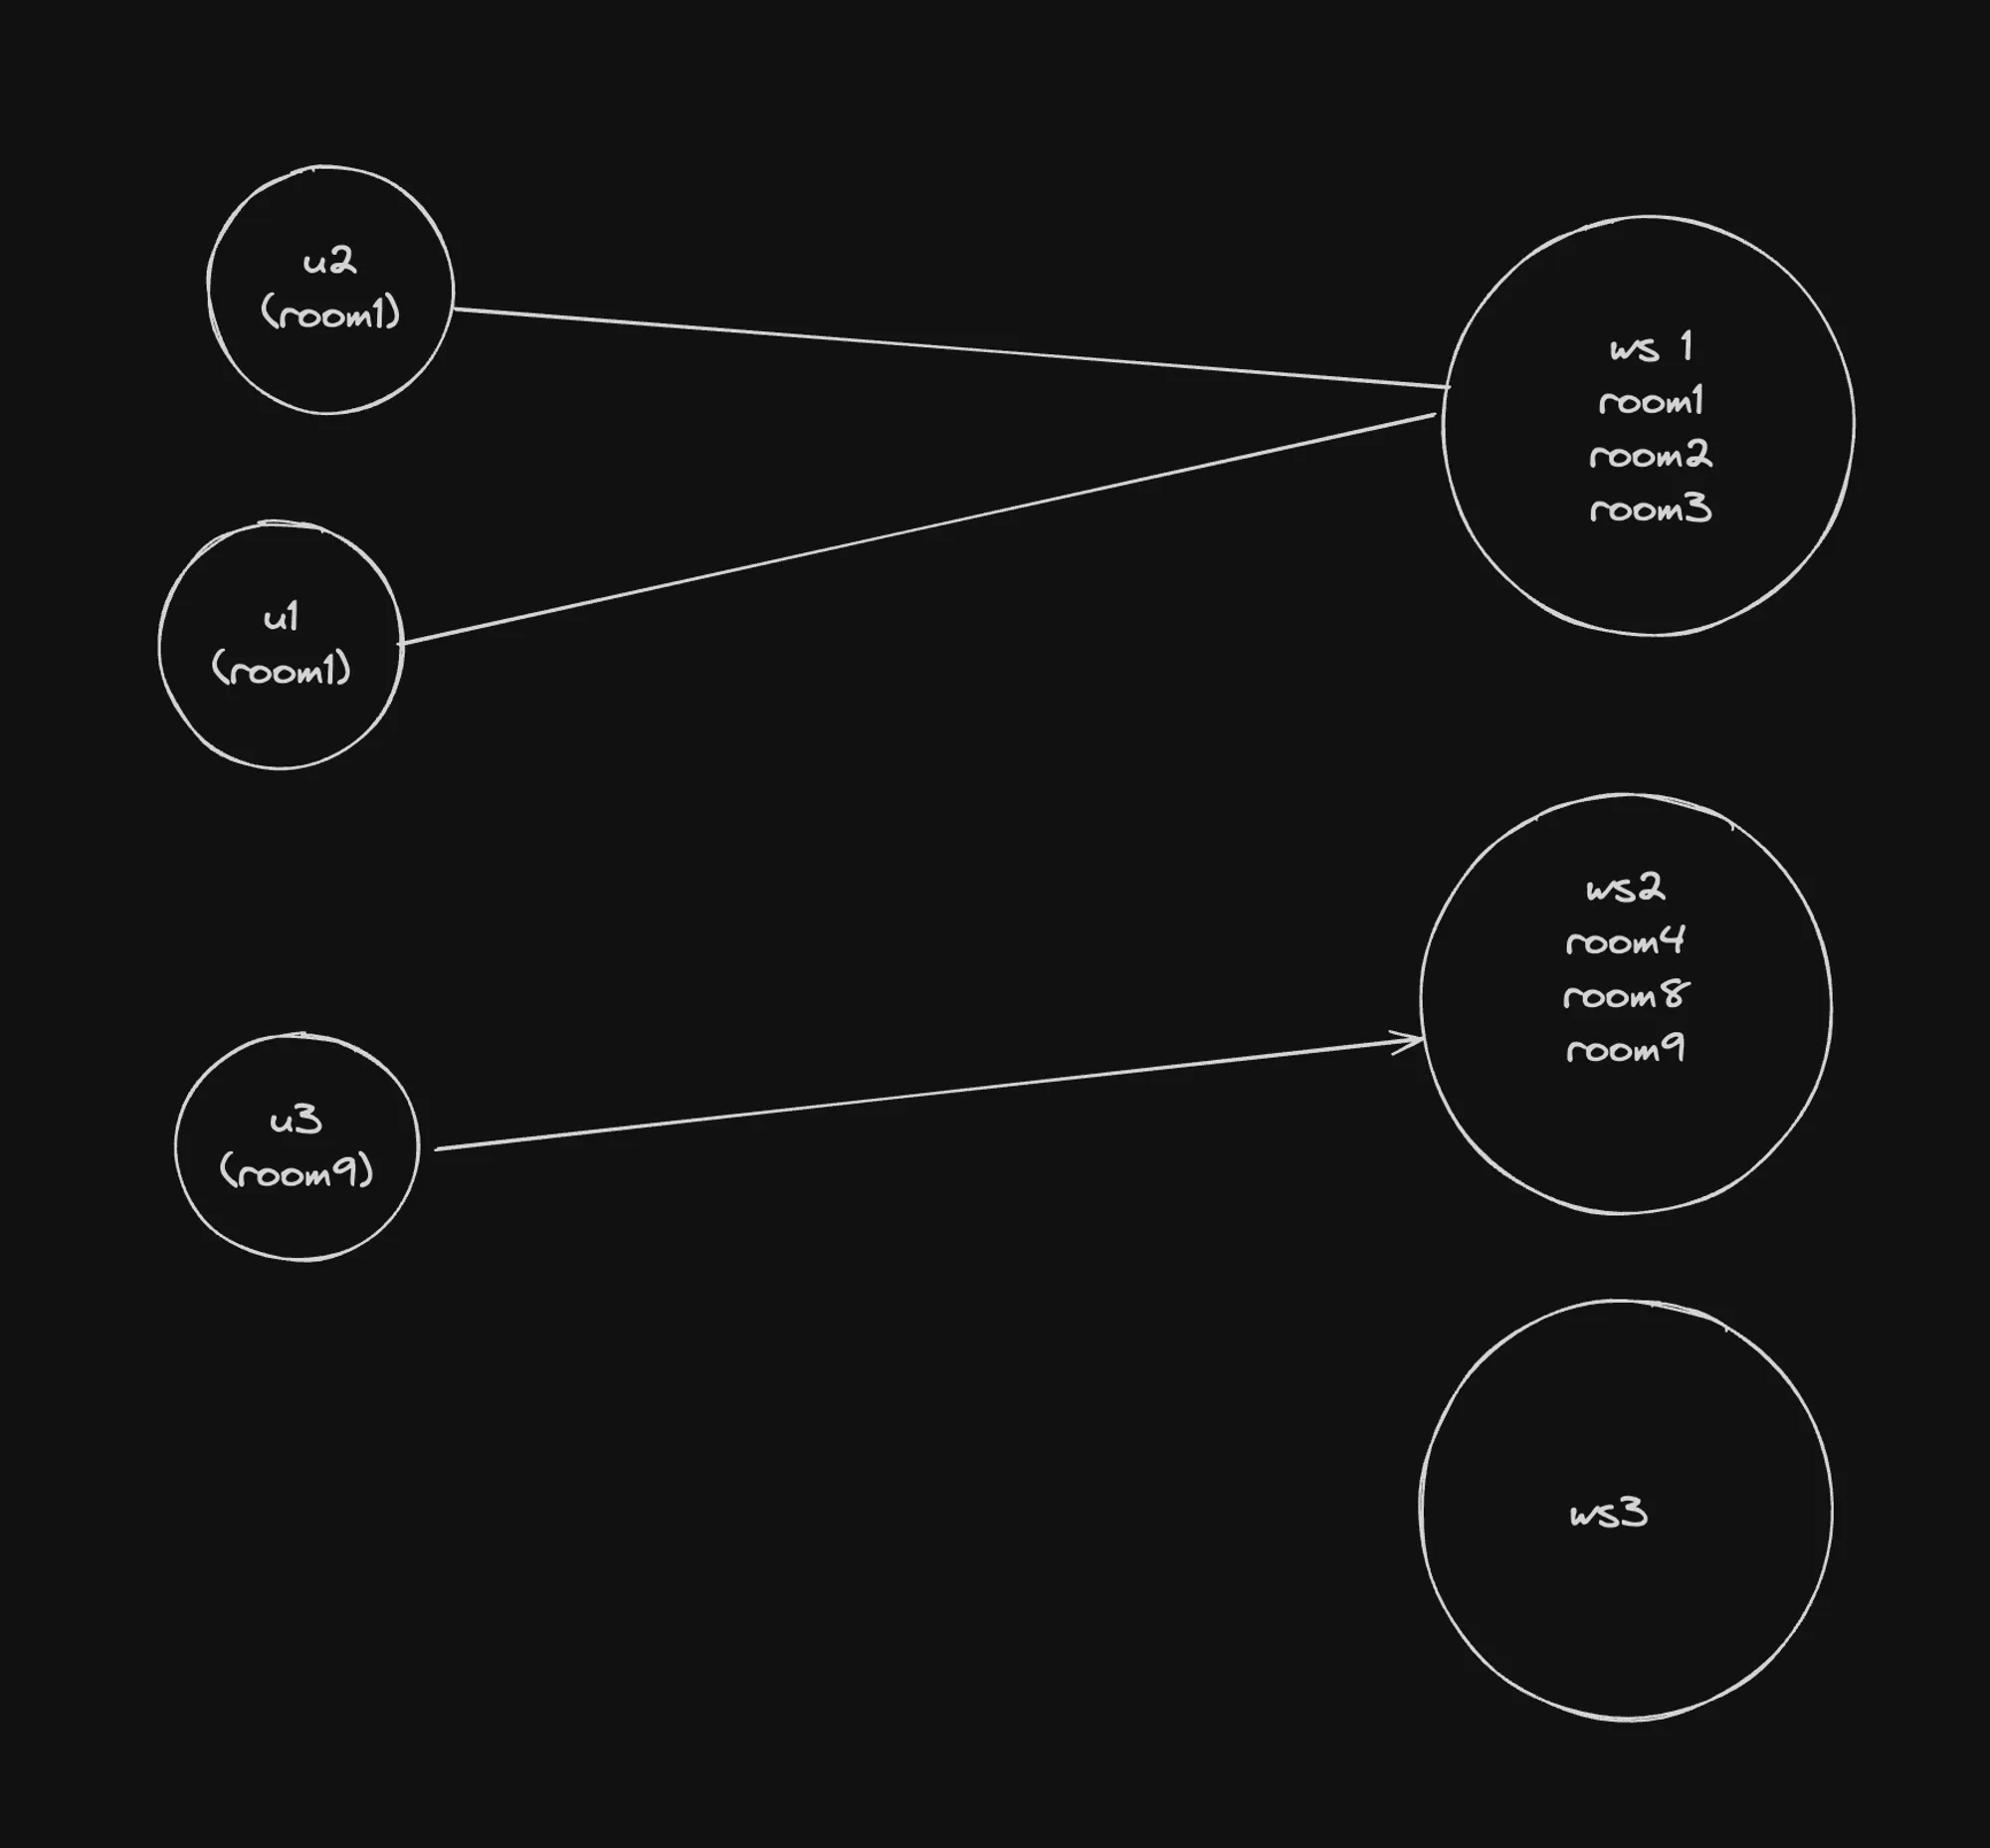
Stateful Server Diagram
In the diagram, users (u1, u2, and u3) are connected to specific WebSocket servers (ws1, ws2) that hold the state for different rooms. For example, u1 and u2 are connected to ws1, which manages rooms 1, 2, and 3, while u3 is connected to ws2, which manages rooms 4, 8, and 9.
Understanding the differences between stateful and stateless backends is essential for designing scalable and efficient systems. Stateless servers offer simplicity and ease of scaling, while stateful servers are necessary for applications that require in-memory state management, such as real-time games and chat applications. Stickiness is a crucial concept for stateful servers to ensure that users are connected to the correct server holding their state.
State in JS Process
When managing state in a JavaScript process, it’s common to store state in a way that can be accessed and modified by multiple files. Here is an example approach:
index.ts - Pushes to games array:
import { games } from "./store";import { startLogger } from "./logger";
startLogger();
setInterval(() => {    games.push({        "whitePlayer": "harkirat",        "blackPlayer": "jaskirat",        moves: []    })}, 5000)
logger.ts - Uses the games array:
import { games } from "./store";
export function startLogger() {    setInterval(() => {        console.log(games);    }, 4000)}
store.ts - Exports the game array:
interface Game {    whitePlayer: string;    blackPlayer: string;    moves: string[];}
export const games: Game[] = [];
State Management Diagram
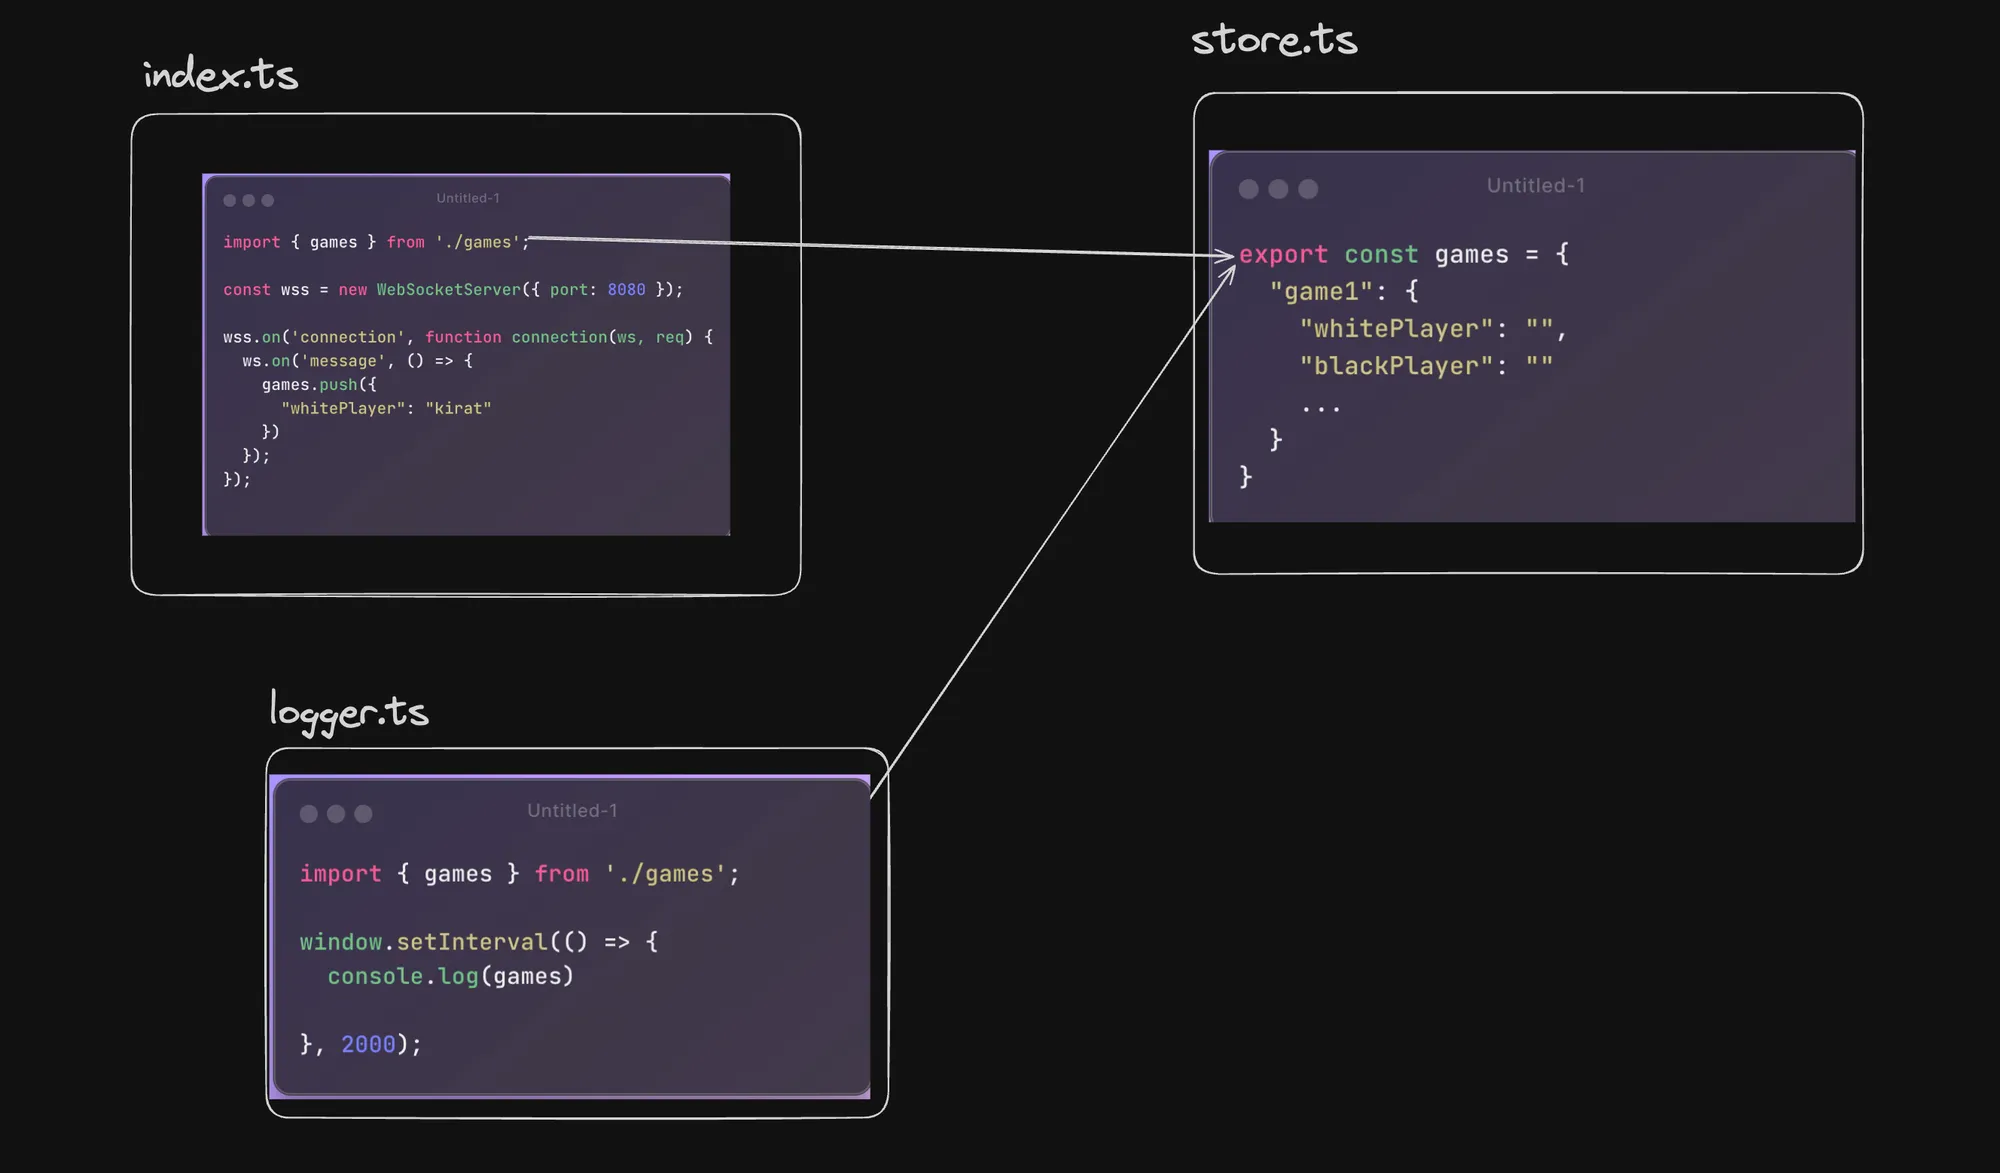
In this diagram:
index.tsimports thegamesarray fromstore.tsand thestartLoggerfunction fromlogger.ts.index.tspushes new game objects to thegamesarray every 5 seconds.logger.tslogs the contents of thegamesarray every 4 seconds.store.tsdefines theGameinterface and exports thegamesarray.
This approach works, but a lot of times you need to attach functionality to state as well. Let’s see how we can create a class called GameManager and expose some functions on it that can be called by files using it. There are other ways of storing state in a TypeScript project as well, with Redux being a popular one. Yes, you can use Redux in the backend as well.
Classes and Singleton Pattern
Implementation of a class called GameManager and the usage of the Singleton pattern in TypeScript.
Initial Approach
The initial approach involves creating a class GameManager that stores an array of Game objects. The Game interface defines the structure of a game object with properties like id, whitePlayer, blackPlayer, and moves.
interface Game {    id: string;    whitePlayer: string;    blackPlayer: string;    moves: string[];}
export class GameManager {    private games: Game[] = [];
    public addGame(game: Game) {        this.games.push(game);    }
    public getGames() {        return this.games;    }
    public addMove(gameId: string, move: string) {        const game = this.games.find(game => game.id === gameId);        if (game) {            game.moves.push(move);        }    }
    public logState() {        console.log(this.games);    }}
The GameManager class has the following methods:
addGame(game: Game): Adds a new game object to thegamesarray.getGames(): Returns the array of games.addMove(gameId: string, move: string): Adds a move to the specified game identified by itsgameId.logState(): Logs the current state of thegamesarray to the console.
Bad Approach
The “Bad Approach” involves creating separate instances of the GameManager class in every file that needs it. This approach can lead to potential inconsistencies and difficulties in managing the state, as multiple instances of the GameManager class will have their own separate state.
interface Game {    id: string;    whitePlayer: string;    blackPlayer: string;    moves: string[];}
export class GameManager {    private games: Game[] = [];
// ... (methods omitted for brevity)}import { GameManager } from "./GameManager";
const gameManager = new GameManager(); // Creating a separate instance
export function startLogger() { setInterval(() => { gameManager.logState(); }, 4000)}import { GameManager } from "./GameManager";import { startLogger } from "./logger";
const gameManager = new GameManager(); // Creating another separate instance
startLogger();
setInterval(() => { gameManager.addGame({ id: Math.random().toString(), "whitePlayer": "harkirat", "blackPlayer": "jaskirat", moves: [] })}, 5000)In this approach, each file (logger.ts and index.ts) creates its own instance of the GameManager class, leading to separate and potentially inconsistent states.
Slightly Better Approach
The “Slightly Better” approach suggests exporting a single instance of the GameManager from the GameManager.ts file and using it everywhere in the codebase. This approach ensures that there is only one instance of the GameManager class, but it still allows the possibility of creating additional instances accidentally.
interface Game {    id: string;    whitePlayer: string;    blackPlayer: string;    moves: string[];}
const gameManagerInstance = new GameManager();
export { gameManagerInstance };import { gameManagerInstance } from "./GameManager";
export function startLogger() { setInterval(() => { gameManagerInstance.logState(); }, 4000)}import { gameManagerInstance } from "./GameManager";import { startLogger } from "./logger";
startLogger();
setInterval(() => { gameManagerInstance.addGame({ id: Math.random().toString(), "whitePlayer": "harkirat", "blackPlayer": "jaskirat", moves: [] })}, 5000)In this approach, a single instance of the GameManager class is created and exported from GameManager.ts. Other files (logger.ts and index.ts) import and use this shared instance, ensuring a consistent state across the application.
Singleton Pattern
The “Even Better” approach utilizes the Singleton pattern to completely prevent any developer from creating a new instance of the GameManager class. The Singleton pattern ensures that a class has only one instance and provides a global point of access to that instance.
Here’s how the Singleton pattern is implemented in the provided code:
interface Game {    id: string;    whitePlayer: string;    blackPlayer: string;    moves: string[];}
export class GameManager {    private static instance: GameManager; // Create a static instance of the class    private games: Game[] = [];
    private constructor() {        // Private constructor ensures that a new instance cannot be created from outside    }
    public static getInstance(): GameManager {        if (!GameManager.instance) {            GameManager.instance = new GameManager();        }        return GameManager.instance;    }
    // ... other methods}
// Usage: GameManager.getInstance().addGame()- A private static instance variable
instanceis declared within theGameManagerclass to hold the single instance. - The constructor of the
GameManagerclass is made private, preventing direct instantiation from outside the class. - A static
getInstance()method is introduced, which checks if theinstancevariable isnull. If it isnull, a new instance of theGameManagerclass is created and assigned toinstance. Otherwise, the existing instance is returned.
By using the getInstance() method, you can access the single instance of the GameManager class throughout the codebase.
The provided code snippets demonstrate the usage of the Singleton pattern:
interface Game {    id: string;    whitePlayer: string;    blackPlayer: string;    moves: string[];}
export class GameManager {    private static instance: GameManager;    private games: Game[] = [];
    private constructor() {        // Private constructor    }
    public static getInstance(): GameManager {        if (!GameManager.instance) {            GameManager.instance = new GameManager();        }        return GameManager.instance;    }
// ... other methodsimport { GameManager } from "./GameManager";
export function startLogger() { setInterval(() => { GameManager.getInstance().logState(); }, 4000)}import { GameManager } from "./GameManager";import { startLogger } from "./logger";
startLogger();
setInterval(() => { GameManager.getInstance().addGame({ id: Math.random().toString(), "whitePlayer": "harkirat", "blackPlayer": "jaskirat", moves: [] })}, 5000)The Singleton pattern ensures that there is only one instance of the GameManager class, and it provides a global point of access to that instance. This approach helps maintain a consistent state and prevents potential issues that could arise from multiple instances.
Trying to Create a New Instance
If you try to create a new instance of the GameManager class when using the Singleton pattern, you will get an error because the constructor is marked as private. This is intentional and prevents developers from accidentally creating multiple instances of the class.
// This will throw an errorconst newInstance = new GameManager(); // Error: Constructor of class 'GameManager' is private and only accessible within the class declaration.The only way to access the instance of the GameManager class is through the getInstance() static method, which ensures that only one instance is created and shared throughout the application.
By following the Singleton pattern implementation, you can ensure that there is a single, shared instance of the GameManager class, providing a centralized and consistent way to manage the state of the games across your application.
Pub/Sub + Singleton Pattern
To build a system where users can subscribe to the feed of stock prices, especially for an application expected to be used by more than 1 million users, you can use a combination of the Pub/Sub (Publisher/Subscriber) pattern and the Singleton pattern. This approach ensures efficient management of subscriptions and real-time updates.
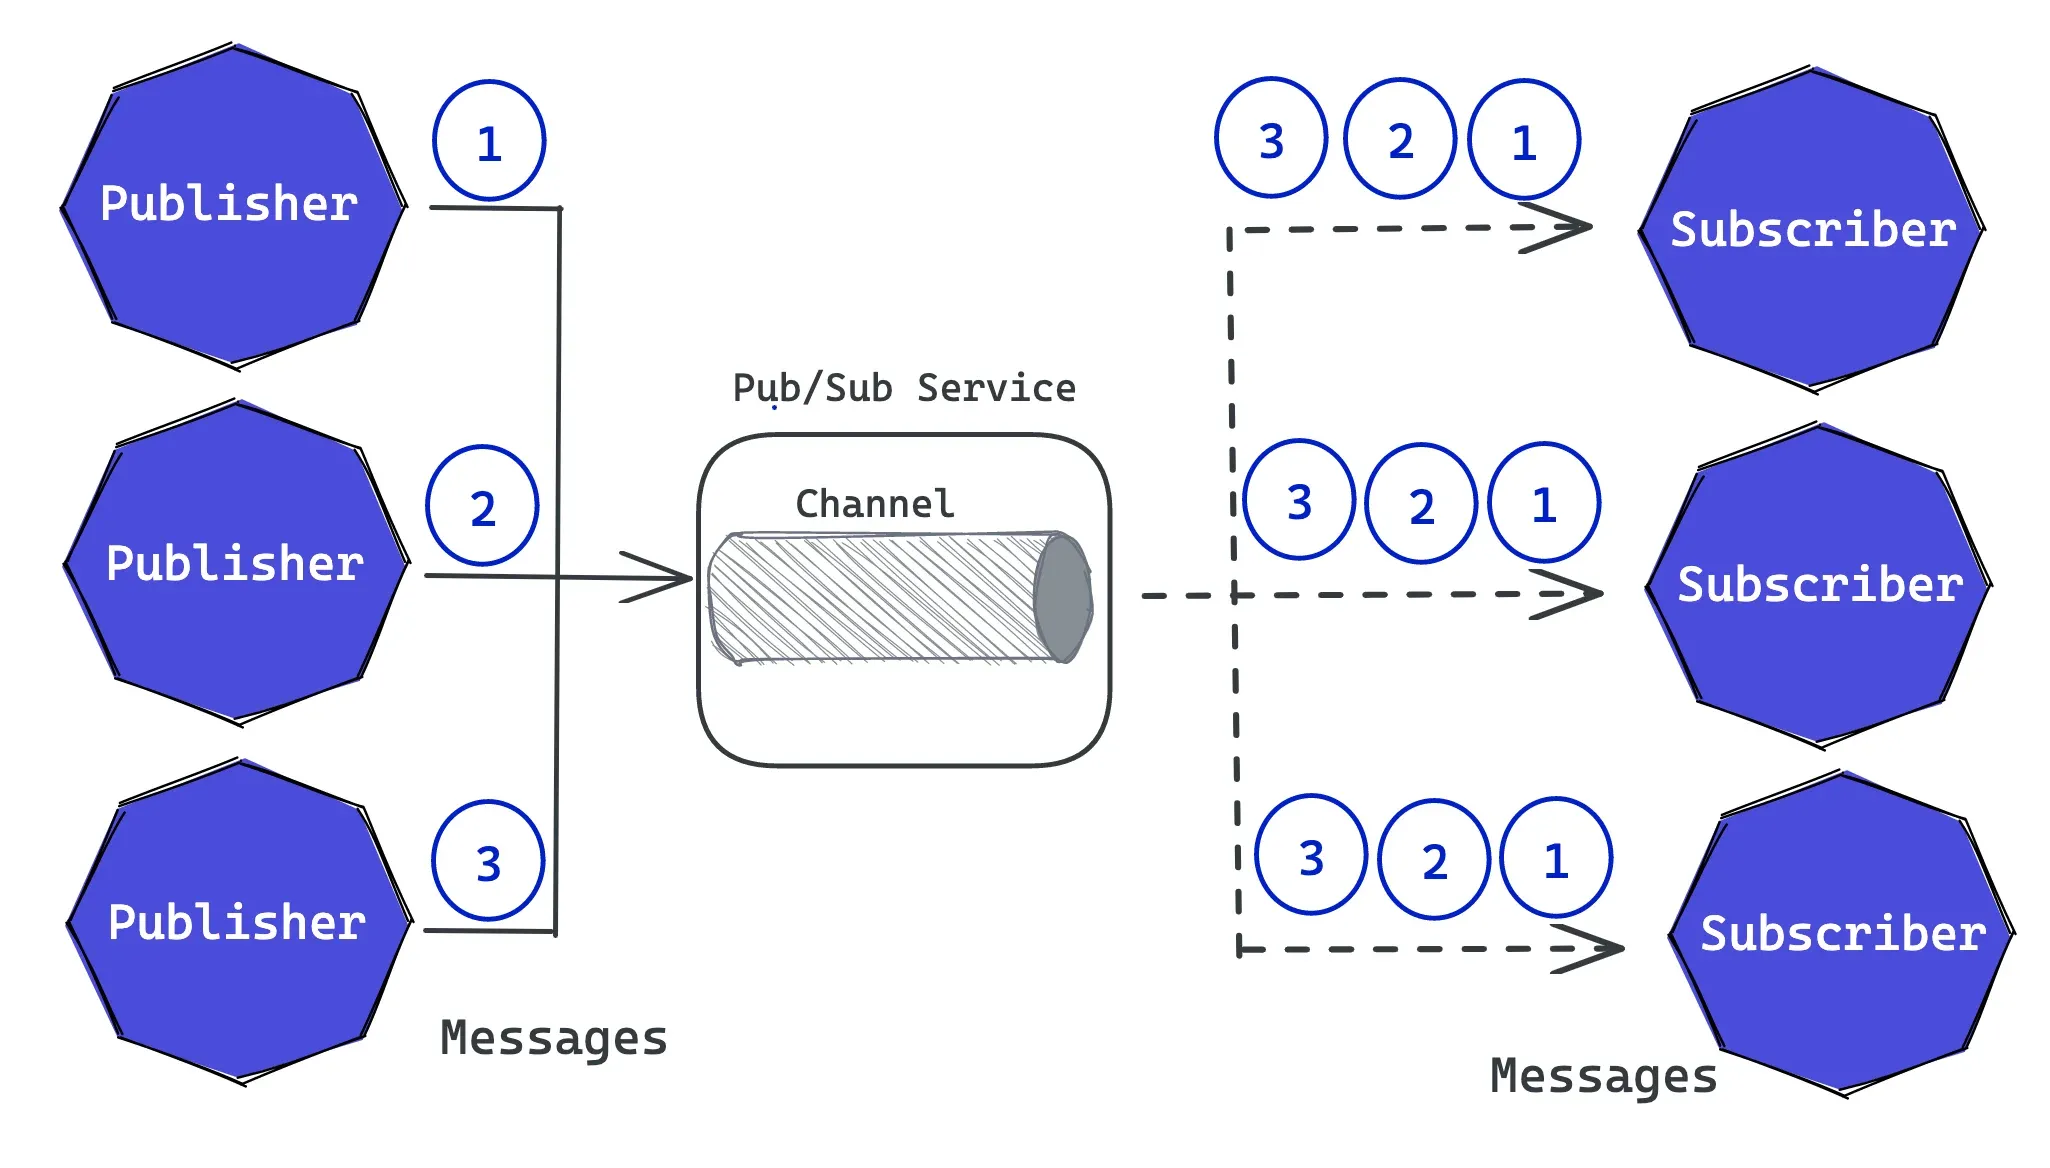
Pub/Sub Pattern
The Pub/Sub pattern is a messaging pattern where senders (publishers) of messages do not send messages directly to specific receivers (subscribers). Instead, messages are published to a channel, and subscribers receive messages from that channel. This decouples the sender and receiver, allowing for scalable and flexible communication.
Singleton Pattern
The Singleton pattern ensures that a class has only one instance and provides a global point of access to that instance. This is useful for managing shared resources or coordinating actions across the system.
System Design
- PubSubManager (Singleton):
- The
PubSubManagerclass will be a singleton, ensuring that there is only one instance of it in the application. - It will keep track of all the stocks that users on the server are interested in, maintaining a list of these stocks.
- Whenever a new stock is added or removed from the list of interested stocks, the
PubSubManagerwill notify the Pub/Sub system about the change. - The
PubSubManagerwill also be responsible for relaying events (such as stock price updates) to the appropriate sockets.
- The
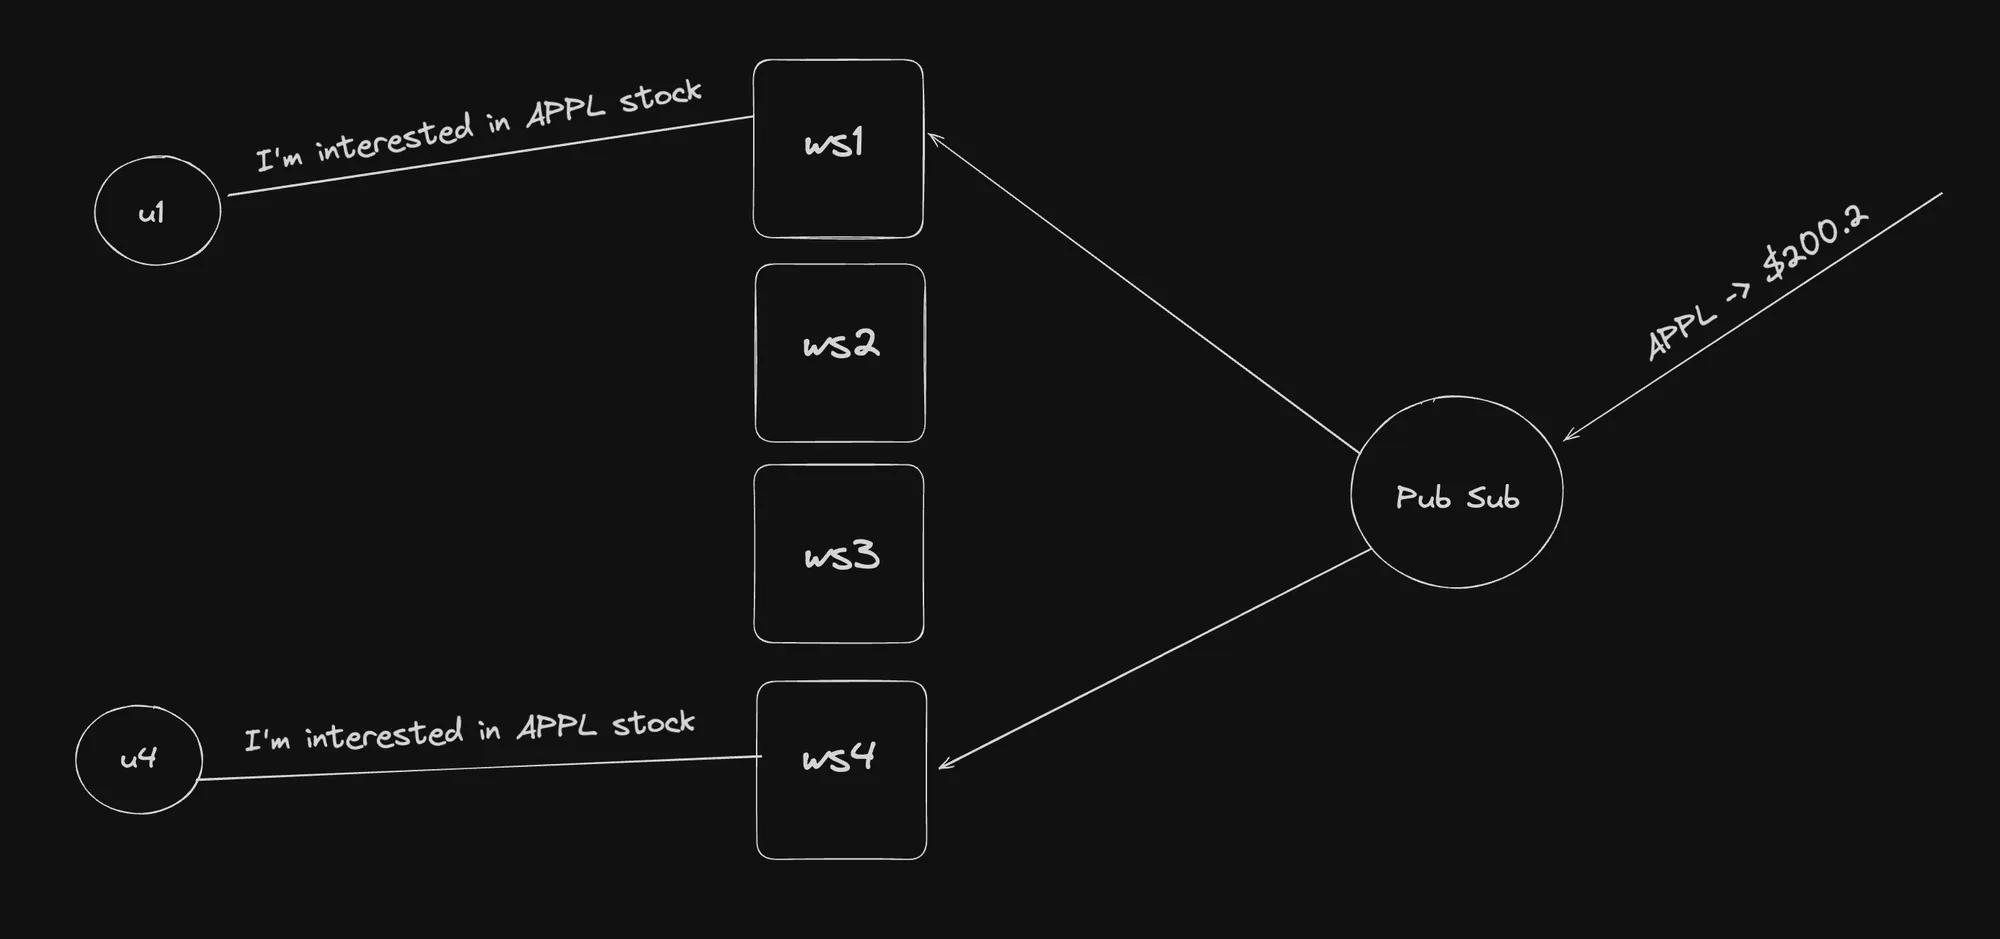
Architecture of a Pub/Sub System
- Users (u1, u4):
- These represent the users who are interested in stock updates. In the diagram,
u1andu4are interested in the APPL stock.
- These represent the users who are interested in stock updates. In the diagram,
- WebSocket Connections (ws1, ws2, ws3, ws4):
- These represent WebSocket connections established by the users to the server. Each user connects to the server through a WebSocket.
ws1andws4are the WebSocket connections for usersu1andu4, respectively, who are interested in the APPL stock.
- Pub/Sub System:
- This is the central component that manages the subscriptions and publishes stock price updates.
- It receives stock price updates (e.g., “APPL -> $400.2”) and relays them to the interested WebSocket connections.
- Flow:
- Users
u1andu4express their interest in the APPL stock through their respective WebSocket connections (ws1andws4). - The
PubSubManagerkeeps track of these interests and notifies the Pub/Sub system. - When a stock price update for APPL is received, the Pub/Sub system relays this update to the interested WebSocket connections (
ws1andws4).
- Users
Implementation of Pub-Sub
Starting the Pub/Sub System
- Start a Pub/Sub System:
-
Use Redis as the Pub/Sub system.
-
Start a Redis server using Docker:
docker run -d -p 6379:6379 redis
-
- Simple Publish/Subscribe in Two Terminals:
-
Open two terminal sessions and connect to the Redis server:
docker exec -it <container_id> /bin/bashredis-cli
-
Creating the PubSubManager
- Initialize a Simple Node.js Project:
-
Initialize a new Node.js project:
npm init -ynpx tsc --initnpm install redis
-
- Create the PubSubManager Class:
- The
PubSubManagerclass will manage the subscriptions and notifications for stock price updates. - It will use Redis for the Pub/Sub mechanism and ensure that there is only one instance of the class (Singleton pattern).
- The
// Import the necessary module from the 'redis' packageimport { createClient, RedisClientType } from 'redis';
export class PubSubManager {    private static instance: PubSubManager;    private redisClient: RedisClientType;    private subscriptions: Map<string, string[]>;
    // Private constructor to prevent direct construction calls with the `new` operator    private constructor() {        // Create a Redis client and connect to the Redis server        this.redisClient = createClient();        this.redisClient.connect();        this.subscriptions = new Map();    }
    // The static method that controls the access to the singleton instance    public static getInstance(): PubSubManager {        if (!PubSubManager.instance) {            PubSubManager.instance = new PubSubManager();        }        return PubSubManager.instance;    }
    public userSubscribe(userId: string, stock: string) {        if (!this.subscriptions.has(stock)) {            this.subscriptions.set(stock, []);        }        this.subscriptions.get(stock)?.push(userId);
        if (this.subscriptions.get(stock)?.length === 1) {            this.redisClient.subscribe(stock, (message) => {                this.handleMessage(stock, message);            });            console.log(`Subscribed to Redis channel: ${stock}`);        }    }
    public userUnSubscribe(userId: string, stock: string) {        this.subscriptions.set(stock, this.subscriptions.get(stock)?.filter((sub) => sub !== userId) || []);
        if (this.subscriptions.get(stock)?.length === 0) {            this.redisClient.unsubscribe(stock);            console.log(`UnSubscribed to Redis channel: ${stock}`);        }    }
    // Define the method that will be called when a message is published to the subscribed channel    private handleMessage(stock: string, message: string) {        console.log(`Message received on channel ${stock}: ${message}`);        this.subscriptions.get(stock)?.forEach((sub) => {            console.log(`Sending message to user: ${sub}`);        });    }
// Cleanup on instance destruction public async disconnect() { await this.redisClient.quit(); }}- Create a Simple
index.tsFile to Simulate Users:- Simulate user subscriptions to stock updates.
import { PubSubManager } from "./PubSubManager";
setInterval(() => {    PubSubManager.getInstance().userSubscribe(Math.random().toString(), "APPL");}, 5000);
By using the Pub/Sub pattern along with the Singleton pattern, you can efficiently manage stock price subscriptions and updates for a large number of users. The PubSubManager class ensures that there is only one instance managing the subscriptions, and it relays updates to the appropriate WebSocket connections. This approach ensures scalability and consistency in handling real-time stock price updates. The attached image visually represents the flow of information in this system, showing how user interests are tracked and how updates are relayed to interested users.