Week 20.2 OpenAPI Spec
In this offline lecture, Harkirat explores the OpenAPI Specification for describing and documenting RESTful APIs. He covers the need for the OpenAPI Spec, its file structure, and demonstrates an implementation using Hono, Zod, and @hono/zod-openapi to generate API documentation automatically. Additionally, Harkirat showcases how to leverage the OpenAPI Spec to auto-generate client libraries in various languages for seamless API integration.
OpenAPI Spec
The OpenAPI Specification (formerly known as the Swagger Specification) is a standardized way to describe the structure and functionality of your API in a single, machine-readable file. It provides a consistent and comprehensive approach to documenting APIs, making it easier for developers to understand, consume, and integrate with your API.
Why OpenAPI Spec?
When you create a backend application, it can be challenging for other developers or consumers to understand the exact shape and structure of your API routes and endpoints. The OpenAPI Spec solves this problem by allowing you to describe your API in a single, well-defined file.
Wouldn’t it be nice if you could describe, in a single file, the shape of your routes? For example, consider the following API endpoint:
<https://sum-server.100xdevs.com/todo?id=1>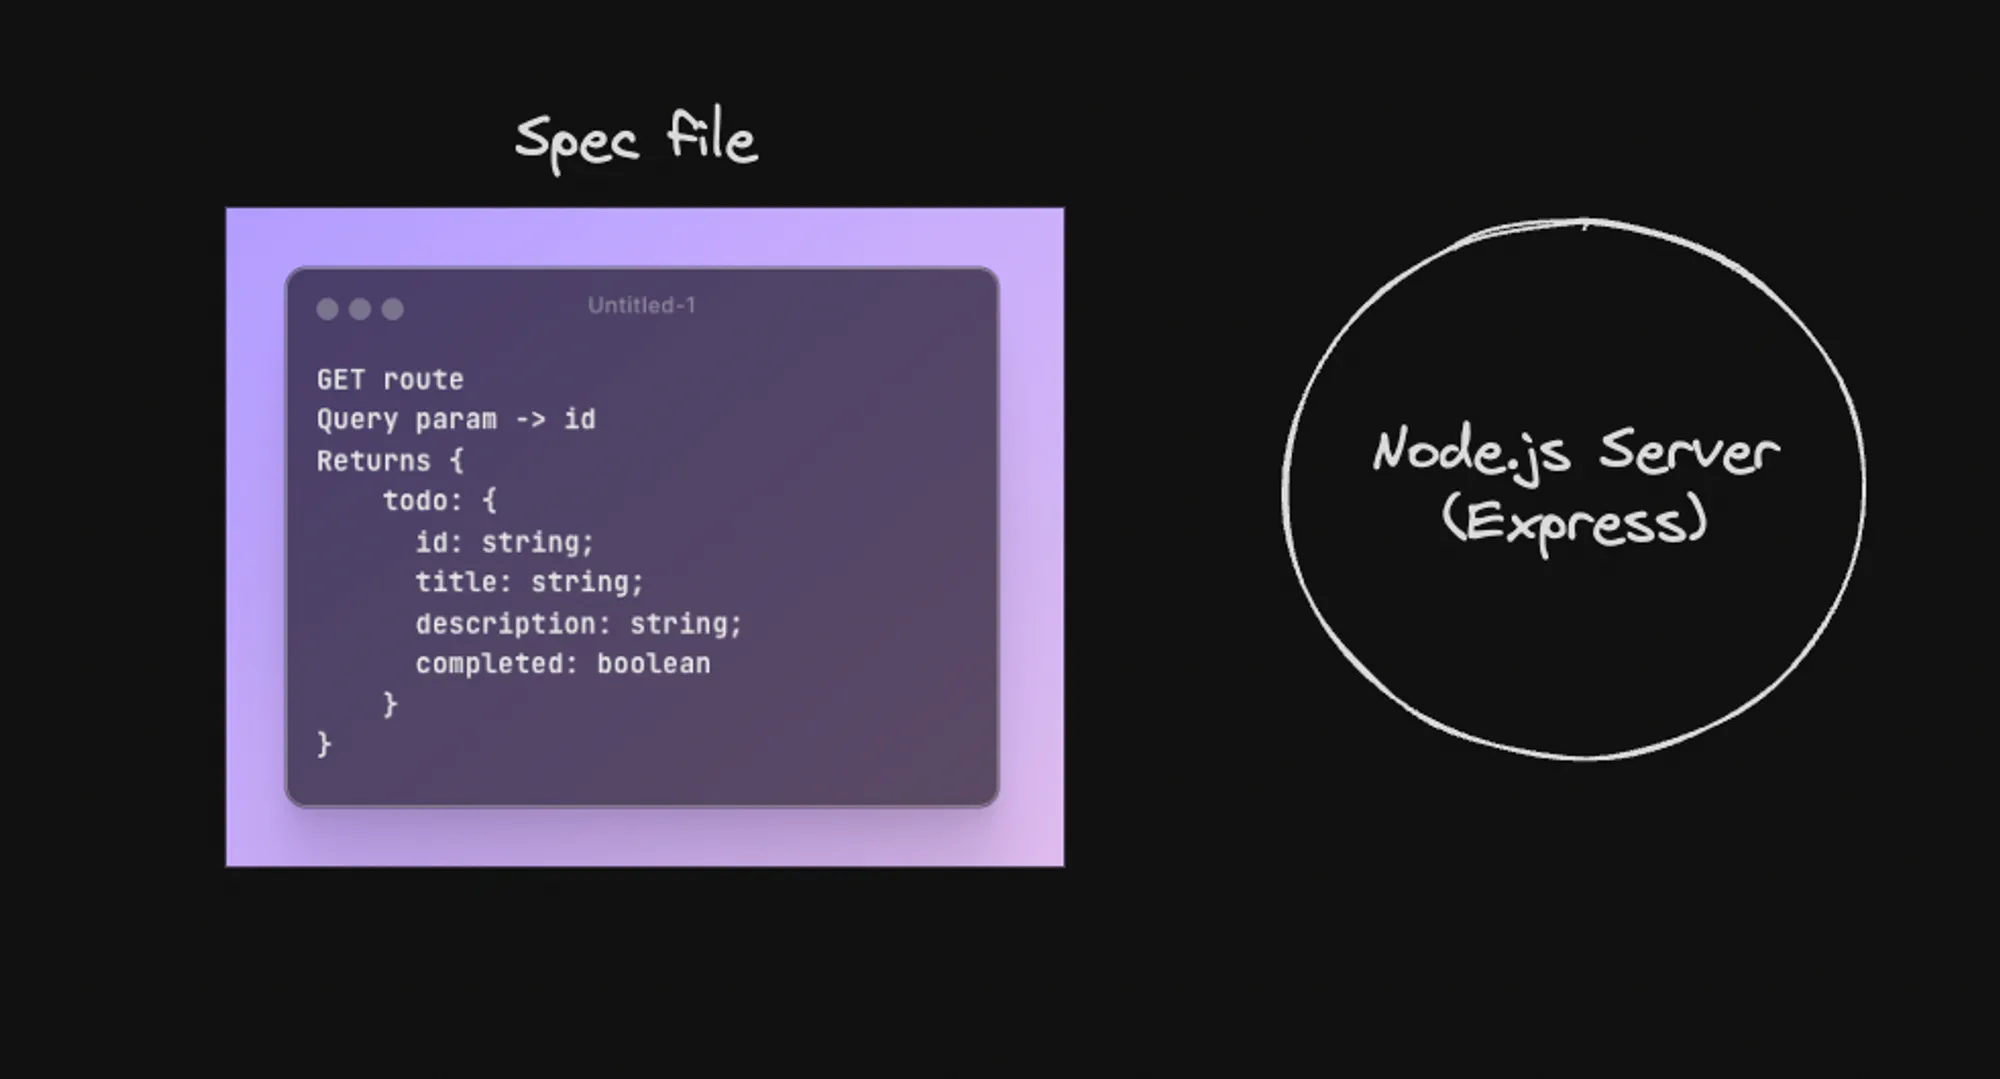
By having a single file that lists all your routes and their specifications, you can:
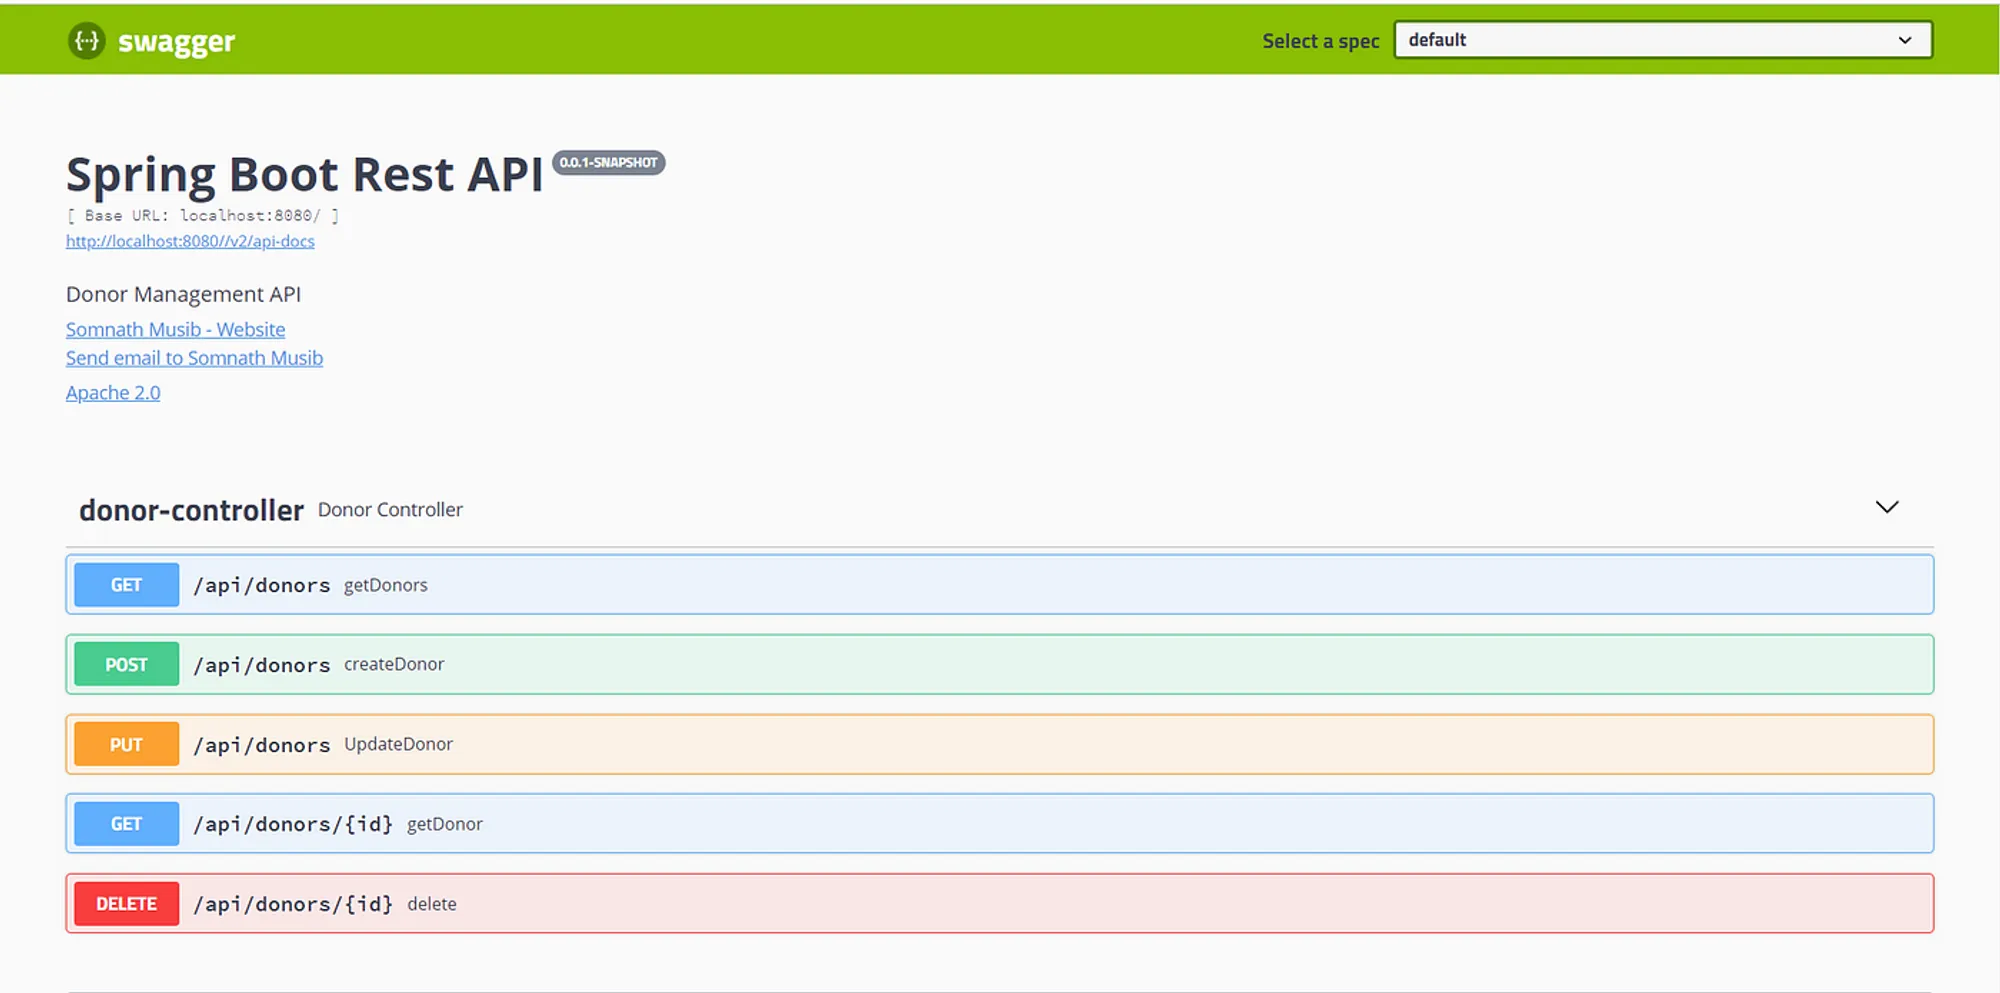
- Auto-generate Documentation Pages: Tools like Swagger UI can automatically generate comprehensive documentation pages for your API based on the OpenAPI Spec file. This documentation can include details such as endpoint paths, request/response formats, authentication requirements, and more. An example of such documentation can be found at https://binance-docs.github.io/apidocs/spot/en/#query-current-order-count-usage-trade.
- Auto-generate Clients in Various Languages: The OpenAPI Spec file can be used to automatically generate client libraries in various programming languages, such as Java, JavaScript, Go, and more. These client libraries simplify the process of interacting with your API, as they provide pre-built functions and classes that handle the low-level details of making API requests and parsing responses.
- Share API Structure Without Sharing Code: By providing the OpenAPI Spec file, you can share the structure and shape of your API routes with other developers or consumers without having to share your actual code. This can be particularly useful in scenarios where you want to keep your codebase private or when working with external parties.
- Enable AI Integration: The OpenAPI Spec file can be used by AI systems to understand the structure and functionality of your API. This can be beneficial for tasks such as automated testing, API monitoring, or even building AI-powered applications that interact with your API.
The OpenAPI Spec provides a standardized and machine-readable way to describe your API, making it easier for developers, tools, and even AI systems to understand and interact with your backend application. By adopting the OpenAPI Spec, you can improve the discoverability, documentation, and integration of your API, ultimately enhancing the developer experience and promoting better collaboration within your team or with external parties.
More About OpenAPI Spec
The OpenAPI Specification (OAS) is a standard, language-agnostic interface to RESTful APIs, which allows both humans and computers to discover and understand the capabilities of a service without access to source code, additional documentation, or network traffic inspection. When properly defined via OpenAPI, a consumer can understand and interact with the remote service with minimal implementation logic.
Developed initially by Swagger, and later donated to the OpenAPI Initiative under the Linux Foundation, the OpenAPI Specification has become a widely adopted industry standard for defining and using APIs.
The OpenAPI Specification provides a standardized way to describe the structure and functionality of an API, including:
- Endpoints: The URLs or paths that define the available operations in the API.
- Operations: The HTTP methods (GET, POST, PUT, DELETE, etc.) supported by each endpoint.
- Parameters: The input data required for each operation, including query parameters, headers, and request bodies.
- Responses: The expected responses from the API, including response codes, headers, and response bodies.
- Authentication: The authentication mechanisms required to access the API, such as API keys, OAuth, or JWT.
- Data Models: The data structures and schemas used in the request and response bodies.
By defining an API using the OpenAPI Specification, developers can easily understand how to interact with the API without needing to read extensive documentation or inspect network traffic. This standardized approach promotes better collaboration, easier integration, and faster development cycles.
Good Reference File
A good example of an OpenAPI Specification file can be found in the ListMonk project on GitHub: https://github.com/knadh/listmonk/blob/1bf7e362bf6bee23e5e2e15f8c7cf12e23860df6/docs/swagger/collections.yaml
This file defines the API endpoints and operations for managing collections (groups of email subscribers) in the ListMonk application. It provides a clear and structured representation of the API, including the available endpoints, request/response formats, and data models.
Here’s a brief overview of the file:
openapi: 3.0.0info:  title: ListMonk Collections API  version: 1.0.0  # ... (additional metadata)
paths:  /collections:    get:      summary: List all collections      # ... (operation details)    post:      summary: Create a new collection      # ... (operation details)
  /collections/{id}:    get:      summary: Get a collection      # ... (operation details)    put:      summary: Update a collection      # ... (operation details)    delete:      summary: Delete a collection      # ... (operation details)
components:  schemas:    Collection:      type: object      properties:        id:          type: integer        name:          type: string        # ... (additional properties)
This file follows the OpenAPI Specification format, defining the API’s metadata, available paths and operations, request/response formats, and data models (schemas). By adhering to this standard, developers can easily understand and interact with the ListMonk Collections API, regardless of the programming language or tools they are using.
Understanding the SPEC File
Let us take the following examples to understand how an OpenAPI Specification file can be structured and used to describe a simple server application.
The example consists of two parts:
- server.js: This is a Node.js server file written using the Express.js framework. It sets up a basic server that listens on port 3000 and defines a single route
/usersthat retrieves a list of users. The route supports an optionalnamequery parameter to filter the users by name. - OpenAPI Spec: This is the OpenAPI Specification file that describes the structure and behavior of the
/usersAPI endpoint. It provides a machine-readable definition of the API, including the server URL, available paths and operations, request parameters, response formats, and data models.
Let’s break down the different parts of the OpenAPI Specification file:
openapi: 3.0.0info: title: User API description: API to manage users version: "1.0.0"servers: - url: <http://localhost:3000>This section defines the metadata for the API, including the OpenAPI version, the API title and description, and the server URL where the API is hosted.
paths: /users: get: summary: Get a list of users description: Retrieves a list of users, optionally filtered by name. parameters: - in: query name: name schema: type: string required: false description: Name filter for user lookup. responses: '200': description: A list of users content: application/json: schema: type: array items: $ref: '#/components/schemas/User'This section defines the /users path and the GET operation. It specifies the summary and description of the operation, the query parameters (in this case, the optional name parameter), and the expected response format (an array of User objects).
components: schemas: User: type: object properties: id: type: integer format: int64 description: The unique identifier of the user. name: type: string description: The name of the user. required: - id - nameThis section defines the User data model, which is referenced in the response schema for the /users endpoint. It specifies the properties of a User object, including the id (an integer) and name (a string), and marks both properties as required.
By defining the API using the OpenAPI Specification, developers can easily understand the structure and behavior of the /users endpoint without needing to read the server code directly. They can also use tools like Swagger UI to generate interactive documentation and client libraries based on the OpenAPI Specification file.
To test the API, you can visit the following URLs:
http://localhost:3000/users: This will retrieve the list of all users.http://localhost:3000/users?name=John Doe: This will retrieve the list of users whose names contain “John Doe”.http://localhost:3000/users?name=John%20Doe: This is the URL-encoded version of the previous query, which will also retrieve the list of users whose names contain “John Doe”.
Creating a SPEC
There are different approaches to generate an OpenAPI specification for your API or web application.
-
Write it by hand: This approach involves manually writing the OpenAPI specification file, which is considered a bad practice and not recommended. However, it is mentioned that this still happens in some cases.
-
Auto-generate it from your code: This is generally considered a better approach, as it allows you to generate the specification directly from your codebase, ensuring consistency and reducing the risk of manual errors.
a. Easy in languages with deep type systems like Rust: Languages with strong type systems, like Rust, make it easier to auto-generate the specification because the type information is more explicit and can be used to infer the structure of the API.
b. Slightly harder in languages like Go/Rust: While Go and Rust have type systems that can facilitate auto-generation, it may be slightly more challenging compared to languages with even deeper type systems.
c. Node.js has some libraries/codebases that let you do it: i. With Express: For Express.js applications, there is a library called
express-openapi(https://www.npmjs.com/package/express-openapi) that can be used to auto-generate the OpenAPI specification. However, it is mentioned that this approach can be highly verbose. ii. Without Express: For Node.js applications not using Express, there is a library calledtsoa(https://github.com/lukeautry/tsoa) that can be used to generate the OpenAPI specification. This library was covered in Cohort 1.d. Hono has a native implementation with Zod: Hono (https://hono.dev/) is a web framework for Node.js that has a native implementation for generating OpenAPI specifications using Zod (https://hono.dev/snippets/zod-openapi), a TypeScript-first schema validation library.
In this lecture, we will cover the approach that uses Hono’s native implementation with Zod for generating the OpenAPI specification. However, if you want to explore the c.ii approach (using the tsoa library) it has already been covered in Cohort 1.
Auto-generating the OpenAPI specification from your codebase is generally preferred over manual writing, as it ensures consistency, reduces the risk of errors, and makes it easier to maintain the specification as your codebase evolves. The choice of approach may depend on the programming language, frameworks, and libraries used in your project.
Hono + Zod + OpenAPI
Now, let’s discuss how we can use the Hono web framework, along with the Zod validation library and the @hono/zod-openapi library, to create an API with automatic OpenAPI documentation generation.
Code Snippet
import { z } from '@hono/zod-openapi'import { createRoute } from '@hono/zod-openapi'import { OpenAPIHono } from '@hono/zod-openapi'
const ParamsSchema = z.object({  id: z    .string()    .min(3)    .openapi({      param: {        name: 'id',        in: 'path',      },      example: '1212121',    }),})
const UserSchema = z  .object({    id: z.string().openapi({      example: '123',    }),    name: z.string().openapi({      example: 'John Doe',    }),    age: z.number().openapi({      example: 42,    }),  })  .openapi('User')
const route = createRoute({  method: 'get',  path: '/users/{id}',  request: {    params: ParamsSchema,  },  responses: {    200: {      content: {        'application/json': {          schema: UserSchema,        },      },      description: 'Retrieve the user',    },  },})
const app = new OpenAPIHono()
app.openapi(route, (c) => {  const { id } = c.req.valid('param')  return c.json({    id,    age: 20,    name: 'Ultra-man',  })})
// The OpenAPI documentation will be available at /docapp.doc('/doc', {  openapi: '3.0.0',  info: {    version: '1.0.0',    title: 'My API',  },})
export default app
Understanding the Code
- Importing Dependencies:
import { z } from '@hono/zod-openapi': Imports thezobject from@hono/zod-openapi, which provides utilities for defining Zod schemas and generating OpenAPI documentation.import { createRoute } from '@hono/zod-openapi': Imports thecreateRoutefunction, which is used to define routes with Zod validation and OpenAPI documentation.import { OpenAPIHono } from '@hono/zod-openapi': Imports theOpenAPIHonoclass, which extends the Hono application with OpenAPI documentation capabilities.
- Defining Schemas:
const ParamsSchema = z.object({ ... }): Defines a Zod schema for the request parameters, specifically theidparameter, which is expected to be a string with a minimum length of 3. Theopenapimethod is used to provide additional metadata for the OpenAPI documentation, such as the parameter name and an example value.const UserSchema = z.object({ ... }).openapi('User'): Defines a Zod schema for the response data, which includes properties likeid,name, andage. Theopenapimethod is used to provide example values for each property, and the schema is given the name “User” for the OpenAPI documentation.
- Creating the Route:
const route = createRoute({ ... }): Creates a route using thecreateRoutefunction from@hono/zod-openapi. The route is defined with the HTTP method (get), path (/users/{id}), request parameters (ParamsSchema), and expected responses (UserSchema). Theresponsesobject specifies the response codes and their corresponding schemas and descriptions.
- Creating the Hono Application:
const app = new OpenAPIHono(): Creates a new instance of theOpenAPIHonoclass, which extends the Hono application with OpenAPI documentation capabilities.
- Defining the Route Handler:
app.openapi(route, (c) => { ... }): Registers the previously definedroutewith the Hono application. The second argument is a callback function that handles the route. In this case, it extracts theidparameter from the request usingc.req.valid('param'), and returns a JSON response with a hardcodedid,age, andname.
- Configuring OpenAPI Documentation:
app.doc('/doc', { ... }): Configures the OpenAPI documentation endpoint at/doc. Theopenapiproperty specifies the OpenAPI version, and theinfoobject provides metadata about the API, such as the version and title.
- Exporting the Application:
export default app: Exports the configured Hono application for use in other parts of the application.
Running & Testing
To run the application locally and test the API and OpenAPI documentation, you can follow these steps:
- Start the application using the appropriate command (e.g.,
npm start). - Visit
http://localhost:8787/users/123123to test the API endpoint and see the JSON response. - Visit
http://localhost:8787/docto access the automatically generated OpenAPI documentation for the API.
By using the Hono framework, Zod validation library, and the
@hono/zod-openapilibrary, you can define routes with request and response validation, and automatically generate OpenAPI documentation for your API. This approach promotes code consistency, improves maintainability, and provides a standardized way to document and share your API with other developers or consumers.
Creating a Swagger Page
Swagger UI is a popular open-source tool that generates interactive documentation for RESTful APIs from an OpenAPI Specification. It provides a user-friendly interface where developers can visualize and interact with the API endpoints, view request/response models, and even test the API directly from the documentation.
Provided below is a code snippet, the example is based on the Hono web framework for Node.js, but the concept is applicable to other frameworks and languages as well.
Here’s an explanation of our code:
app.get('/ui', swaggerUI({ url: '/doc' }))app.get('/ui', ...): This line defines a route handler for the/uipath in your web application.swaggerUI({ url: '/doc' }): This is a middleware function provided by theswagger-ui-expresspackage (or a similar package depending on your framework). It takes an object as an argument, where you can specify the URL of your OpenAPI Specification file.url: '/doc': In this example, the OpenAPI Specification file is assumed to be served at the/docpath. This could be a static file or dynamically generated based on your application’s API routes.
By adding this route handler to your web application, you can access the Swagger UI page by visiting http://localhost:8787/ui (assuming your application is running on localhost:8787).
When you visit the /ui path, the swaggerUI middleware will load the OpenAPI Specification file from the specified URL (/doc in this case) and render the Swagger UI interface based on the API definitions in the specification file.
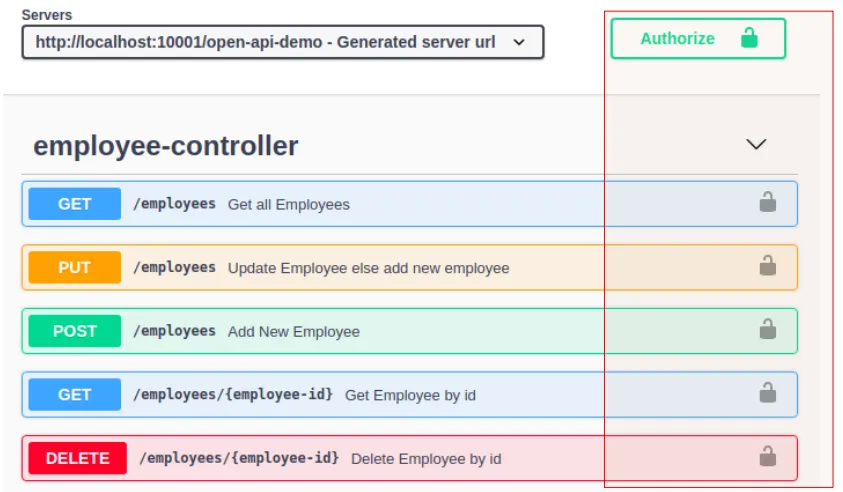
The Swagger UI page provides a user-friendly interface where you can:
- View a list of available API endpoints and their descriptions.
- Inspect the request and response models for each endpoint, including parameters, headers, and request/response bodies.
- Test the API endpoints directly from the Swagger UI interface by providing sample request data and executing the requests.
- View response examples and error codes for each endpoint.
By creating a Swagger UI page for your web application, you can improve the developer experience by providing comprehensive and interactive documentation for your API. This can be particularly useful for teams working on the same project, as well as for external developers who need to integrate with your API.
It’s important to note that while the provided example uses the Hono framework, the concept of creating a Swagger UI page is applicable to other web frameworks and languages as well, as long as you have an OpenAPI Specification file that describes your API and a compatible Swagger UI middleware or library for your chosen framework.
Auto Generated Clients
In this section we understand how to generate a TypeScript client library based on an OpenAPI Specification (formerly known as Swagger Specification) file. This client library can be used in Node.js or React applications to interact with the backend API described by the specification.
The steps involved are as follows:
- Store the OpenAPI Specification in a file (spec.json): The first step is to create a JSON file (or YAML file) that contains the OpenAPI Specification for your API. This file describes the structure of your API routes, request/response formats, data models, and other relevant information.
{  "openapi": "3.0.0",  "info": {    "version": "1.0.0",    "title": "My API"  },  "components": {    "schemas": {      "User": {        "type": "object",        "properties": {          "id": {            "type": "string",            "example": "123"          },          "name": {            "type": "string",            "example": "John Doe"          },          "age": {            "type": "number",            "example": 42          }        },        "required": [          "id",          "name",          "age"        ]      }    },    "parameters": {
    }  },  "paths": {    "/users/{id}": {      "get": {        "parameters": [          {            "schema": {              "type": "string",              "minLength": 3,              "example": "1212121"            },            "required": true,            "name": "id",            "in": "path"          }        ],        "responses": {          "200": {            "description": "Retrieve the user",            "content": {              "application/json": {                "schema": {                  "$ref": "#/components/schemas/User"                }              }            }          }        }      }    }  }}
In the provided example, the spec.json file defines a simple API with a single endpoint /users/{id} that retrieves a user object based on the provided id parameter. The User data model is also defined in the components.schemas section.
-
Generate the TypeScript client: Once you have the OpenAPI Specification file, you can use the
openapi-typescript-codegenpackage to generate a TypeScript client library based on the specification.Terminal window npx openapi-typescript-codegen --input ./spec.json --output ./generatedThis command uses the
npxtool to run theopenapi-typescript-codegenpackage without installing it globally. The--inputflag specifies the path to the OpenAPI Specification file (spec.json), and the--outputflag specifies the output directory where the generated TypeScript client will be placed (./generated). -
Explore the generated client: After running the command, a new directory
generatedwill be created containing the generated TypeScript client library.Terminal window cd generatedcat index.tsThe
index.tsfile is the entry point for the generated client library. You can explore the generated code to understand how the client library is structured and how it maps to the OpenAPI Specification. -
Use the generated client in your project: Once you have the generated TypeScript client library, you can import and use it in your Node.js or React application to interact with the backend API.
For example, in a Node.js application, you might import the client like this:
import { MyAPIClient } from './generated';const client = new MyAPIClient('<https://api.example.com>');const user = await client.getUser({ id: '123' });console.log(user);In this example,
MyAPIClientis the generated client class based on the OpenAPI Specification. You can create an instance of this class, passing the base URL of your API, and then use the generated methods (e.g.,getUser) to interact with the API endpoints.
By generating a TypeScript client library from the OpenAPI Specification, you can benefit from type safety, code completion, and better maintainability when working with your API. The generated client library abstracts away the low-level details of making HTTP requests and handling responses, allowing you to focus on the application logic.
It’s important to note that the openapi-typescript-codegen package is just one example of a tool that can generate TypeScript clients from OpenAPI Specifications. There are other tools and libraries available that serve a similar purpose, and the choice may depend on your project’s specific requirements and preferences.