Week 18.1 Building Paytm (3/3)
In this final lecture on the PayTm Wallet Project, Harkirat encourages everyone to actively participate by either following the provided project outlines or coding along with him. In this part he guides us through the remaining components: How to do transfers, transactions, and locking in databases using Prisma and Raw Queries By the end, you should have a comprehensive understanding of building a full-stack digital wallet application.
The stack for this project includes Next.js for the frontend and backend (or a separate backend), Express for auxiliary backends, Turborepo for managing the monorepo, a PostgreSQL database, Prisma as the ORM, and Tailwind for styling.
While there are
no specific notesprovided for this section, a mini guide is outlined below to assist you in navigating through the process of building the application. Therefore, it is stronglyadvised to actively follow alongduring the lecture for a hands-on learning experience.
Get comfortable with the repo
Our starter repo is this - https://github.com/100xdevs-cohort-2/week-17-final-code
The repo has 3 issues, we’ll be trying to fix them all today - https://github.com/100xdevs-cohort-2/week-17-final-code/issues


Let’s setup the repo locally before we proceed
- Clone the repo
git clone https://github.com/100xdevs-cohort-2/week-17-final-code- npm install
- Run postgres either locally or on the cloud (neon.tech)
docker run -e POSTGRES_PASSWORD=mysecretpassword -d -p 5432:5432 postgres- Copy over all .env.example files to .env
- Update .env files everywhere with the right db url
- Go to
packages/db- npx prisma migrate dev
- npx prisma db seed
- Go to
apps/user-app, runnpm run dev - Try logging in using phone - 1111111111 , password - alice (See
seed.ts)
Understanding the example.env file
Open source projects often include an example.env file to provide a template for setting up required environment variables. This file lists the variables needed by the project, along with placeholders or examples for their values. Users can copy this file as .env and fill in the actual values, including sensitive information like API keys or database passwords. The example.env file serves as documentation and prevents accidental exposure of secrets in version control.
When contributing to or using an open source project that includes an example.env file, the typical workflow is:
- Copy the
example.envfile and rename it to.env(or the appropriate name for the project). - Modify the values in the copied
.envfile to match your local environment or deployment settings, including any sensitive information (e.g., API keys, database passwords) that should not be shared publicly. - Make sure the
.envfile is included in the project’s.gitignorefile (or equivalent) to prevent it from being committed to version control. - Use the project’s documentation or instructions to load the environment variables from the
.envfile during development or deployment.
By following this approach, contributors and users can easily set up the required environment variables for the open source project without exposing sensitive information or modifying the project’s source code directly.
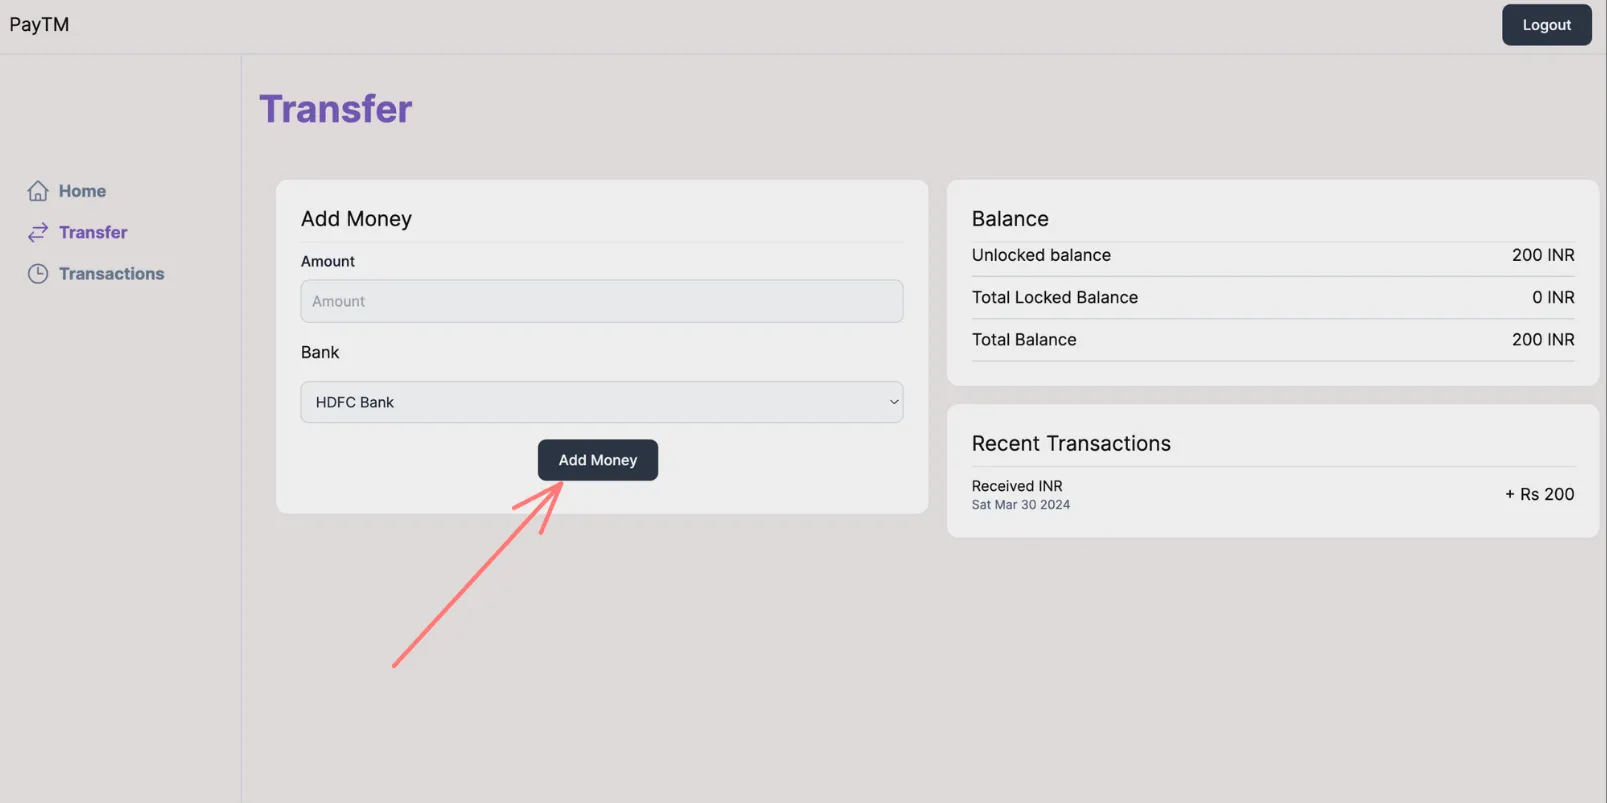
Finish onramps
Right now, we’re able to see the onramp transactions that have been seeded.
We don’t see any new ones though
Clicking on this button should initiate a new entry in the onRampTransactions table, that is eventually fulfilled by the bank-webhook module

Let’s implement this feature via a server action
- Create a new action in
lib/actions/createOnrampTransaction.ts
"use server";
import prisma from "@repo/db/client";import { getServerSession } from "next-auth";import { authOptions } from "../auth";
export async function createOnRampTransaction(provider: string, amount: number) {    // Ideally the token should come from the banking provider (hdfc/axis)    const session = await getServerSession(authOptions);    if (!session?.user || !session.user?.id) {        return {            message: "Unauthenticated request"        }    }    const token = (Math.random() * 1000).toString();    await prisma.onRampTransaction.create({        data: {            provider,            status: "Processing",            startTime: new Date(),            token: token,            userId: Number(session?.user?.id),            amount: amount * 100        }    });
return { message: "Done" }}- Call the action when the button is pressed (
AddMoneyCard)
"use client"import { Button } from "@repo/ui/button";import { Card } from "@repo/ui/card";import { Select } from "@repo/ui/select";import { useState } from "react";import { TextInput } from "@repo/ui/textinput";import { createOnRampTransaction } from "../app/lib/actions/createOnrampTransaction";
const SUPPORTED_BANKS = [{ name: "HDFC Bank", redirectUrl: "https://netbanking.hdfcbank.com"}, { name: "Axis Bank", redirectUrl: "https://www.axisbank.com/"}];
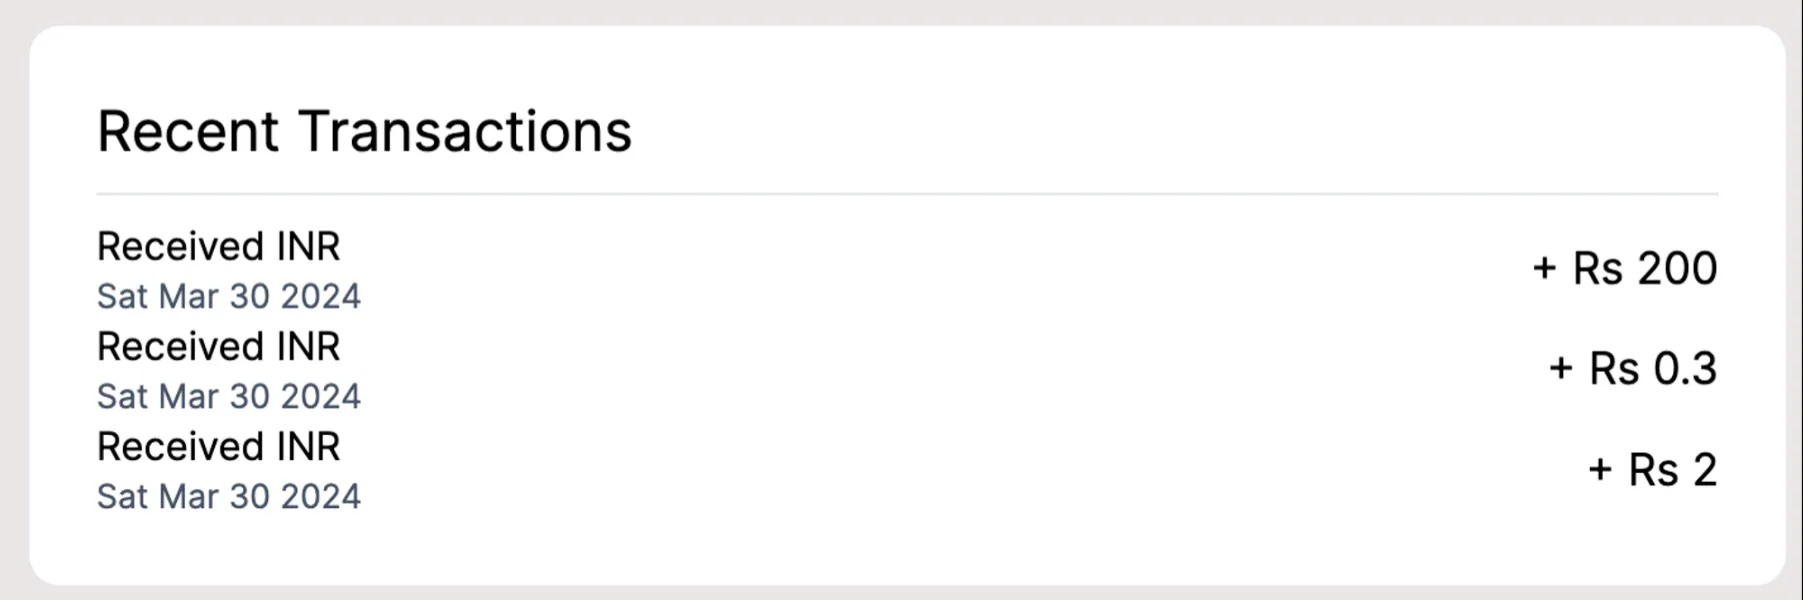
export const AddMoney = () => { const [redirectUrl, setRedirectUrl] = useState(SUPPORTED_BANKS[0]?.redirectUrl); const [provider, setProvider] = useState(SUPPORTED_BANKS[0]?.name || ""); const [value, setValue] = useState(0) return <Card title="Add Money"> <div className="w-full"> <TextInput label={"Amount"} placeholder={"Amount"} onChange={(val) => { setValue(Number(val)) }} /> <div className="py-4 text-left"> Bank </div> <Select onSelect={(value) => { setRedirectUrl(SUPPORTED_BANKS.find(x => x.name === value)?.redirectUrl || ""); setProvider(SUPPORTED_BANKS.find(x => x.name === value)?.name || ""); }} options={SUPPORTED_BANKS.map(x => ({ key: x.name, value: x.name }))} /> <div className="flex justify-center pt-4"> <Button onClick={async () => { await createOnRampTransaction(provider, value) window.location.href = redirectUrl || ""; }}> Add Money </Button> </div> </div></Card>}Notice more balances getting added , but the balance will remain the same. This is because the bank hasn’t yet approved the txn


Simulating the bank webhook
- cd
apps/bank-webhook - npm run dev (If it fails, try installing esbuild)
- In another terminal, get the
tokenfor one of the onRamp transactions by runningnpx prisma studioinpackages/db
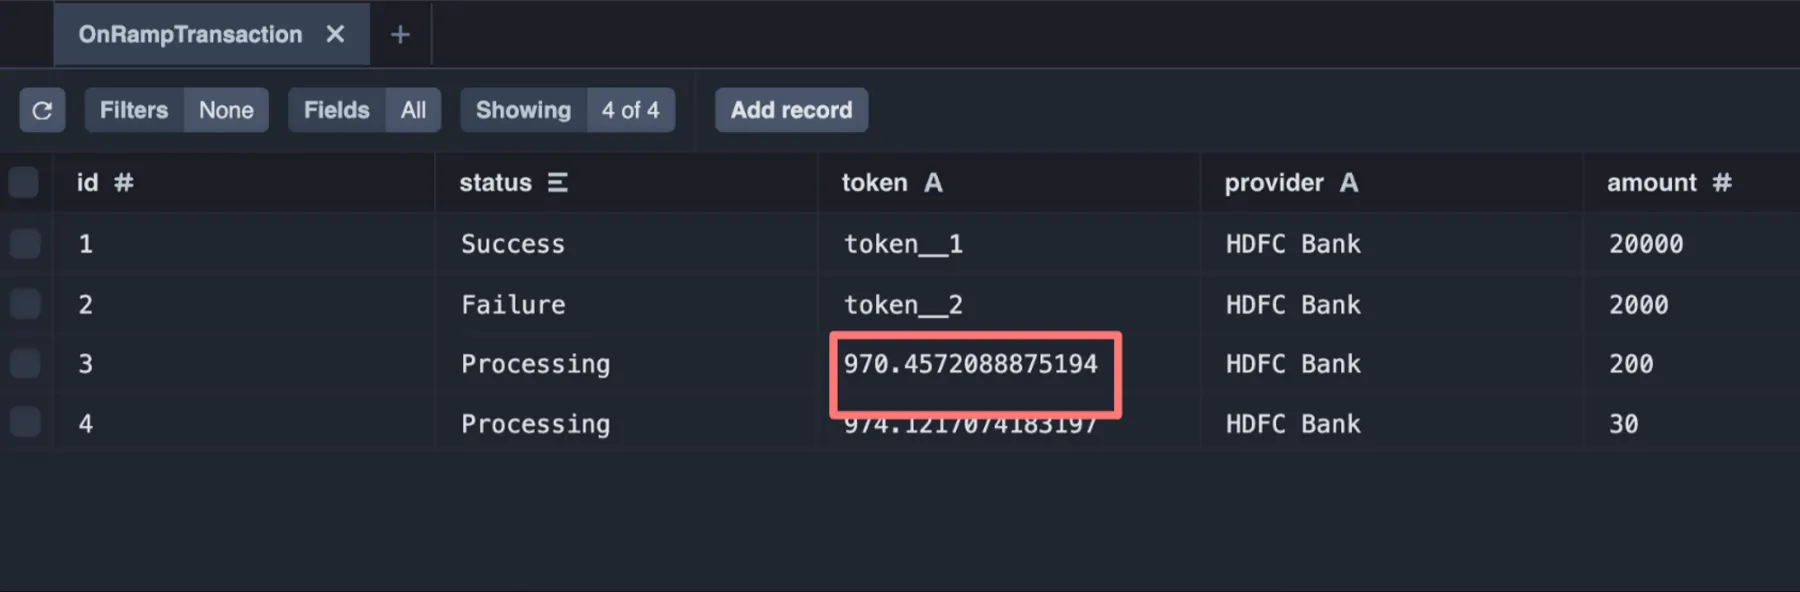

- Simulate a hdfcBank transaction POST http://localhost:3003/hdfcWebhook
{ "token": "970.4572088875194", "user_identifier": 1, "amount": "210"}Do you really need the amount/user id to come from the hdfc bank server? Or is the token enough?
Add transfers
Once money has been onramped, users should be allowed to transfer money to various wallets
Let’s create a P2P transfer page

- Got to
user-app/app/(dashboard)/layout.tsx
<SidebarItem href={"/p2p"} icon={<P2PTransferIcon />} title="P2P Transfer" />
function P2PTransferIcon() { return <svg xmlns="http://www.w3.org/2000/svg" fill="none" viewBox="0 0 24 24" stroke-width="1.5" stroke="currentColor" className="w-6 h-6"> <path stroke-linecap="round" stroke-linejoin="round" d="m4.5 19.5 15-15m0 0H8.25m11.25 0v11.25" /> </svg>}- Create a handler for /p2p page by creating
user-app/app/(dashboarD)/p2p/page.tsx
export default function() { return <div> Dashboard </div>}
- Add a
SendCardcomponent that let’s you put the number of a user and amount to send

user-app/components/SendCard.tsx
"use client"import { Button } from "@repo/ui/button";import { Card } from "@repo/ui/card";import { Center } from "@repo/ui/center";import { TextInput } from "@repo/ui/textinput";import { useState } from "react";
export function SendCard() {    const [number, setNumber] = useState("");    const [amount, setAmount] = useState("");
    return <div className="h-[90vh]">        <Center>            <Card title="Send">                <div className="min-w-72 pt-2">                    <TextInput placeholder={"Number"} label="Number" onChange={(value) => {                        setNumber(value)                    }} />                    <TextInput placeholder={"Amount"} label="Amount" onChange={(value) => {                        setAmount(value)                    }} />                    <div className="pt-4 flex justify-center">                        <Button onClick={() => {
                        }}>Send</Button>                    </div>                </div>            </Card>        </Center>    </div>}
user-app/app/(dashboard)/p2p/page.tsx
import { SendCard } from "../../../components/SendCard";
export default function() { return <div className="w-full"> <SendCard /> </div>}- Create a new action in
lib/actions/p2pTransfer.tsx
"use server"import { getServerSession } from "next-auth";import { authOptions } from "../auth";import prisma from "@repo/db/client";
export async function p2pTransfer(to: string, amount: number) {    const session = await getServerSession(authOptions);    const from = session?.user?.id;    if (!from) {        return {            message: "Error while sending"        }    }    const toUser = await prisma.user.findFirst({        where: {            number: to        }    });
    if (!toUser) {        return {            message: "User not found"        }    }    await prisma.$transaction(async (tx) => {        const fromBalance = await tx.balance.findUnique({            where: { userId: Number(from) },          });          if (!fromBalance || fromBalance.amount < amount) {            throw new Error('Insufficient funds');          }
          await tx.balance.update({            where: { userId: Number(from) },            data: { amount: { decrement: amount } },          });
await tx.balance.update({ where: { userId: toUser.id }, data: { amount: { increment: amount } }, }); });}- Update SendCard to call this action
"use client"import { Button } from "@repo/ui/button";import { Card } from "@repo/ui/card";import { Center } from "@repo/ui/center";import { TextInput } from "@repo/ui/textinput";import { useState } from "react";import { p2pTransfer } from "../app/lib/actions/p2pTransfer";
export function SendCard() {    const [number, setNumber] = useState("");    const [amount, setAmount] = useState("");
    return <div className="h-[90vh]">        <Center>            <Card title="Send">                <div className="min-w-72 pt-2">                    <TextInput placeholder={"Number"} label="Number" onChange={(value) => {                        setNumber(value)                    }} />                    <TextInput placeholder={"Amount"} label="Amount" onChange={(value) => {                        setAmount(value)                    }} />                    <div className="pt-4 flex justify-center">                        <Button onClick={async () => {                            await p2pTransfer(number, Number(amount) * 100)                        }}>Send</Button>                    </div>                </div>            </Card>        </Center>    </div>}
Try sending money a few times and see if it works. You can inspect the DB by using npx prisma studio in packages/db
Problem with this approch.
Try simulating two request together by adding a 4s sleep timeout in the transaction
"use server"import { getServerSession } from "next-auth";import { authOptions } from "../auth";import prisma from "@repo/db/client";
export async function p2pTransfer(to: string, amount: number) {    const session = await getServerSession(authOptions);    const from = session?.user?.id;    if (!from) {        return {            message: "Error while sending"        }    }    const toUser = await prisma.user.findFirst({        where: {            number: to        }    });
    if (!toUser) {        return {            message: "User not found"        }    }    await prisma.$transaction(async (tx) => {        const fromBalance = await tx.balance.findUnique({            where: { userId: Number(from) },          });          if (!fromBalance || fromBalance.amount < amount) {            throw new Error('Insufficient funds');          }          await new Promise(r => setTimeout(r, 4000));          await tx.balance.update({            where: { userId: Number(from) },            data: { amount: { decrement: amount } },          });
          await tx.balance.update({            where: { userId: toUser.id },            data: { amount: { increment: amount } },          });    });}
Send two requests in two tabs and see if you are able to receive negative balances?
Locking of rows
In postgres, a transaction ensure that either all the statements happen or none. It does not lock rows/ revert a transaction if something from this transaction got updated before the transaction committed (unlike MongoDB)
So we need to explicitly lock the balance row for the sending user so that only one transaction can access it at at time, and the other one waits until the first transaction has committed
Hint 1 - https://www.cockroachlabs.com/blog/select-for-update/
Hint 2 - https://www.prisma.io/docs/orm/prisma-client/queries/raw-database-access/raw-queries
-
Solution
"use server"import { getServerSession } from "next-auth";import { authOptions } from "../auth";import prisma from "@repo/db/client";export async function p2pTransfer(to: string, amount: number) {const session = await getServerSession(authOptions);const from = session?.user?.id;if (!from) {return {message: "Error while sending"}}const toUser = await prisma.user.findFirst({where: {number: to}});if (!toUser) {return {message: "User not found"}}await prisma.$transaction(async (tx) => {await tx.$queryRaw`SELECT * FROM "Balance" WHERE "userId" = ${Number(from)} FOR UPDATE`;const fromBalance = await tx.balance.findUnique({where: { userId: Number(from) },});if (!fromBalance || fromBalance.amount < amount) {throw new Error('Insufficient funds');}await new Promise(r => setTimeout(r, 4000));await tx.balance.update({where: { userId: Number(from) },data: { amount: { decrement: amount } },});await tx.balance.update({where: { userId: toUser.id },data: { amount: { increment: amount } },});});}
Add P2P transactions table
Update schema.prisma
model User {  id                Int                 @id @default(autoincrement())  email             String?             @unique  name              String?  number            String              @unique  password          String  OnRampTransaction OnRampTransaction[]  Balance           Balance[]  sentTransfers     p2pTransfer[]       @relation(name: "FromUserRelation")  receivedTransfers p2pTransfer[]       @relation(name: "ToUserRelation")}
model p2pTransfer { id Int @id @default(autoincrement()) amount Int timestamp DateTime fromUserId Int fromUser User @relation(name: "FromUserRelation", fields: [fromUserId], references: [id]) toUserId Int toUser User @relation(name: "ToUserRelation", fields: [toUserId], references: [id])}- Run
npx prisma migrate dev --name added_p2p_txn - Regenerate client
npx prisma generate - Do a global build (npm run build) (it’s fine if it fails
- Add entries to
p2pTransferwhenever a transfer happens
Assignment: Add frontend for the p2p transactions
Can you add code that let’s you see the users existing transactions?

Final code - https://github.com/100xdevs-cohort-2/week-18-live-1-final