Week 24.3 Tests, Mocks and CI /CD integration
In this offline lecture, Harkirat recaps testing concepts and covers the differences between spies and mocks. He explores integrating testing with CI/CD pipelines and differentiates between unit, integration, and end-to-end tests. Harkirat provides examples and best practices for implementing each test type, ensuring comprehensive code coverage and quality.
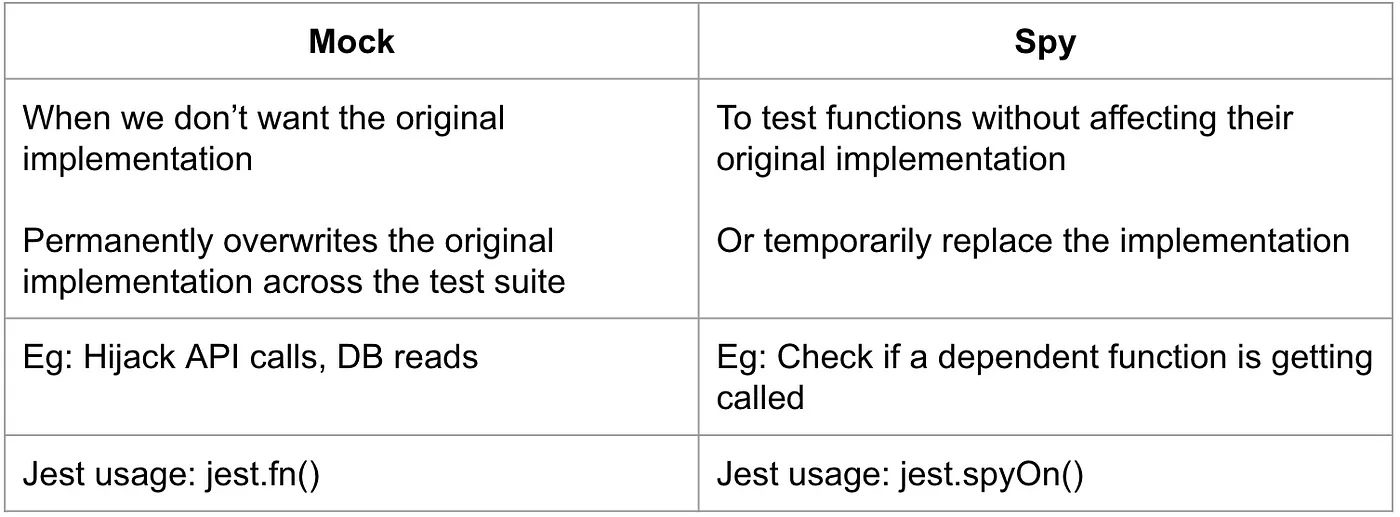
Spies vs Mocks
In the context of testing, mocks and spies are related but distinct concepts. While mocks allow you to replace the functionality of a function or module with a simulated implementation, spies enable you to observe and verify the behavior of a function or module without modifying its implementation.
The Problem with Mocks Alone
In the previous sections, we mocked the prismaClient.sum.create function to return a predefined value. However, this approach has a limitation: even if we pass incorrect inputs to the prismaClient.sum.create function, the tests would still pass because the mock doesn’t care about the input values; it simply returns the mocked value.
To illustrate this problem, let’s try flipping the a and b inputs in the src/index.ts file:
const response = await prismaClient.sum.create({ data: { a: parsedResponse.data.b, // Swapped with b b: parsedResponse.data.a, // Swapped with a result: answer }});If you run the tests with this incorrect code, they will still pass because the mock doesn’t verify the input values.
This means our tests are flaky, as they succeed even when the code is incorrect. To address this issue, we need to introduce spies to ensure that the database call is made with the correct inputs.
Using Spies
Spies allow you to observe and verify the behavior of a function or module without modifying its implementation. In our case, we can use a spy to ensure that the prismaClient.sum.create function is called with the correct input values.
- Update the first test case in
index.test.tsto include a spy:
it("should return the sum of two numbers", async () => {    prismaClient.sum.create.mockResolvedValue({      id: 1,      a: 1,      b: 1,      result: 3    });
    vi.spyOn(prismaClient.sum, "create");
    const res = await request(app).post("/sum").send({      a: 1,      b: 2    });
    expect(prismaClient.sum.create).toHaveBeenCalledWith({      data: {        a: 1,        b: 2,        result: 3      }    });
    expect(res.statusCode).toBe(200);    expect(res.body.answer).toBe(3);  });
In this updated test case, we use vi.spyOn(prismaClient.sum, "create") to create a spy on the prismaClient.sum.create function. We then assert that the function was called with the correct input values using expect(prismaClient.sum.create).toHaveBeenCalledWith({ ... }).
- Run the tests:
npm run testWith the incorrect application logic (swapped a and b inputs), the tests should now fail because the spy detects that the prismaClient.sum.create function was called with incorrect input values.
- Revert the application logic in
src/index.tsto make it correct again:
const response = await prismaClient.sum.create({ data: { a: parsedResponse.data.a, b: parsedResponse.data.b, result: answer }});After reverting the application logic, the tests should pass again.
By using spies in addition to mocks, you can ensure that your tests not only verify the expected output but also validate that the functions or modules under test are called with the correct input values. This approach helps catch flaky tests and improves the reliability and accuracy of your test suite.
Adding a CI/CD Pipeline
Continuous Integration and Continuous Deployment (CI/CD) pipelines are essential for ensuring that your application is thoroughly tested and that any issues are caught early in the development process. In this section, we’ll create a CI/CD pipeline using GitHub Actions that runs our tests whenever a pull request is opened against the main branch.
Creating the GitHub Actions Workflow
- In your project repository, create a new directory called
.github/workflows. - Inside the
workflowsdirectory, create a new file calledtest.ymlwith the following content:
name: CI/CD Pipeline
on:  pull_request:    branches:      - main
jobs:  build:    runs-on: ubuntu-latest
    steps:      - name: Checkout code        uses: actions/checkout@v2
      - name: Set up Node.js        uses: actions/setup-node@v2        with:          node-version: 20
      - name: Install dependencies        working-directory: 5-express-vitest-prisma        run: npm install && npx prisma generate
      - name: Run tests        working-directory: 5-express-vitest-prisma        run: npm run test
This workflow file defines a job called build that runs on the latest Ubuntu environment provided by GitHub Actions. Here’s what each step does:
Checkout code: Checks out the repository code.Set up Node.js: Sets up the specified Node.js version (in this case, 20).Install dependencies: Installs the project dependencies and generates the Prisma client.Run tests: Runs thenpm run testcommand to execute the tests.
The working-directory field specifies the directory where the respective commands should be executed. In this case, we’re assuming that the project code is located in the 5-express-vitest-prisma directory.
- Commit and push the changes to your repository.
Triggering the CI/CD Pipeline
Once the workflow file is committed and pushed to your repository, the CI/CD pipeline will automatically trigger whenever a pull request is opened against the main branch.
You can view the progress and results of the pipeline by navigating to the “Actions” tab in your repository on GitHub.
Example Pull Requests
Here are two example pull requests that trigger the CI/CD pipeline:
In these pull requests, you can see the CI/CD pipeline running and executing the tests. If any tests fail, the pipeline will report the failure, allowing you to address the issues before merging the changes.
By integrating testing and coverage in your CI/CD pipeline, you can catch issues early, ensure that your codebase is thoroughly tested, and maintain a high level of code quality throughout the development process.
The provided code repository (https://github.com/100xdevs-cohort-2/week-24-testing) contains the final code for this example, including the GitHub Actions workflow file and the example pull requests. You can use this repository as a reference or starting point for further exploration.
Unit Tests vs Integration Tests vs End-to-End Tests
In software testing, there are three main types of tests: unit tests, integration tests, and end-to-end tests. Each type of test serves a different purpose and focuses on different aspects of the application. Here’s an explanation of each type:

Unit Tests
Unit tests are low-level tests that focus on testing individual units or components of your application in isolation. A unit can be a function, a method, or a small piece of code that performs a specific task. Unit tests are designed to verify the correctness of the unit’s behavior and ensure that it works as expected.
When writing unit tests, you typically mock out external services or dependencies, such as databases, APIs, or other external systems. This approach allows you to test the unit’s logic without being affected by the behavior of external components.
Unit tests are typically fast to execute and provide quick feedback during the development process. They help catch bugs early and ensure that individual components work correctly before integrating them into the larger system.
Integration Tests
Integration tests focus on testing the interaction between different components or modules of your application. Unlike unit tests, integration tests do not mock out external services or dependencies. Instead, they test the integration of multiple components by starting and interacting with the actual external services or dependencies.
Integration tests are more comprehensive than unit tests and help ensure that the different components of your application work together correctly. They can catch issues that may arise from the integration of different components, such as compatibility problems, communication errors, or data inconsistencies.
Integration tests are typically slower to execute than unit tests because they involve setting up and tearing down external services or dependencies. However, they provide a higher level of confidence in the overall system’s functionality.
End-to-End Tests
End-to-end (E2E) tests simulate real-world user scenarios by testing the entire application flow, from the user interface to the backend services. These tests interact with the application as a user would, mimicking user actions and verifying that the application behaves as expected.
In the context of a web application, E2E tests may involve opening a browser, navigating to different pages, filling out forms, clicking buttons, and asserting that the expected behavior occurs. For a mobile application, E2E tests may involve simulating user interactions on the device, such as tapping, swiping, or entering text.
E2E tests are the most comprehensive type of tests and provide the highest level of confidence in the application’s overall functionality. However, they are also the slowest and most resource-intensive tests to execute, as they involve setting up and interacting with the entire application stack, including the user interface, backend services, and external dependencies.
It’s important to have a balanced combination of unit tests, integration tests, and end-to-end tests in your testing strategy. Unit tests provide fast feedback and ensure the correctness of individual components, while integration tests and end-to-end tests ensure that the components work together correctly and that the application behaves as expected from a user’s perspective.