Week 27.1 Kubernates
In this lecture, Harkirat introduces Kubernetes, a powerful container orchestration platform. He begins by contrasting the landscape before and after Kubernetes’ introduction, highlighting its impact on cloud-native applications. The lecture covers essential Kubernetes jargon, including nodes, clusters, images, containers, pods, master and worker nodes, and the Kubernetes API in a very hands on manner.
Understanding Kubernetes
Kubernetes, often abbreviated as K8s, is a powerful container orchestration platform that has revolutionized the way applications are deployed, managed, and scaled in modern cloud-native environments. Let’s delve into the core concepts and benefits of Kubernetes.
What is Kubernetes?
Kubernetes is an open-source container orchestration system for automating the deployment, scaling, and management of containerized applications. It was originally developed by Google and is now maintained by the Cloud Native Computing Foundation (CNCF)
Key points to understand about Kubernetes:
- Container Orchestration Engine: Kubernetes provides a robust framework for managing containerized workloads, allowing you to create, delete, and update containers efficiently.
- Built on Docker: While Kubernetes can work with various container runtimes, it’s important to note that Docker is often a prerequisite for understanding and working with Kubernetes. Docker provides the containerization technology that Kubernetes orchestrates.
- Cloud-Native Deployment: Kubernetes excels at deploying Docker images from registries in a cloud-native fashion, making it ideal for modern, distributed applications.
- Auto-healing: One of the key benefits of Kubernetes is its ability to automatically recover from failures. If a container crashes or a node goes down, Kubernetes can restart or reschedule containers to maintain the desired state of your application.
- Auto-scaling: Kubernetes provides simple constructs for automatically scaling your applications based on resource utilization or custom metrics, ensuring optimal performance under varying loads.
- Observability: With Kubernetes, you get a comprehensive view of your entire system through its dashboard and various monitoring tools, making it easier to manage and troubleshoot complex applications.
Key Components of Kubernetes
To effectively use Kubernetes, it’s essential to understand its main components:
- Cluster: A Kubernetes cluster consists of a control plane and one or more compute machines, or nodes.
- Control Plane: This is the brain of Kubernetes, where all task assignments originate and cluster management decisions are made.
- Kubelet: This service runs on nodes and ensures that containers are running in a pod as expected.
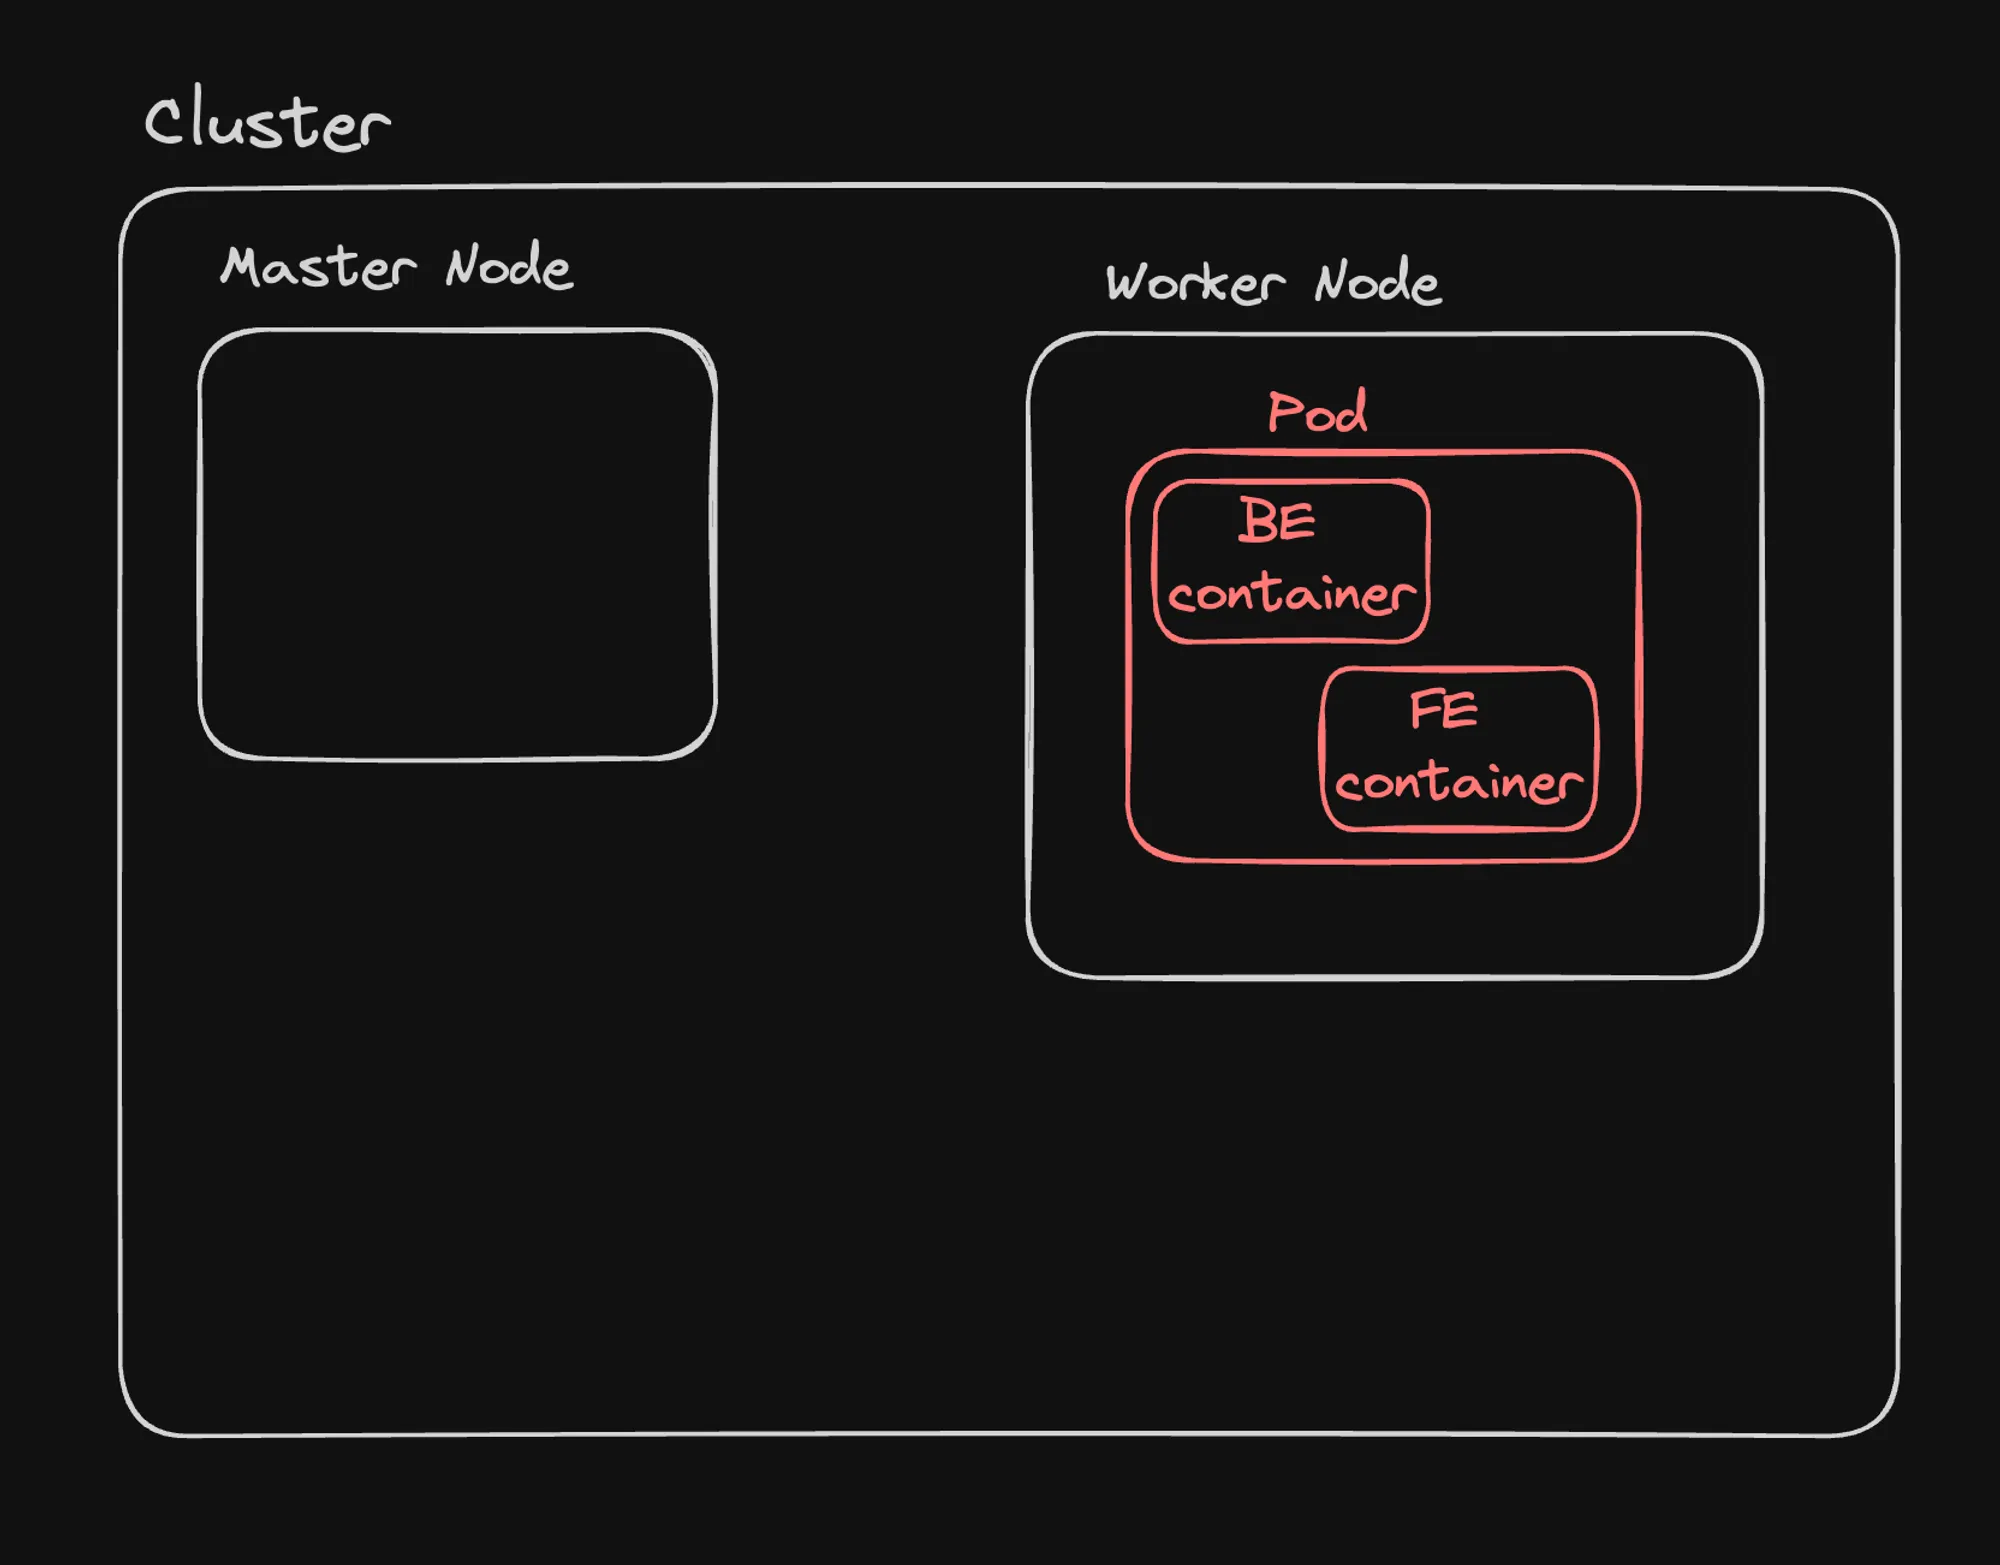
- Pod: The smallest deployable unit in Kubernetes, a pod is a group of one or more containers that share network and storage resources.
Kubernetes has become the de facto standard for container orchestration due to its robust features, extensive community support, and ability to handle complex, large-scale deployments. By automating many aspects of application deployment and management, Kubernetes enables organizations to build and operate applications more efficiently and at scale. As you dive deeper into Kubernetes, you’ll discover its power in simplifying container management, enhancing application resilience, and enabling truly cloud-native architectures. Remember, mastering Kubernetes is a journey, but one that can significantly enhance your ability to deploy and manage modern, containerized applications.
Before Kubernetes
In this section, we’ll explore the typical architecture of web applications before the widespread adoption of Kubernetes. This will help us appreciate the improvements and efficiencies that Kubernetes brings to modern application deployment and management.
Traditional Web Application Architecture
Before Kubernetes, web applications were often deployed using a combination of various cloud services and infrastructure components. Let’s break down the common architecture for backend and frontend deployments:
1] Backend Architecture
The backend architecture typically followed this pattern:
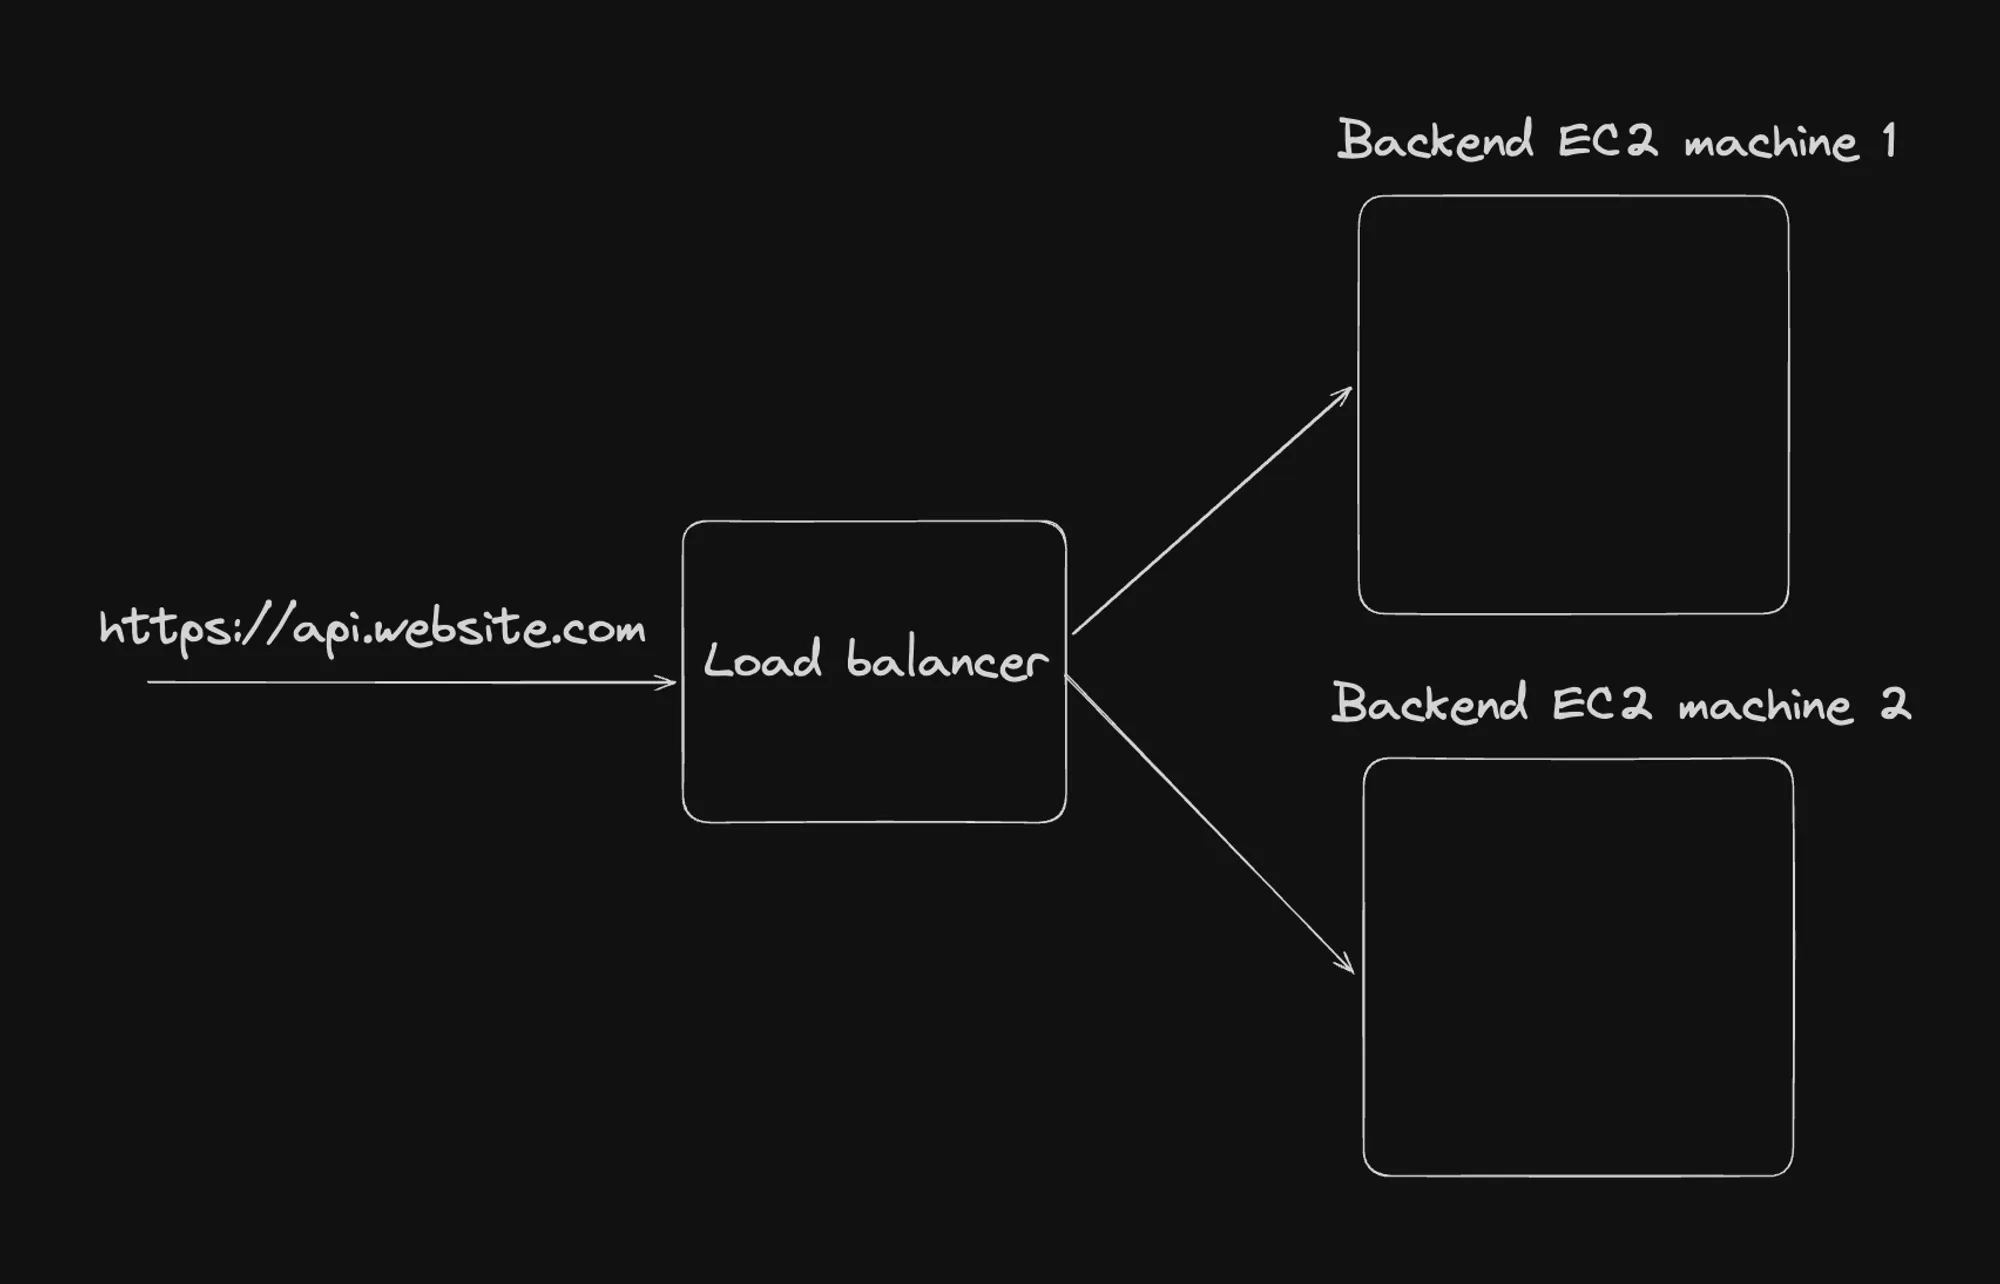
Key Components:
- Domain and HTTPS: The backend API was usually accessed through a subdomain (e.g., api.website.com) and secured with HTTPS.
- Load Balancer: A load balancer was used to distribute incoming traffic across multiple backend servers. This improved reliability and allowed for horizontal scaling.
- EC2 Instances: Amazon EC2 (Elastic Compute Cloud) instances were commonly used to host the backend services. Multiple instances were deployed for redundancy and to handle higher loads.
Challenges:
- Scaling was manual or required additional automation scripts.
- Deploying updates often involved downtime or complex blue-green deployment strategies.
- Managing multiple EC2 instances increased operational complexity.
2] Frontend Architecture (Next.js)
For server-side rendered applications using frameworks like Next.js, the architecture was often:
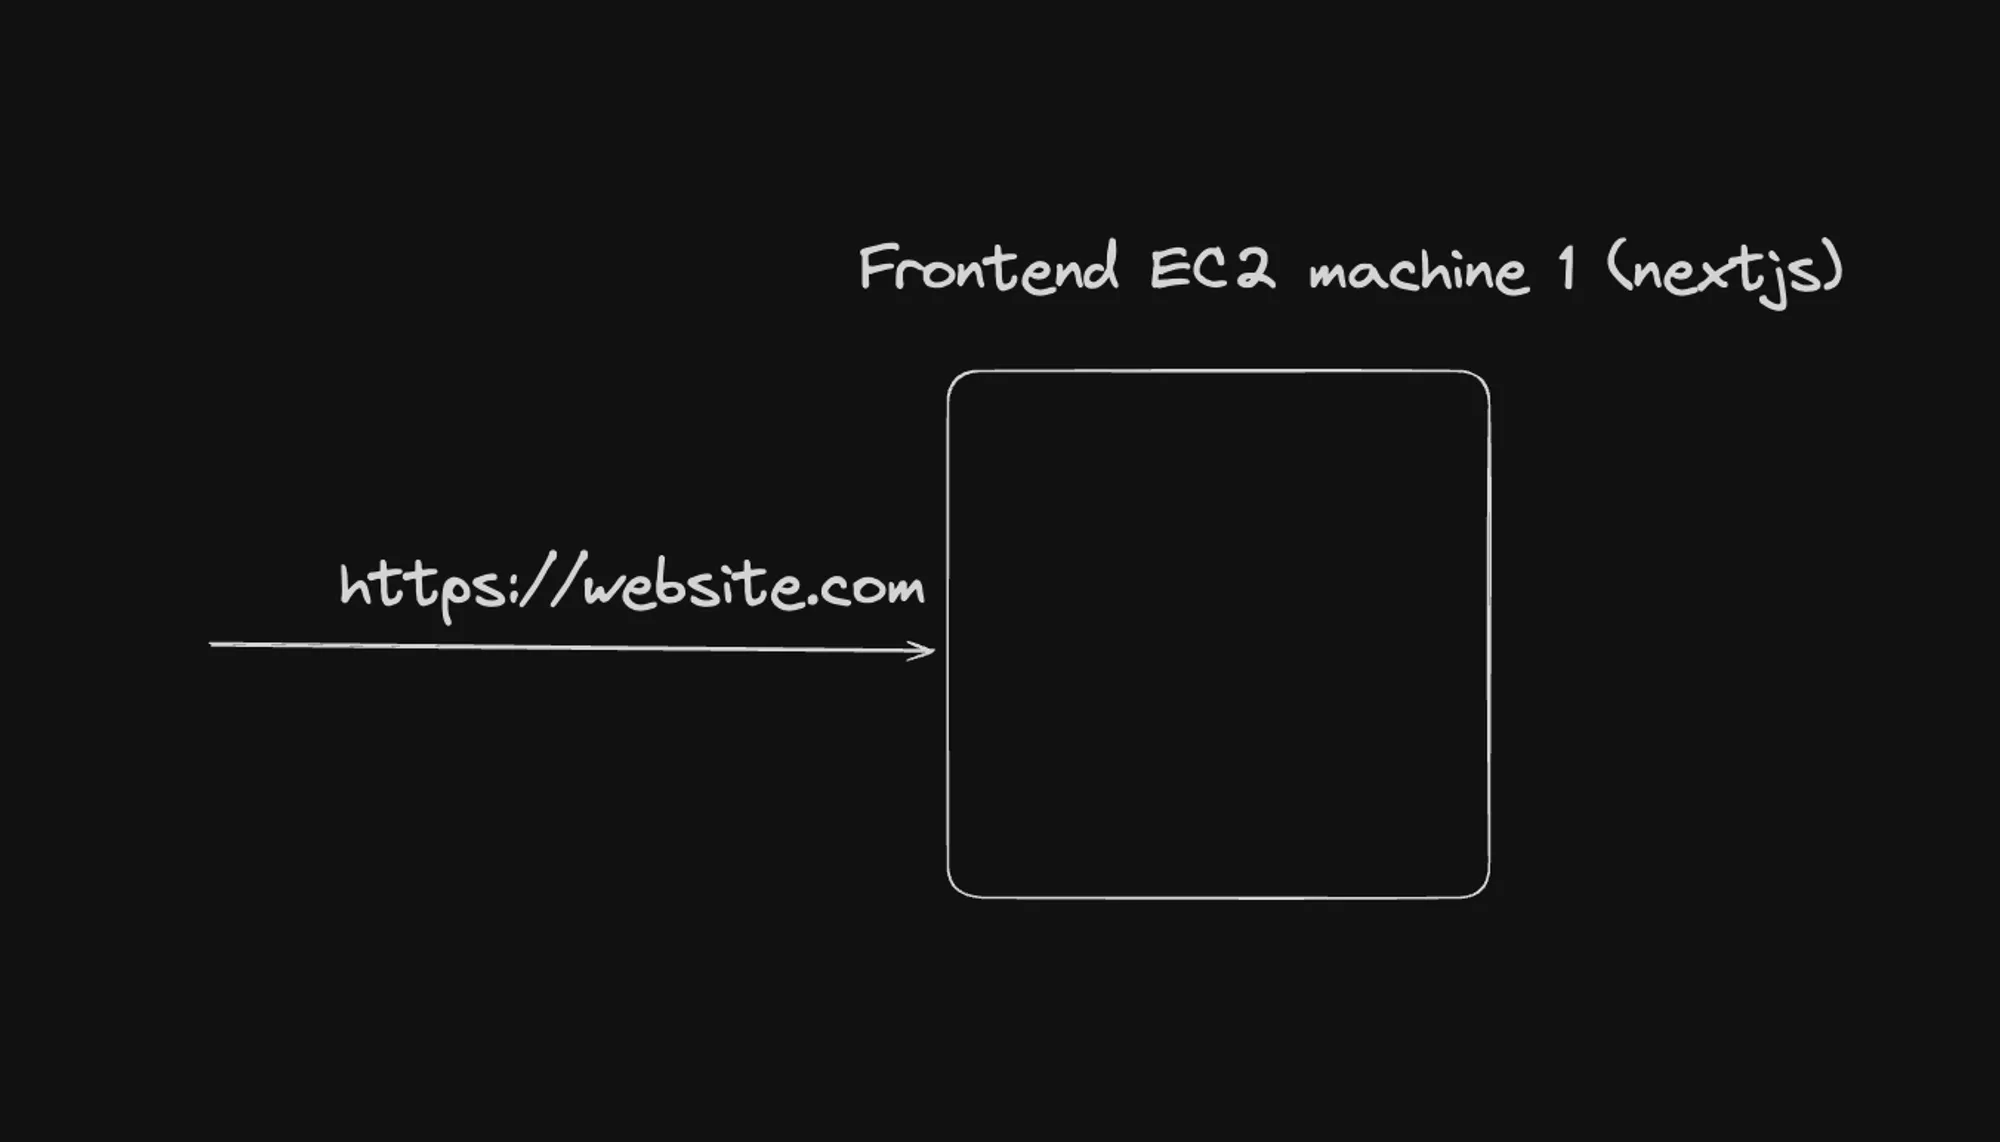
Key Components:
- Domain and HTTPS: The main domain (website.com) would point directly to the frontend server.
- EC2 Instance: A single EC2 instance would host the Next.js application, handling both server-side rendering and serving the application.
Challenges:
- Limited scalability with a single instance.
- Potential single point of failure.
- Updating the application could lead to downtime.
3] Frontend Architecture (React - Static Site)
For static single-page applications built with frameworks like React, a common architecture was:
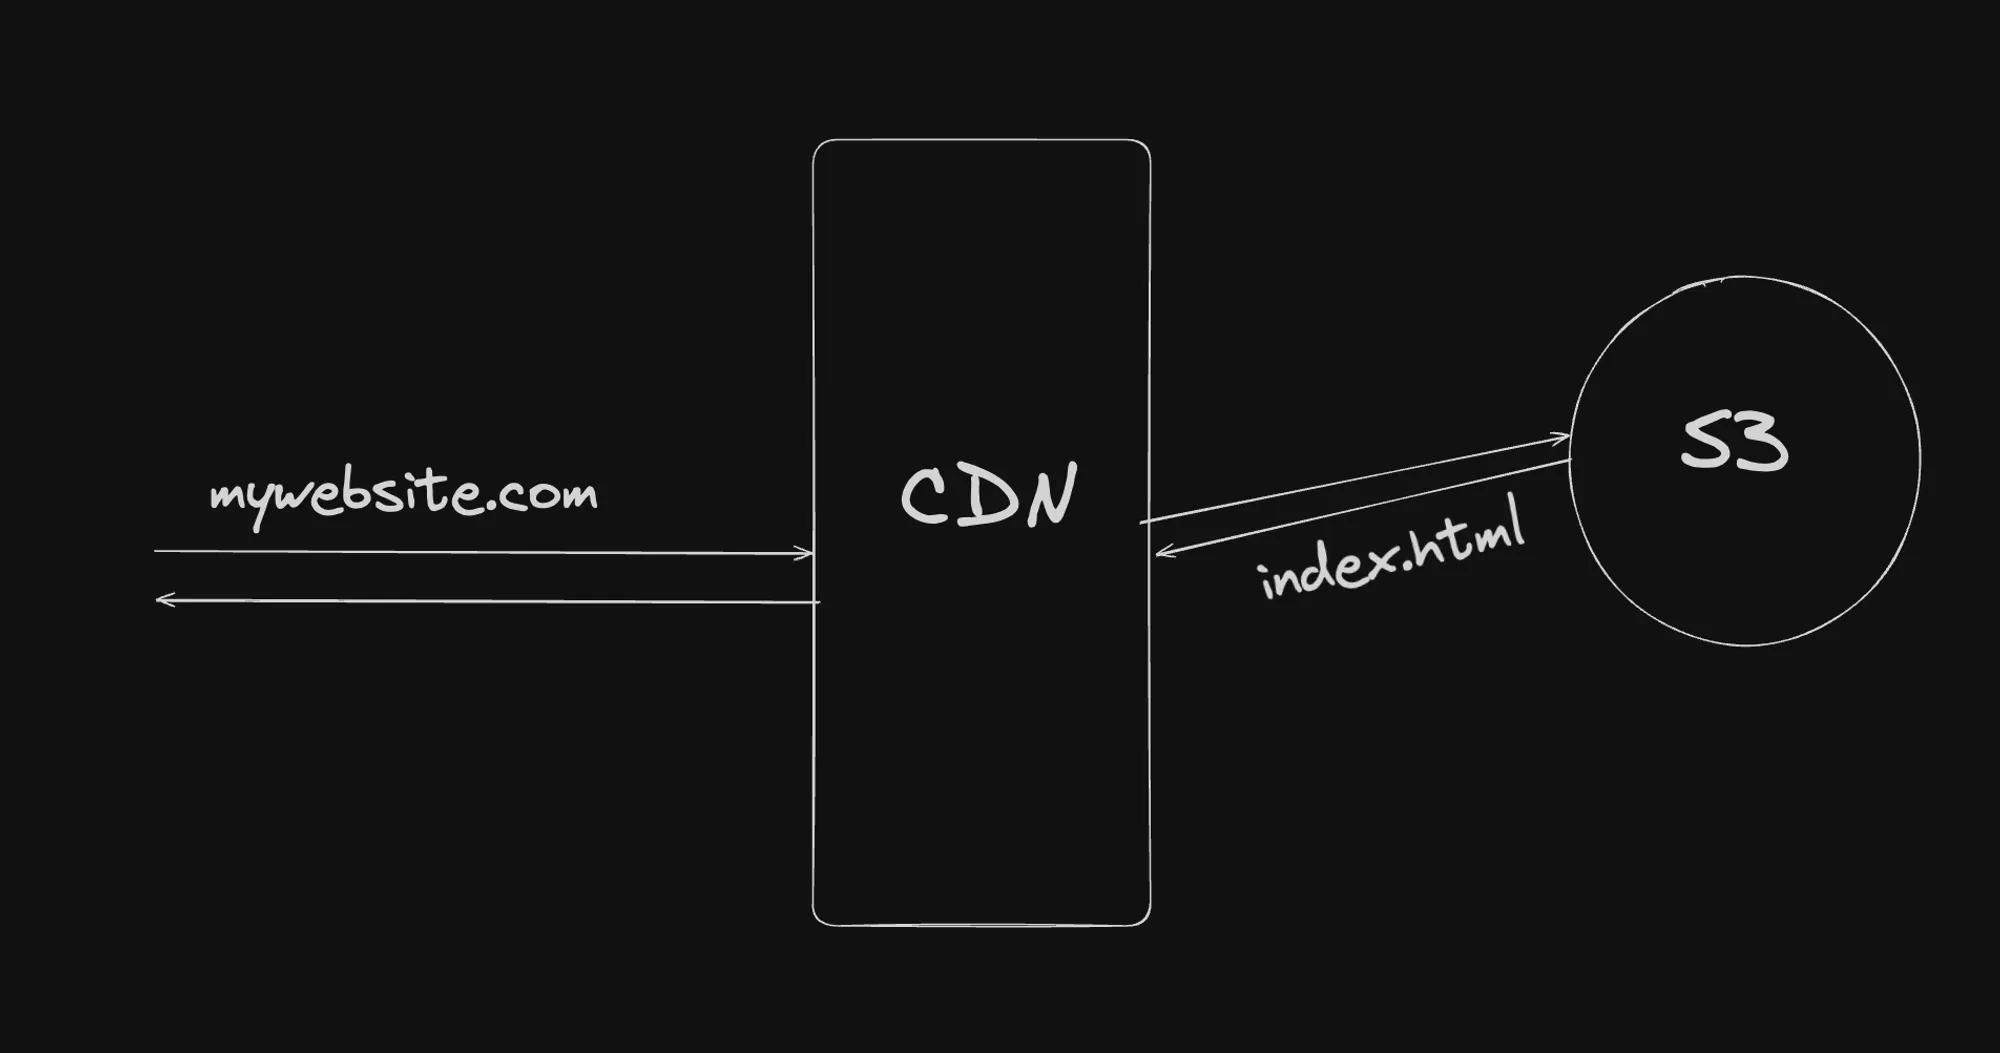
Key Components:
- Domain: The domain would point to a Content Delivery Network (CDN).
- CDN: A CDN like Amazon CloudFront would be used to cache and serve the static assets globally, improving load times for users worldwide.
- S3: Amazon S3 (Simple Storage Service) would host the static files of the React application.
Advantages:
- Highly scalable and cost-effective for static content.
- Global distribution through CDN improved performance.
- Easy to update by simply uploading new files to S3.
Challenges:
- Limited to static content, requiring additional services for dynamic functionality.
- Complex setups needed for features like server-side rendering or dynamic routes.
Limitations of Pre-Kubernetes Architectures
While these architectures were functional, they had several limitations:
- Complex Scaling: Scaling applications often required manual intervention or complex automation scripts.
- Resource Utilization: EC2 instances were often underutilized, leading to inefficient resource allocation.
- Deployment Complexity: Deploying updates, especially for backend services, could be complex and risky.
- Limited Portability: Applications were often tightly coupled with the specific cloud provider’s services.
- Operational Overhead: Managing multiple EC2 instances, load balancers, and other components increased operational complexity.
Summary
The pre-Kubernetes era of web application deployment was characterized by static, often manually managed infrastructures. While these setups were functional, they lacked the flexibility, scalability, and efficiency that modern containerized applications require.
Kubernetes addresses many of these limitations by providing:
- Automated scaling and load balancing
- Efficient resource utilization through containerization
- Simplified deployment and update processes
- Improved portability across different environments
- Reduced operational overhead through automation
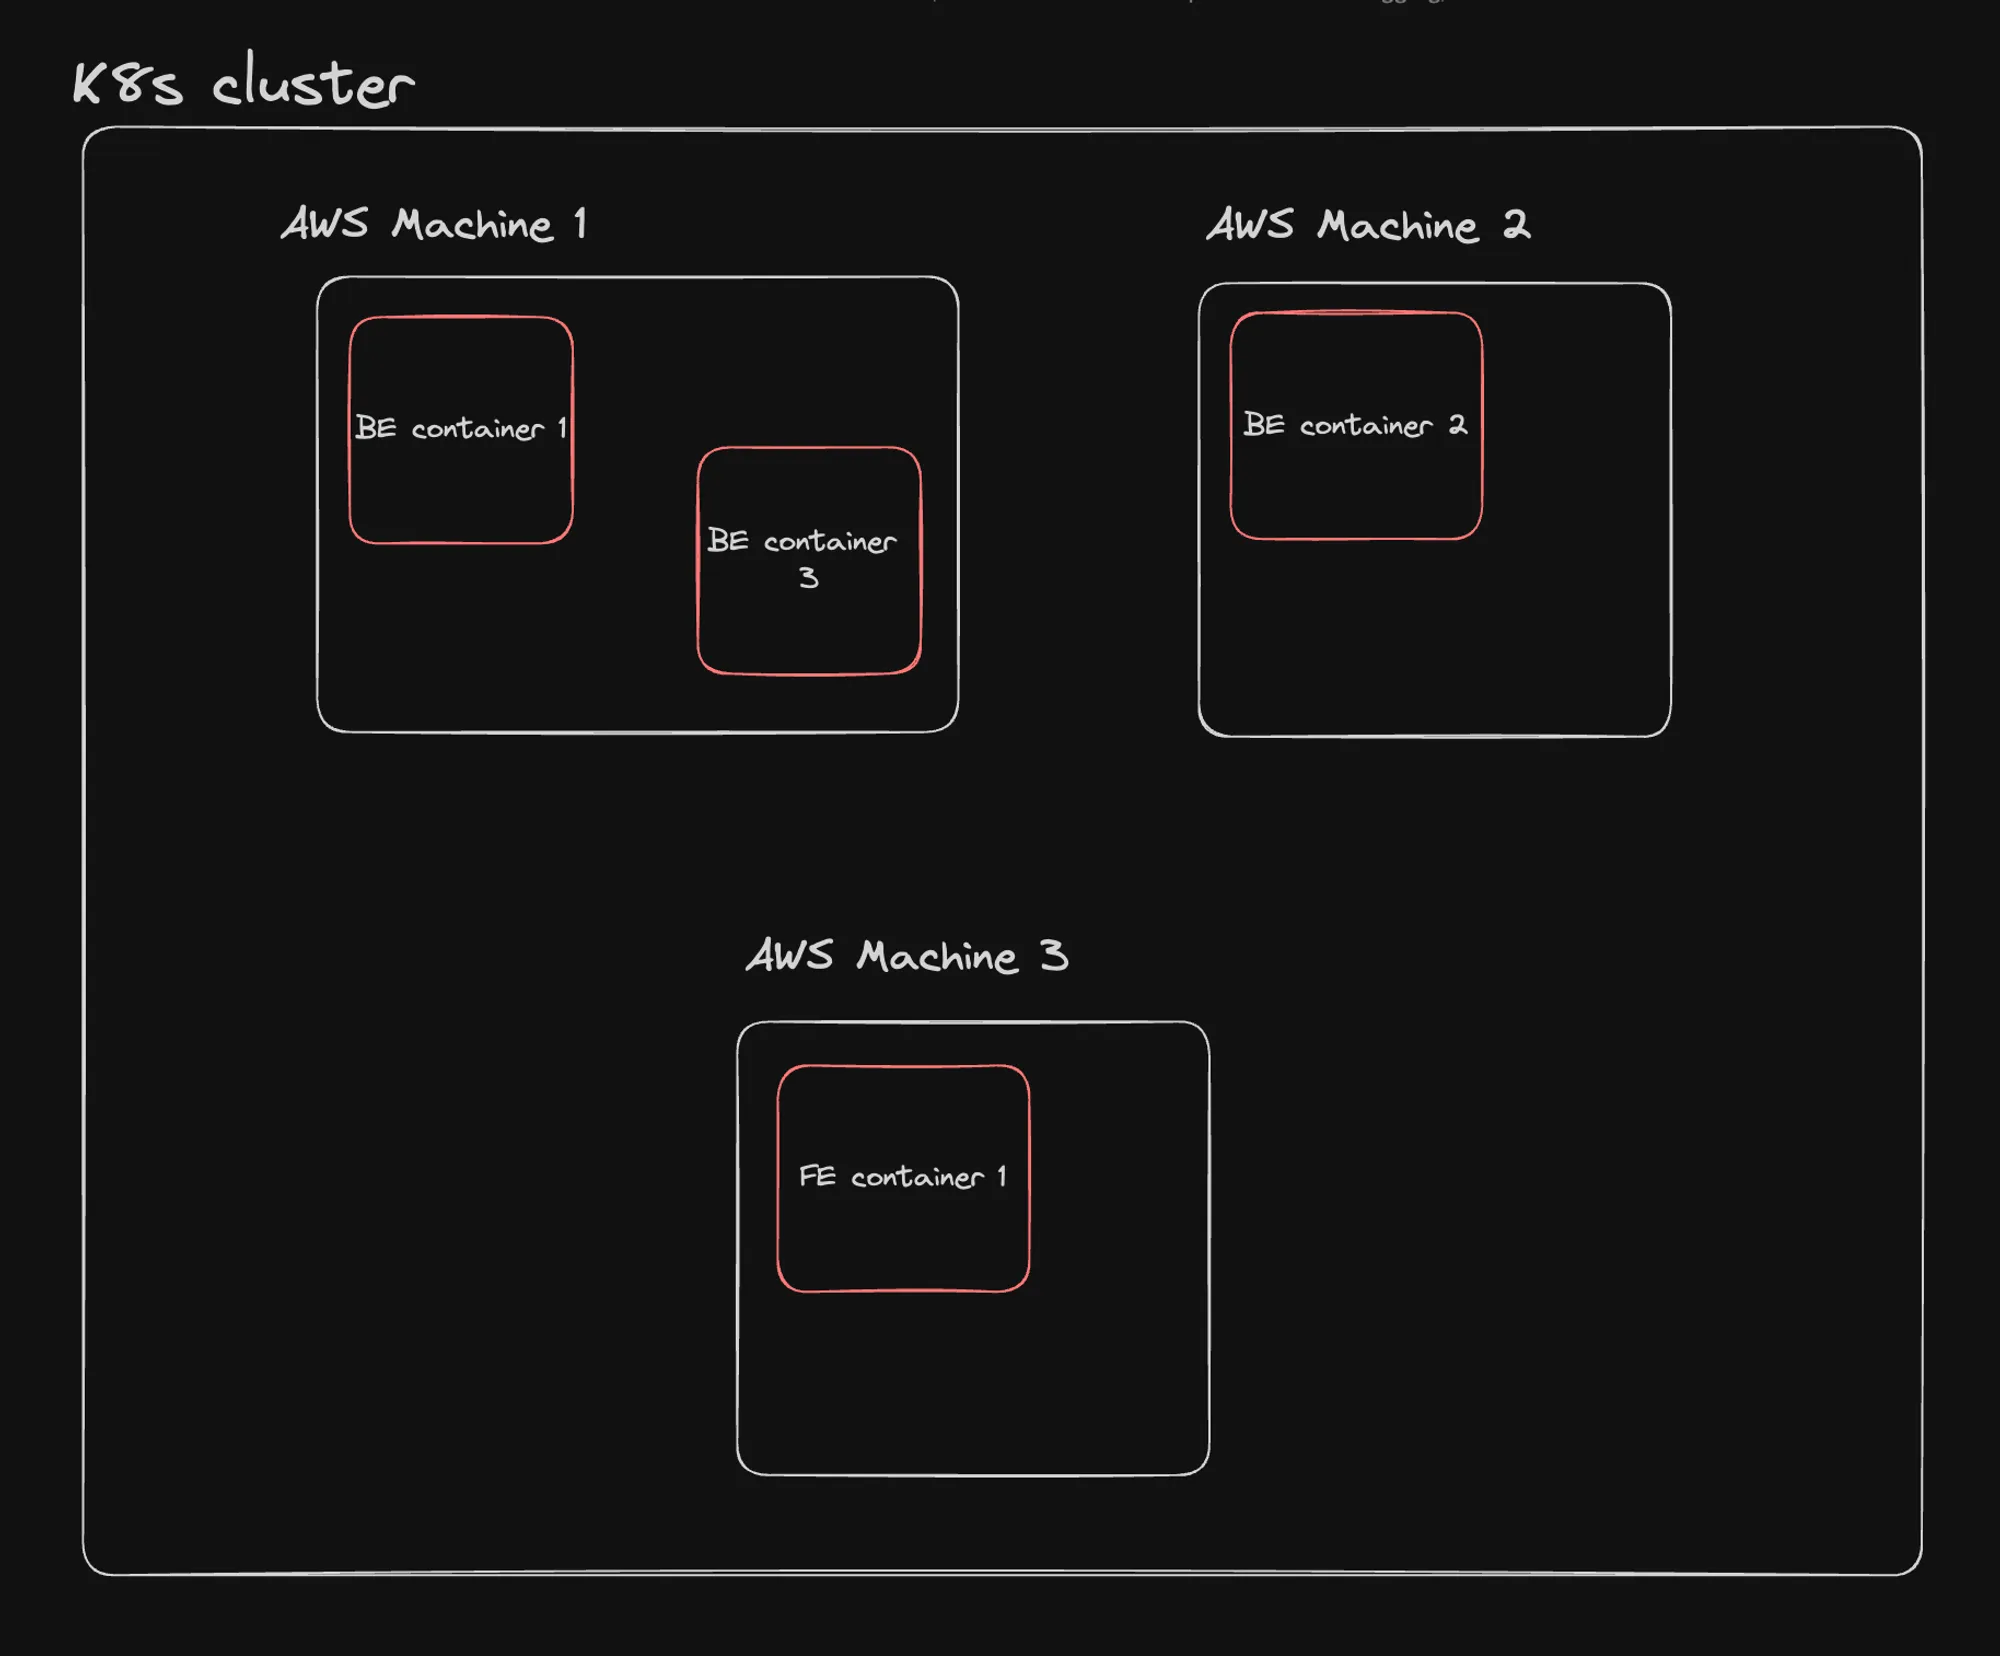
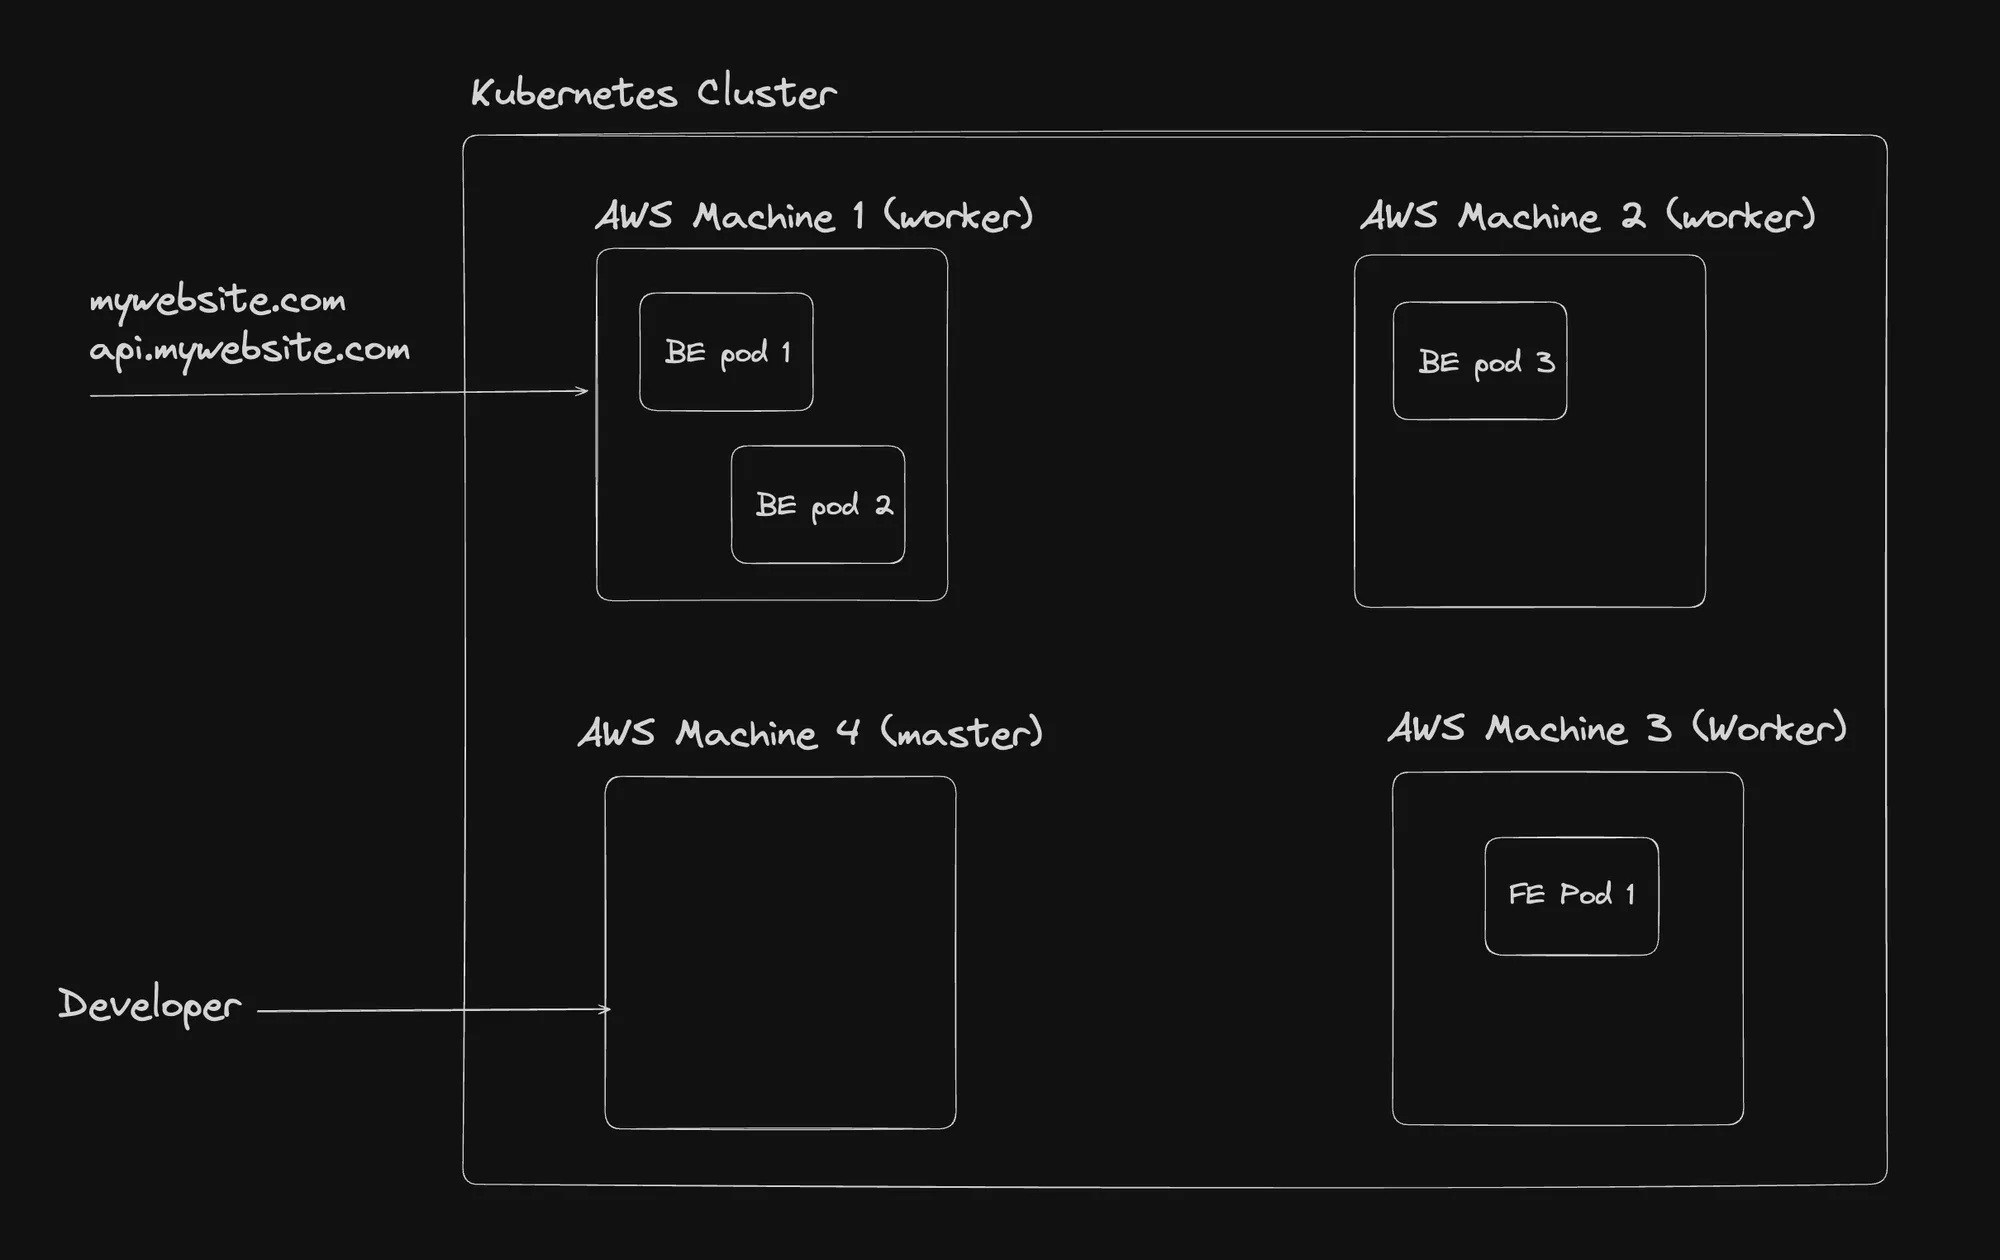
After Kubernetes
With Kubernetes, both frontend and backend components of your application are deployed as pods within a Kubernetes cluster. This unified approach simplifies management and improves scalability.
Key Kubernetes Concepts
1] Nodes
Nodes are the building blocks of a Kubernetes cluster. They are machines (physical or virtual) that run Kubernetes and your containerized applications.
There are two types of nodes:
- Master Node (Control Plane):
- Manages the overall state of the cluster
- Handles scheduling, scaling, and updates
- Responds to API requests from users and other components
- Key components include:
- API Server
- Scheduler
- Controller Manager
- etcd (distributed key-value store)
- Worker Nodes:
- Run the actual application workloads
- Host the pods that contain your application containers
- Key components include:
- Kubelet (communicates with the control plane)
- Container runtime (e.g., Docker)
- Kube-proxy (network proxy)
2] Cluster
A Kubernetes cluster is a set of nodes grouped together. It consists of at least one master node and multiple worker nodes. The cluster provides:
- High availability
- Load balancing
- Scalability
- Efficient resource utilization
You can dynamically add or remove nodes from a cluster to adjust to your workload requirements.
3] Images
In the context of Kubernetes, images refer to Docker images. Key points about images:
- Self-contained packages including all dependencies
- Built from instructions in a Dockerfile
- Stored in container registries (e.g., Docker Hub)
- Used to create containers
Example: The official MongoDB image (https://hub.docker.com_/mongo) can be used to deploy MongoDB instances in your cluster.
4] Containers
Containers are running instances of images. They provide:
- Isolation of applications and their dependencies
- Consistency across different environments
- Efficient resource utilization
Example of running a PostgreSQL container:
docker run -p 5432:5432 -e POSTGRES_PASSWORD=mysecretpassword -d postgresThis command creates a container from the PostgreSQL image, mapping port 5432 and setting an environment variable for the password.
5] Pods
Pods are the smallest deployable units in Kubernetes. Key characteristics of pods:
- Can contain one or more containers
- Share network namespace and storage
- Are ephemeral (can be created, destroyed, and replaced dynamically)
- Represent a single instance of an application
Advantages of Kubernetes Architecture
- Unified Management: All components (frontend, backend, databases) are managed uniformly within the Kubernetes ecosystem.
- Scalability: Easily scale applications by adjusting the number of pod replicas or nodes.
- Self-healing: Kubernetes automatically restarts failed containers or replaces pods on node failures.
- Load Balancing: Built-in load balancing distributes traffic across pods.
- Rolling Updates: Perform updates with zero downtime using rolling update strategies.
- Resource Efficiency: Better utilization of hardware resources across the cluster.
Kubernetes vs. Traditional Architecture
| Aspect | Traditional | Kubernetes |
|---|---|---|
| Deployment | Manual or script-based | Declarative, version-controlled manifests |
| Scaling | Often manual or requires custom automation | Automatic based on defined metrics |
| High Availability | Requires complex setup | Built-in with multi-node clusters |
| Resource Utilization | Often inefficient | Optimized through container packing |
| Updates | Can involve downtime | Rolling updates with zero downtime |
| Service Discovery | Often manual configuration | Automatic within the cluster |
The concepts of nodes, clusters, images, containers, and pods form the foundation of the Kubernetes ecosystem. Understanding these components is crucial for effectively leveraging Kubernetes to build scalable, resilient, and easily manageable applications.
Master Node (Control Plane)
The Master Node, also known as the Control Plane, is the brain of a Kubernetes cluster. It’s responsible for maintaining the desired state of the cluster, making global decisions about the cluster, and responding to cluster events. Let’s dive into the key components of the Master Node and their functions.
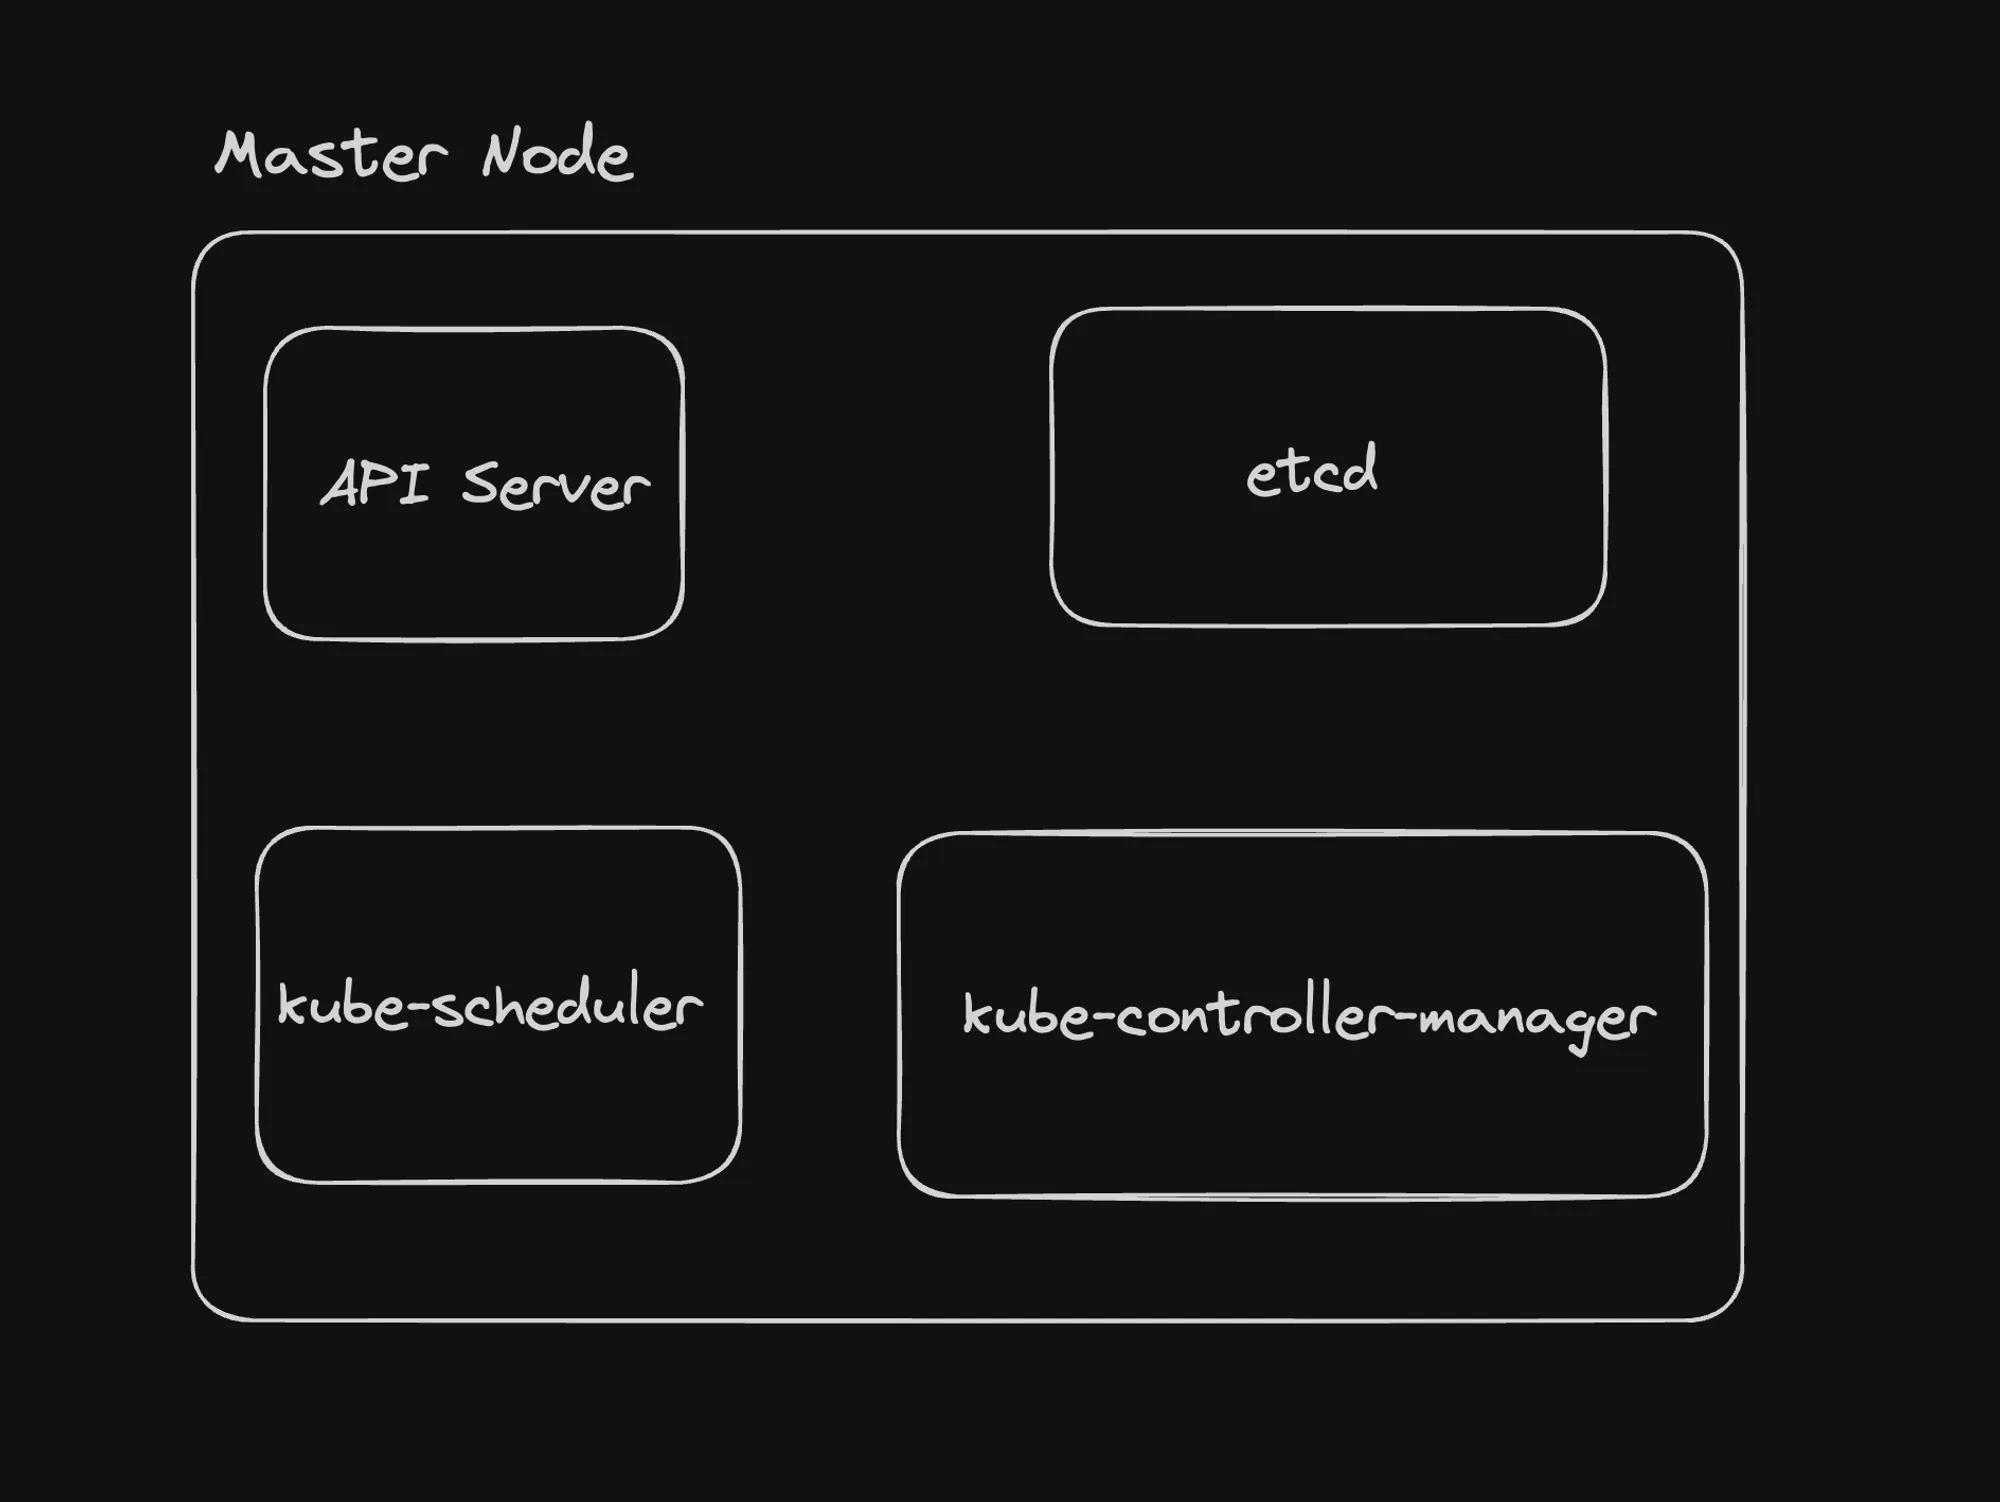
Components of the Master Node
1. API Server
The API Server is the front-end for the Kubernetes control plane, exposing the Kubernetes API. It’s the primary management point for the entire cluster.
Key responsibilities:
- Handling RESTful API Requests: Processes and responds to API requests from various clients (kubectl, other Kubernetes components, external applications).
- Authentication and Authorization: Ensures only authenticated and authorized entities can perform actions on the cluster.
- Metrics and Health Checks: Exposes endpoints for monitoring and diagnosing the control plane’s health and performance.
- Communication Hub: Acts as the central point of communication for all cluster components.
2. etcd
etcd is a consistent and highly-available key-value store used as Kubernetes’ backing store for all cluster data.
Key features:
- Distributed: Ensures high availability and consistency across multiple nodes.
- Reliable: Provides strong consistency guarantees for cluster data.
- Fast: Optimized for rapid reads and writes of small amounts of data.
- Secure: Supports SSL/TLS client certificates for secure communication.
Reference: https://etcd.io/docs/v3.5/quickstart/
3. kube-scheduler
The kube-scheduler is responsible for assigning newly created pods to nodes in the cluster.
Key functions:
- Pod Placement: Decides which node is best suited for running a newly created or unscheduled pod.
- Resource Evaluation: Considers factors like resource requirements, hardware/software/policy constraints, affinity and anti-affinity specifications, and data locality.
- Optimization: Aims to balance resource utilization across nodes.
4. kube-controller-manager
The kube-controller-manager runs controller processes that regulate the state of the cluster.
Key controllers:
- Node Controller: Monitors node health and responds when nodes go down.
- Deployment Controller: Manages the lifecycle of deployments, ensuring the desired state is maintained.
- ReplicaSet Controller: Ensures the correct number of pod replicas are running.
- Endpoint Controller: Populates the Endpoints object (joins Services & Pods).
- Service Account & Token Controllers: Create default accounts and API access tokens for new namespaces.
Reference: https://kubernetes.io/docs/concepts/architecture/controller/
How the Control Plane Components Work Together
- API Server as the Hub: All components interact with the API server to update or retrieve cluster state.
- etcd as the Source of Truth: The API server stores and retrieves cluster state from etcd.
- Controllers Watch for Changes: The controller manager runs various controllers that watch the API server for changes and work to move the current state towards the desired state.
- Scheduler Makes Placement Decisions: When new pods need to be scheduled, the scheduler determines the best node for placement based on current cluster state and constraints.
Example Workflow
Let’s consider an example of deploying a new application:
- A user submits a deployment manifest using
kubectl. - The API server validates and persists this information to etcd.
- The Deployment controller notices the new deployment and creates a ReplicaSet.
- The ReplicaSet controller notices the new ReplicaSet and creates Pod objects.
- The Scheduler notices unassigned pods and decides which nodes they should run on.
- Kubelet on the selected worker nodes pull the necessary images and start the containers.
Conclusion
The Master Node’s components work in concert to manage the entire Kubernetes cluster. Understanding these components and their interactions is crucial for effectively managing and troubleshooting Kubernetes deployments.
Key takeaways:
- The API Server is the central communication hub.
- etcd provides reliable storage for cluster state.
- The Scheduler makes intelligent placement decisions for pods.
- Controllers continuously work to maintain the desired state of the cluster.
Worker Nodes
Worker nodes are the workhorses of a Kubernetes cluster, responsible for running the actual application workloads. Let’s explore the key components that make up a worker node and their functions.
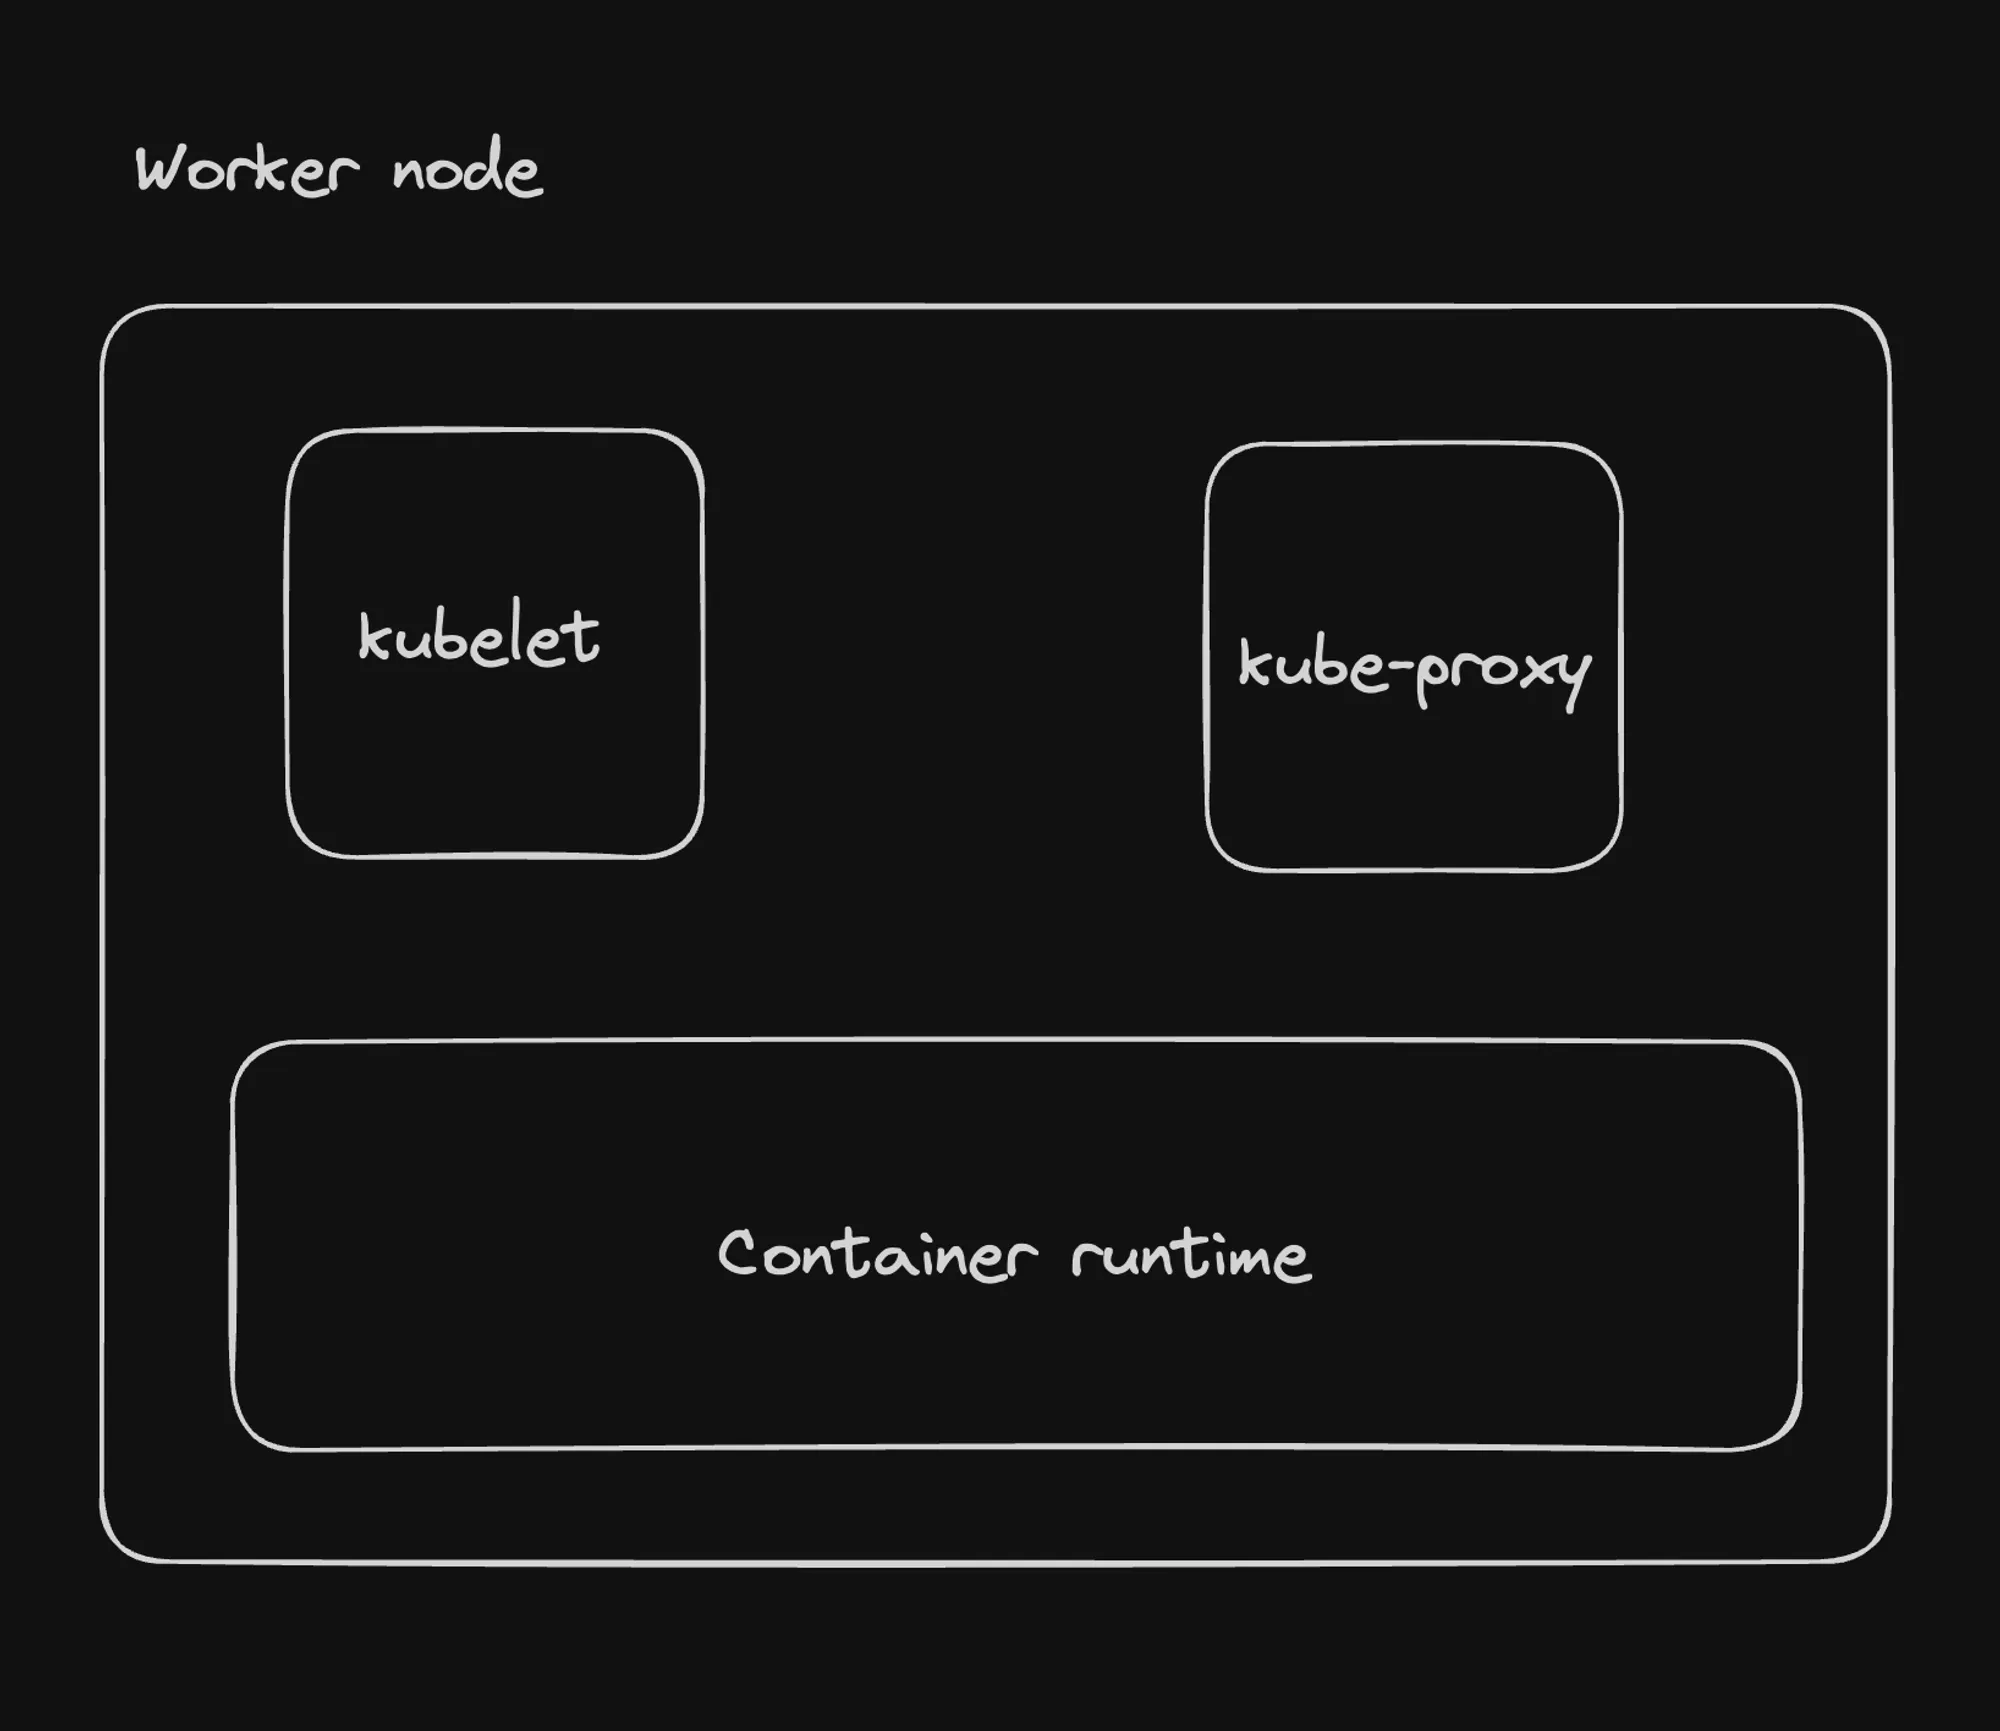
Key Components of a Worker Node
1. kubelet
The kubelet is a critical agent that runs on each node in the cluster, ensuring that containers are running in a Pod as expected.
How the kubelet Control Loop Works:
- Watch for PodSpecs: The kubelet continuously monitors the API server for new or updated PodSpecs assigned to its node.
- Reconcile Desired State: It compares the current state of the node with the desired state defined in the PodSpecs.
- Take Action: Based on this comparison, the kubelet performs necessary actions:
- Starts new pods by pulling container images and creating containers
- Monitors container health through liveness and readiness probes
- Updates existing pods as needed
- Stops and removes containers for terminated pods
- Report Status: The kubelet regularly reports pod and node status back to the API server, including resource usage and container statuses.
2. kube-proxy
The kube-proxy is a network proxy that runs on each node, facilitating network communication to and from pods.
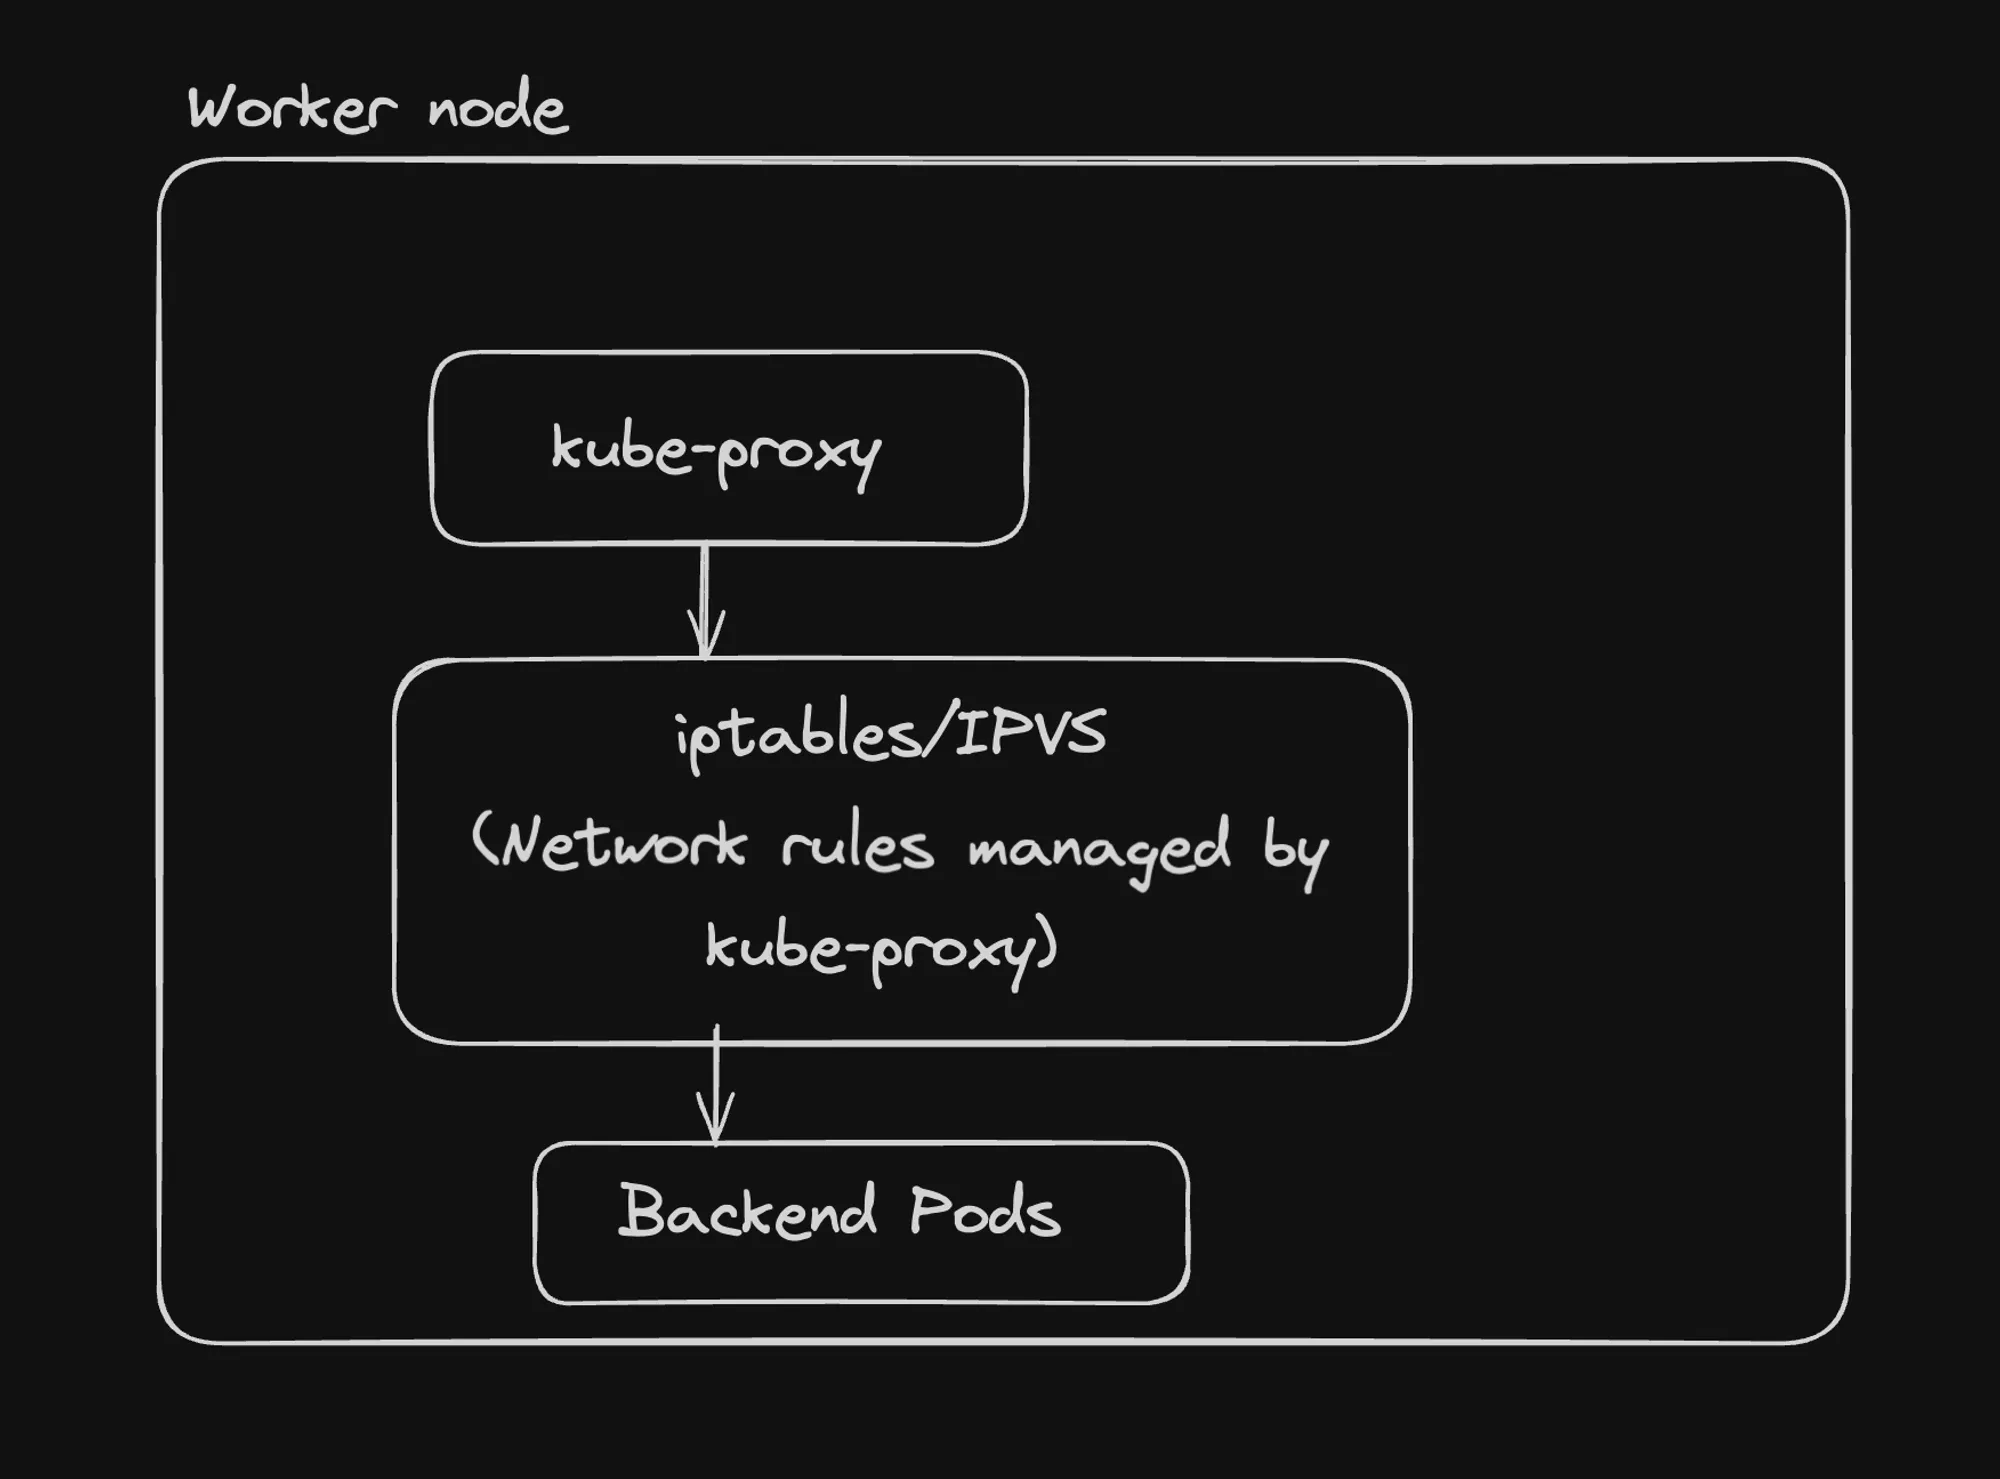
Key functions:
- Maintains network rules on nodes
- Performs connection forwarding
- Implements part of the Kubernetes Service concept
3. Container Runtime
The container runtime is the software responsible for running containers on a node.
Common Container Runtimes for Kubernetes:
- containerd
- CRI-O
- Docker (though Docker support is being phased out)
Container Runtime Interface (CRI)
The Container Runtime Interface (CRI) is a crucial abstraction layer that allows Kubernetes to support multiple container runtimes without needing to know the specifics of each. This provides flexibility and choice for users in selecting their preferred container runtime.
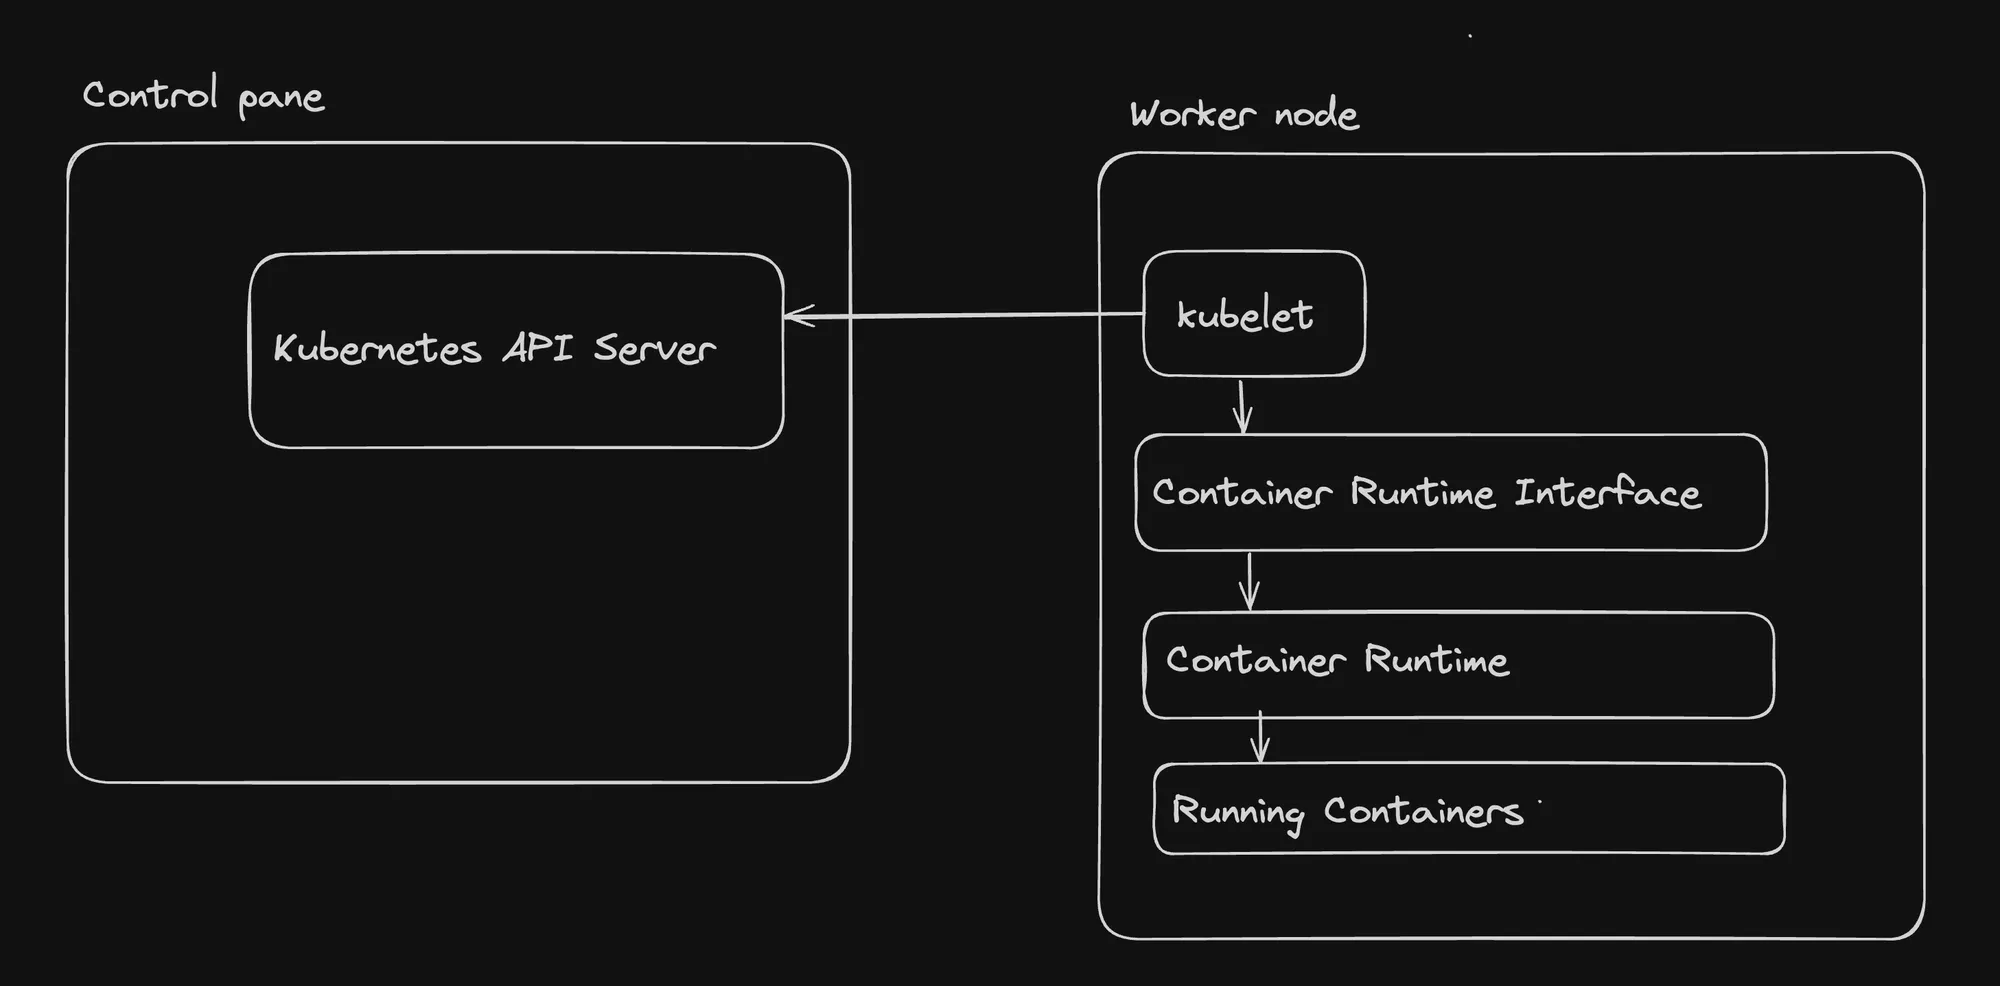
How Worker Node Components Interact
- kubelet and Container Runtime: The kubelet interacts with the container runtime through the CRI to manage container lifecycles.
- kubelet and API Server: The kubelet communicates with the API server to receive pod specifications and report node and pod status.
- kube-proxy and Network: kube-proxy manages network rules to enable communication with pods from within or outside the cluster.
- Container Runtime and Containers: The container runtime is responsible for the actual execution and management of containers based on instructions from the kubelet.
Example Workflow on a Worker Node
- The API server assigns a new pod to the node.
- The kubelet receives the pod specification.
- The kubelet instructs the container runtime to pull necessary images and start containers.
- The container runtime executes the containers.
- The kubelet monitors the health of the containers and reports status to the API server.
- kube-proxy sets up necessary network rules for the new pod.
Conclusion
Worker nodes are essential components of a Kubernetes cluster, hosting the actual application workloads. The interplay between the kubelet, kube-proxy, and container runtime enables efficient container management, networking, and execution of applications.
Key takeaways:
- The kubelet is the primary node agent, ensuring pods run as expected.
- kube-proxy manages network rules for pod communication.
- The container runtime, accessed through the CRI, handles the actual execution of containers.
- These components work together to maintain the desired state of applications running on the node.
Understanding these components and their interactions is crucial for effectively managing and troubleshooting Kubernetes deployments at the node level.
Creating a Kubernetes Cluster
Setting up a Kubernetes cluster is a crucial step in working with Kubernetes. There are several ways to create a cluster, depending on your needs and environment. Let’s explore the options for creating Kubernetes clusters both locally and in the cloud.
Local Kubernetes Clusters
For development and testing purposes, you can set up a Kubernetes cluster on your local machine. Two popular tools for this are:
1. Minikube
Minikube is a lightweight Kubernetes implementation that creates a VM on your local machine and deploys a simple cluster containing only one node.
To set up Minikube:
-
Install Minikube: Follow the instructions at https://minikube.sigs.k8s.io/docs/start/
-
Start a Kubernetes cluster:
Terminal window minikube start -
Verify the setup:
Terminal window docker psYou should see a single node setup.
2. Kind (Kubernetes IN Docker)
Kind is a tool for running local Kubernetes clusters using Docker container “nodes”.
To set up Kind:
-
Install Kind: https://kind.sigs.k8s.io/docs/user/quick-start/#installation
-
Create a single-node cluster:
Terminal window kind create cluster --name local -
Verify the setup:
Terminal window docker psYou should see a single container running (control-plane).
-
To delete the cluster:
Terminal window kind delete cluster -n local
Multi-node setup with Kind:
-
Create a
clusters.ymlfile:kind: ClusterapiVersion: kind.x-k8s.io/v1alpha4nodes:- role: control-plane- role: worker- role: worker -
Create the multi-node cluster:
Terminal window kind create cluster --config clusters.yml --name local -
Verify the setup:
Terminal window docker psYou should see multiple containers representing the control-plane and worker nodes.
Cloud-based Kubernetes Clusters
For production environments or larger-scale testing, cloud-based Kubernetes services are often preferred:
- Google Kubernetes Engine (GKE): Managed Kubernetes service by Google Cloud.
- Amazon Elastic Kubernetes Service (EKS): Managed Kubernetes service by AWS.
- Azure Kubernetes Service (AKS): Managed Kubernetes service by Microsoft Azure.
- Vultr Kubernetes Engine: Managed Kubernetes service by Vultr.
These services handle much of the cluster management overhead, allowing you to focus on deploying and managing your applications.
Best Practices and Considerations
- Multi-node Clusters: While single-node setups are convenient for development, they’re not ideal for production. In a proper cluster, you should separate the control plane from worker nodes.
- Resource Allocation: Ensure your local machine has sufficient resources (CPU, memory) when running local clusters, especially multi-node setups.
- Persistent Storage: For local development, be aware that data may not persist when you delete and recreate clusters. Plan accordingly for stateful applications.
- Network Considerations: Local clusters may have limitations in terms of network functionality compared to cloud-based clusters.
- Version Compatibility: Ensure the Kubernetes version in your local setup matches or is close to your production environment to avoid compatibility issues.
Conclusion
Creating a Kubernetes cluster is the first step in your Kubernetes journey. Local setups like Minikube and Kind are excellent for development and learning, while cloud-based solutions offer scalability and robustness for production workloads.
Key takeaways:
- Minikube and Kind offer simple ways to run Kubernetes locally.
- Multi-node setups provide a more realistic cluster environment.
- Cloud-based solutions like GKE, EKS, and AKS offer managed Kubernetes services for production use.
- Consider factors like resource allocation, persistence, and network functionality when choosing your cluster setup.
As you progress, you’ll likely use a combination of local and cloud-based clusters for different stages of your development and deployment pipeline.
Kubernetes API
The Kubernetes API is a crucial component of the control plane, exposed by the master node. It serves as the primary interface for developers and administrators to interact with the cluster. Here’s a breakdown of the key points:
-
API Exposure: The master node (control plane) exposes an API that developers can use to manage the cluster, including starting pods.
-
API Server Location: To find where the control plane is running, you can use the
docker pscommand. This will show you the containers running on your local machine, including the Kubernetes API server. -
API Endpoints: The API server provides various endpoints for different Kubernetes resources. For example, you can access pod information using an endpoint like:
Terminal window <https://127.0.0.1:50949/api/v1/namespaces/default/pods>The exact port (50949 in this case) may vary depending on your setup.
-
Authentication and Authorization: The Kubernetes API server implements authentication checks to prevent unauthorized access. When you try to access the API directly, you’ll likely encounter authentication errors.
-
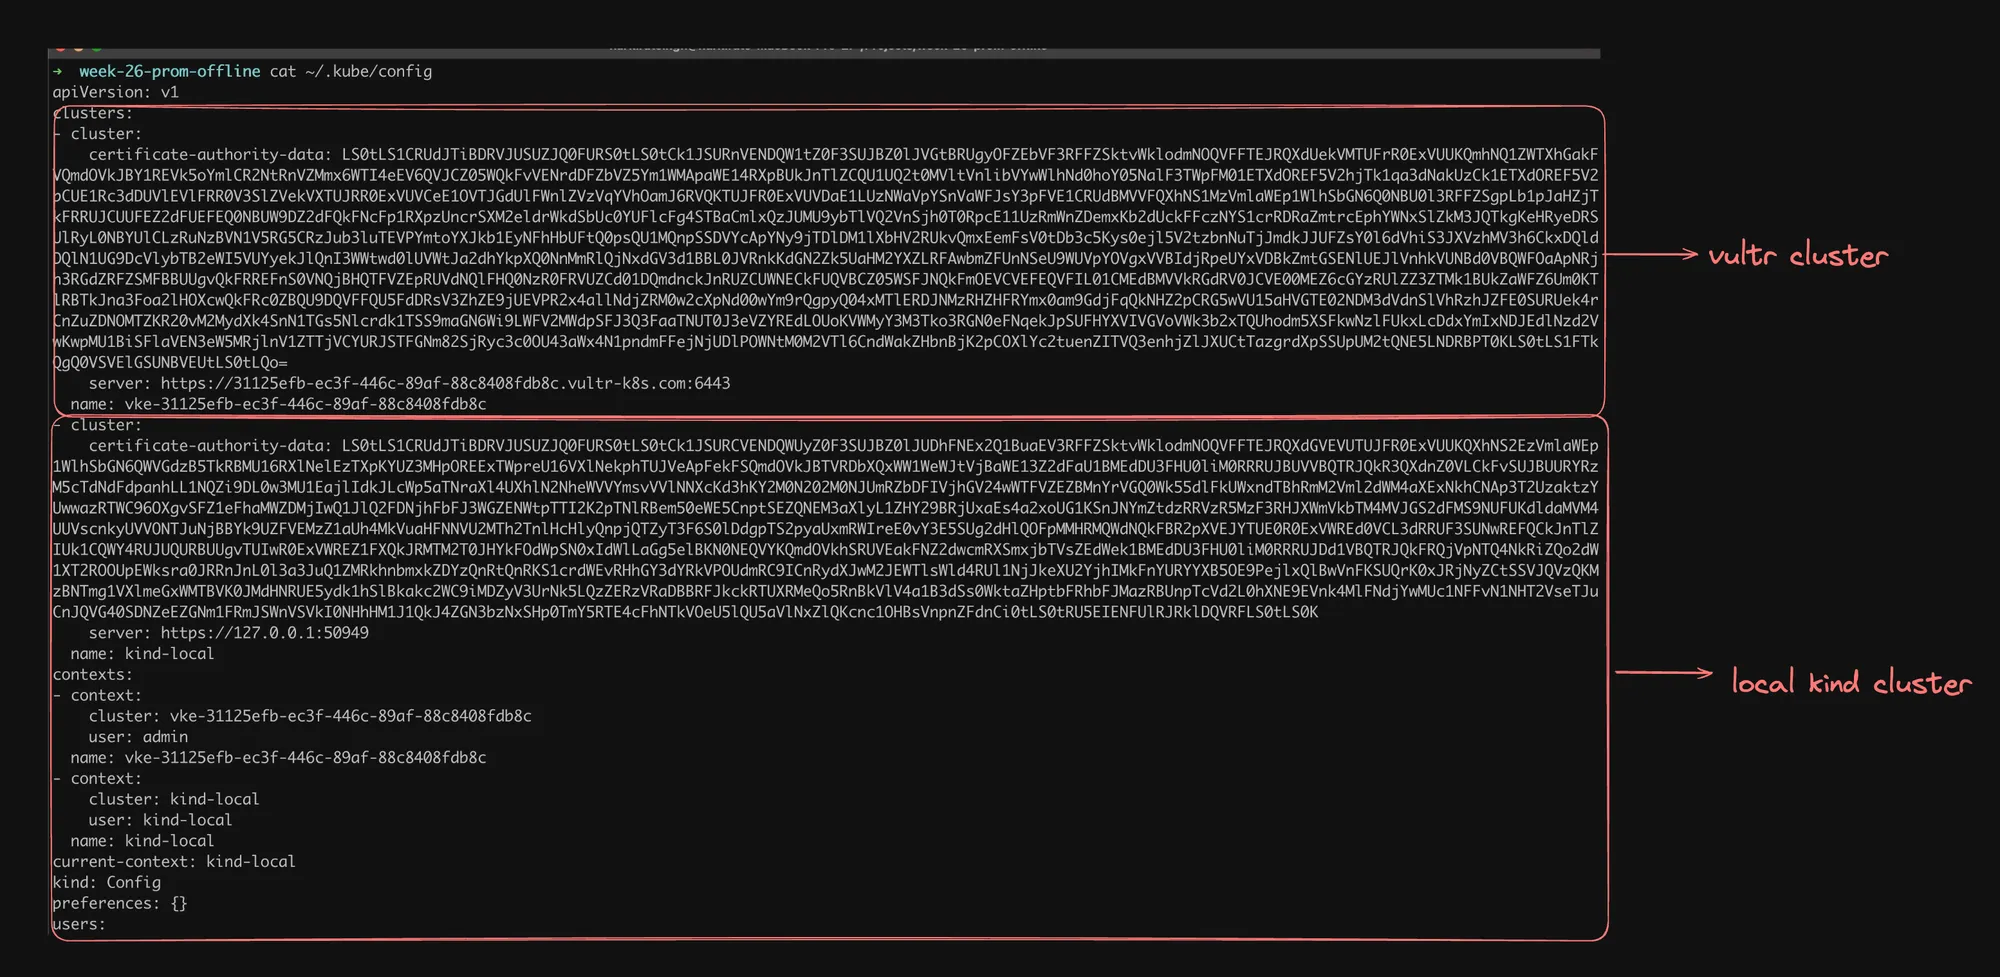
Credentials Storage: For local development environments like Kind (Kubernetes in Docker), your authorization credentials are typically stored in the
~/.kube/configfile. This file contains the necessary information for tools like kubectl to authenticate with your cluster. -
Multiple Clusters: The image shows that there are credentials for multiple clusters in the kubeconfig file, including a VULTR CLUSTER and a LOCAL KIND CLUSTER. This demonstrates that you can manage multiple Kubernetes clusters from the same machine.
The Kubernetes API is a powerful interface that allows programmatic control over your cluster. While it’s possible to interact with it directly, tools like kubectl provide a more manageable and secure way to work with your Kubernetes resources. Understanding the API structure and security mechanisms is crucial for effectively managing and developing applications on Kubernetes.
Understanding and Using kubectl
kubectl is an essential command-line tool for interacting with Kubernetes clusters. It provides a user-friendly interface to communicate with the Kubernetes API server and manage various Kubernetes resources. Let’s explore how to set up and use kubectl effectively.
Installing kubectl
To get started with kubectl, you need to install it on your local machine:
-
Visit the official Kubernetes documentation for installation instructions: https://kubernetes.io/docs/tasks/tools/#kubectl
-
Follow the instructions specific to your operating system (Linux, macOS, or Windows).
-
After installation, verify that kubectl is correctly installed by running:
kubectl version --client
Basic kubectl Commands
Once installed, you can start using kubectl to interact with your Kubernetes cluster. Here are some fundamental commands:
-
Get Nodes:
kubectl get nodesThis command lists all the nodes in your cluster.
-
Get Pods:
kubectl get podsThis command lists all the pods in the default namespace.
Verifying kubectl Configuration
To ensure kubectl is properly configured to communicate with your cluster:
-
Run:
kubectl get nodesIf this returns a list of nodes, your kubectl is correctly configured.
-
If you encounter any issues, check your kubeconfig file (usually located at
~/.kube/config) to ensure it contains the correct cluster information.
Debugging kubectl Requests
For debugging or understanding the exact HTTP requests that kubectl sends to the API server, you can use the verbose flag:
kubectl get nodes --v=8This command will display detailed information about the HTTP request, including:
- The full URL of the API server
- Request headers
- Response status
- Response body
This can be extremely useful for troubleshooting or understanding the underlying API calls.
Best Practices for Using kubectl
-
Use Namespaces: When working with multiple projects or teams, use namespaces to organize your resources:
kubectl get pods -n my-namespace -
Leverage kubectl Contexts: If you work with multiple clusters, use contexts to switch between them easily:
kubectl config use-context my-cluster-context -
Use kubectl Explain: To get information about resource types, use the explain command:
kubectl explain pods -
Utilize kubectl Apply: For declarative management of resources, use
kubectl applyinstead ofcreate:kubectl apply -f my-resource.yaml -
Practice with Dry Runs: Before making changes, use the
-dry-run=clientflag to see what would happen:kubectl create deployment my-dep --image=nginx --dry-run=client -o yaml
Creating a Pod
Now that we understand the basic components of Kubernetes, let’s walk through the process of creating and managing a pod. We’ll use the NGINX web server as an example.
Finding and Testing an Image
-
Choosing an Image: We’ll use the official NGINX image from Docker Hub: https://hub.docker.com/_/nginx
-
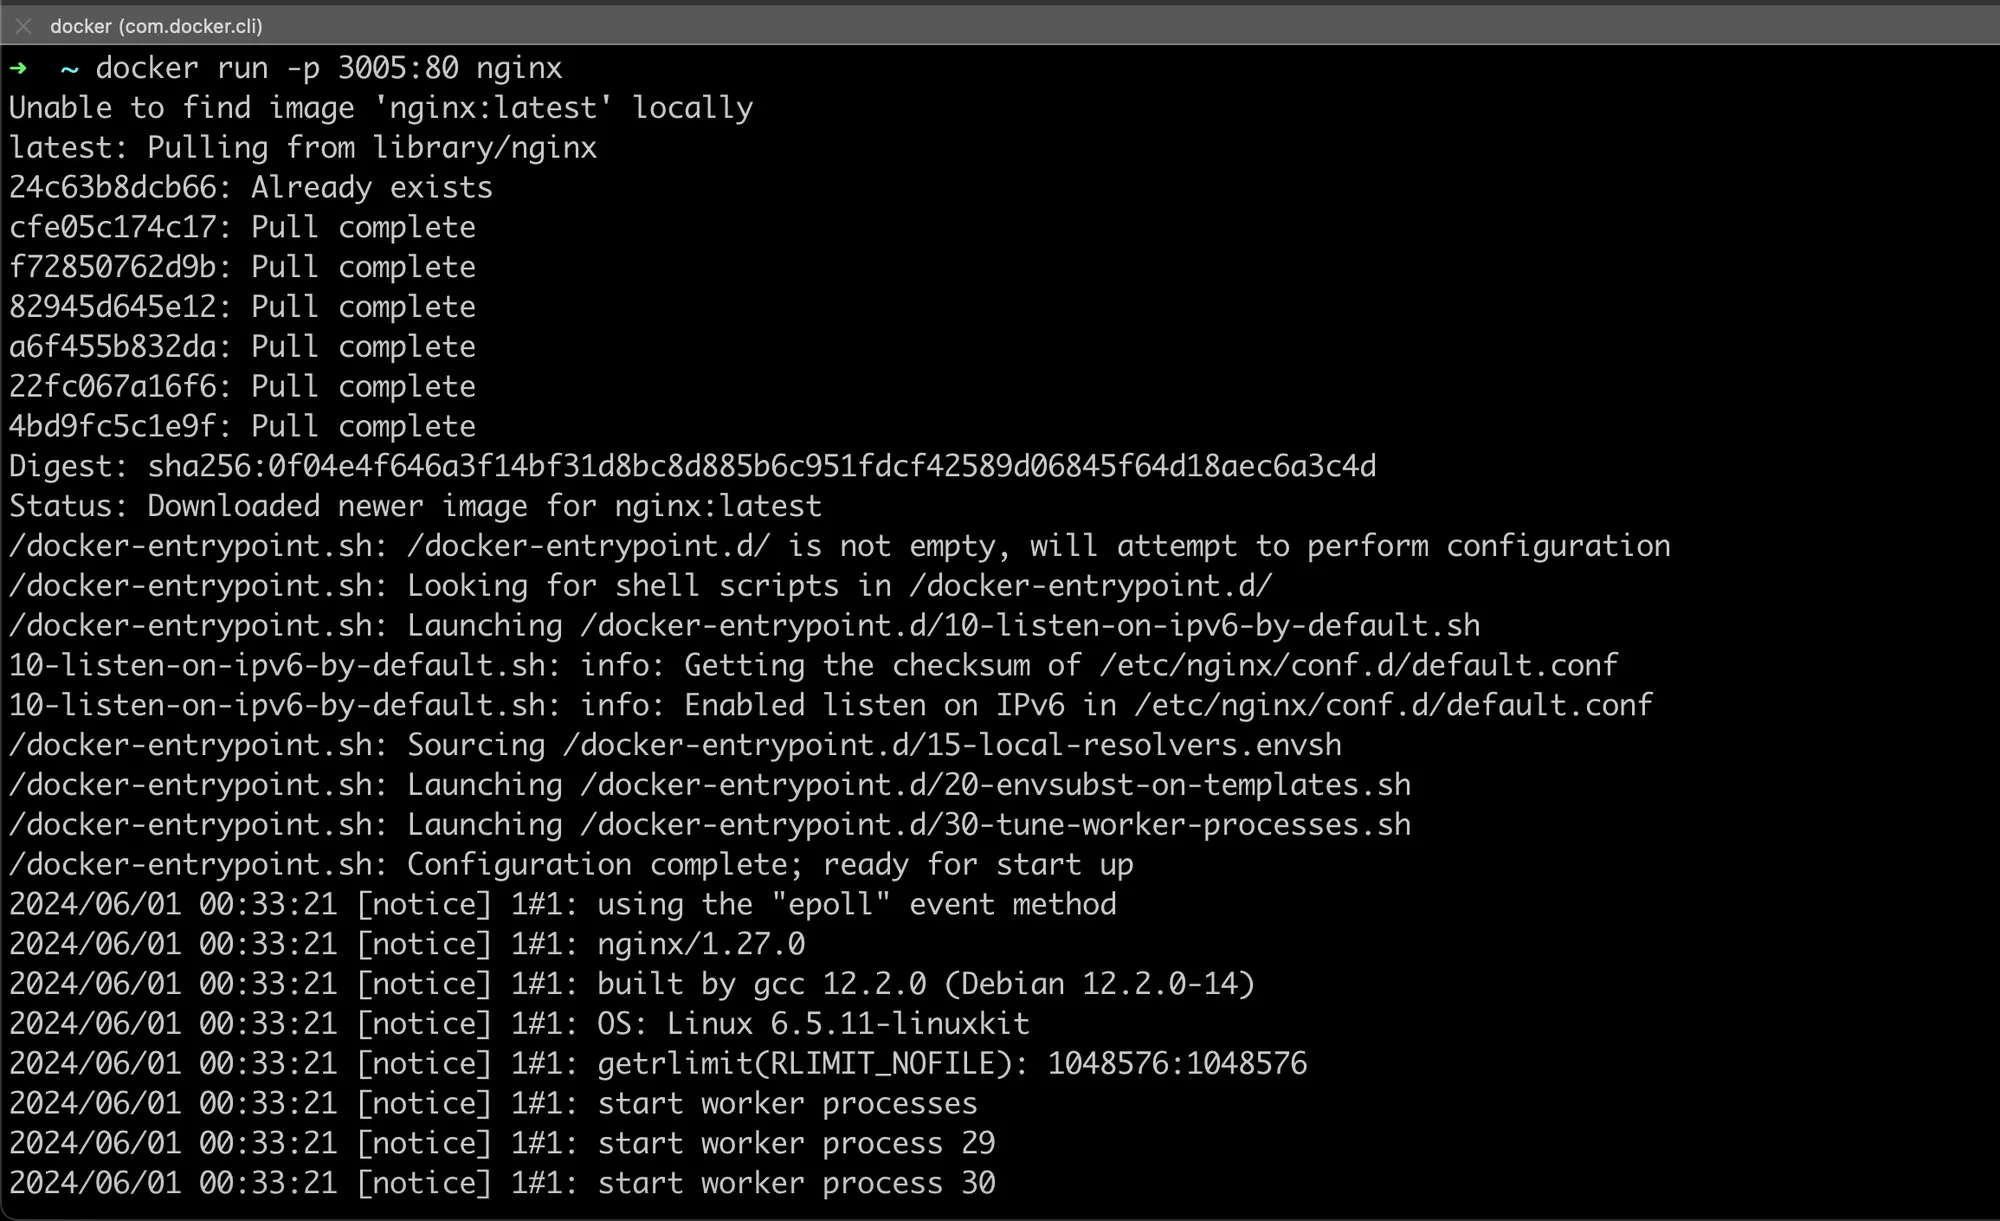
Testing Locally with Docker: Before deploying to Kubernetes, it’s good practice to test the image locally:
docker run -p 3005:80 nginxThis command runs an NGINX container, mapping port 80 in the container to port 3005 on your local machine.
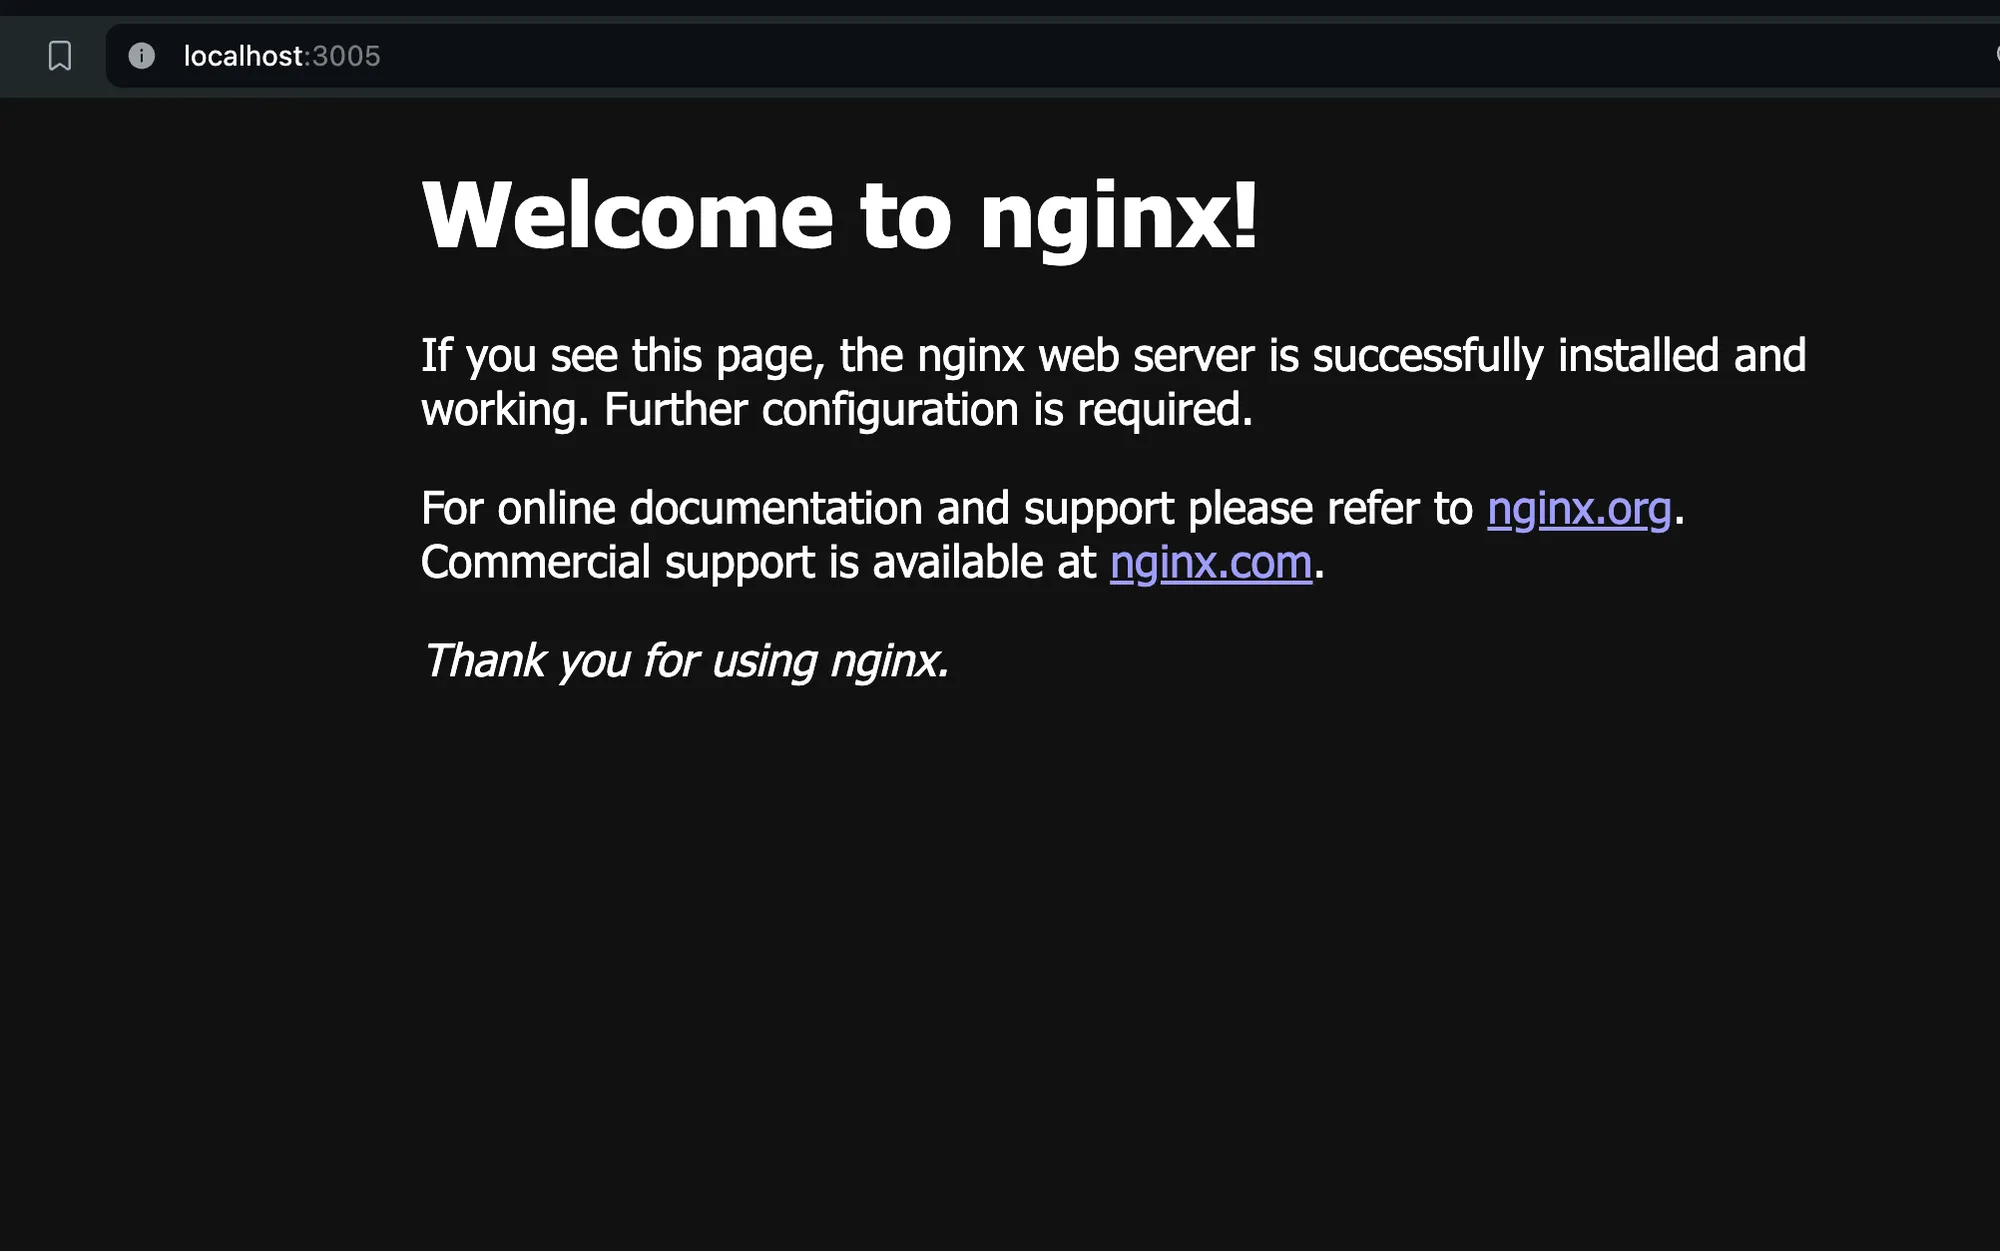
-
Verifying Local Deployment: Visit
localhost:3005in your web browser. You should see the NGINX welcome page.
Deploying a Pod in Kubernetes
Now, let’s deploy this image as a pod in our Kubernetes cluster:
-
Create a Pod:
kubectl run nginx --image=nginx --port=80This command creates a pod named “nginx” using the nginx image, exposing port 80.
-
Check Pod Status:
kubectl get podsThis will show the status of your pod. Wait until it shows “Running”.
-
View Pod Logs:
kubectl logs nginxThis displays the logs from your NGINX pod.
-
Describe the Pod:
kubectl describe pod nginxThis provides detailed information about the pod, including its current state, IP address, and events.
Understanding the Current Setup
At this point, you have:
- A Kubernetes cluster with 3 nodes (1 control plane, 2 workers)
- A single NGINX pod running on one of the worker nodes
Important Questions and Answers
-
How can I stop a pod? To delete the pod:
kubectl delete pod nginx -
How can I visit the pod? Which port is it available on? The pod is not directly accessible from outside the cluster. To access it, you need to expose it using a Service. For now, you can use port-forwarding:
kubectl port-forward pod/nginx 8080:80Then visit
localhost:8080in your browser. -
How many pods can I start? The number of pods you can start depends on your cluster’s resources. Each node has a limit based on its CPU and memory. You can start multiple pods until you hit these resource limits.
Best Practices and Additional Information
-
Resource Requests and Limits: When creating pods, specify resource requests and limits to ensure efficient resource allocation:
kubectl run nginx --image=nginx --port=80 --requests=cpu=100m,memory=128Mi --limits=cpu=500m,memory=256Mi -
Using YAML Files: For more complex configurations, use YAML files instead of command-line arguments:
apiVersion: v1kind: Podmetadata:name: nginxspec:containers:- name: nginximage: nginxports:- containerPort: 80Apply this with:
kubectl apply -f nginx-pod.yaml -
Namespaces: Use namespaces to organize your pods, especially in shared clusters:
kubectl create namespace myappkubectl run nginx --image=nginx --port=80 -n myapp -
Health Checks: Implement liveness and readiness probes for your pods to ensure they’re healthy and ready to serve traffic.
-
Pod Lifecycle: Understand the pod lifecycle (Pending, Running, Succeeded, Failed, Unknown) to better manage your applications.