Week 14.1 Next js
In this lecture, Harkirat introduces Next.js, a React framework that simplifies the development of server-rendered React applications. He highlights the benefits of Next.js over traditional React applications, such as built-in server-side rendering, API routes, file-based routing, and optimizations for bundle size and static site generation. Harkirat addresses the waterfalling issue, explores Next.js offerings, and guides through project setup, file structure, routing, layouts, and the use of client components.
Pre-requisites
Before diving into Next.js 14, it’s essential to have a solid understanding of basic frontend development concepts and React. Here’s what you need to know:
- HTML, CSS, and JavaScript: Familiarize yourself with the fundamentals of web development, including HTML for structuring content, CSS for styling, and JavaScript for adding interactivity.
- React Basics: Learn the core concepts of React, such as components, state, props, and lifecycle methods. Understand how to create simple React applications and manage component hierarchies.
import React, { useState } from 'react';
function Counter() {  const [count, setCount] = useState(0);
  const incrementCount = () => {    setCount(count + 1);  };
  return (    <div>      <h1>Count: {count}</h1>      <button onClick={incrementCount}>Increment</button>    </div>  );}
This is a simple React component that demonstrates state management and event handling.
Next.js Introduction
Next.js is a popular React framework that simplifies the development of server-rendered React applications. It was introduced to address some of the challenges and inconveniences faced in traditional React development.
Problems Addressed by Next.js
- Separate Backend Project for API Routes: In a traditional React project, you often need to maintain a separate backend project for handling API routes and server-side logic. Next.js provides a built-in API routes feature, allowing you to handle API requests directly within your Next.js application.
- Routing: React doesn’t provide out-of-the-box routing capabilities, requiring the use of third-party libraries like React Router. Next.js comes with a built-in file-based routing system, making it easier to manage routes and handle navigation.
- SEO Optimization: React applications are rendered on the client-side by default, which can negatively impact search engine optimization (SEO). Next.js supports server-side rendering (SSR) and static site generation (SSG), ensuring that your application is SEO-friendly and optimized for search engines.
- Waterfalling Problem: In traditional React applications, the entire application bundle needs to be downloaded before the application can start rendering, leading to a “waterfalling” effect. Next.js addresses this issue by supporting code splitting and lazy loading, allowing for faster initial load times and improved performance.
React Server Components (RSC)
While React was initially not optimized for SEO, the introduction of React Server Components (RSC) in Next.js 13 has improved this aspect. RSC allows you to render components on the server, providing better SEO and performance benefits. We’ll discuss RSC in more detail later in this guide.
In the next sections, we’ll explore these problems and the solutions provided by Next.js in greater depth, along with code examples and practical implementations.
SEO Optimization
Search engines like Google and Bing use web crawlers (also known as bots or spiders) to discover and index websites. These crawlers visit websites and analyze the HTML content to understand what the website is about and how to rank it in search results.
However, traditional client-side rendered (CSR) React applications pose a challenge for SEO because the crawlers typically don’t execute JavaScript and render the page to see the final output. Instead, they rely on the initial HTML response received from the server.
Googlebot and JavaScript
While Googlebot (Google’s web crawler) can execute JavaScript to a certain extent, dynamically generated content is still harder for the crawler to index effectively. This is where the issue lies with CSR React applications.
To illustrate this, let’s visit a React website built with Vite and TypeScript: https://blog-six-tan-47.vercel.app/signup
When you visit this URL, you’ll notice that the initial HTML response doesn’t contain any meaningful content related to the application. It only shows a basic HTML structure with references to Vite, React, and TypeScript.
<!DOCTYPE html><html lang="en"> <head> <meta charset="UTF-8" /> <link rel="icon" type="image/svg+xml" href="/vite.svg" /> <meta name="viewport" content="width=device-width, initial-scale=1.0" /> <title>Vite + React + TS</title> <script type="module" crossorigin src="/assets/index.d3f2e1c9.js"></script> <link rel="stylesheet" href="/assets/index.e1c4b2f0.css"> </head> <body> <div id="root"></div> </body></html>This is because the actual content of the React application is rendered dynamically using JavaScript after the initial HTML is loaded. While the content will eventually be rendered and visible to users, search engine crawlers like Googlebot may have difficulty discovering and indexing this dynamically generated content effectively.
Next.js Solution
Next.js addresses this SEO challenge by providing two powerful rendering techniques: Server-Side Rendering (SSR) and Static Site Generation (SSG).
Server-Side Rendering (SSR)
With SSR, Next.js pre-renders the initial page on the server and sends the fully rendered HTML to the client. This means that search engine crawlers can easily index the content without having to execute JavaScript.
Static Site Generation (SSG)
Next.js also supports Static Site Generation (SSG), which pre-renders pages at build time and serves them as static HTML files. This approach is particularly useful for content-heavy websites or blogs, where the content doesn’t change frequently. Here’s an example of using SSG in Next.js:
By leveraging SSR and SSG, Next.js provides a robust solution for SEO optimization, ensuring that your React application’s content is easily discoverable and indexable by search engines like Google and Bing.

Waterfalling Problem
The waterfalling problem is a common issue in traditional client-side rendered (CSR) React applications, where data fetching operations are chained or dependent on each other, leading to inefficient loading behavior. Let’s understand this problem with an example of a blogging website built with React.
Request Cycle in a Traditional React Application
Suppose you have a blogging website built with React, and a user visits the homepage. The request cycle might look something like this:
- Fetch the
index.htmlfrom the CDN: The browser first fetches the initial HTML file, which typically contains minimal content and a reference to the JavaScript bundle. - Fetch the
script.jsfrom the CDN: After the initial HTML is loaded, the browser fetches the JavaScript bundle, which contains the React application code. - Check if the user is logged in: Once the JavaScript bundle is loaded and executed, the application checks if the user is logged in. If the user is not logged in, they are redirected to the
/loginpage. - Fetch the actual blog posts: If the user is logged in, the application fetches the actual blog post data from an API or a database.
In this scenario, there are four round trips that happen sequentially, one after the other. The browser has to wait for each step to complete before moving on to the next one, resulting in a “waterfalling” effect. This can lead to slow initial load times and a poor user experience, especially on slower network connections.
Next.js Solution
Next.js provides several features and optimizations to address the waterfalling problem and improve the overall performance and loading behavior of your React application.
Code Splitting and Lazy Loading
Next.js automatically performs code splitting and lazy loading for your application. This means that instead of loading the entire application bundle upfront, Next.js splits the code into smaller chunks and loads them on-demand as needed. This reduces the initial JavaScript payload and improves the initial load time.
Server-Side Rendering (SSR) and Static Site Generation (SSG)
As discussed earlier, Next.js supports Server-Side Rendering (SSR) and Static Site Generation (SSG). With SSR, the initial page is pre-rendered on the server and sent as a fully rendered HTML page to the client. This eliminates the need for multiple round trips to fetch the initial content, improving the perceived loading speed.
With SSG, the pages are pre-rendered at build time and served as static HTML files. This approach is particularly beneficial for content-heavy websites or blogs, where the content doesn’t change frequently.
Incremental Static Regeneration (ISR)
Next.js 9.5 introduced Incremental Static Regeneration (ISR), which allows you to update static pages after they’ve been built, by re-rendering them in the background when new requests come in. This feature helps keep your static content up-to-date without the need for a full rebuild.
Automatic Optimizations
Next.js automatically applies various optimizations to your application, such as:
- Image Optimization: Next.js optimizes images by resizing, compressing, and serving them in modern formats like WebP, reducing the overall page weight and improving load times.
- Script Loading Optimization: Next.js automatically optimizes the loading of JavaScript bundles, ensuring that they are loaded efficiently and in the correct order.
By leveraging these features and optimizations, Next.js helps mitigate the waterfalling problem and provides a smoother and more efficient loading experience for your React application.

Other Next.js Offerings
In addition to addressing the waterfalling problem, Next.js provides several other benefits over traditional React applications:
- SEO Optimization: Next.js’s SSR and SSG capabilities ensure that your application’s content is easily discoverable and indexable by search engines like Google and Bing.
- API Routes: Next.js allows you to handle API requests directly within your application, eliminating the need for a separate backend project.
- File-based Routing: Next.js provides a file-based routing system, making it easier to manage routes and handle navigation without the need for third-party libraries like React Router.
- Bundle Size Optimizations: Next.js automatically optimizes the bundle size of your application, reducing the overall page weight and improving load times.
- Maintained by the Vercel Team: Next.js is maintained by the Vercel team, ensuring regular updates, bug fixes, and new features.
However, it’s important to note that Next.js also has some downsides:
- Deployment Considerations: Next.js applications can’t be distributed via a CDN and always require a server running to handle server-side rendering, which can be more expensive compared to traditional static hosting.
- Opinionated Framework: Next.js is a highly opinionated framework, which can make it challenging to move out of it or integrate with other libraries or frameworks that don’t align with its conventions.
By leveraging the features and optimizations provided by Next.js, you can mitigate the waterfalling problem and improve the overall performance and user experience of your React application, while also benefiting from its other offerings like SEO optimization, API routes, and file-based routing.
Bootstrapping a Simple Next.js App
To bootstrap a new Next.js project with TypeScript, Tailwind CSS, and ESLint, we’ll use the create-next-app command provided. We’ll be using the App Router without the src/ directory structure and enabling import aliases
Creating the Project
Open your terminal and run the following command:
npx create-next-app@latest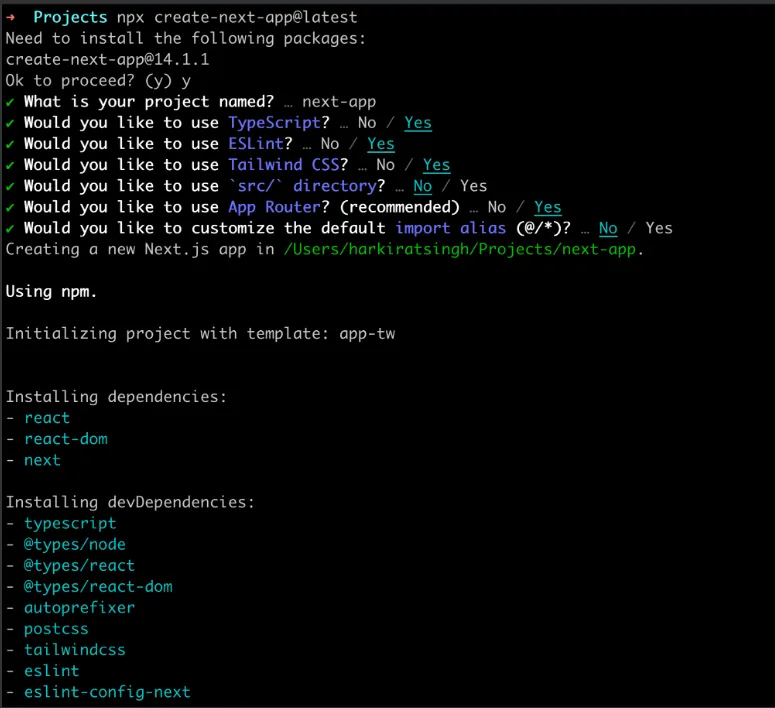
File Structure
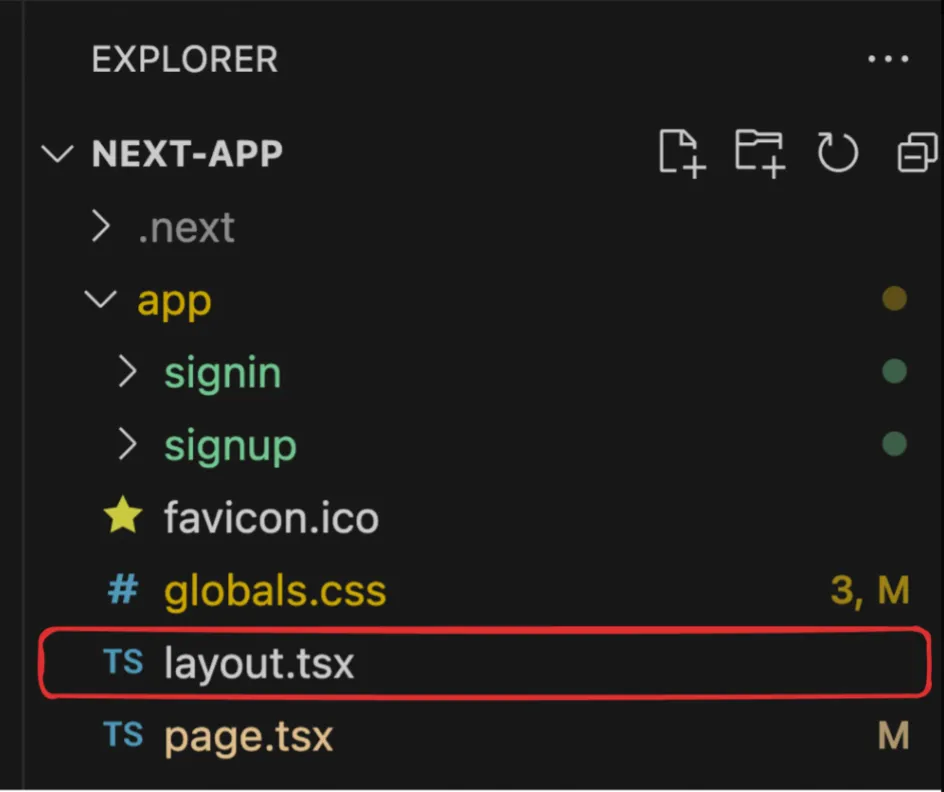
After the project is created, you’ll see the following file structure:
my-next-app/├── app/│ ├── layout.tsx│ ├── page.tsx│ └── globals.css├── node_modules/├── package.json├── package-lock.json├── next.config.mjs├── postcss.config.js├── tailwind.config.js├── .eslintrc.json├── tsconfig.json└── README.mdapp/: This directory contains all your code, components, layouts, routes, and APIs.next.config.mjs: This file is used for Next.js configuration.tailwind.config.js: This file is used for Tailwind CSS configuration..eslintrc.json: This file contains the ESLint configuration.tsconfig.json: This file contains the TypeScript configuration.
Initial Setup
Before we start building our application, let’s clean up the initial files:
- Open
app/page.tsxand remove everything inside theHomecomponent. Replace it with an emptydiv:
export default function Home() { return <div></div>;}- Open
app/globals.cssand remove the CSS styles, leaving only the Tailwind CSS imports:
@tailwind base;@tailwind components;@tailwind utilities;Configuring Import Aliases
To enable import aliases in your Next.js project, you need to modify the tsconfig.json file. Open tsconfig.json and add the following configuration under the compilerOptions section:
{ "compilerOptions": { // ... "baseUrl": ".", "paths": { "@/*": ["./app/*"] } }}This configuration sets the base URL to the project root and maps the @/ alias to the app/ directory.
Running the Development Server
To start the development server, run the following command in your terminal:
npm run devOpen your browser and navigate to http://localhost:3000. You should see an empty page, which is expected since we removed the initial content from app/page.tsx.
Routing in Next.js
In traditional React applications, routing is typically handled using a third-party library like React Router. However, Next.js takes a different approach by providing a file-based routing system out of the box.
Next.js has a built-in file-based router, which means that the way you structure your files and folders determines how routes are rendered. This approach is more intuitive and easier to reason about compared to defining routes programmatically.
According to the Next.js documentation (https://nextjs.org/docs/app/building-your-application/routing/defining-routes), the file structure directly maps to the URL structure. Each folder represents a route segment, and a special page.tsx (or page.js) file is used to make that route segment publicly accessible.
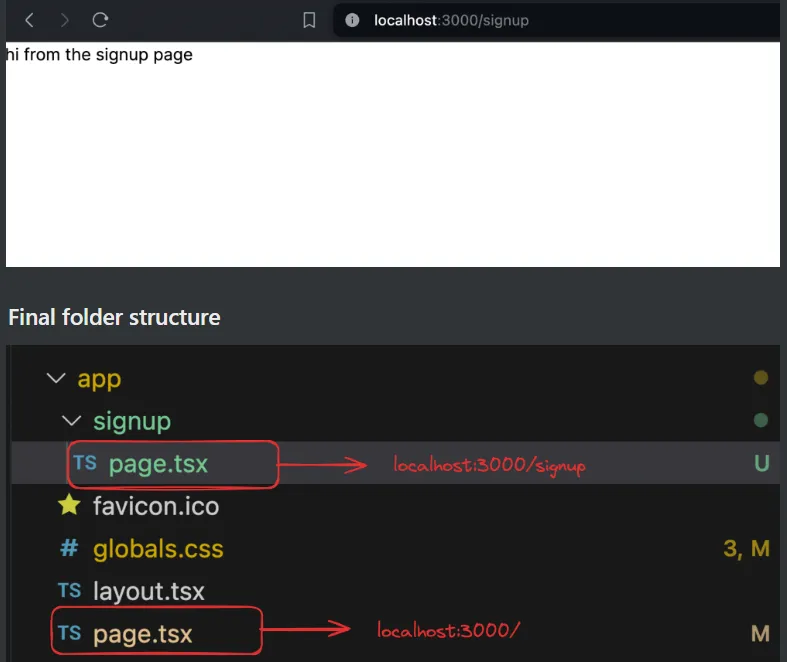
To illustrate this, let’s create a new route for /signup:
- Inside the
appdirectory, create a new folder calledsignup:
my-next-app/└── app/ └── signup/- Inside the
signupfolder, create a new file calledpage.tsxand add a React component that will be rendered for the/signuproute:
export default function SignUp() { return ( <div> <h1>Sign Up</h1> {/* Add your sign-up form or content here */} </div> );}- Start the development server by running the following command in your terminal:
npm run dev- Once the development server is running, you can access the
/signuproute by visitinghttp://localhost:3000/signupin your browser.
You should now see the content from the SignUp component rendered on the /signup route.
By following this file-based routing system, you can easily create new routes by adding folders and files within the app directory. This approach makes it straightforward to manage and organize your application’s routes without the need for a separate routing library.
Prettifying the signin page
Let’s replace the signup page with a prettier one
export default function Signin() {    return <div className="h-screen flex justify-center flex-col">        <div className="flex justify-center">        <a href="#" className="block max-w-sm p-6 bg-white border border-gray-200 rounded-lg shadow hover:bg-gray-100 ">                <div>                    <div className="px-10">                        <div className="text-3xl font-extrabold">                            Sign in                        </div>                    </div>                    <div className="pt-2">                        <LabelledInput label="Username" placeholder="harkirat@gmail.com" />                        <LabelledInput label="Password" type={"password"} placeholder="123456" />                        <button type="button" className="mt-8 w-full text-white bg-gray-800 focus:ring-4 focus:ring-gray-300 font-medium rounded-lg text-sm px-5 py-2.5 me-2 mb-2">Sign in</button>                    </div>                </div>            </a>        </div>    </div>}
interface LabelledInputType {    label: string;    placeholder: string;    type?: string;}
function LabelledInput({ label, placeholder, type }: LabelledInputType) {    return <div>        <label className="block mb-2 text-sm text-black font-semibold pt-4">{label}</label>        <input type={type || "text"} id="first_name" className="bg-gray-50 border border-gray-300 text-gray-900 text-sm rounded-lg focus:ring-blue-500 focus:border-blue-500 block w-full p-2.5" placeholder={placeholder} required />    </div>}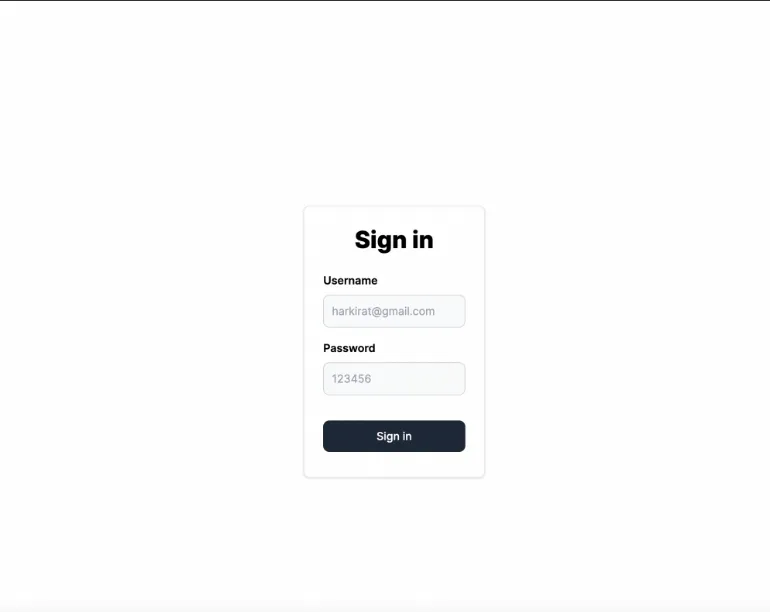
Server-Side Rendering
Next.js provides server-side rendering out of the box, which means that the initial page load is rendered on the server and sent as a fully rendered HTML page to the client. This approach has several benefits, including improved SEO and better initial load performance.
To understand how SSR works in Next.js, let’s follow these steps:
- Start the Development Server
Run the following command in your terminal to start the Next.js development server:
npm run dev- Visit the
/signupRoute
Once the development server is running, open your browser and visit http://localhost:3000/signup. This will render the SignIn component that we created earlier for the /signup route.
- Inspect the HTML Response
Right-click on the page and select “View Page Source” (or similar option depending on your browser). You should see the fully rendered HTML content of the SignIn component, including the form elements and the associated Tailwind CSS styles.
Here’s an example of what the HTML response might look like:
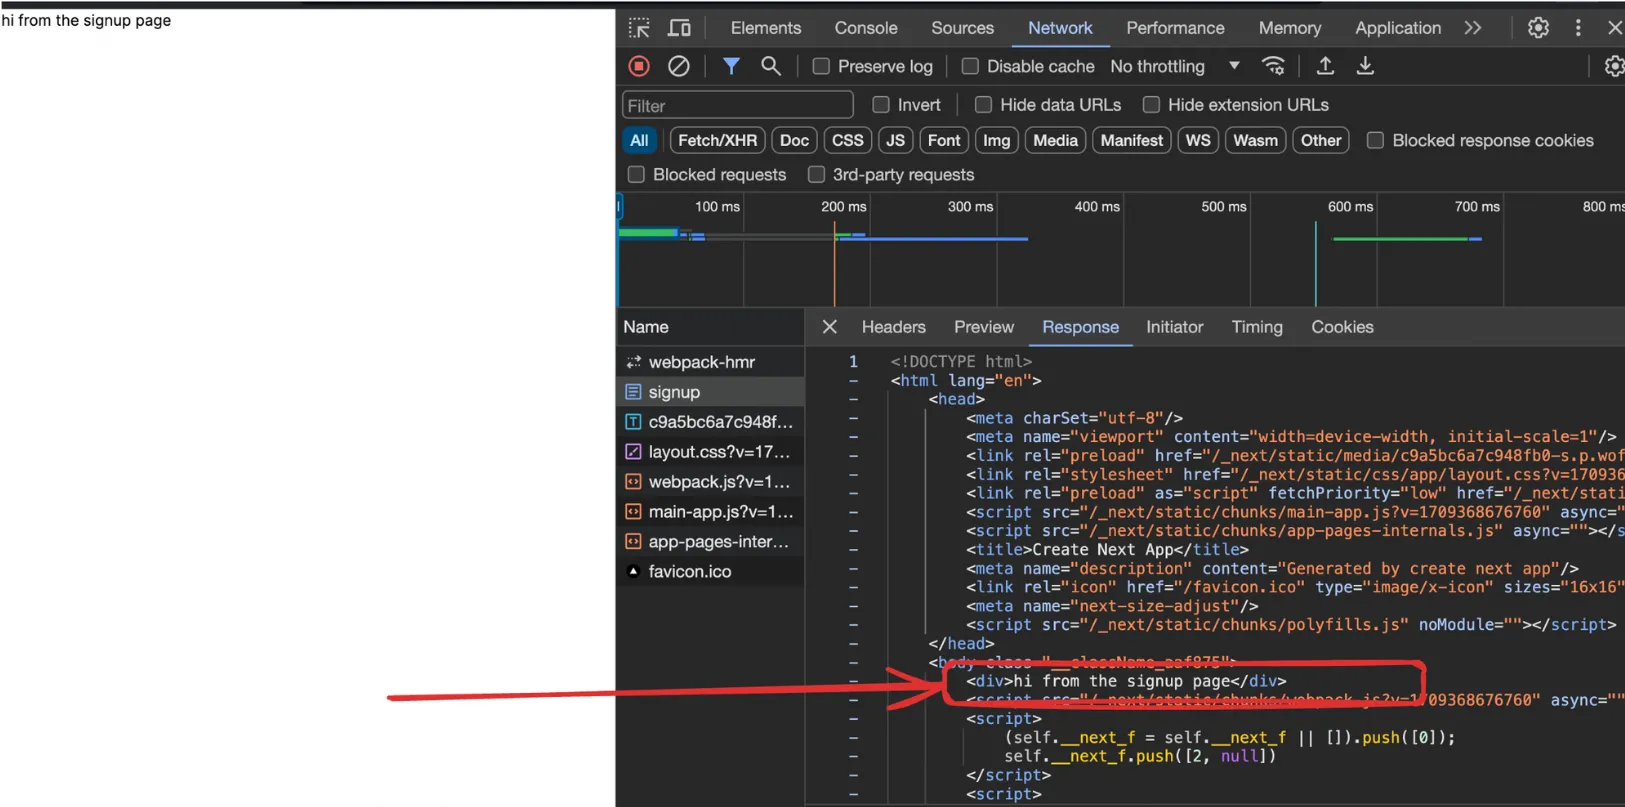
Notice that the HTML response contains the fully rendered content of the SignIn component, including the form title, input fields, and the sign-in button. This is the result of server-side rendering.
- SEO Implications
Now, when search engine crawlers like Googlebot try to scrape your page, they will receive this fully rendered HTML response, which clearly indicates that this is a sign-in page. This is a significant advantage over traditional client-side rendered React applications, where the initial HTML response would be minimal, and the crawlers would have difficulty understanding the content and purpose of the page.
It’s important to note that while SSR provides SEO benefits, it also introduces some additional complexity and overhead compared to static site generation (SSG) or client-side rendering (CSR). Next.js provides a flexible approach, allowing you to choose the rendering method that best suits your application’s needs.
Layouts
Layouts in Next.js are a powerful feature that allow you to define shared UI components across multiple routes in your application. They provide a way to wrap child pages or nested layouts with common elements, such as headers, footers, sidebars, or any other reusable UI components.
Here’s what you can do with layouts in Next.js:
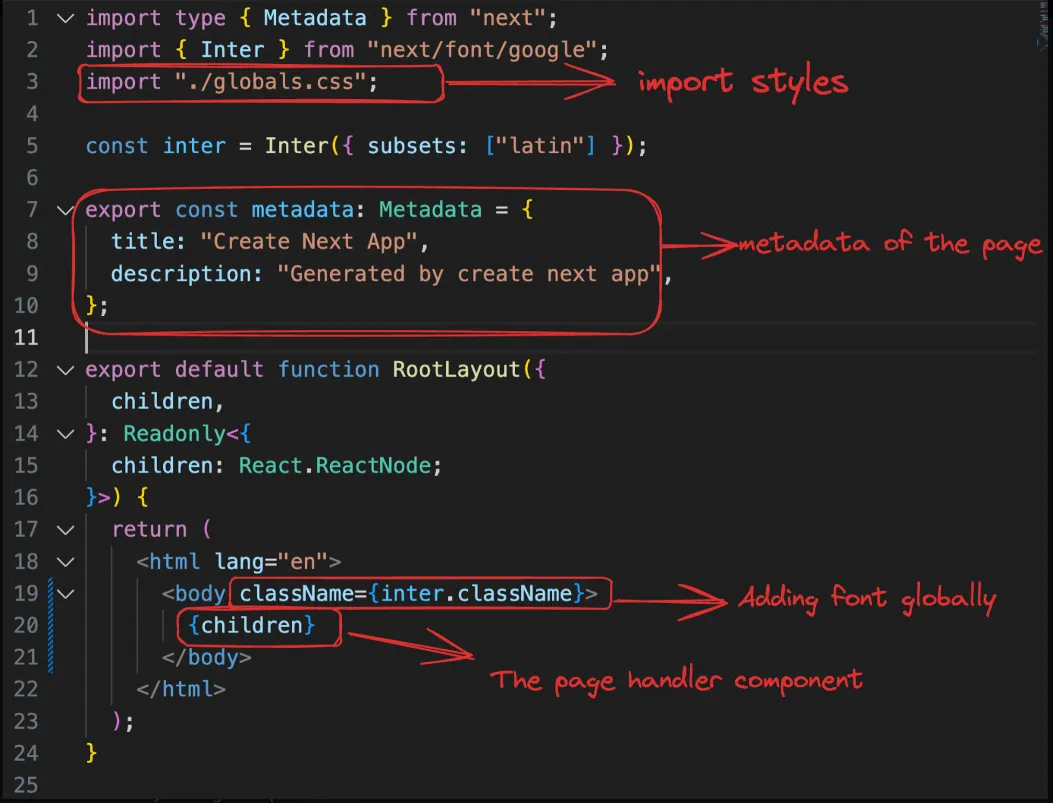
- Define a Root Layout:
- The
appdirectory in a Next.js application must include a rootlayout.tsx(orlayout.js) file. - This root layout is responsible for defining the
<html>and<body>tags, as well as any globally shared UI components. - It acts as the top-most layout, wrapping all other layouts and pages in your application.
- The
- Create Nested Layouts:
- You can create nested layouts by adding
layout.tsxfiles inside specific route segments (folders). - These nested layouts wrap the child pages or nested layouts within their respective route segments.
- Nested layouts allow you to define UI components that are shared among a subset of routes in your application.
- You can create nested layouts by adding
- Wrap Child Pages:
- Layouts wrap the child pages or nested layouts using the
childrenprop. - The
childrenprop is populated with the component of the child page or nested layout during rendering. - This allows you to surround the child content with your desired UI components, such as headers, footers, or sidebars.
- Layouts wrap the child pages or nested layouts using the
- Access Route Parameters:
- Layouts can access dynamic route parameters through the
paramsprop. - This prop contains an object with the dynamic route parameters from the root segment down to the current layout.
- You can use these parameters to conditionally render UI components or fetch data based on the current route.
- Layouts can access dynamic route parameters through the
- Preserve State and Interactivity:
- On navigation, layouts preserve their state and remain interactive, without re-rendering.
- This behavior is different from pages, which re-render on navigation.
- Layouts can maintain state across route changes, providing a seamless user experience.
- Fetch Data:
- While layouts cannot use the built-in
getServerSidePropsorgetStaticPropsfunctions, you can fetch data on the client-side using hooks likeuseEffector libraries like SWR. - This allows you to fetch data for shared UI components within your layouts.
- While layouts cannot use the built-in
By leveraging layouts, you can create consistent and reusable UI structures across your Next.js application, reducing code duplication and improving maintainability. Layouts help you organize your application’s UI in a modular and scalable way, making it easier to manage complex user interfaces.
Nested Layouts
Next.js allows you to create nested layouts for specific route segments, enabling you to define shared UI components for a subset of routes in your application. This feature is particularly useful when you need to add additional or niche shared UI components for certain routes.
To create a layout for a sub-route, you can follow these steps:
- Create a folder for the sub-route: First, create a folder for the sub-route where you want to add the shared UI component. For example, if you want to add a shared UI component for all routes starting with
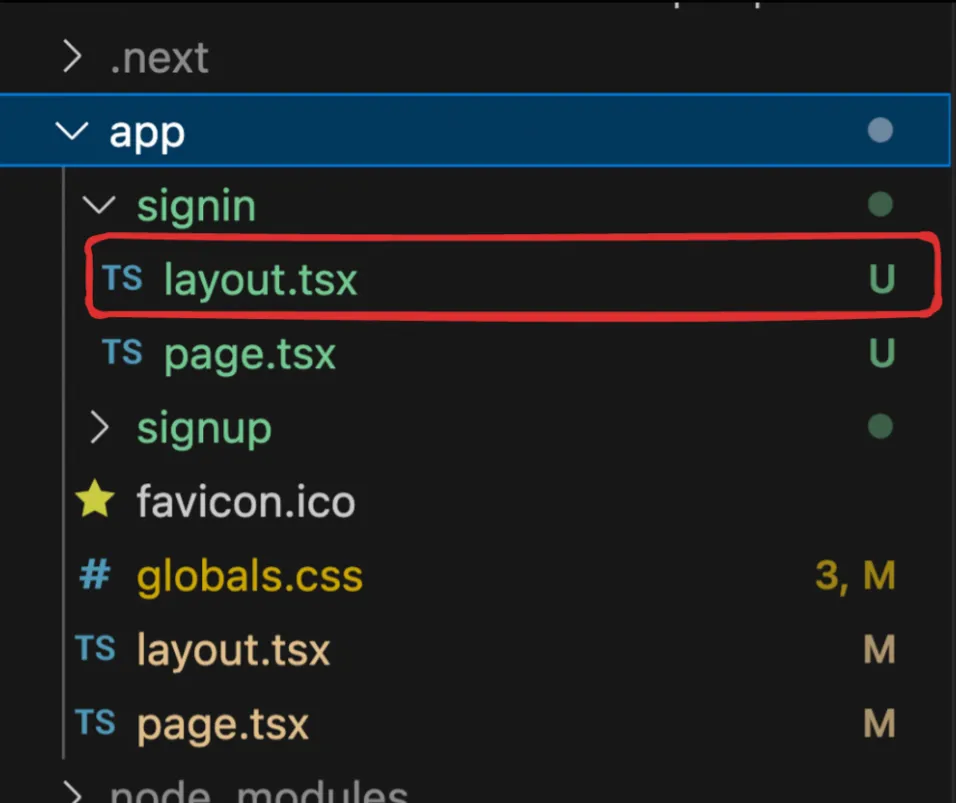
/signin, create asigninfolder inside theappdirectory. - Add a
layout.tsxfile: Inside thesigninfolder, create a new file calledlayout.tsx(orlayout.jsfor JavaScript). This file will define the layout component for the/signinsub-route.
Here’s an example of how you can create a layout for the /signin sub-route with a banner that says “Login now to get 20% off”:
import React from 'react';
export default function SignInLayout({ children }: { children: React.ReactNode }) {  return (    <div>      <div className="bg-yellow-200 py-2 text-center">        <span className="font-bold">Login now to get 20% off</span>      </div>      {children}    </div>  );}
In this example, the SignInLayout component renders a banner with the message “Login now to get 20% off” using Tailwind CSS classes. The children prop is where the child pages or nested layouts will be rendered.
You can also nest layouts further by creating additional folders inside the signin folder and adding layout.tsx files within those folders. This allows you to create even more specific shared UI components for nested routes.
Merging Routes
Next.js provides two approaches to merge routes and share UI components across multiple routes. Let’s explore both approaches:
Approach #1: Nesting Routes
In this approach, you can nest the signup and signin routes under a common parent route, such as auth. By creating a layout for the auth route, you can share UI components across both the /signup and /signin routes.
Here’s how you can implement this approach:
- Create an
authfolder inside theappdirectory. - Inside the
authfolder, create alayout.tsxfile and define the shared UI component (e.g., the banner).
import React from 'react';
export default function AuthLayout({ children }: { children: React.ReactNode }) { return ( <div> <div className="bg-yellow-200 py-2 text-center"> <span className="font-bold">Login now to get 20% off</span> </div> {children} </div> );}- Move the
signupandsigninfolders inside theauthfolder.
app/└── auth/ ├── signup/ │ └── page.tsx └── signin/ └── page.tsxWith this structure, the AuthLayout component will wrap both the /signup and /signin routes, displaying the “Login now to get 20% off” banner at the top.
You can access these routes at:
http://localhost:3000/auth/signuphttp://localhost:3000/auth/signin
Approach #2: Using a Parenthesized Folder
Next.js allows you to create a parenthesized folder, which is ignored by the router. This approach is useful when you want to share UI components across multiple routes without nesting them under a common parent route.
Here’s how you can implement this approach:
- Create a new folder with parentheses around its name, e.g.,
(shared), inside theappdirectory. - Inside the
(shared)folder, create alayout.tsxfile and define the shared UI component (e.g., the banner).
// app/(shared)/layout.tsximport React from 'react';
export default function SharedLayout({ children }: { children: React.ReactNode }) { return ( <div> <div className="bg-yellow-200 py-2 text-center"> <span className="font-bold">Login now to get 20% off</span> </div> {children} </div> );}- Move the
signupandsigninfolders inside theappdirectory.
app/├── (shared)/│ └── layout.tsx├── signup/│ └── page.tsx└── signin/ └── page.tsxWith this structure, the SharedLayout component will wrap both the /signup and /signin routes, displaying the “Login now to get 20% off” banner at the top.
You can access these routes at:
http://localhost:3000/signuphttp://localhost:3000/signin
Both approaches allow you to share UI components across multiple routes, but the choice between them depends on your preference and the organization of your application’s routes. The nested approach (Approach #1) is suitable when you have a logical parent route that encompasses multiple child routes. The parenthesized folder approach (Approach #2) is useful when you want to share UI components across routes that don’t have a common parent route.
The components directory
Organizing components in a separate directory is a best practice in React and Next.js applications. It helps to maintain a clean and modular codebase, making it easier to manage and reuse components across different parts of your application.
Here’s how you can move the sign-in logic to a separate component and render it in the app/(auth)/signin/page.tsx file:
- Create a
componentsdirectory:- In the root of your project, create a new folder called
components.
- In the root of your project, create a new folder called
- Create the
Signin.tsxcomponent:- Inside the
componentsdirectory, create a new file calledSignin.tsx. - Move the sign-in component logic from
app/(auth)/signin/page.tsxto this new file.
- Inside the
import React from 'react';
interface LabelledInputType {  label: string;  placeholder: string;  type?: string;}
function LabelledInput({ label, placeholder, type }: LabelledInputType) {  return (    <div>      <label className="block mb-2 text-sm text-black font-semibold pt-4">{label}</label>      <input        type={type || "text"}        id="first_name"        className="bg-gray-50 border border-gray-300 text-gray-900 text-sm rounded-lg focus:ring-blue-500 focus:border-blue-500 block w-full p-2.5"        placeholder={placeholder}        required      />    </div>  );}
export function Signin() { return ( <div className="h-screen flex justify-center flex-col"> <div className="flex justify-center"> <a href="#" className="block max-w-sm p-6 bg-white border border-gray-200 rounded-lg shadow hover:bg-gray-100" > <div> <div className="px-10"> <div className="text-3xl font-extrabold">Sign in</div> </div> <div className="pt-2"> <LabelledInput label="Username" placeholder="harkirat@gmail.com" /> <LabelledInput label="Password" type={"password"} placeholder="123456" /> <button type="button" className="mt-8 w-full text-white bg-gray-800 focus:ring-4 focus:ring-gray-300 font-medium rounded-lg text-sm px-5 py-2.5 me-2 mb-2" > Sign in </button> </div> </div> </a> </div> </div> );}- Render the
Signincomponent inapp/(auth)/signin/page.tsx:- In the
app/(auth)/signin/page.tsxfile, import theSignincomponent from thecomponentsdirectory and render it.
- In the
// app/(auth)/signin/page.tsximport { Signin } from '@/components/Signin';
export default function SigninPage() {  return <Signin />;}
By following this approach, you’ve separated the sign-in component logic into a reusable component within the components directory. This promotes code reusability and maintainability, as you can now easily import and use the Signin component in other parts of your application if needed.
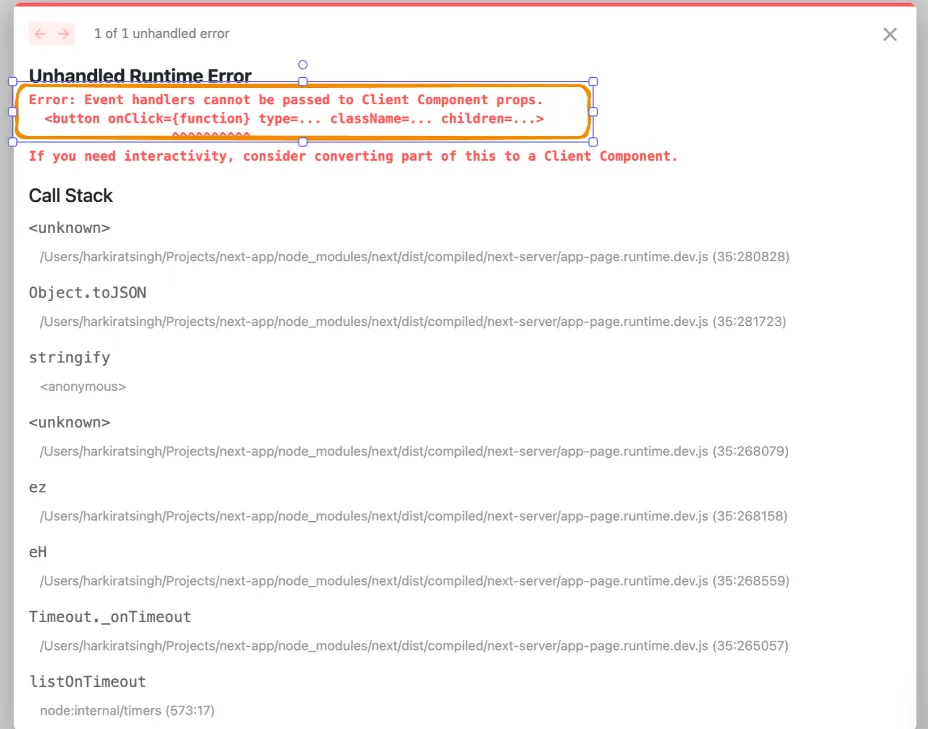
Add a button onclick handler
Now try adding a onclick handler to the button on the signin page
<button onClick={() => { console.log("User clicked on signin")}} type="button" className="mt-8 w-full text-white bg-gray-800 focus:ring-4 focus:ring-gray-300 font-medium rounded-lg text-sm px-5 py-2.5 me-2 mb-2">Sign in</button>When you add an onClick handler to the sign-in button in the Signin component, you might encounter an error in the browser console. This error occurs because the Signin component is rendered on the server-side during the initial page load, and the browser doesn’t have access to the console object on the server.
Here’s what’s happening behind the scenes:
- Server-Side Rendering (SSR): When you visit the
/signinroute, Next.js renders theSignincomponent on the server-side, which includes executing theonClickhandler and theconsole.logstatement. - Server Environment: On the server-side, Node.js doesn’t have access to the browser’s
consoleobject, which is a client-side API. This is why you see the error about theconsoleobject being deprecated. - Hydration: After the initial server-rendered HTML is sent to the browser, Next.js “hydrates” the application by attaching event handlers and making it interactive on the client-side.
- Client-Side Rendering: Once the application is hydrated on the client-side, the
onClickhandler and theconsole.logstatement will work as expecte, as the browser environment has access to theconsoleobject.
Client and server components
The concept of client and server components in Next.js is a powerful feature that allows you to split your application’s rendering between the server and the client. This approach helps optimize performance and provides a better user experience. Let’s dive into the details and understand when to create client components.
By default, all components in Next.js are server components, which means they are rendered on the server during the initial page load. This server-side rendering (SSR) approach has several benefits, including improved SEO and faster initial load times, as the client receives a fully rendered HTML page from the server.
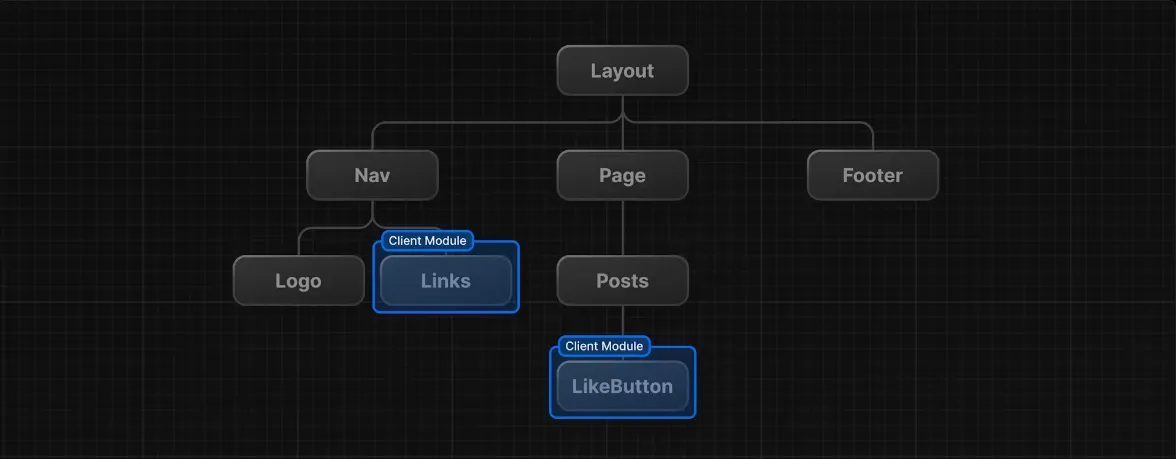
However, there are certain scenarios where you need to create client components, which are rendered on the client-side (in the browser). You should create client components whenever you encounter an error related to using browser-specific APIs or when you need to use React hooks or event handlers that are not supported on the server.
Here are some common scenarios where you should create client components:
- Using Browser APIs: If you need to use browser APIs like
window,document,navigator, orlocalStorage, you must create a client component. These APIs are not available on the server-side, and attempting to use them in a server component will result in an error. - Using React Hooks: React hooks like
useState,useEffect,useContext, and others are designed to work in the client-side environment. If you try to use them in a server component, you’ll encounter an error because these hooks rely on browser-specific functionality. - Handling User Events: If you need to handle user events like
onClick,onSubmit, oronChange, you should create a client component. These events are triggered by user interactions in the browser, and they don’t make sense in a server-side environment. - Rendering Dynamic Content: If you need to render dynamic content that changes based on user interactions or browser state, you should create a client component. Server components are designed to render static content during the initial page load.
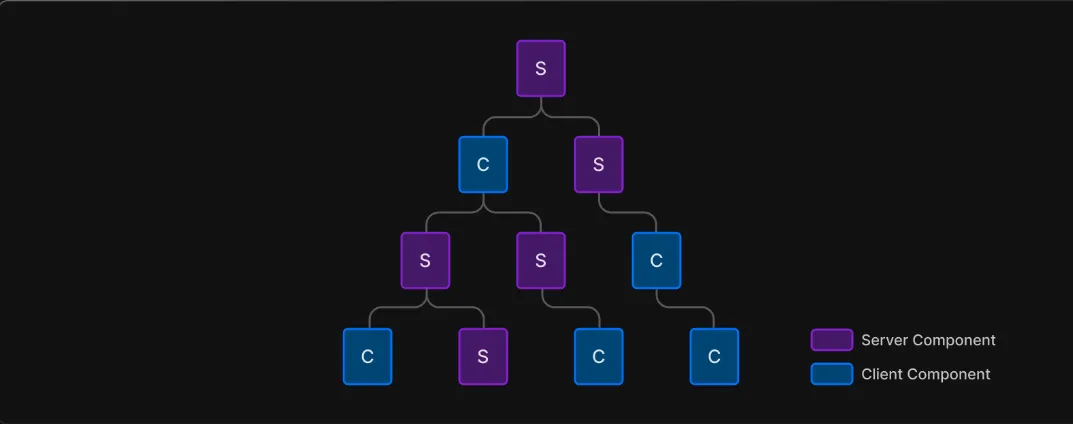
The general rule of thumb is to defer the creation of client components as much as possible and keep the majority of your application logic in server components. This approach helps optimize performance by reducing the amount of client-side JavaScript that needs to be downloaded and executed.
When you encounter an error related to using browser-specific APIs or React hooks in a server component, Next.js will typically provide a clear error message suggesting that you create a client component. In such cases, you can add the 'use client' directive at the top of your component file to mark it as a client component.
Here’s an example of how to create a client component:
'use client'; // This directive marks the component as a client component
import { useState, useEffect } from 'react';
export default function ClientComponent() {  const [count, setCount] = useState(0);
  useEffect(() => {    // This code will run on the client-side    const handleWindowResize = () => {      // Access the window object      console.log('Window resized');    };
    window.addEventListener('resize', handleWindowResize);
    return () => {      window.removeEventListener('resize', handleWindowResize);    };  }, []);
  return (    <div>      <p>Count: {count}</p>      <button onClick={() => setCount(count + 1)}>Increment</button>    </div>  );}
In this example, the ClientComponent uses the useState hook to manage state, the useEffect hook to handle window resize events, and an onClick event handler. Since these features rely on browser functionality, the 'use client' directive is added at the top of the file to mark it as a client component.