Week 19.1 Backend Communication
In this lecture, Harkirat covers the fundamentals of backend communication, including different types like WebSockets and Polling, their implementation in Node.js and Next.js, and strategies for scaling these systems using pub/sub architectures.
Backend Communication
Backend communication refers to the exchange of data and coordination between different backend systems or components within an application’s architecture. It is required because modern applications often have complex requirements that cannot be fulfilled by a single, monolithic backend system. Instead, they rely on multiple specialized backend services or microservices that handle different aspects of the application’s functionality.
Why Do We Need?
The need for backend communication arises due to several reasons:
- Separation of Concerns: By breaking down an application into smaller, focused services, each service can be developed, deployed, and scaled independently, promoting modularity and maintainability.
- Scalability: Different components may have varying scalability requirements. Backend communication allows scaling specific components without affecting the entire system.
- Fault Isolation: If one component fails, it does not necessarily bring down the entire application, as other components can continue functioning.
- Leveraging Specialized Services: Backend communication enables integrating specialized services (e.g., payment gateways, notification services, data processing pipelines) into the application’s architecture.
General Backend Communication
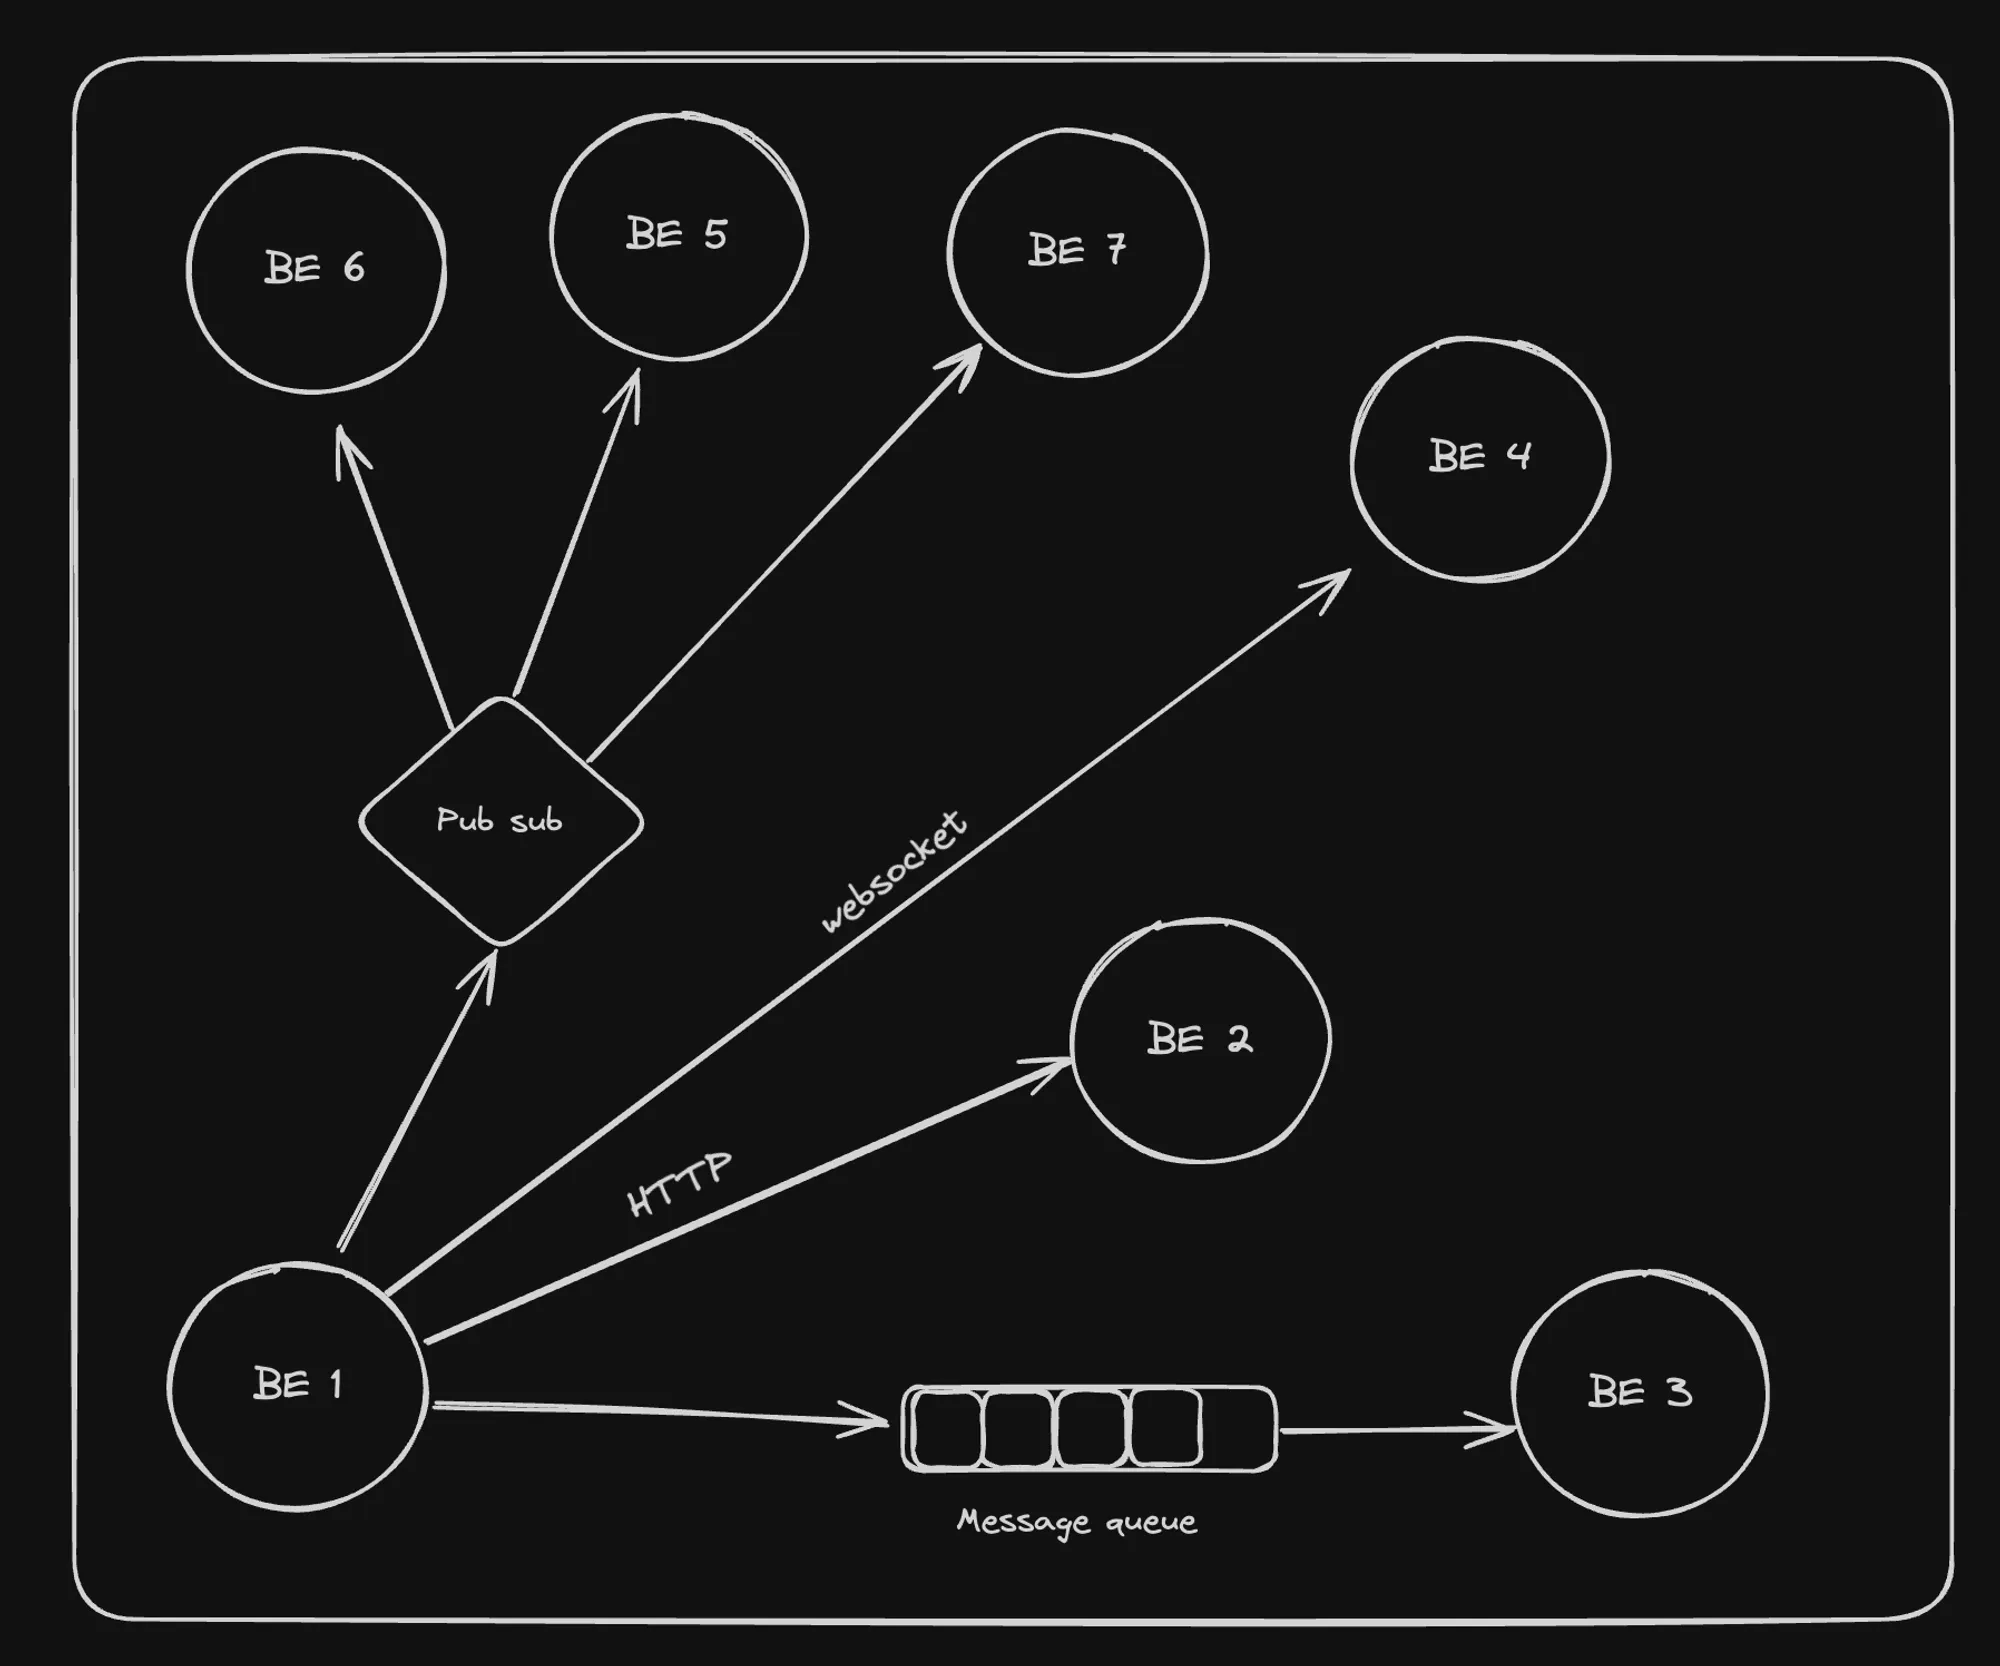
This diagram illustrates a general backend communication architecture using a message queue pattern and a publish-subscribe (pub/sub) component.
Key Components:
- Backend Services (BE 1 - BE 7): Represent different backend components or microservices within the system.
- Message Queue: A central queue that facilitates asynchronous communication between components. Components can send messages to the queue, which are then consumed by other components.
- Pub Sub: A publish-subscribe component that enables decoupled communication. Components can publish messages to topics, and other components subscribed to those topics receive the messages.
Communication Flow:
- BE 1 sends messages or tasks to the Message Queue via HTTP.
- BE 3 consumes messages from the Message Queue.
- BE 2, BE 4, BE 5, BE 6, and BE 7 communicate with the Pub Sub component using WebSockets for real-time, bidirectional communication.
- Components can publish messages to specific topics on the Pub Sub, and other subscribed components receive those messages.
This architecture promotes scalability, fault isolation, and asynchronous processing. Components can be scaled independently, and failures in one component do not necessarily affect the entire system.
PayTM Transaction Flow
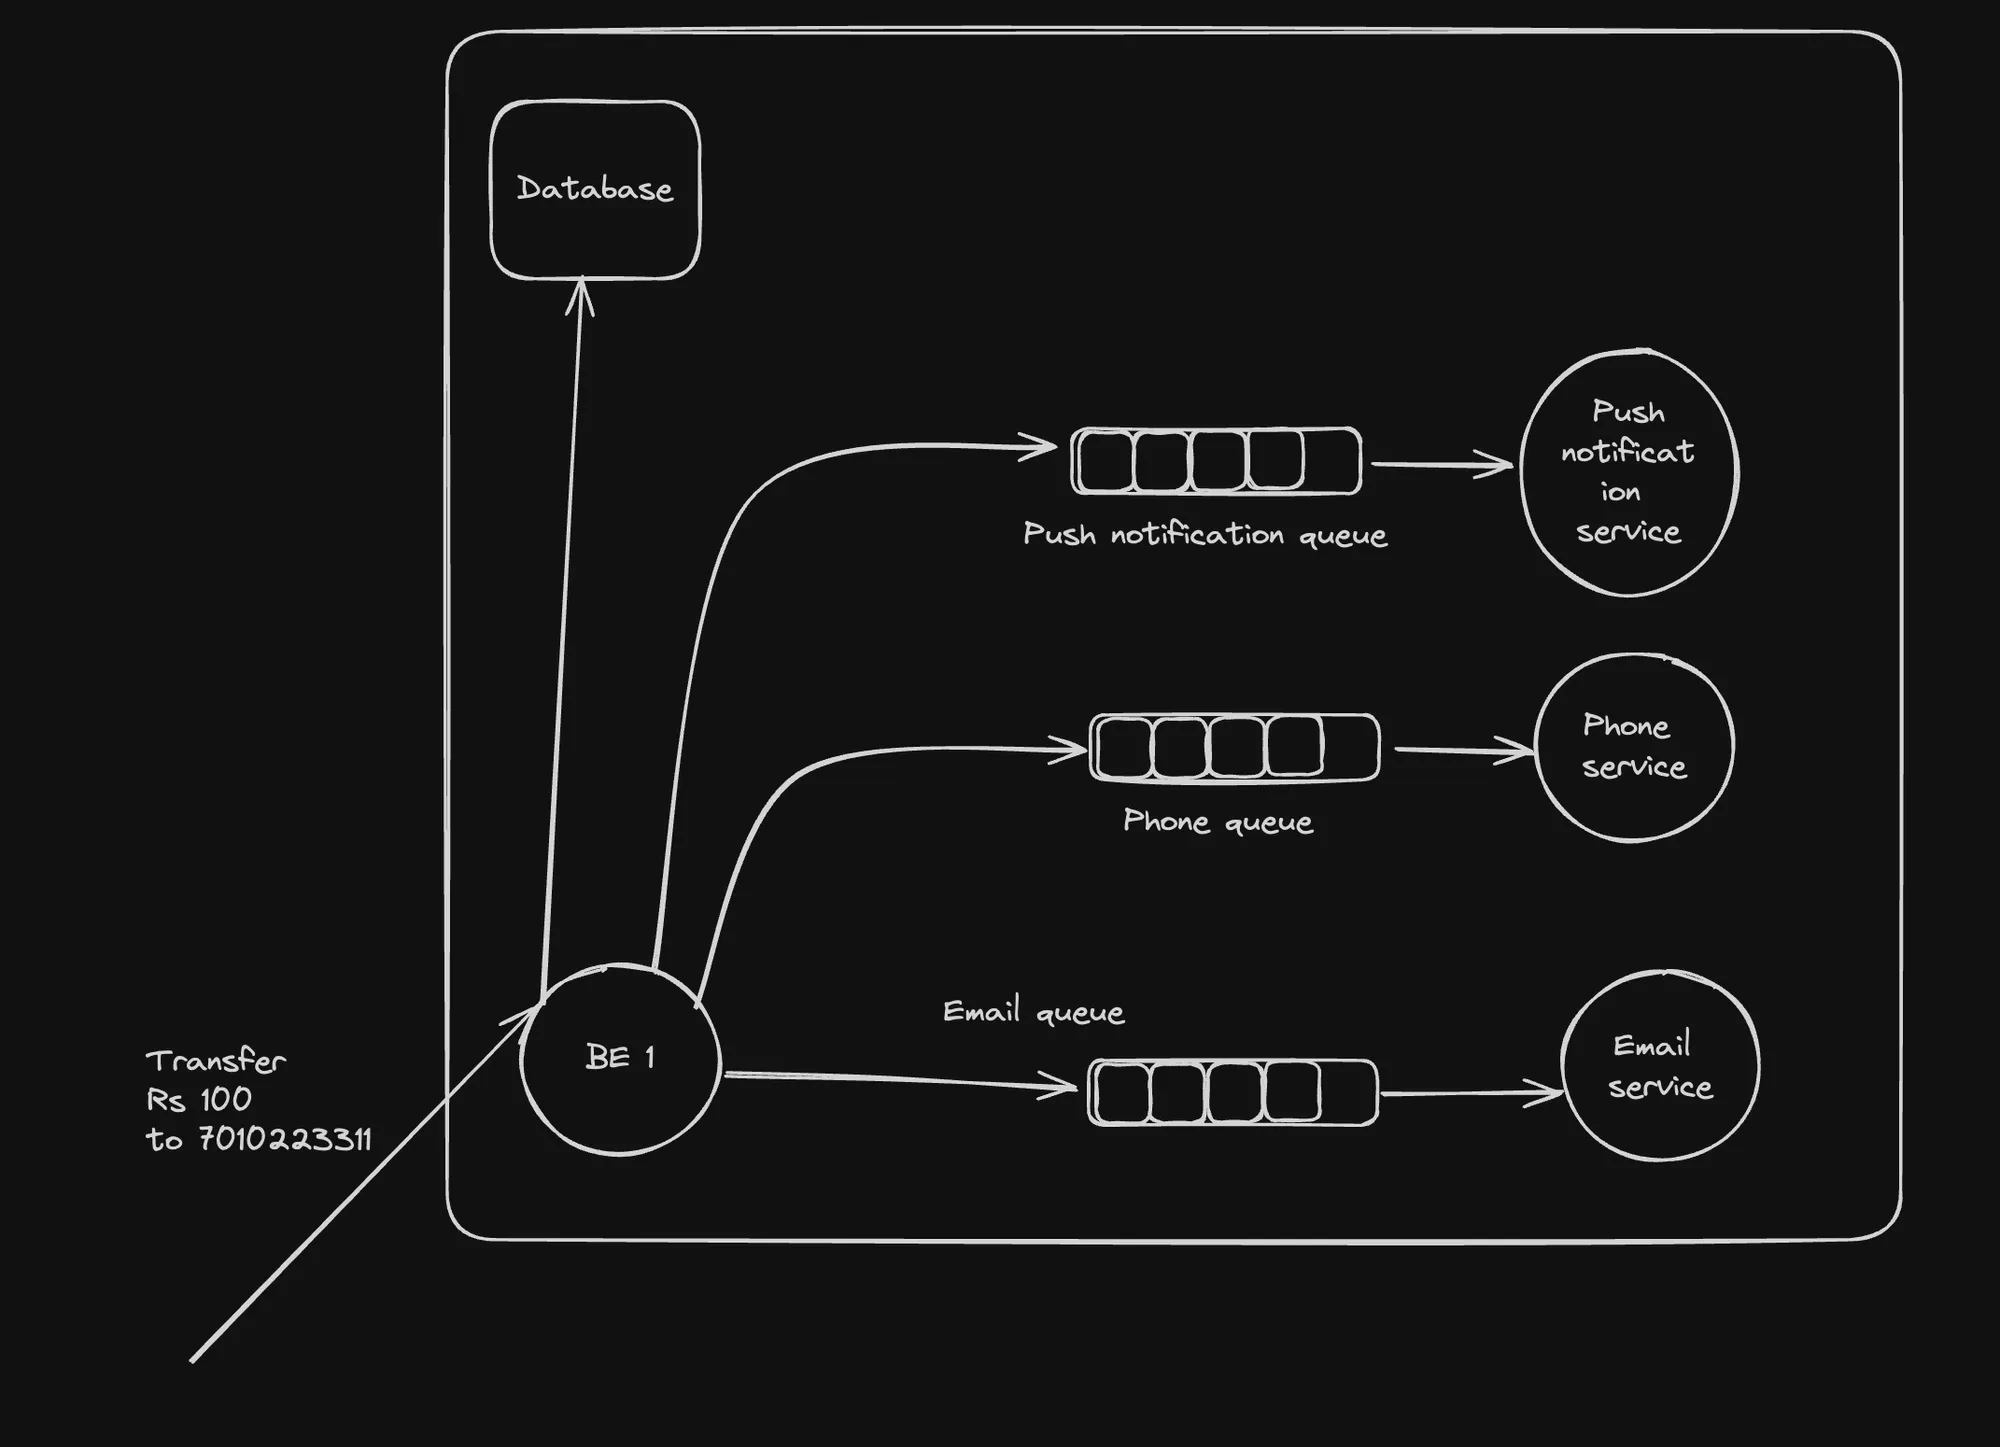
This diagram depicts a potential backend architecture for handling transactions and notifications on the PayTM platform.
Key Components:
- Database: The central data storage component.
- Push Notification Service: Handles push notifications, connected to the Push Notification Queue.
- Phone Service: Handles phone-related tasks, connected to the Phone Queue.
- Email Service: Handles email-related tasks, connected to the Email Queue.
Transaction Flow:
- A transaction occurs, e.g., “Transfer Rs 100 to 7010233311”.
- The transaction data is stored in the Database.
- Messages related to the transaction are added to the respective queues (Push Notification Queue, Phone Queue, Email Queue).
- Dedicated services (Push Notification Service, Phone Service, Email Service) consume messages from their respective queues and process them asynchronously.
This architecture allows for efficient handling of different notification types (push, phone, email) independently and asynchronously, ensuring responsiveness and scalability.
LeetCode Problem Submission
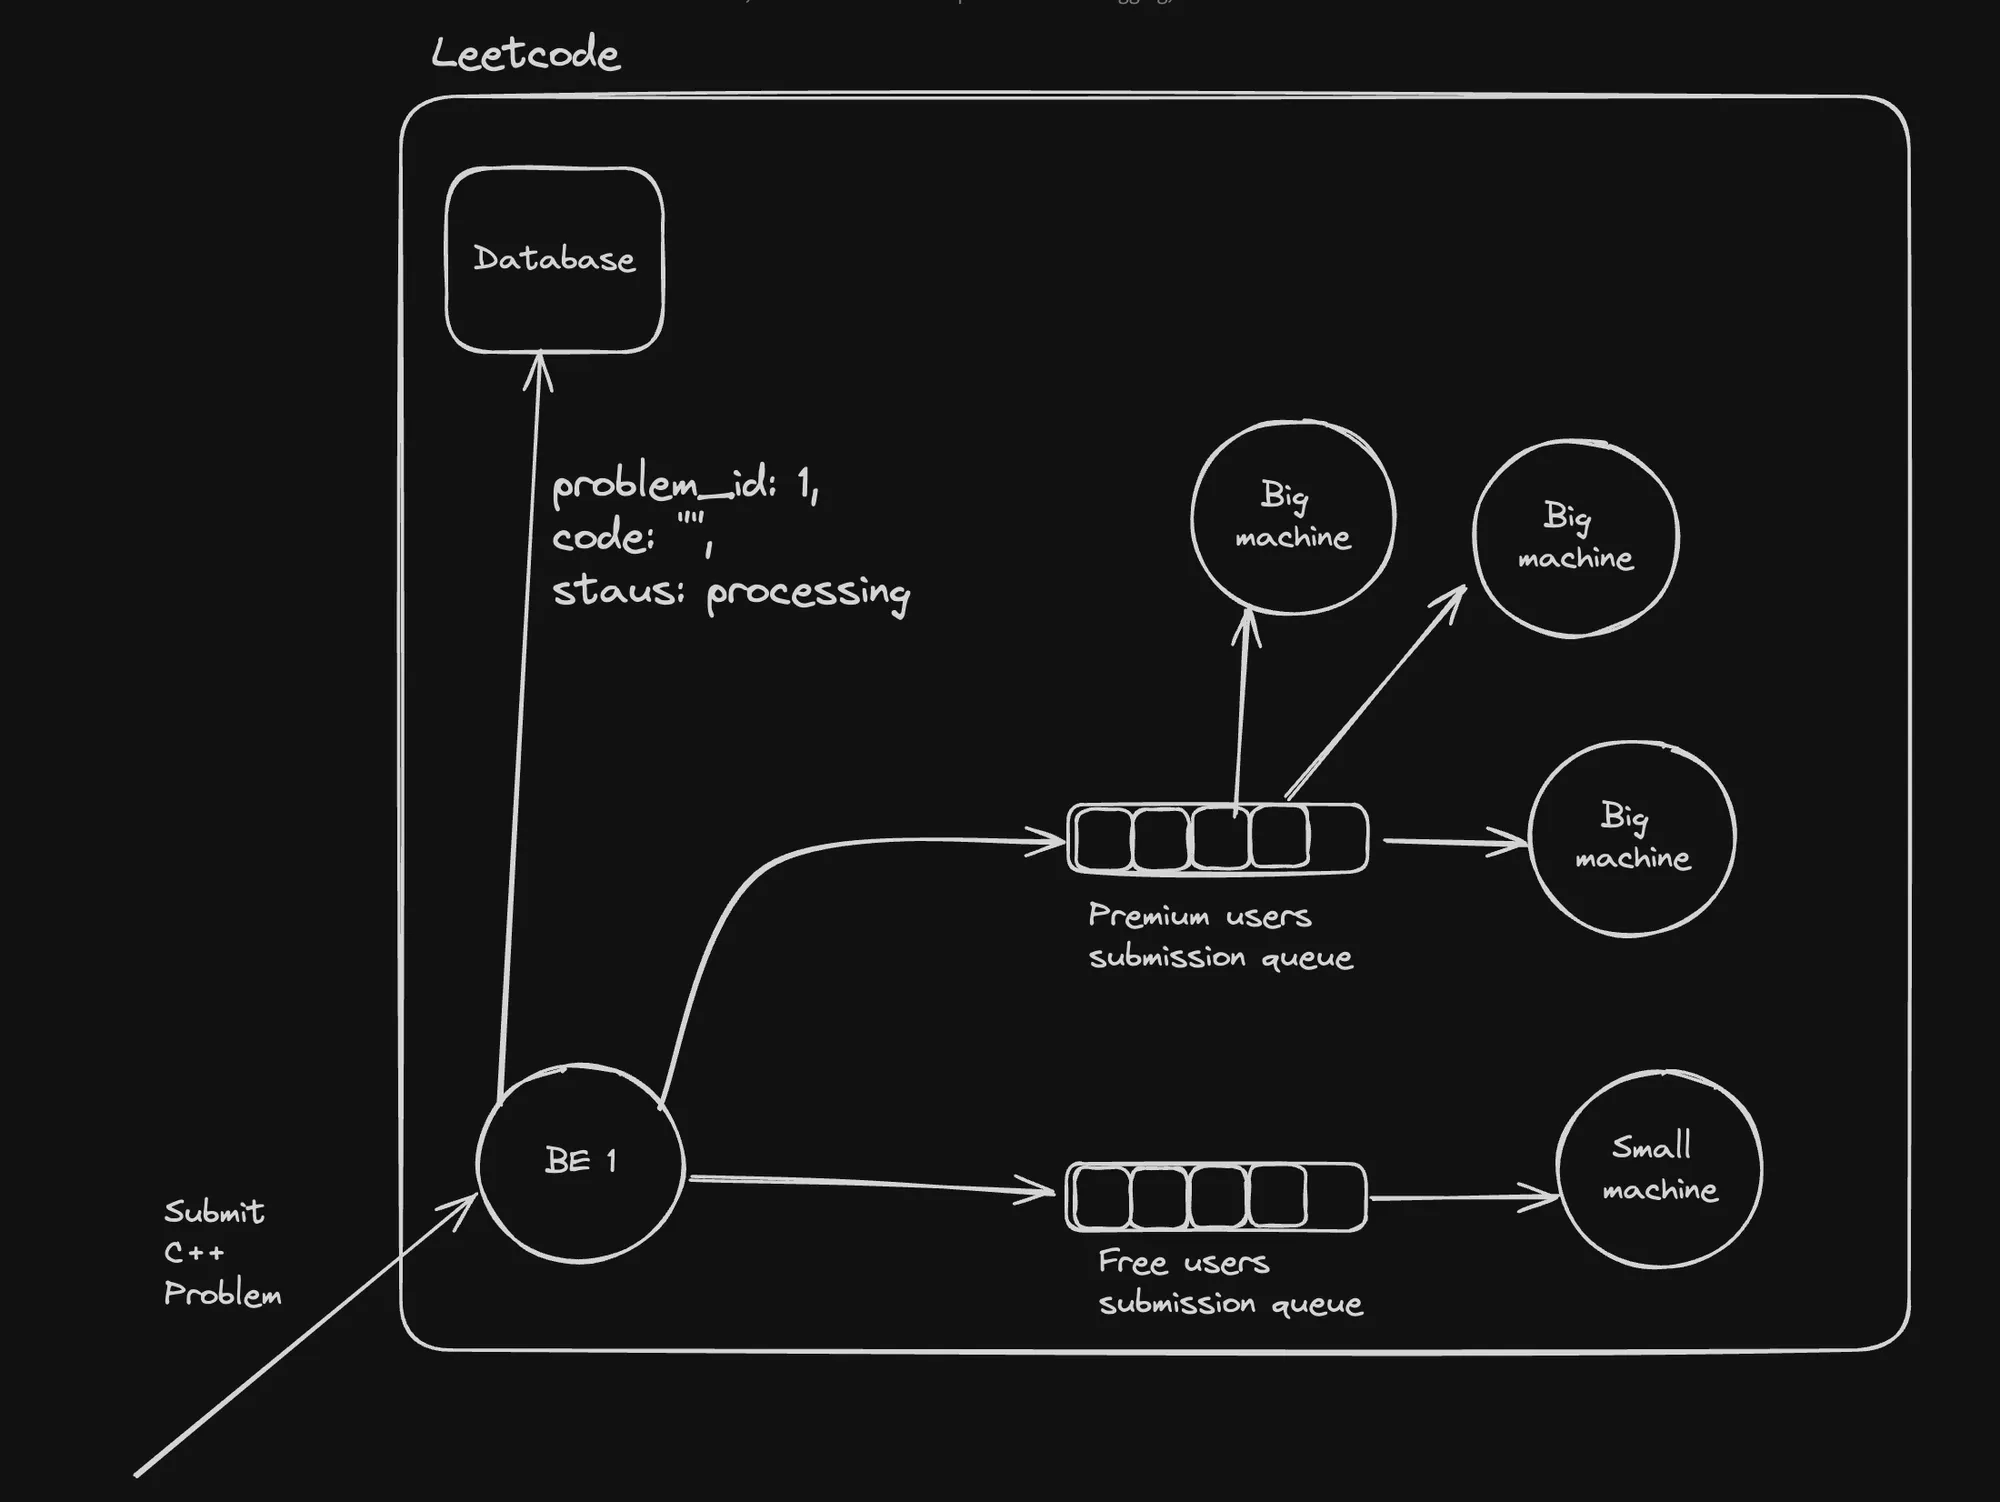
This diagram illustrates the backend architecture for handling problem submissions on the LeetCode platform.
Key Components:
- Database: Stores problem data and user submissions.
- Premium Users Submission Queue: Queue for submissions from premium users.
- Free Users Submission Queue: Queue for submissions from free users.
- Big Machines: Powerful computing resources for processing premium user submissions.
- Small Machines: Smaller computing resources for processing free user submissions.
Submission Flow:
- A user submits a problem or task (e.g., “problem_id: 1, code: 1, status: processing”).
- The submission is stored in the Database.
- The submission is added to the appropriate queue (Premium Users Submission Queue or Free Users Submission Queue) based on the user’s account type.
- Big Machines consume submissions from the Premium Users Submission Queue, prioritizing premium user submissions.
- Small Machines consume submissions from the Free Users Submission Queue, handling free user submissions with available resources.
This architecture allows for prioritization of premium user submissions by allocating more powerful computing resources. It also enables efficient resource utilization by distributing free user submissions across multiple smaller machines.
In summary, these architecture diagrams illustrate different approaches to backend communication, catering to specific requirements such as asynchronous processing, notification handling, and resource allocation based on user prioritization. The choice of architecture depends on the application’s needs, scalability requirements, and the desired level of decoupling between components.
Types of Communication
The communication mechanisms used in software systems can be broadly classified into two categories: synchronous (strong coupling) and asynchronous (weak coupling).
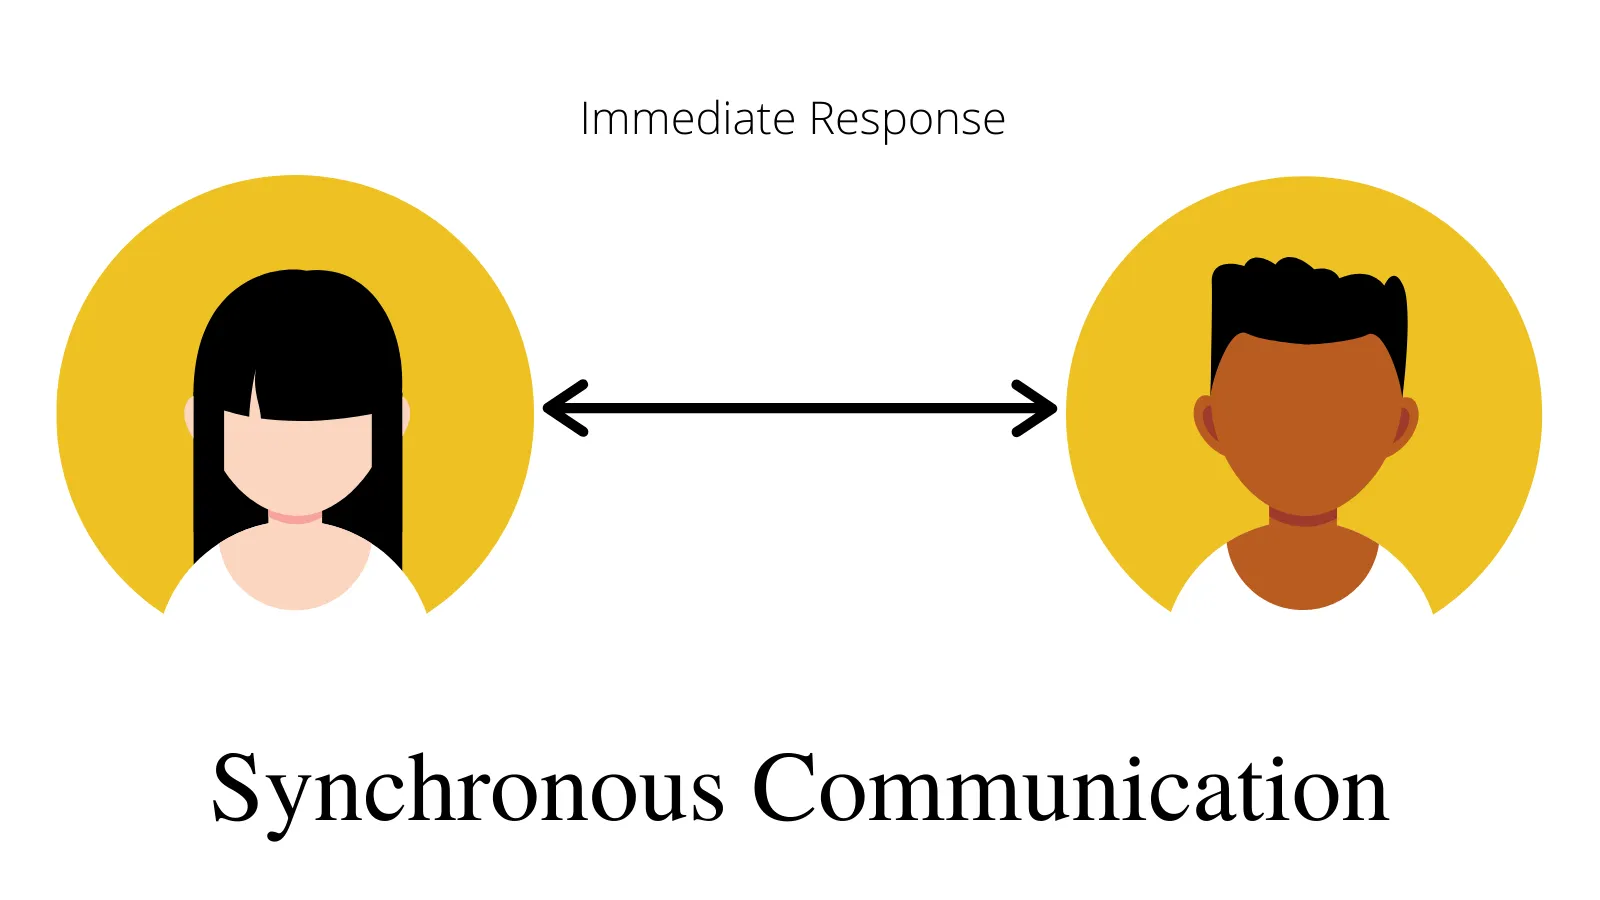
Synchronous Communication (Strong Coupling)
Synchronous communication involves direct, real-time interaction between components, where the sender waits for a response from the receiver before proceeding. This type of communication is considered “strongly coupled” because the components are tightly integrated and dependent on each other.
- HTTP (REST/GraphQL): HTTP is a synchronous communication protocol widely used for building web services and APIs. REST (Representational State Transfer) and GraphQL are architectural styles that leverage HTTP for data exchange. In a synchronous HTTP request, the client sends a request to the server and waits for the server’s response before continuing.
- WebSocket (debatable if sync or async): WebSockets enable real-time, bidirectional communication between a client (e.g., web browser) and a server. While WebSockets can be used for both synchronous and asynchronous communication, they are often considered synchronous due to their low-latency, full-duplex nature. However, their classification can be debated based on the specific use case and implementation details.
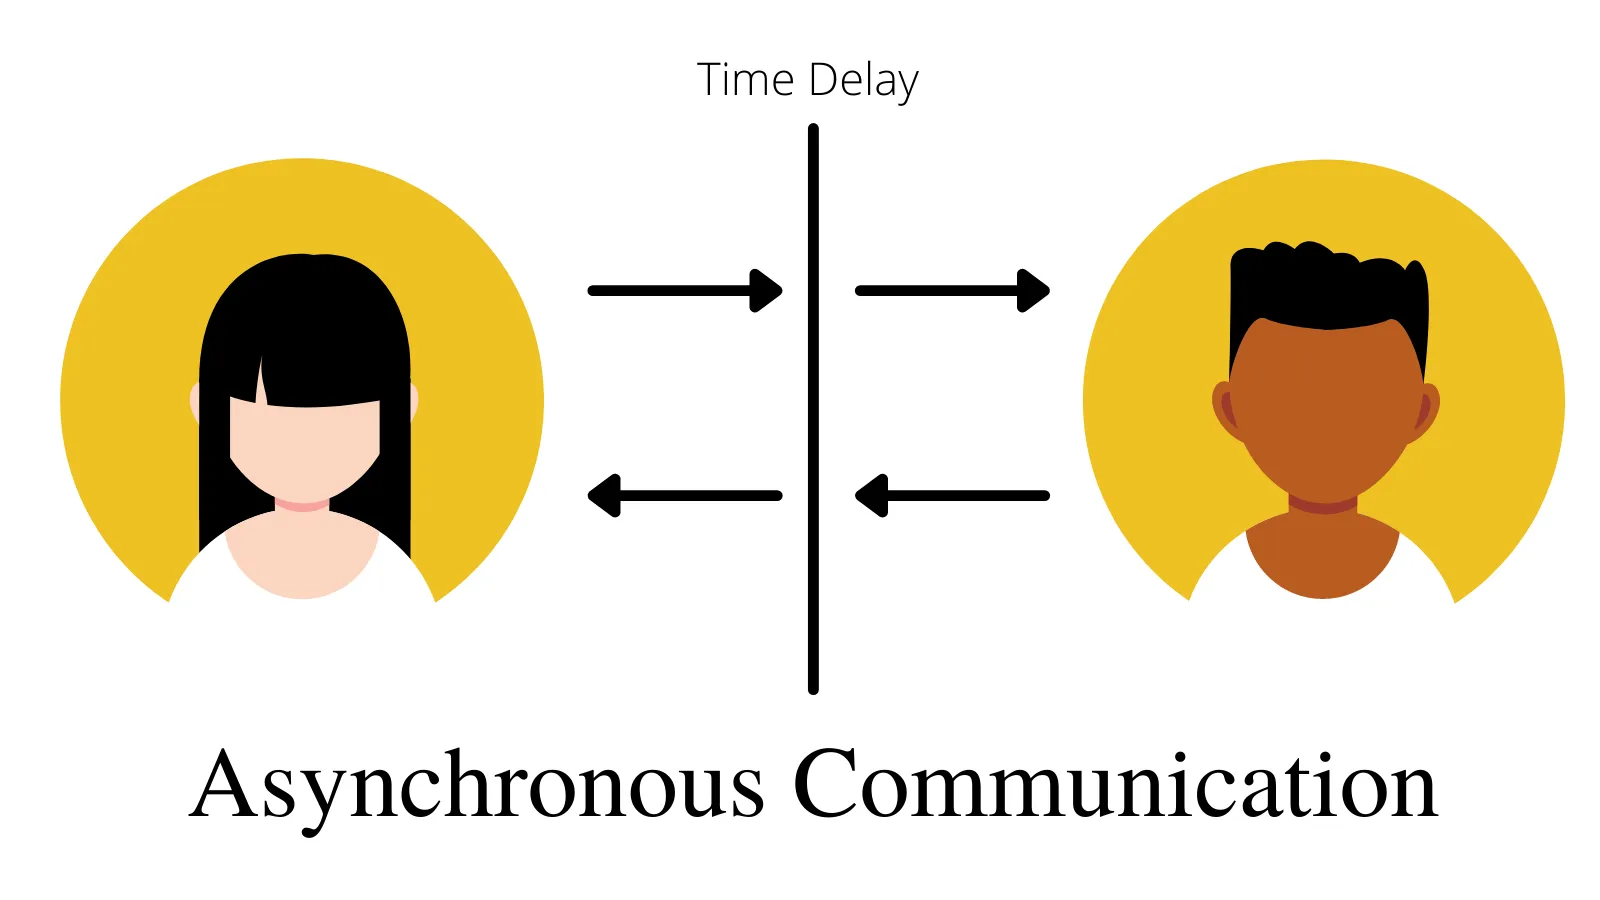
Asynchronous Communication (Weak Coupling)
Asynchronous communication decouples the sender and receiver, allowing them to operate independently. The sender does not wait for a response from the receiver, promoting loose coupling and improving overall system responsiveness and scalability.
- Messaging Queues: Messaging queues facilitate asynchronous communication by acting as intermediaries between components. Producers (senders) send messages to the queue, and consumers (receivers) process messages from the queue at their own pace. This decoupling allows components to communicate without being directly connected or aware of each other’s availability.
- Pub/Sub (Publish-Subscribe): Pub/Sub is a messaging pattern where publishers (producers) send messages to a topic without knowing the recipients. Subscribers (consumers) express interest in one or more topics and receive messages published to those topics. This pattern enables loose coupling and scalability, as components can be added or removed without affecting the entire system.
- Server-Sent Events (SSE): Server-Sent Events is a standard that enables servers to push data to clients in an asynchronous, unidirectional manner. Clients establish a long-lived connection with the server, and the server can send updates or events to the clients as they occur, without the clients explicitly requesting them.
- WebSocket (debatable if sync or async): As mentioned earlier, WebSockets can be used for both synchronous and asynchronous communication, depending on the implementation. When used asynchronously, WebSockets enable real-time, bidirectional data exchange without the need for constant polling or refreshing.
In summary, synchronous communication is suitable for scenarios where immediate feedback or response is required, while asynchronous communication promotes loose coupling, scalability, and responsiveness by decoupling components and allowing them to operate independently.
Websockets
WebSockets provide a way to establish a persistent, full-duplex communication channel over a single TCP connection between the client (typically a web browser) and the server. This allows for real-time, bidirectional communication, where the server can push data to the client without the client having to constantly poll the server.
Use Cases for WebSockets
- Real-Time Applications: Chat applications, live sports updates, real-time gaming, and any application requiring instant updates can benefit from WebSockets. For example, the Binance trading platform (https://www.binance.com/en/trade/SOL_USDT?type=spot) uses WebSockets to provide real-time updates on cryptocurrency prices and trades.
- Live Feeds: Financial tickers, news feeds, and social media updates are examples where WebSockets can be used to push live data to users without the need for constant polling or refreshing.
- Interactive Services: Collaborative editing tools, live customer support chat, and interactive webinars can use WebSockets to enhance user interaction and provide a seamless real-time experience.
Why not use HTTP/REST?
While HTTP/REST is a widely used architecture for building web services and APIs, it has limitations when it comes to real-time, bidirectional communication:
- Network Handshake: In HTTP, a new network handshake is required for every request, which can introduce latency and overhead, especially for frequent updates.
- Server Push: HTTP is a request-response protocol, which means the server cannot push data to the client without the client explicitly requesting it. This limitation can be mitigated by polling, but it is not an efficient approach for real-time updates.
Polling vs. WebSockets
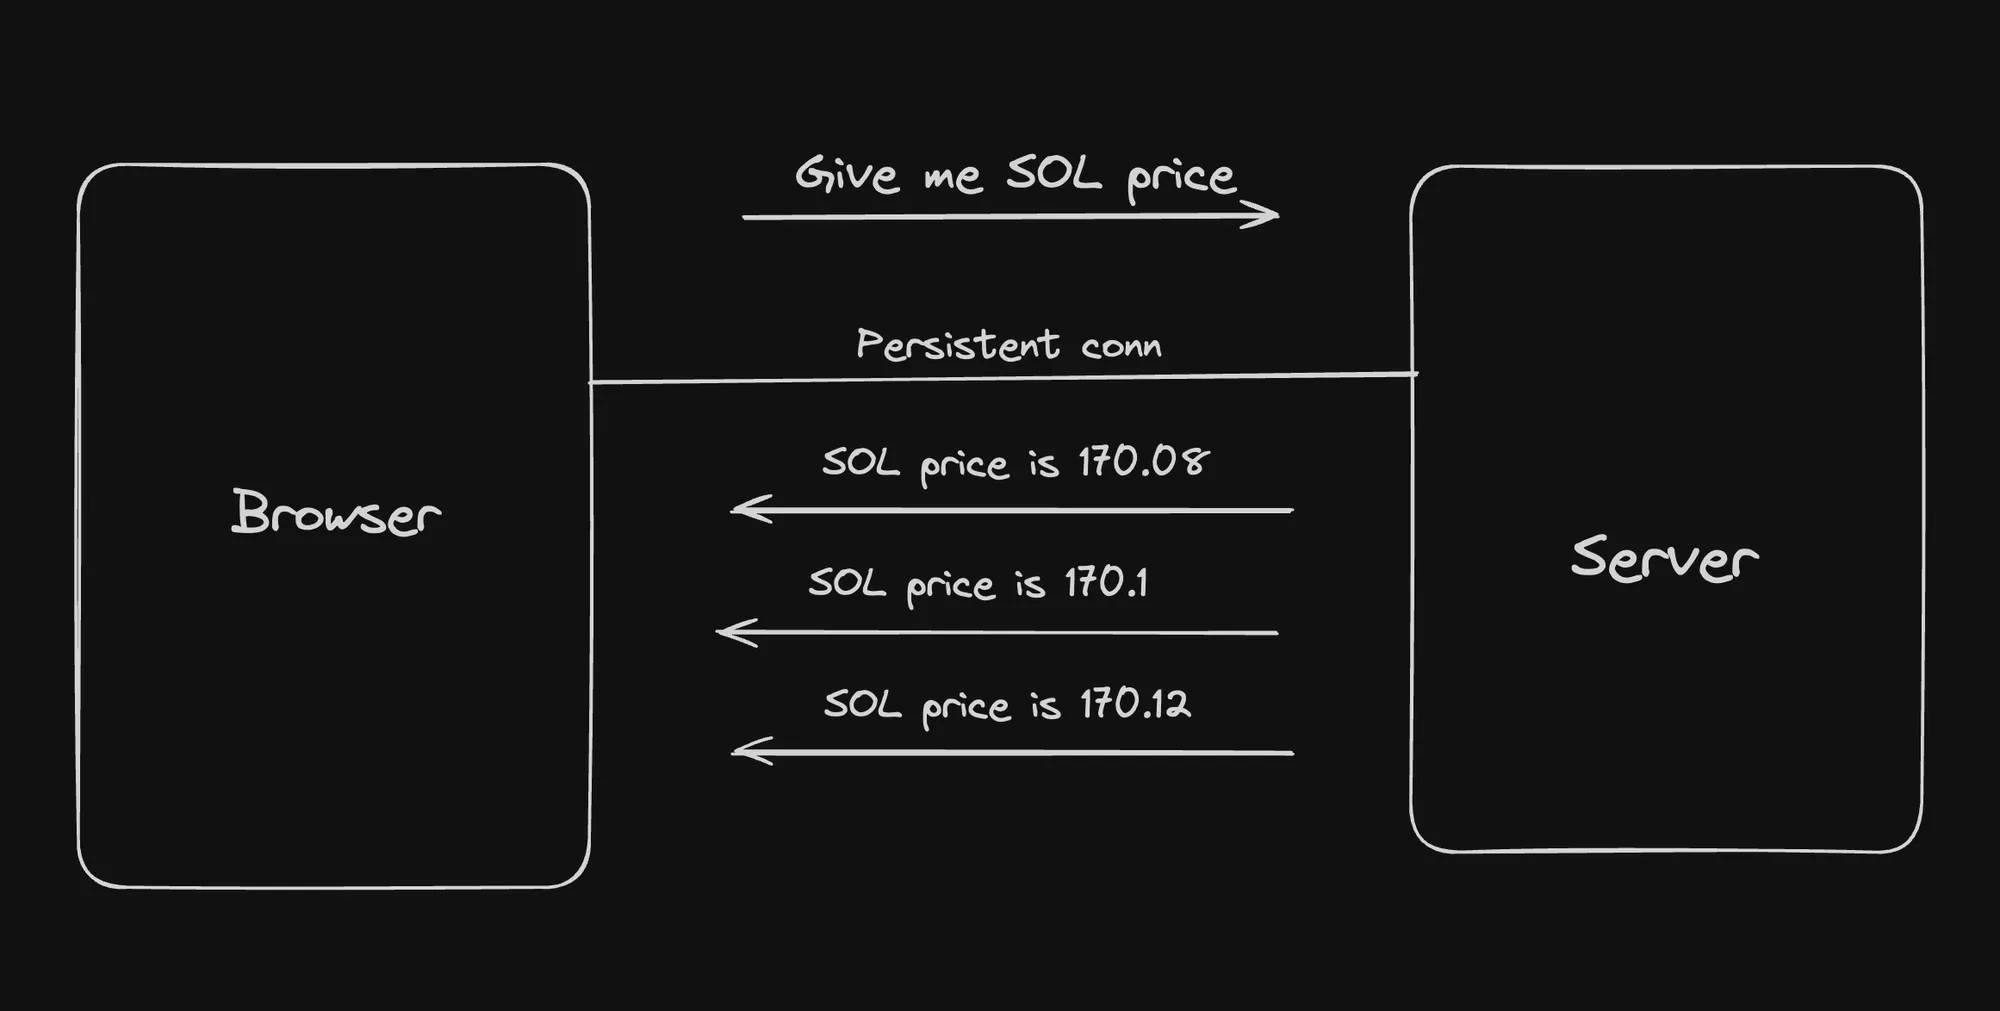
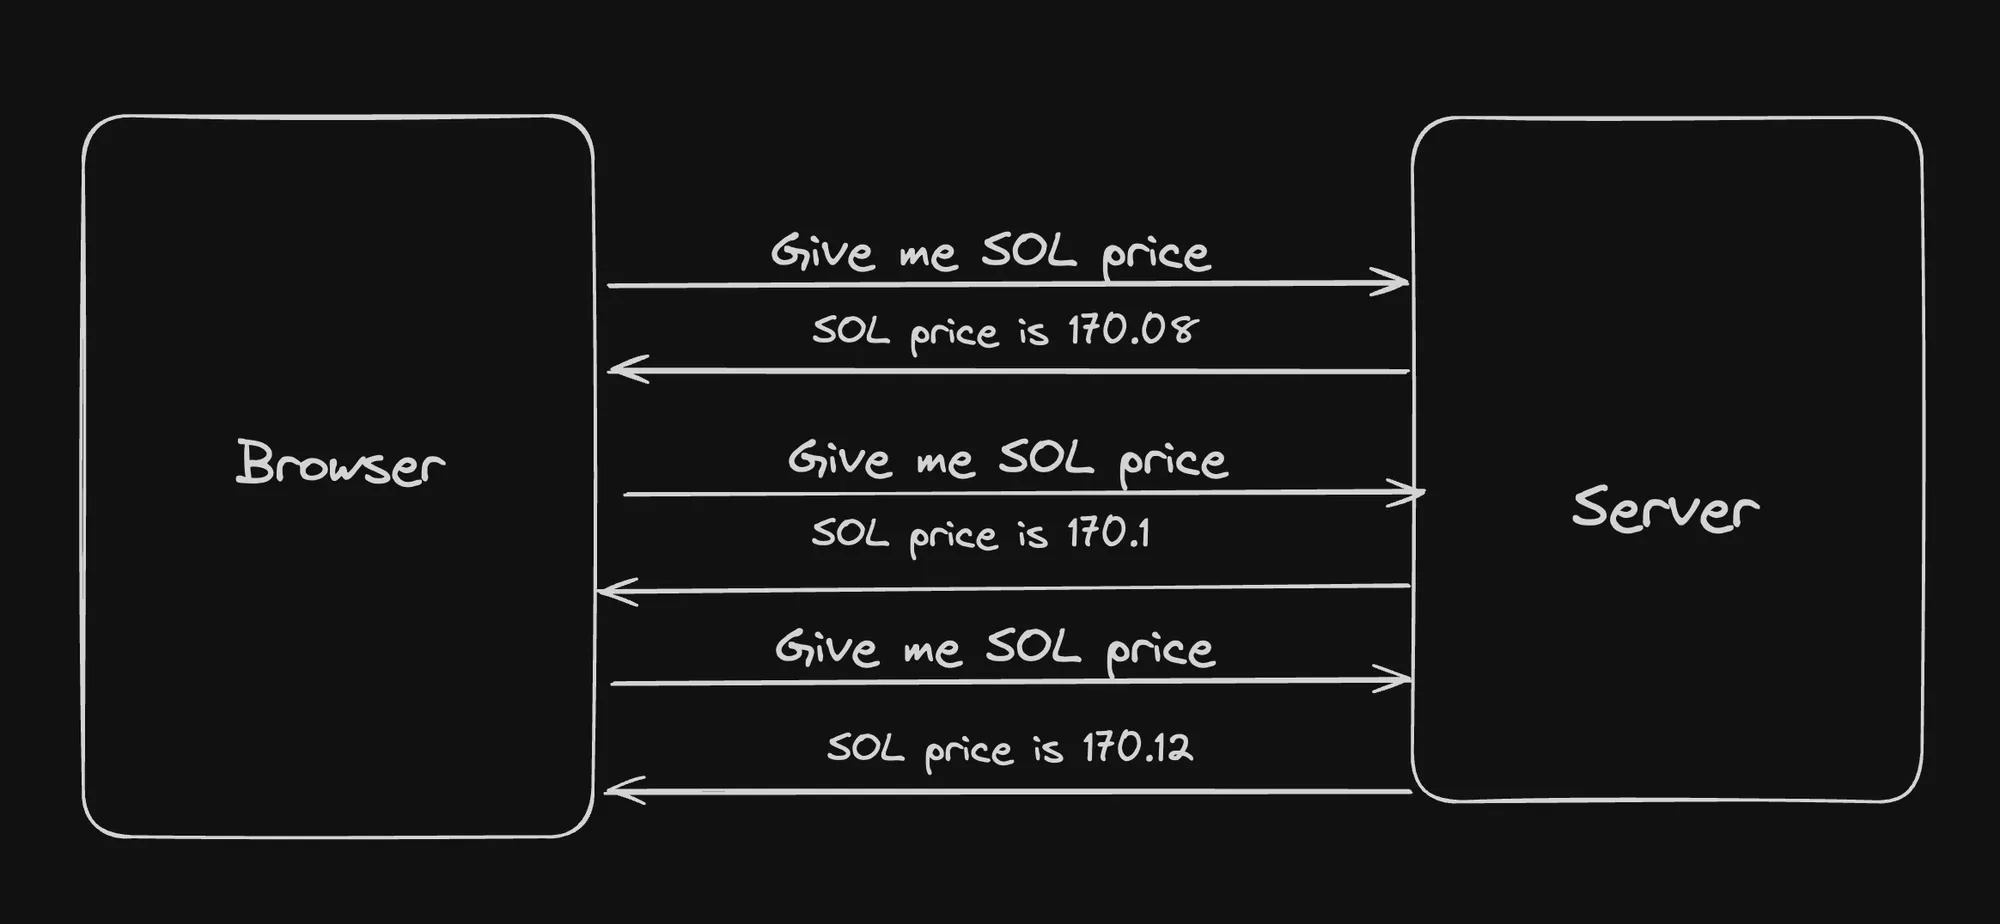
The diagram illustrates the difference between polling and WebSockets for retrieving the “SOL price” from the server. With polling, the browser repeatedly sends requests to the server, even if the data hasn’t changed, leading to unnecessary network traffic and potential delays.
In contrast, WebSockets establish a persistent connection, allowing the server to push updates to the client as soon as the data changes, without the client having to constantly poll for new information.
While polling can be used for some applications, it is not an optimal solution for real-time updates or scenarios where data changes frequently, as it can lead to increased latency, inefficient use of resources, and a degraded user experience.
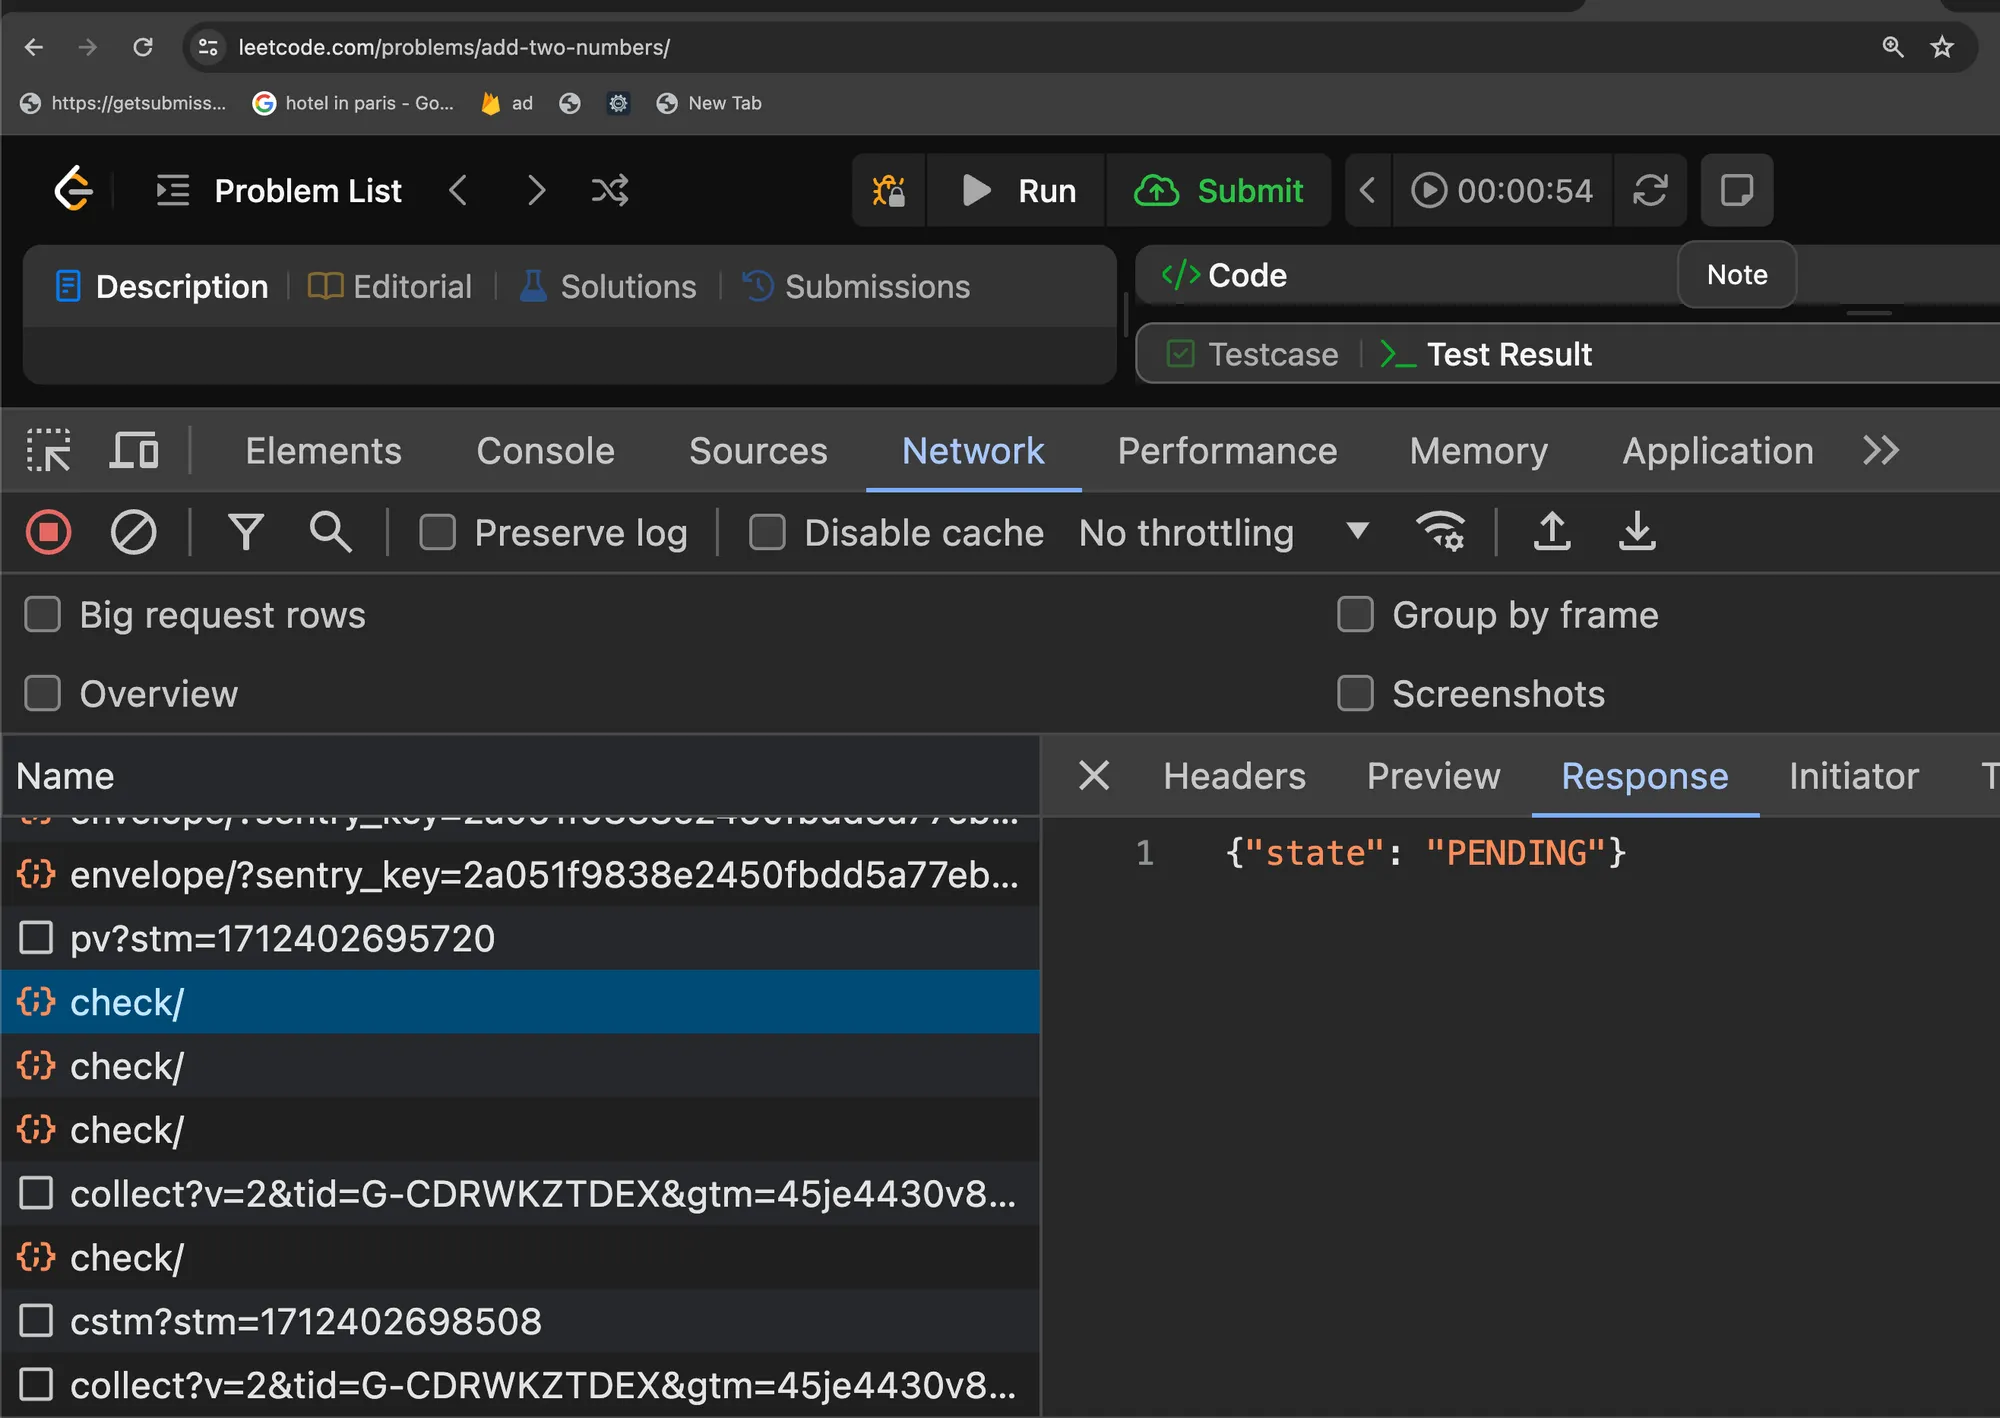
LeetCode Example
The LeetCode platform uses polling when a user submits a problem. This approach may be suitable for LeetCode’s use case, where the problem submission process does not require instant updates, and the server can respond with the final result once the processing is complete.
However, for applications that require real-time updates or collaborative features, WebSockets would be a more appropriate choice, providing a seamless and responsive user experience.
Websocket in NodeJS
Node.js provides several libraries that allow developers to create WebSocket servers, similar to how the Express library is used to create HTTP servers. WebSockets enable real-time, bidirectional communication between a client (e.g., a web browser) and a server, making them well-suited for applications that require instant updates, such as chat applications, real-time gaming, and collaborative editing tools.
The most commonly used WebSocket libraries for Node.js are:
- ws (https://github.com/websockets/ws)
- This is a popular, lightweight, and high-performance WebSocket library for Node.js.
- It provides a simple and clean API for creating WebSocket servers and clients.
- The
wslibrary is recommended for its simplicity and ease of integration with other platforms (Android, iOS, Rust).
- websocket (https://www.npmjs.com/package/websocket)
- An alternative WebSocket library for Node.js.
- It offers additional features like multiplexing and automatic ping/pong handling.
- Socket.IO (https://socket.io/)
- Socket.IO is a popular library that provides a higher-level abstraction over WebSockets.
- It offers additional features like automatic reconnection, fallback to other transports (e.g., long-polling), and the concept of “rooms” for managing connections.
- While Socket.IO is powerful, it can be more challenging to support across multiple platforms (Android, iOS, Rust) due to its additional constructs and features.
In this case, the recommendation is to use the ws library for its simplicity and better cross-platform support. The ws library provides a straightforward API for creating WebSocket servers and clients, without the additional overhead of features like “rooms” found in Socket.IO.
Here’s an example of how to create a WebSocket server using the ws library in Node.js:
const WebSocket = require('ws');
// Create a new WebSocket serverconst wss = new WebSocket.Server({ port: 8080 });
// Handle WebSocket connectionswss.on('connection', (ws) => {  console.log('New client connected');
  // Handle incoming messages  ws.on('message', (data) => {    console.log(`Received message: ${data}`);    // Broadcast the message to all connected clients    wss.clients.forEach((client) => {      if (client !== ws && client.readyState === WebSocket.OPEN) {        client.send(data);      }    });  });
  // Handle client disconnections  ws.on('close', () => {    console.log('Client disconnected');  });});
In this example, a new WebSocket server is created and listens on port 8080. When a client connects, the connection event is triggered, and the server can handle incoming messages and client disconnections.
The choice between ws and Socket.IO depends on the specific requirements of your application. If you need advanced features like automatic reconnection, fallback transports, or the concept of “rooms,” Socket.IO might be a better fit. However, if you prefer a more lightweight and straightforward approach, and cross-platform support is a concern, the ws library is a solid choice for creating WebSocket servers in Node.js.
Implementing WS in NodeJS
WebSockets provide a way to establish a persistent, full-duplex communication channel between the client and the server, enabling real-time, bidirectional data exchange. Node.js offers several libraries for implementing WebSockets, with the most popular being the ws library.
Here’s a step-by-step guide to implementing WebSockets in Node.js using the ws library:
- Initialize a Node.js project:
npm init -y- Set up TypeScript configuration:
npx tsc --initUpdate the tsconfig.json file with the following settings:
"rootDir": "./src","outDir": "./dist",- Install dependencies:
npm install ws @types/ws- Implement WebSocket server using the built-in
httpmodule:
import WebSocket, { WebSocketServer } from 'ws';import http from 'http';
const server = http.createServer((request, response) => {  console.log(`${new Date()} Received request for ${request.url}`);  response.end("Hi there");});
const wss = new WebSocketServer({ server });
wss.on('connection', (ws) => {  ws.on('error', console.error);
  ws.on('message', (data, isBinary) => {    wss.clients.forEach((client) => {      if (client.readyState === WebSocket.OPEN) {        client.send(data, { binary: isBinary });      }    });  });
  ws.send('Hello! Message From Server!!');});
server.listen(8080, () => {  console.log(`${new Date()} Server is listening on port 8080`);});
In this example, we create an HTTP server using the built-in http module and then initialize a WebSocket server (WebSocketServer) on top of it. The WebSocket server listens for incoming connections and handles messages by broadcasting them to all connected clients. Additionally, it sends a “Hello! Message From Server!!” message to each new client that connects.
- Implement WebSocket server using Express.js:
npm install express @types/expressimport express from 'express';import { WebSocketServer } from 'ws';
const app = express();const httpServer = app.listen(8080);
const wss = new WebSocketServer({ server: httpServer });
wss.on('connection', (ws) => { ws.on('error', console.error);
ws.on('message', (data, isBinary) => { wss.clients.forEach((client) => { if (client.readyState === WebSocket.OPEN) { client.send(data, { binary: isBinary }); } }); });
ws.send('Hello! Message From Server!!');});In this example, we create an Express.js application and then initialize a WebSocket server (WebSocketServer) on top of the Express HTTP server. The WebSocket server functionality remains the same as in the previous example.
Both examples demonstrate how to set up a WebSocket server in Node.js using the ws library. The server listens for incoming WebSocket connections, handles messages, and broadcasts them to all connected clients.
Handling Client Side
With the useSocket custom hook, you can easily manage WebSocket connections and send messages in your React components.
import { useEffect, useState } from 'react';
const useSocket = (url: string) => {  const [socket, setSocket] = useState<WebSocket | null>(null);
  useEffect(() => {    const newSocket = new WebSocket(url);
    newSocket.onopen = () => {      console.log('Connection established');    };
    newSocket.onmessage = (message) => {      console.log('Message received:', message.data);    };
    newSocket.onerror = (error) => {      console.error('WebSocket error:', error);    };
    newSocket.onclose = () => {      console.log('WebSocket connection closed');    };
    setSocket(newSocket);
    return () => {      newSocket.close();    };  }, [url]);
  const sendMessage = (message: string) => {    if (socket && socket.readyState === WebSocket.OPEN) {      socket.send(message);    } else {      console.error('WebSocket is not connected');    }  };
  return { socket, sendMessage };};
export default useSocket;
Here’s how you can use the useSocket hook in your React component:
import React from 'react';import useSocket from './useSocket';
const App = () => {  const { socket, sendMessage } = useSocket('ws://localhost:8080');
  const handleSendMessage = () => {    sendMessage('Hello Server!');  };
  return (    <div>      <button onClick={handleSendMessage}>Send Message</button>    </div>  );};
export default App;
In the useSocket hook:
- The
useStatehook is used to create asocketstate variable to store the WebSocket instance. - The
useEffecthook is used to create a new WebSocket instance when the component mounts or when theurlchanges. - Event handlers (
onopen,onmessage,onerror,onclose) are set up to handle different WebSocket events. - The
sendMessagefunction is defined to send a message to the server if the WebSocket connection is open. - The hook returns the
socketinstance and thesendMessagefunction.
In the App component:
- The
useSockethook is imported and used with the server URL (ws://localhost:8080). - The
sendMessagefunction from the hook is used to send a “Hello Server!” message when the “Send Message” button is clicked.
You can interact with WebSockets through various methods and develop applications like chat apps or other real-time communication tools. For simplicity’s sake, we’ll explore a basic code illustration in this context.
NextJS Implementation
- Create a fresh Next.js project:
npx create-next-app my-websocket-appThis command will create a new Next.js project named “my-websocket-app” with the necessary files and dependencies.
- Update page.tsx to be a client component:
In Next.js 13, you can create client-side components by using the "use client" directive at the top of the file. Open the app/page.tsx file and add the following code:
"use client"
import { useEffect, useState } from 'react'
export default function HomePage() { // WebSocket code goes here}- Add the code to create a socket connection:
Inside the HomePage component, add the following code to create a WebSocket connection:
export default function HomePage() {  const [socket, setSocket] = useState<WebSocket | null>(null);
  useEffect(() => {    const newSocket = new WebSocket('ws://localhost:8080');
    newSocket.onopen = () => {      console.log('Connection established');      newSocket.send('Hello Server!');    }
    newSocket.onmessage = (message) => {      console.log('Message received:', message.data);    }
    setSocket(newSocket);
    return () => newSocket.close();  }, [])
  return (    <>      hi there    </>  )}
Here’s what the code does:
- The
useStatehook is used to create a state variablesocketto store the WebSocket instance, and a functionsetSocketto update it. - The
useEffecthook is used to set up the WebSocket connection when the component mounts. - Inside the
useEffectcallback, a new WebSocket connection is created with the URLws://localhost:8080. - The
onopenevent handler is set to log a message and send a “Hello Server!” message to the server when the connection is established. - The
onmessageevent handler is set to log any messages received from the server. - The
setSocketfunction is called to store the WebSocket instance in thesocketstate variable. - The
useEffectcleanup function is used to close the WebSocket connection when the component unmounts.
With this code, you now have a Next.js client-side component that establishes a WebSocket connection with a server running on ws://localhost:8080. When the connection is opened, it sends a “Hello Server!” message, and it logs any messages received from the server.
You can further enhance this code by adding functionality to handle different types of messages, send messages from the client to the server, and integrate it with your application’s logic and user interface.
Scaling Websocket Servers
In real-world scenarios, as the traffic to a website or application increases, a single WebSocket server may not be sufficient to handle the load. To address this, a common approach is to create a fleet or cluster of WebSocket servers, which can be scaled horizontally to accommodate the growing demand.
The key points regarding scaling WebSocket servers are:
- Multiple WebSocket Servers: Instead of relying on a single WebSocket server, multiple instances of WebSocket servers are deployed to form a fleet or cluster. This allows for load distribution and increased capacity.
- Central Orchestration Layer: Behind the WebSocket server fleet, there is typically a central layer that orchestrates the communication and message routing between the servers. This central layer is often implemented using a publish-subscribe (pub/sub) messaging system or a load balancer.
- Stateless WebSocket Servers: WebSocket servers are designed to be stateless, meaning they do not maintain persistent state information about client connections or messages. This stateless nature allows WebSocket servers to be easily scaled, as client connections can be distributed across multiple servers without the need for complex state management.
Pub/Sub Architecture for Scaling WebSocket Servers
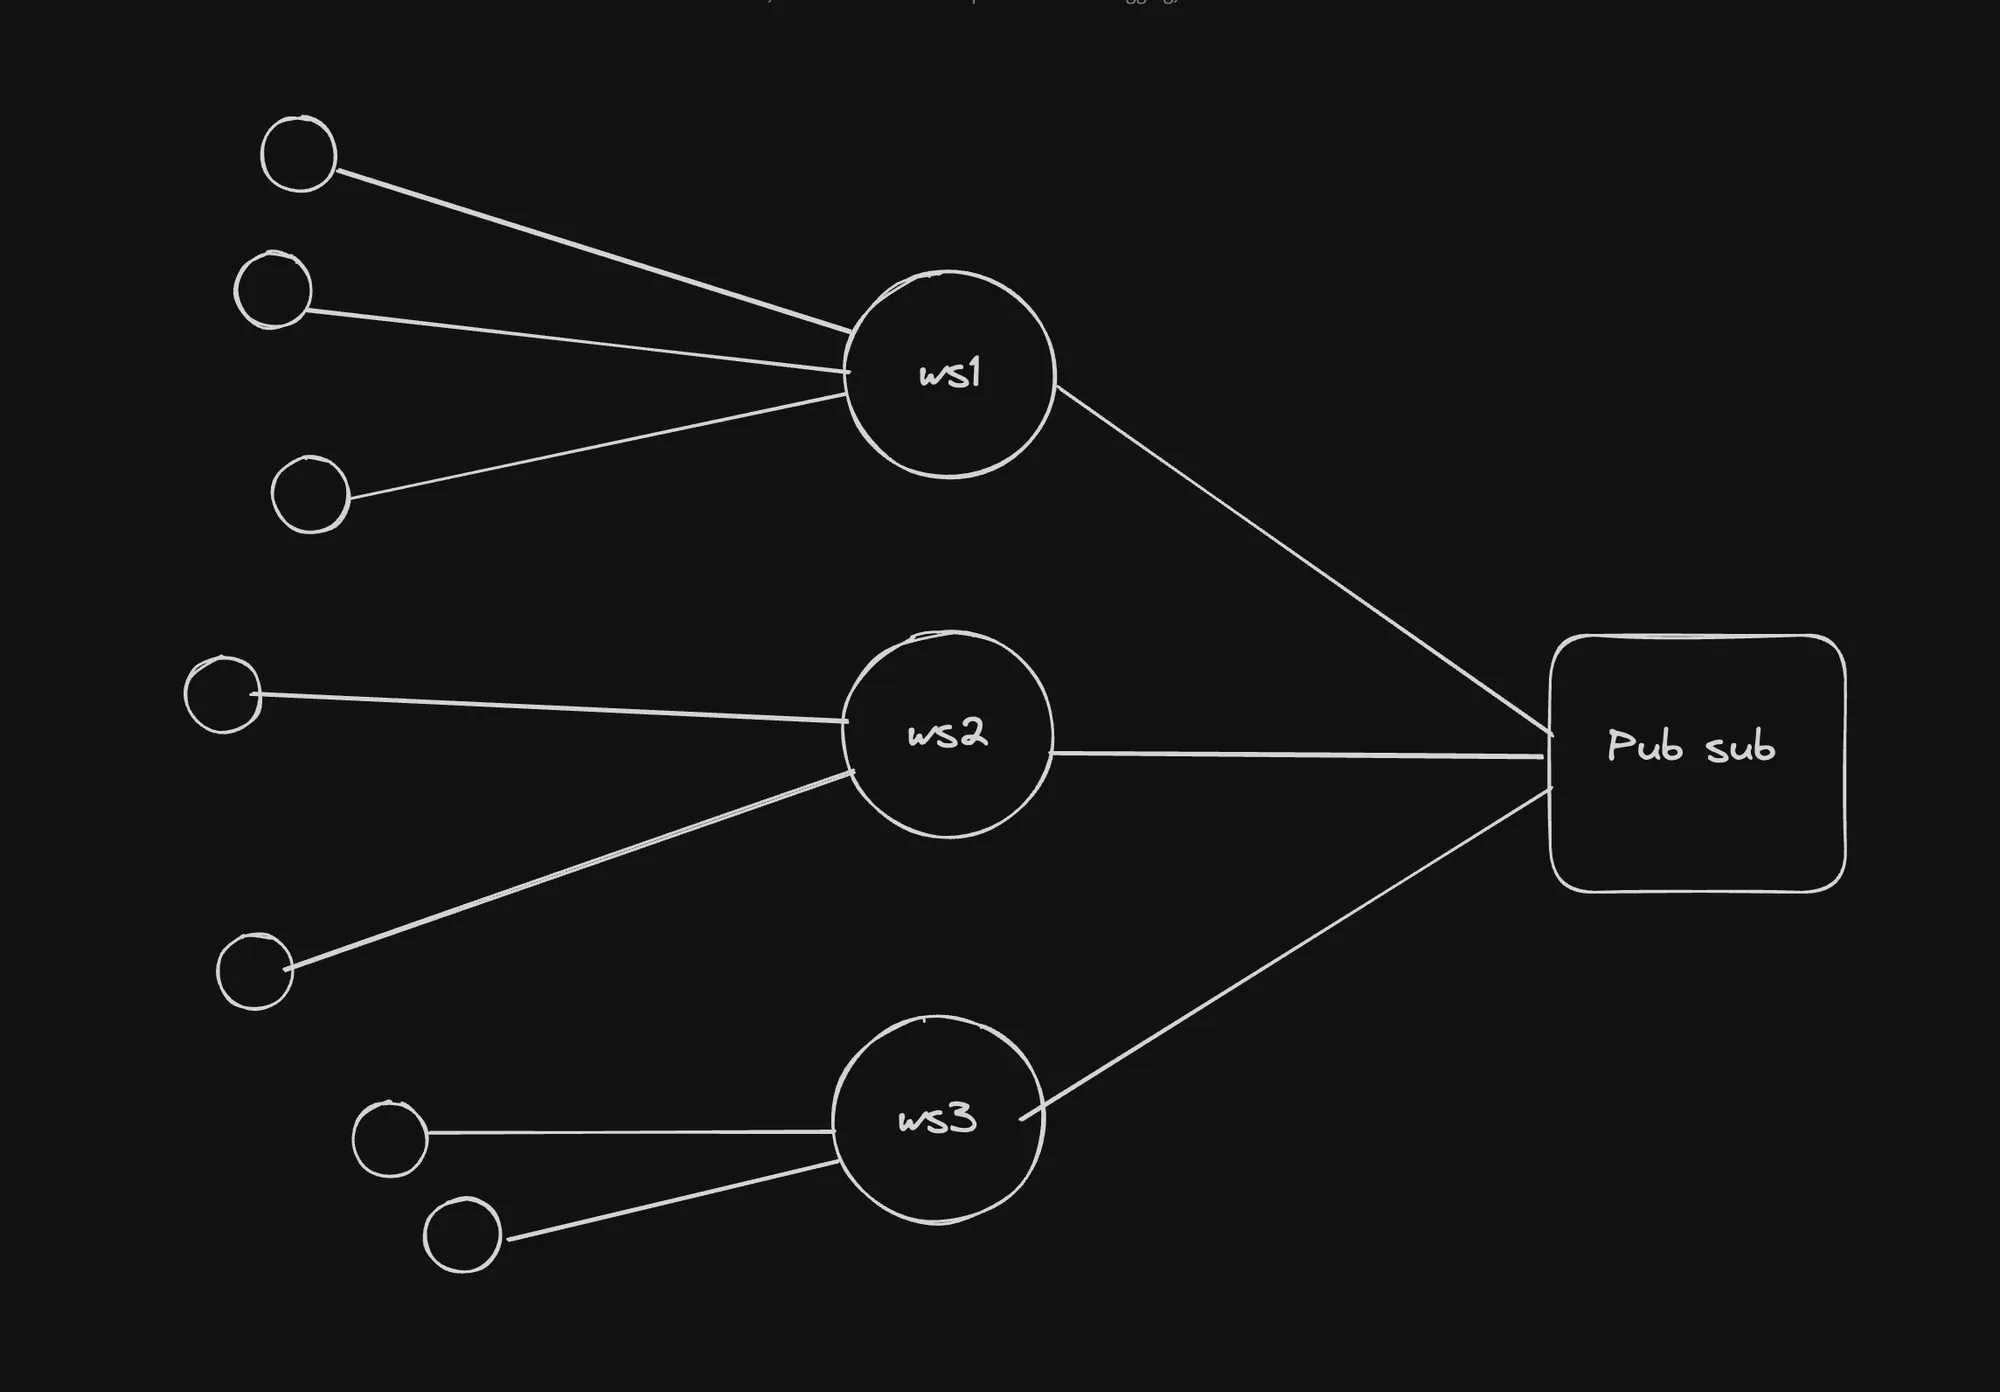
The architecture diagram above, illustrates a pub/sub system for scaling WebSocket servers. Let’s break it down:
- WebSocket Servers (ws1, ws2, ws3): These represent the individual WebSocket server instances that make up the WebSocket server fleet.
- Pub Sub Component: This central component acts as the pub/sub messaging system or message broker. It facilitates the communication and message routing between the WebSocket servers.
- Communication Flow:
- WebSocket servers (ws1, ws2, ws3) establish connections with the Pub Sub component, typically using WebSockets or another real-time communication protocol.
- When a client connects to any of the WebSocket servers, the server subscribes to a specific topic or channel on the Pub Sub component.
- When a message needs to be broadcasted to all connected clients, one of the WebSocket servers publishes the message to the corresponding topic on the Pub Sub component.
- The Pub Sub component then distributes the message to all WebSocket servers that have subscribed to that topic.
- Each WebSocket server, in turn, relays the message to the clients connected to it.
This architecture allows for horizontal scaling by adding or removing WebSocket server instances as needed. The Pub Sub component acts as a central point of communication, ensuring that messages are efficiently distributed to all connected clients, regardless of which WebSocket server they are connected to.
By keeping the WebSocket servers stateless, client connections can be easily redistributed across the fleet without the need for complex state management. The Pub Sub component handles the message routing and distribution, allowing the WebSocket servers to focus solely on handling client connections and real-time communication.
In summary, scaling WebSocket servers involves creating a fleet or cluster of multiple WebSocket server instances, with a central pub/sub messaging system orchestrating the communication and message routing between them. This architecture promotes scalability, load distribution, and efficient real-time communication for applications with high traffic or demanding real-time requirements.