Week 14.3 Prisma in Next js
In this offline lecture, Harkirat expands on the previous Next.js lectures by introducing database interactions using Prisma ORM, implementing better fetching techniques, creating a singleton Prisma client instance, and exploring Server Actions for executing server-side code directly from components.
In the last lecture, we covered the basics of building a Next.js application with server-side rendering, API routes, and client-side interactivity. We explored how to fetch data from an API and render it on the server-side, as well as how to create API routes within our Next.js application to handle backend logic. Well, In this lecture, we will dive deeper into more advanced topics related to building a full-stack application with Next.js.Specifically, we will explore the following:
What will we cover
- Databases: We will learn how to integrate a database with our Next.js application, allowing us to store and retrieve data persistently.
- Better Fetching Techniques: While we have used basic fetching techniques in this lecture, we will explore more robust and efficient ways to fetch data from APIs, including optimizations and caching strategies.
- Singleton Prisma Client: We will introduce Prisma, a popular Object-Relational Mapping (ORM) tool, and learn how to create a singleton instance of the Prisma client for efficient database access.
- Server Section: We will dive into the server-side capabilities of Next.js, including server-side rendering, server components, and server-side data fetching techniques.
Databases
Next.js is a full-stack framework that allows you to build both the frontend and backend components of your application within a single codebase. While Next.js provides built-in support for server-side rendering (SSR) and API routes, it doesn’t include a database solution out of the box. This is where third-party tools like Prisma come into play.
- Install Prisma
First, we need to install the Prisma package in our Next.js project:
npm install prisma- Initialize Prisma Schema
Next, we need to initialize the Prisma schema, which defines the structure of our database:
npx prisma initThis command will create a new directory called prisma with a schema.prisma file inside it.
- Define the User Model
Open the schema.prisma file and define a simple User model:
model User { id Int @id @default(autoincrement()) username String @unique password String}This model defines a User table with three fields: id (auto-incrementing primary key), username (unique string), and password (string).
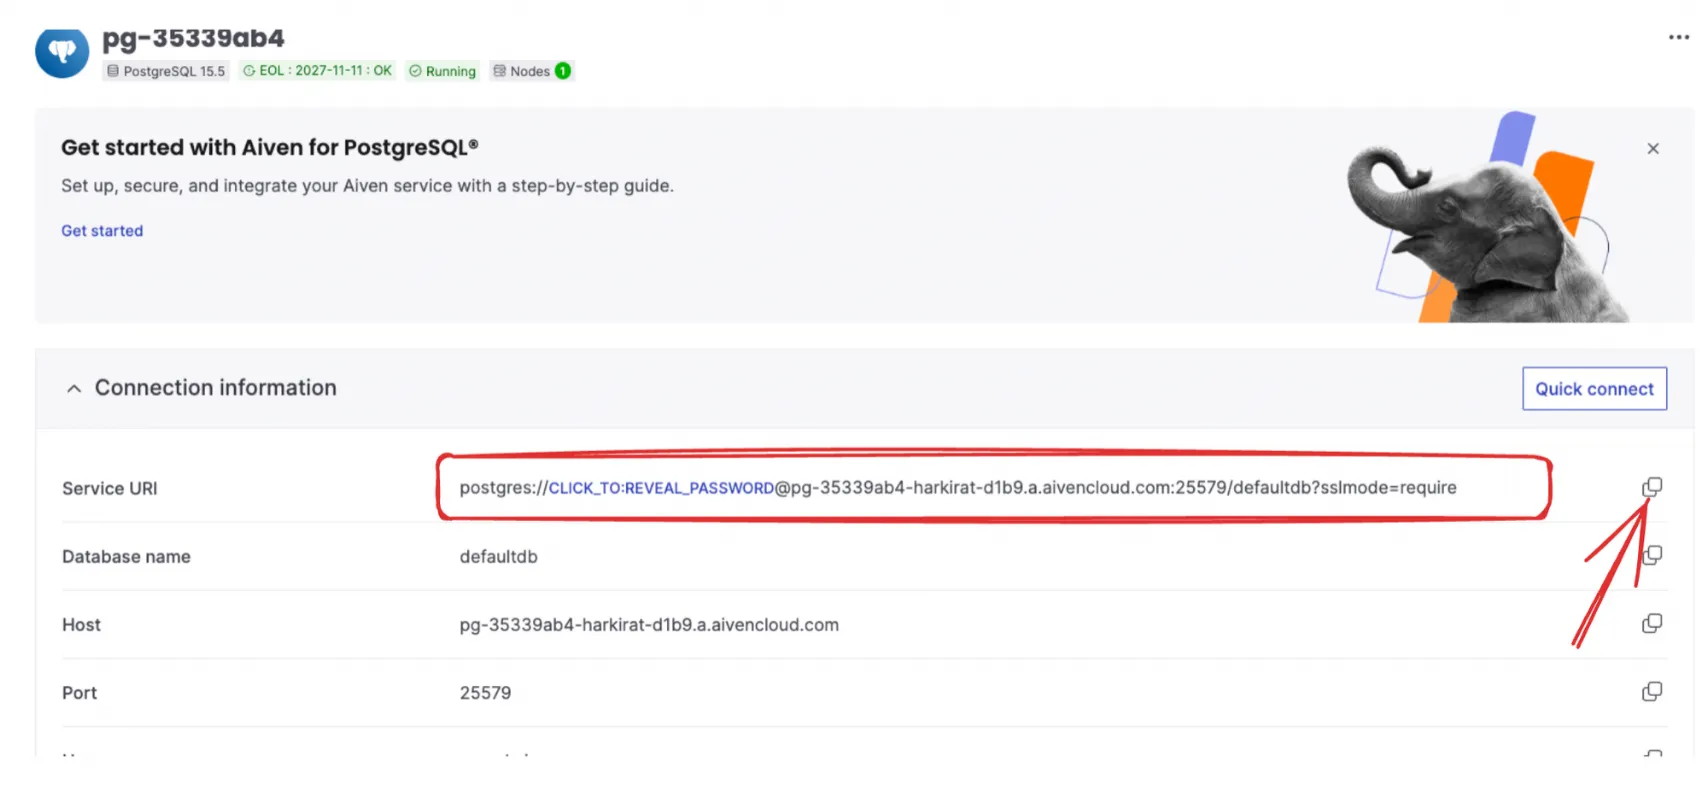
For starting a PostgreSQL instance, you can check out PlanetScale, Neon.tech, and Aiven, which are managed database providers that offer PostgreSQL as a service.
- Configure the Database Connection
Replace the DATABASE_URL value in the .env file with your PostgreSQL database connection URL:
DATABASE_URL="postgresql://johndoe:randompassword@localhost:5432/mydb?schema=public"Make sure to replace the placeholders with your actual database credentials.
- Migrate the Database
Run the following command to create the initial migration and apply it to your database:
npx prisma migrate dev --name init_schemaThis command will create a new migration file and apply the changes to your database.
- Generate the Prisma Client
Next, we need to generate the Prisma client, which provides an interface to interact with our database:
npx prisma generateThis command will generate the Prisma client based on the defined models in the schema.prisma file.
- Update the Sign Up Route
Now, let’s update the sign-up route in app/api/user/route.ts to store user data in the database:
import { NextRequest, NextResponse } from 'next/server';import { prisma } from '@/lib/prisma'; // Import the Prisma client
export async function POST(req: NextRequest) {  const body = await req.json();  // Add validation logic here (e.g., using Zod)
  const user = await prisma.user.create({    data: {      username: body.username,      password: body.password,    },  });
  console.log(user.id);
  return NextResponse.json({ message: 'Signed up' });}
In this updated code, we import the Prisma client and use the prisma.user.create method to create a new user in the database with the provided username and password.
- Update the GET Endpoint
We can also update the GET endpoint to retrieve user data from the database:
import { NextResponse } from 'next/server';import { prisma } from '@/lib/prisma';
export async function GET() {  const user = await prisma.user.findFirst({});  return NextResponse.json({ name: user?.username, email: user?.username });}
In this example, we use the prisma.user.findFirst method to retrieve the first user from the database and return their username as both the name and email properties.
Better Fetches
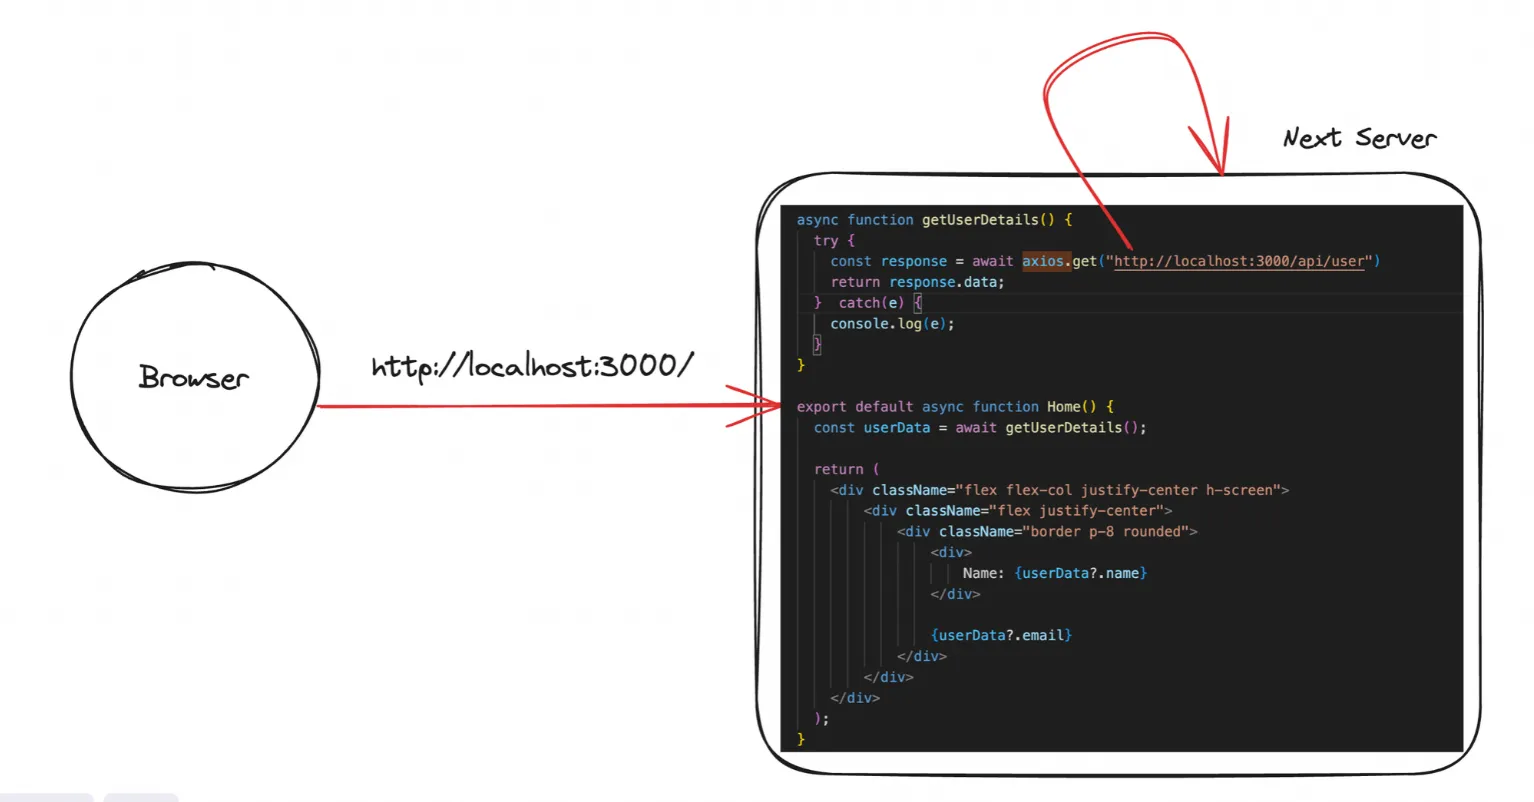
In the previous implementation, we were fetching user details by making an HTTP request to our API route (/api/user). While this approach works, it introduces an unnecessary network round-trip, as we’re sending a request from the server back to the server itself.
A better solution is to directly interact with the database from our server component, eliminating the need for an API route and reducing the overhead of making an HTTP request.
Here’s how we can implement this better solution:
- Import the Prisma Client
First, we need to import the Prisma client from the @prisma/client package:
import { PrismaClient } from "@prisma/client";- Create a Prisma Client Instance
Next, we create a new instance of the Prisma client:
const client = new PrismaClient();- Update the
getUserDetailsFunction
Now, we can update the getUserDetails function to directly interact with the database using the Prisma client:
async function getUserDetails() { try { const user = await client.user.findFirst({}); return { name: user?.username, email: user?.username, }; } catch (e) { console.log(e); }}In this updated function, we use the client.user.findFirst method to retrieve the first user from the database. We then return an object containing the name and email properties, which are derived from the username field of the retrieved user.
- Keep the
HomeComponent Unchanged
The Home component remains unchanged, as it still receives the user data from the getUserDetails function:
export default async function Home() {  const userData = await getUserDetails();
  return (    <div className="flex flex-col justify-center h-screen">      <div className="flex justify-center">        <div className="border p-8 rounded">          <div>Name: {userData?.name}</div>          {userData?.email}        </div>      </div>    </div>  );}
By directly interacting with the database from our server component, we eliminate the need for an API route and the overhead of making an HTTP request. This approach is more efficient and reduces the overall complexity of our application.
Singleton Prisma Client
Why a Singleton Prisma Client?
In a Next.js development environment, the next dev command clears the Node.js cache on each run. This behavior can lead to the creation of multiple instances of the Prisma client due to hot reloading, which can quickly exhaust the database connections, as each Prisma client instance holds its own connection pool.
To avoid this issue, it’s recommended to create a singleton instance of the Prisma client, ensuring that only one instance is created and reused throughout the application’s lifecycle.
Creating the Singleton Prisma Client
- Create a
db/index.tsfile
First, create a new file called index.ts inside a db directory at the root of your project.
- Import the Prisma Client
Import the PrismaClient from the @prisma/client package:
import { PrismaClient } from '@prisma/client';- Define a function to create the Prisma Client instance
Define a function prismaClientSingleton that creates a new instance of the Prisma client:
const prismaClientSingleton = () => { return new PrismaClient();};- Declare a global variable for the Prisma client
Declare a global variable prisma that will hold the singleton instance of the Prisma client:
declare global { var prisma: undefined | ReturnType<typeof prismaClientSingleton>;}- Create the singleton instance
Create the singleton instance by checking if the prisma global variable is already defined. If not, call the prismaClientSingleton function to create a new instance:
const prisma = globalThis.prisma ?? prismaClientSingleton();- Assign the instance to the global variable (development only)
In the development environment, assign the created instance to the prisma global variable to ensure it’s reused across hot reloads:
if (process.env.NODE_ENV !== 'production') globalThis.prisma = prisma;- Export the singleton instance
Finally, export the prisma instance as the default export:
export default prisma;Here’s the complete db/index.ts file:
import { PrismaClient } from '@prisma/client';
const prismaClientSingleton = () => {  return new PrismaClient();};
declare global {  var prisma: undefined | ReturnType<typeof prismaClientSingleton>;}
const prisma = globalThis.prisma ?? prismaClientSingleton();
export default prisma;
if (process.env.NODE_ENV !== 'production') globalThis.prisma = prisma;
Updating Prisma Client Imports
After creating the singleton instance, you need to update all imports of the Prisma client throughout your application to use the singleton instance from the db/index.ts file:
import client from '@/db';By following this approach, you ensure that only a single instance of the Prisma client is created and reused throughout your Next.js application, preventing the exhaustion of database connections and improving overall performance and stability.
Server Actions
Server Actions are a powerful feature introduced in Next.js 13 that allow you to execute server-side code directly from your components, without the need for creating dedicated API routes. This can simplify your codebase and improve developer experience by providing a more intuitive way to handle data mutations and form submissions.
Here’s how you can implement Server Actions in your Next.js application:
- Create an Actions File
First, create a new file called actions/user.ts (or any other appropriate name and location) to define your Server Actions.
"use server"; // This directive marks the file as containing Server Actions
import client from "@/db";
export async function signup(username: string, password: string) {  // You can add validation logic here (e.g., using Zod)  const user = await client.user.create({    data: {      username,      password,    },  });
  console.log(user.id);
  return "Signed up!";}
In this example, we define a signup function that takes username and password as input, creates a new user in the database using the Prisma client, and returns a success message.
- Update the Sign Up Component
Next, update your Signup component to use the signup Server Action instead of making an API request.
"use client"; // Mark this component as a client component
import { signup } from "@/actions/user";import { useRouter } from "next/router";import { ChangeEventHandler, useState } from "react";
export function Signup() {  const [username, setUsername] = useState("");  const [password, setPassword] = useState("");  const router = useRouter();
  return (    <div className="h-screen flex justify-center flex-col">      {/* ... */}      <button        onClick={async () => {          const response = await signup(username, password);          localStorage.setItem("token", response);          router.push("/");        }}        type="button"        className="mt-8 w-full text-white bg-gray-800 focus:ring-4 focus:ring-gray-300 font-medium rounded-lg text-sm px-5 py-2.5 me-2 mb-2"      >        Sign up      </button>    </div>  );}
In this updated component, we import the signup Server Action and call it when the user clicks the “Sign up” button. The response from the Server Action is stored in localStorage as a token, and the user is redirected to the home page (/).
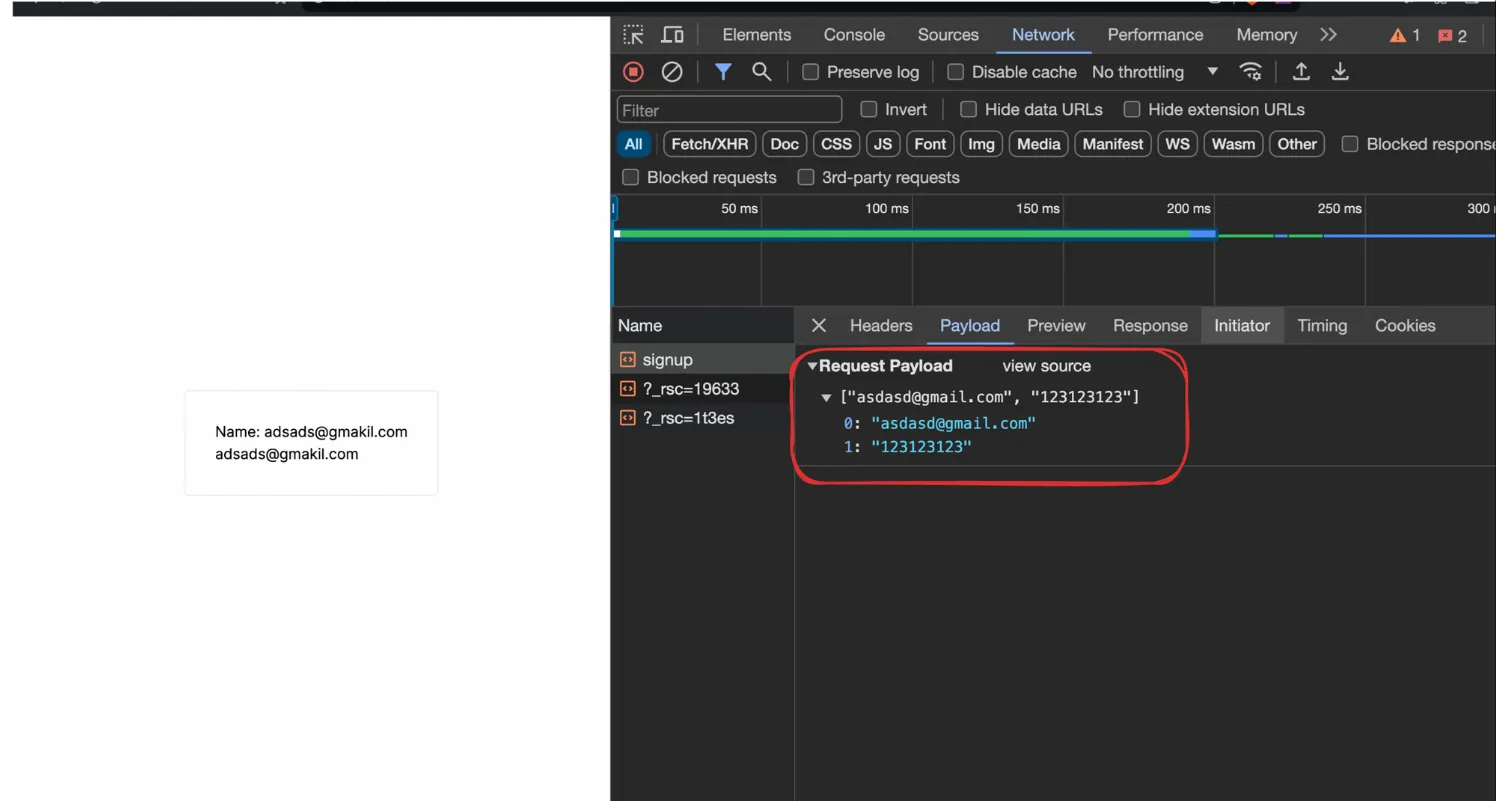
- Check the Network Tab
When you run your application and sign up with a new username and password, you should see the user’s ID logged in the console, and the network tab should not show any API requests. Instead, the Server Action is executed on the server, and the response is returned directly to the client component.
Benefits of Server Actions
Using Server Actions in your Next.js application provides several benefits:
- Single Function for Client and Server Components: Server Actions can be used in both client and server components, reducing code duplication and improving consistency.
- Typed Responses: Server Actions provide typed responses on the frontend, similar to tools like tRPC, improving type safety and developer experience.
- Seamless Form Integration: Server Actions can be seamlessly integrated with forms, simplifying the process of handling form submissions and data mutations.
- Improved Security: Server Actions execute on the server, reducing the risk of client-side vulnerabilities and providing better security for sensitive operations.
- Simplified Development: By eliminating the need for dedicated API routes, Server Actions can simplify your codebase and improve developer productivity.
However, it’s important to note that Server Actions still rely on HTTP requests under the hood, but they provide a more intuitive and streamlined developer experience by abstracting away the complexities of creating and managing API routes.