Week 4.1 Introduction to DOM
In this lecture, Harkirat lays a solid foundation for the upcoming Frontend Lectures, covering crucial topics such as ECMA script, DOM manipulation, methods for backend interaction, and the importance of debouncing. This session serves as a foundation for a deeper understanding of front-end development principles.
ECMA Scripts
ECMAScript, often abbreviated as ES, is a scripting language specification that serves as the standard upon which JavaScript is based. Basically, consider them as a set of rules and guidelines that make sure JavaScript behaves in a certain way. It’s like a manual that tells developers what features JavaScript should have and how it should work.
Auxiliary APIs
Auxiliary APIs, in the context of web development, refer to additional interfaces and functionalities provided by browsers or runtime environments beyond the core JavaScript language (as specified by ECMAScript). These APIs extend the capabilities of JavaScript, enabling developers to interact with various aspects of the browser environment or perform tasks that go beyond the language’s basic features.
Here are some examples:
- Node.js APIs:
- In the context of server-side JavaScript using Node.js, there are APIs specific to Node.js that provide access to the file system, networking, and other server-related functionalities.
// Example using the Node.js fs module for file system operationsconst fs = require('fs');fs.readFile('file.txt', 'utf8', (err, data) => { if (err) { console.error(err); return; } console.log(data);});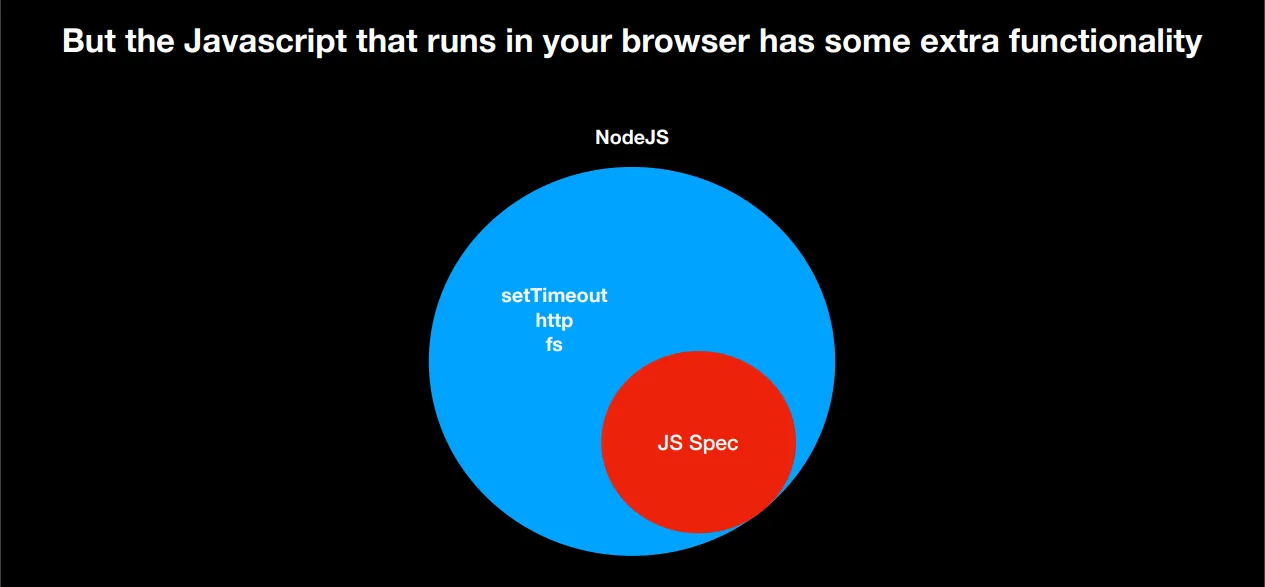
- Third-Party APIs:
- APIs provided by external services or libraries that developers can use to enhance their applications. Examples include Google Maps API, Twitter API, or any other API that allows integration with external services.
// Example using the Google Maps APIconst map = new google.maps.Map(document.getElementById('map'), { center: { lat: -34.397, lng: 150.644 }, zoom: 8});- Web APIs:
- These are browser-specific APIs that provide additional functionality to JavaScript for interacting with the browser environment. Examples include the DOM (Document Object Model), Fetch API for making network requests, and the Web Storage API for local storage.
// Example using the Fetch APIfetch('<https://api.example.com/data>').then(response => response.json()).then(data => console.log(data)).catch(error => console.error('Error:', error));
These APIs are not part of the JavaScript language specification (ECMAScript) but are essential for building web applications, interacting with external services, and handling server-side operations. They extend the capabilities of JavaScript in specific environments.
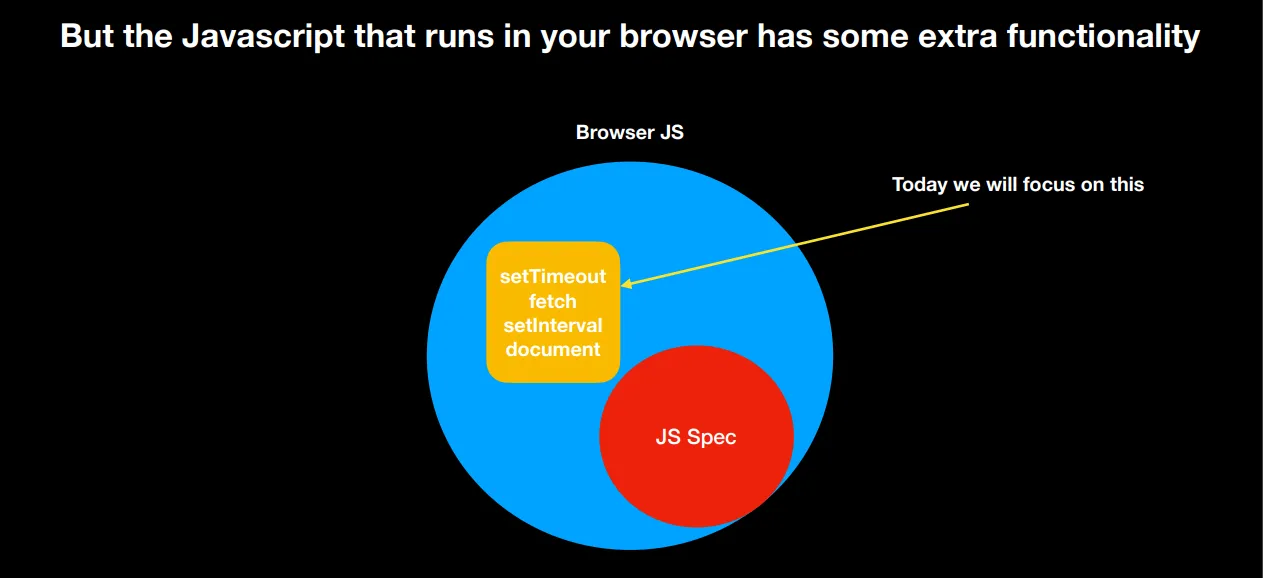
Further, in these topics of interest, we have already covered seTimeout, fetch and setInterval. Thus, our major focus today will be on understanding the Document.
Understanding Document
In JavaScript, the Document refers to the root object of the DOM.
The DOM (Document Object Model) API is a programming interface for web documents. It represents the page so that programs can change the document structure, style, and content. The DOM represents the document as a tree of objects; each object represents a part of the page.
The document object provides an entry point to the DOM, and it represents the entire HTML or XML document. Developers can use methods and properties provided by the document object to interact with and manipulate the content of a web page dynamically.
Manipulating HTML with JS
The DOM (Document Object Model) allows JavaScript to manipulate the HTML of a web page.
Imagine the DOM as a tree-like structure that represents your HTML document. Each element in your HTML, like buttons, paragraphs, and images, is a part of this tree. JavaScript can interact with this tree, changing, adding, or removing elements. It’s like giving JavaScript the power to update what you see on a webpage.
Code Example: Let’s create a simple button that, when clicked, changes the content of a paragraph:
<!DOCTYPE html><html lang="en"><head>  <meta charset="UTF-8">  <meta name="viewport" content="width=device-width, initial-scale=1.0">  <title>DOM Magic</title></head><body>
  <!-- Our HTML with a button and an empty paragraph -->  <button id="simpleButton">Click me!</button>  <p id="output"></p>
  <!-- Our JavaScript -->  <script>    // Get the button and the paragraph by their IDs    const simpleButton = document.getElementById('simpleButton');    const outputParagraph = document.getElementById('output');
    // Add a click event listener to the button    simpleButton.addEventListener('click', function() {      // Change the content of the paragraph when the button is clicked      outputParagraph.textContent = 'Awesome! You clicked the button!';    });  </script>
</body></html>
In this example:
- We have an HTML file with a button (
simpleButton) and an empty paragraph (output). - JavaScript code at the bottom gets references to these elements using
document.getElementById. - An event listener is added to the button. When clicked, the event listener function is triggered.
- Inside the function, we use
textContentto change the content of the paragraph, making something appear on the page.
When you open this HTML file in a browser, clicking the button will make the paragraph magically display a message. This showcases how the DOM allows JavaScript to interact with and modify the content of a web page dynamically.
Understanding Rendering Via DOM
Let’s create a simple HTML page with two input fields, a button, and JavaScript code to calculate the sum and render it when the button is clicked.
<!DOCTYPE html><html lang="en"><head>  <meta charset="UTF-8">  <meta name="viewport" content="width=device-width, initial-scale=1.0">  <title>Simple Calculator</title></head><body>
  <!-- Our HTML with two input fields, a button, and an empty paragraph -->  <label for="num1">Number 1:</label>  <input type="number" id="num1" placeholder="Enter a number">
  <label for="num2">Number 2:</label>  <input type="number" id="num2" placeholder="Enter another number">
  <button id="calculateButton">Calculate Sum</button>  <p id="sumResult"></p>
  <!-- Our JavaScript to perform the calculation -->  <script>    // Get input fields, button, and result paragraph by their IDs    const num1Input = document.getElementById('num1');    const num2Input = document.getElementById('num2');    const calculateButton = document.getElementById('calculateButton');    const sumResultParagraph = document.getElementById('sumResult');
    // Add a click event listener to the button    calculateButton.addEventListener('click', function() {      // Get the values from input fields and calculate the sum      const num1 = parseFloat(num1Input.value) || 0; // Convert to number or default to 0      const num2 = parseFloat(num2Input.value) || 0; // Convert to number or default to 0      const sum = num1 + num2;
      // Display the result in the paragraph      sumResultParagraph.textContent = `Sum: ${sum}`;    });  </script>
</body></html>
Explanation:
- We have two input fields (
num1andnum2), a button (calculateButton), and an empty paragraph (sumResult) in our HTML. - JavaScript code at the bottom gets references to these elements using
document.getElementById. - An event listener is added to the button. When clicked, the event listener function is triggered.
- Inside the function, it retrieves the values from the input fields, calculates the sum, and displays the result in the paragraph.
Now, when you enter numbers into the input fields and click the “Calculate Sum” button, it will compute the sum and display the result on the page.
Classes vs IDs
Classes:
- Definition: Used to group multiple HTML elements together.
- Syntax (HTML):
<element class="class-name">Content</element> - Syntax (CSS):
.class-name { /* styles */ } - Usage: Can be shared by multiple elements; an element can have multiple classes.
IDs:
- Definition: Used to uniquely identify a specific HTML element.
- Syntax (HTML):
<element id="unique-id">Content</element> - Syntax (CSS):
#unique-id { /* styles */ } - Usage: Must be unique within a page; often used for styling or JavaScript interaction.
Differences:
- Uniqueness:
- Classes can be shared; IDs must be unique within a page.
- Application:
- Classes are for styling multiple elements.
- IDs are for styling a specific element or targeting with JavaScript.
In short, classes group elements, allowing shared styles, while IDs uniquely identify elements, often for specific styling or JavaScript interactions.
Methods to Select Elements
1. querySelector():
-
Definition:
querySelector()is a method that selects the first element that matches a specified CSS selector. -
Syntax:
document.querySelector('selector') -
Example:
<div id="example">This is an example.</div><script>const element = document.querySelector('#example');element.style.color = 'blue';</script>- In this example,
querySelector('#example')selects the element with the ID “example,” and the text color is changed to blue.
- In this example,
2. getElementById():
-
Definition:
getElementById()is a method that selects a single element by its ID attribute. -
Syntax:
document.getElementById('id') -
Example:
<div id="example">This is an example.</div><script>const element = document.getElementById('example');element.style.color = 'red';</script>- In this example,
getElementById('example')selects the element with the ID “example,” and the text color is changed to red.
- In this example,
3. getElementsByClassName():
-
Definition:
getElementsByClassName()is a method that selects all elements with a specific class name. -
Syntax:
document.getElementsByClassName('class') -
Example:
<p class="highlight">This is a highlighted paragraph.</p><p class="highlight">Another highlighted paragraph.</p><script>const elements = document.getElementsByClassName('highlight');for (const element of elements) {element.style.fontWeight = 'bold';}</script>- In this example,
getElementsByClassName('highlight')selects all elements with the class “highlight,” and their font weight is changed to bold.
- In this example,
Relationship:
- All three methods are used to select and manipulate HTML elements.
getElementById()is specifically for selecting by ID.getElementsByClassName()selects by class name, but it returns a collection of elements.querySelector()is more flexible as it can select by any valid CSS selector and returns the first matching element.
Example Using All Three:
<div id="example">This is an example.</div><p class="highlight">This is a highlighted paragraph.</p>
<script>  // Using getElementById  const elementById = document.getElementById('example');  elementById.style.color = 'blue';
  // Using getElementsByClassName  const elementsByClass = document.getElementsByClassName('highlight');  for (const element of elementsByClass) {    element.style.fontWeight = 'bold';  }
  // Using querySelector  const elementByQuery = document.querySelector('.highlight');  elementByQuery.style.backgroundColor = 'yellow';</script>
In this example, all three methods are used to select elements by ID, class name, and a general CSS selector, respectively. Each selected element is then styled accordingly.
Communicating to the Backend Server
Let’s try to understand the process of connecting the frontend and backend through a small example. In this scenario, the backend is already hosted on the internet. This implies that in the frontend, we only need to make an API call to the provided link to interact with the backend.
<html>  <script>    function populateDiv() {      // Retrieve values from input fields      const a = document.getElementById("firstNumber").value;      const b = document.getElementById("secondNumber").value;
      // Make a fetch API call to the backend      fetch("<https://sum-server.100xdevs.com/sum?a=>" + a + "&b=" + b)        .then(function(response) {          // Parse the response as text          response.text()            .then(function(ans) {              // Display the result in the "finalSum" div              document.getElementById("finalSum").innerHTML = ans;            });        });    }
      // Async function for populating the "finalSum" div        async function populateDiv2() {          // Retrieve values from input fields          const a = document.getElementById("firstNumber").value;          const b = document.getElementById("secondNumber").value;
          // Make a fetch API call to the backend using async/await          const response = await fetch("https://sum-server.100xdevs.com/sum?a=" + a + "&b=" + b);          const ans = await response.text();
          // Display the result in the "finalSum" div          document.getElementById("finalSum").innerHTML = ans;        }
  </script>  <body>    <!-- Input fields for numbers -->    <input id="firstNumber" type="text" placeholder="First number"></input> <br></br>    <input id="secondNumber" type="text" placeholder="Second number"></input> <br></br>
    <!-- Button to trigger the calculation -->    <button onclick="populateDiv()">Calculate sum</button> <br></br>
    <!-- Display area for the final sum -->    <div id="finalSum"></div>  </body></html>
Explanation:
- Input Fields: Two input fields (
firstNumberandsecondNumber) are provided for users to enter numeric values. - Button: The “Calculate sum” button is associated with the
populateDiv()function, which will be triggered when the button is clicked. - JavaScript Function (
populateDiv):- Retrieves the values entered by the user from the input fields.
- Uses the
fetchAPI to make a GET request to the specified backend server (https://sum-server.100xdevs.com/sum) with the provided parametersaandb. - Processes the response:
- Converts the response to text.
- Updates the content of the
finalSumdiv with the calculated sum.
- Display Area: The result is displayed in the
finalSumdiv. - Async Function (
populateDiv2):
- The
asynckeyword is added before the function declaration, indicating that the function will handle asynchronous operations usingawait. awaitis used with thefetchcall, allowing the code to pause and wait for the promise to resolve before moving on to the next line of code.- The response is obtained from the fetch call using
await, and then the response text is retrieved similarly.
By using
async/await, the code becomes more concise and easier to read, making it a preferable alternative for handling promises. BothpopulateDiv()andpopulateDiv2()perform the same functionality, but the latter takes advantage of modern JavaScript syntax for better code organization.
The onInput() Function
The onInput function is an event handler in JavaScript that gets executed when the value of an input field is changed by the user. This event is triggered dynamically as the user types or modifies the content within the input field. The onInput event is commonly used to perform actions in real-time as the user interacts with the input element.
Understanding Debouncing
Debouncing is a programming practice used to ensure that time-consuming tasks do not fire so often, making them more efficient. In the context of onInput events, debouncing is often applied to delay the execution of certain actions (e.g., sending requests) until after a user has stopped typing for a specific duration.
Implementation:
The following example demonstrates debouncing in the onInput event to delay the execution of a function that sends a request based on user input.
<html>  <body>    <!-- Input field with onInput event and debouncing -->    <input id="textInput" type="text" onInput="debounce(handleInput, 500)" placeholder="Type something...">
    <!-- Display area for the debounced input value -->    <p id="displayText"></p>
    <script>      // Debounce function to delay the execution of a function      function debounce(func, delay) {        let timeoutId;
        return function() {          // Clear the previous timeout          clearTimeout(timeoutId);
          // Set a new timeout          timeoutId = setTimeout(() => {            func.apply(this, arguments);          }, delay);        };      }
      // Function to handle the debounced onInput event      function handleInput() {        // Get the input field's value        const inputValue = document.getElementById("textInput").value;
        // Display the input value in the paragraph        document.getElementById("displayText").innerText = "You typed: " + inputValue;
        // Simulate sending a request (replace with actual AJAX call)        console.log("Request sent:", inputValue);      }    </script>  </body></html>
Explanation:
- The
debouncefunction is a generic debounce implementation that takes a function (func) and a delay time (delay). - Inside the
debouncefunction, a timeout is set to delay the execution of the provided function (func) by the specified delay time (delay). - The
handleInputfunction is the actual function to be executed when theonInputevent occurs. It simulates sending a request (e.g., an AJAX call) based on user input.
How it works:
- When a user types in the input field, the
onInputevent triggers thedebouncefunction. - The
debouncefunction sets a timeout, and if the user continues typing within the specified delay time, the previous timeout is cleared, and a new one is set. - After the user stops typing for the specified delay, the
handleInputfunction is executed.
This ensures that the function associated with the
onInputevent is not called on every keystroke but rather after the user has stopped typing for a brief moment, reducing unnecessary and potentially resource-intensive calls, such as sending requests.
Throttling vs Rate Limiting
Throttling:
- Definition: Controls the rate at which a specific action is performed.
- Purpose: Ensures a smooth user experience, preventing rapid consecutive actions.
- Implementation: Limits the frequency of a particular function within a specified time frame.
Rate Limiting:
- Definition: Controls the number of requests a client can make within a specific time period.
- Purpose: Protects server resources, avoids abuse, and maintains fair usage.
- Implementation: Typically applied at the server/API level, limiting requests per second or minute.
Key Differences:
- Throttling focuses on action frequency; rate limiting focuses on request count.
- Throttling can be applied to various actions; rate limiting is often used at the API level.
- Throttling aims for a smooth user experience; rate limiting protects server resources and enforces fairness.