Week 16.2 Mono Repo Part 2
In this lecture, Harkirat covers adding new pages to apps/web, exploring turbo.json and caching in Turborepo, integrating a Node.js app, and creating a shared common module for frontend and backend apps within the monorepo.
Exploring apps/web
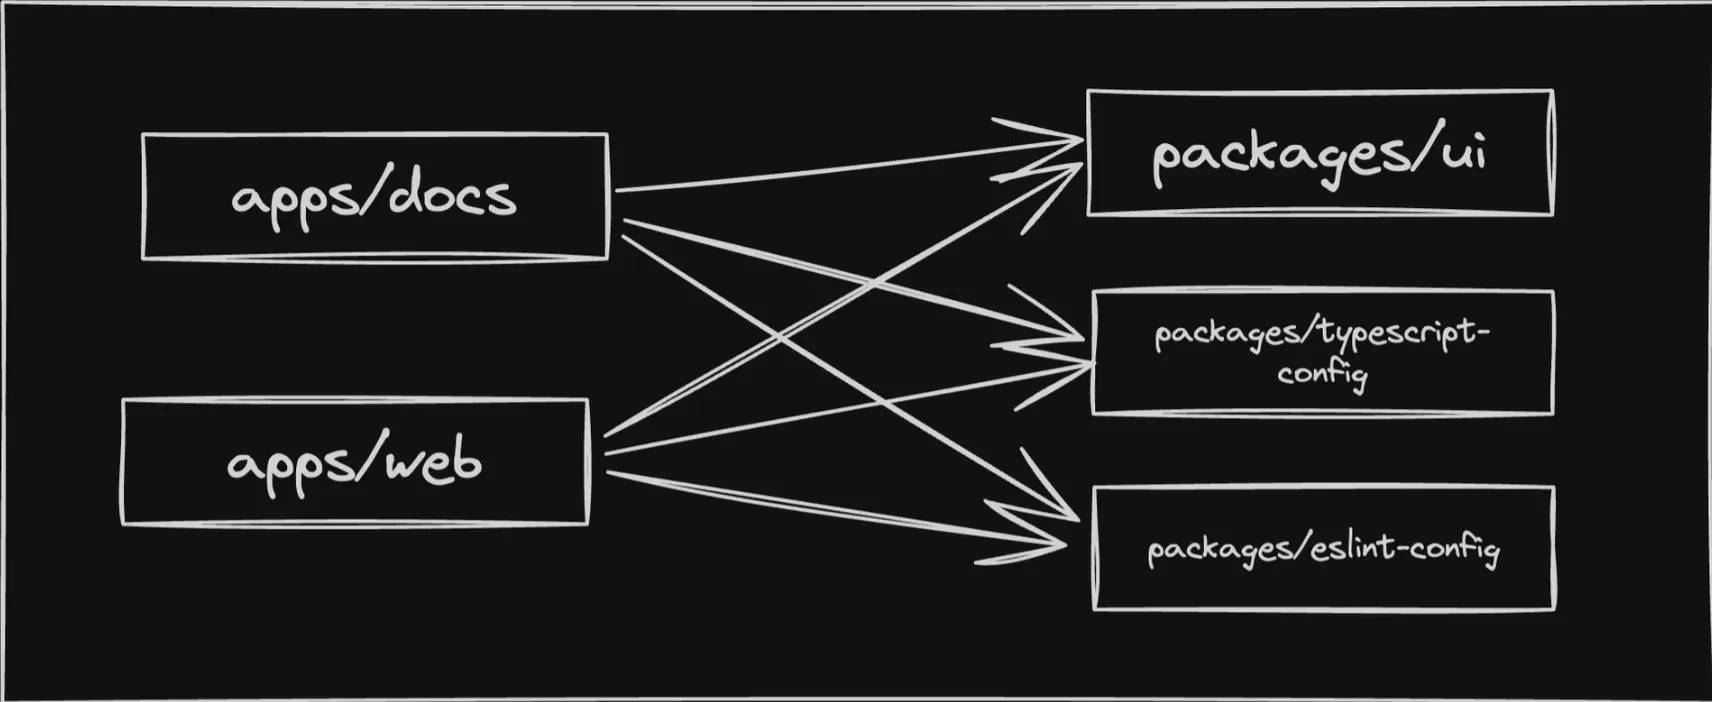
Sure, let’s explore the apps/web directory and understand how it utilizes components from the packages/ui module.
1] Dependencies
As mentioned, apps/web is a simple Next.js application. However, it leverages UI components from the packages/ui module, which is a shared UI library within the monorepo.
2] Exploring package.json
In the package.json file of the apps/web directory, you’ll notice that @repo/ui is listed as a dependency:
{ "dependencies": { "@repo/ui": "*", "next": "^14.1.1", "react": "^18.2.0", "react-dom": "^18.2.0" }}The "@repo/ui": "workspace:*" entry indicates that the apps/web application depends on the packages/ui package within the same monorepo workspace. This allows the apps/web application to import and use the UI components defined in the packages/ui module.
3] Exploring page.tsx
The page.tsx file is a Next.js page component that demonstrates the usage of the Button component from the packages/ui module.
Here’s an example of how the Button component might be imported and used in the page.tsx file:
import { Button } from '@repo/ui/button';import styles from "./page/module.css";
export default function HomePage() {  return (    <div>      <h1>Welcome to the Web App</h1>
      <Button appName="Web" className={styles.button}>        Click me      </Button>
    </div>  );}
In this example:
- The
Buttoncomponent is imported from@repo/ui/button, which corresponds to thepackages/ui/src/button.tsxfile defined in theexportsfield of thepackages/uipackage. - The
Buttoncomponent is used within theHomePagecomponent, passing in the required props:appName="Web": This prop is used to personalize the alert message displayed when the button is clicked.className={styles.button}: This prop applies imported styles to the button using Tailwind CSS classes.- The content
Click meis passed as thechildrenprop, which will be rendered inside the button.
By importing and using the Button component from the packages/ui module, the apps/web application can leverage the shared UI components without duplicating code or maintaining separate implementations.
Shared Components
The same Button component can be used by other applications within the monorepo, such as the apps/docs website. This promotes code reuse and consistency across different parts of the project.
For example, in the apps/docs application, the Button component can be imported and used in a similar manner:
import { Button } from '@repo/ui/button';
export default function DocsPage() {  return (    <div>      <h1>Documentation</h1>      <Button appName="Docs" className="bg-green-500 hover:bg-green-700 text-white font-bold py-2 px-4 rounded">        Read More      </Button>    </div>  );}
In this case, the Button component is imported from the same packages/ui module, but with different prop values (e.g., appName="Docs" and different styles).
Adding a New Page
1. Create a new component in packages/ui/src
First, we need to create a new file admin.tsx inside the packages/ui/src directory. This file will contain the implementation of the Admin component.
"use client";
export const Admin = () => {  return <h1>hi from admin component</h1>;};
In this example, we’re exporting a simple functional component called Admin that renders an <h1> element with the text “hi from admin component”.
2. Add the component to exports in packages/ui/package.json
Next, we need to add the Admin component to the exports field in the packages/ui/package.json file, so that it can be imported and used by other applications within the monorepo.
{ "exports": { "./button": "src/button.tsx", "./card": "src/card.tsx", "./code": "src/code.tsx", "./admin": "src/admin.tsx" }}By adding "./admin": "src/admin.tsx" to the exports field, we’re exposing the Admin component as part of the public API of the packages/ui module.
3. Create apps/web/app/admin/page.tsx
Now, we can create a new page in the apps/web application that will use the Admin component from the packages/ui module.
Create a new file apps/web/app/admin/page.tsx with the following content:
import { Admin } from "@repo/ui/admin";
export default function AdminPage() {  return (    <div>      <h1>Admin Page</h1>      <Admin />    </div>  );}
In this file, we’re importing the Admin component from @repo/ui/admin (which maps to the packages/ui/src/admin.tsx file) and using it within the AdminPage component.
4. Run the development server
To see the new page in action, you can run the development server by executing the following command in the root directory or the apps/web directory:
npm run devOnce the development server is running, you can visit http://localhost:3000/admin in your web browser to see the new AdminPage component, which includes the Admin component from the packages/ui module.
Using the packages/ui/turbo/generators
Turborepo provides a code generation feature that can automate the process of creating new components and files. You can use the npx gen react-component command to generate a new React component within the packages/ui module.
When you run npx gen react-component, Turborepo will prompt you for the component name and other details. It will then generate the necessary files and update the package.json file with the new component export.
By leveraging the code generation feature, you can streamline the process of creating new components and ensure consistency across the monorepo.
In summary, we’ve added a new page to the
apps/webNext.js website by creating a newAdmincomponent in thepackages/uimodule, exposing it through theexportsfield in thepackage.jsonfile, and using it within theAdminPagecomponent. Additionally, we’ve explored the code generation feature provided by Turborepo, which can further simplify the process of creating new components.
Exploring turbo.json
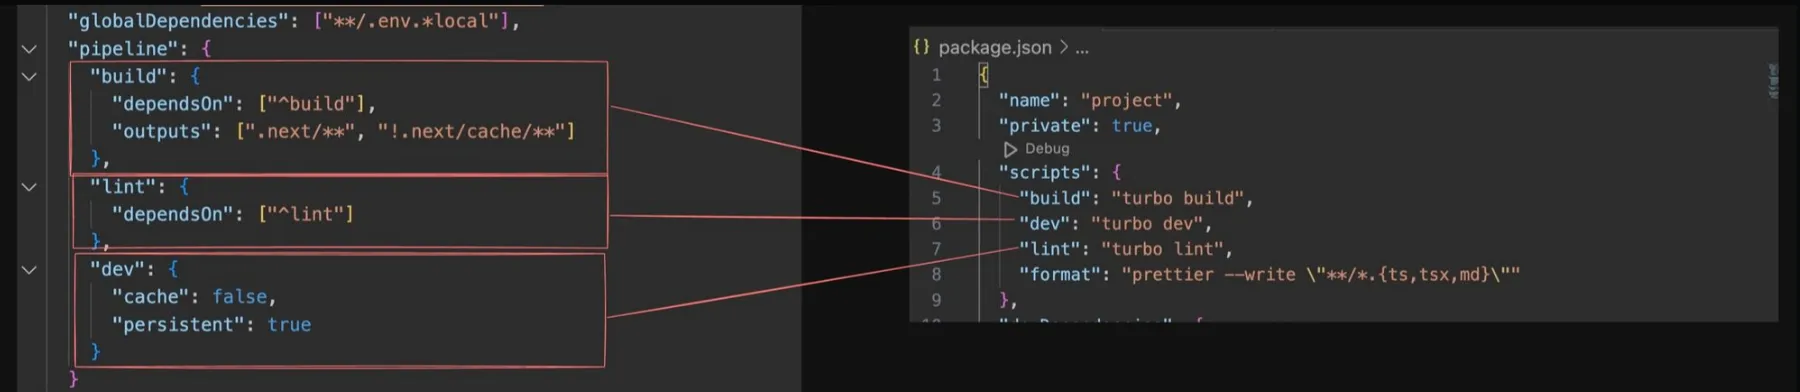
The turbo.json file is a configuration file used by Turborepo to define the build pipeline and task dependencies within a monorepo. It plays a crucial role in orchestrating the execution of tasks across different packages and applications.
Here’s an example of what a turbo.json file might look like:
{ "$schema": "<https://turborepo.org/schema.json>", "pipeline": { "build": { "dependsOn": ["^build"], "outputs": ["dist/**"] }, "test": { "dependsOn": ["build"], "outputs": [] }, "lint": { "dependsOn": ["^lint"] }, "dev": { "cache": false, "persistent": true } }}Let’s break down the different sections of this file:
- Schema Definition: The
"$schema"field specifies the URL of the JSON schema that defines the structure and properties of theturbo.jsonfile. This helps with validation and autocompletion in code editors. - Pipeline: The
"pipeline"object defines the tasks that Turborepo can execute and their dependencies."build": This task is responsible for building the packages and applications within the monorepo. The"dependsOn": ["^build"]property specifies that this task depends on thebuildtasks of its dependencies (denoted by the^prefix). The"outputs": ["dist/**"]property indicates that the outputs of this task will be stored in thedistdirectory and its subdirectories."test": This task is responsible for running tests. It"dependsOn"thebuildtask, meaning that the tests will be executed after the packages and applications have been built."lint": This task is responsible for linting the codebase. It"dependsOn"thelinttasks of its dependencies (denoted by^lint)."dev": This task is likely used for running the development server. The"cache": falseproperty tells Turborepo not to cache the outputs of this task, as it is a long-running process. The"persistent": trueproperty indicates that this task is a persistent, long-running process, and other tasks should not depend on it.
The turbo.json file allows you to define the tasks and their dependencies in a declarative way. Turborepo uses this information to optimize the execution of tasks, leveraging caching, parallelization, and dependency graph awareness.
For example, when you run turbo build, Turborepo will execute the build task for each package and application in the correct order, based on the defined dependencies. It will also cache the outputs of the build task, so that subsequent runs can reuse the cached outputs if the inputs haven’t changed, resulting in faster build times.
Similarly, when you run turbo test, Turborepo will first execute the build task (if necessary), and then run the test task for each package and application that depends on the build task.
Adding React Projects
1. Navigate to the apps folder
First, navigate to the apps folder within your Turborepo monorepo:
cd apps2. Create a fresh Vite app
We’ll use the create-vite command to create a new Vite-based React application:
npm create vite@latestFollow the prompts to specify the project name, package manager (e.g., npm or pnpm), and other options. Once the project is created, navigate into the project directory.
3. Update package.json to include @repo/ui as a dependency
Open the package.json file in the newly created Vite app and add @repo/ui as a dependency:
{ "dependencies": { "@repo/ui": "*" }}This will allow your Vite app to import and use components from the packages/ui module.
4. Run npm install in the root folder
Navigate back to the root folder of your Turborepo monorepo and run npm install to install the new dependencies:
cd ..npm install5. Run npm run dev
To start the development server for your Turborepo monorepo, including the new Vite app, run:
npm run devThis will start the development servers for all the applications and packages within your monorepo.
6. Import and use components from @repo/ui
In your Vite app, you can now import and use components from the packages/ui module. For example, in your App.jsx file, you can import and render the Button component:
import { Button } from '@repo/ui/button';
function App() {  return (    <div>      <h1>My Vite App</h1>      <Button appName="Vite">Click me</Button>    </div>  );}
export default App;
7. Add a turbo.json to the Vite app folder
To ensure that Turborepo correctly handles the build outputs for your Vite app, you can create a turbo.json file in the Vite app’s directory. This file will override the outputs object for this specific workspace.
Create a turbo.json file in your Vite app’s directory with the following content:
{ "extends": ["//"], "pipeline": { "build": { "outputs": ["dist/**"] } }}This configuration tells Turborepo to treat the dist directory and its subdirectories as the build outputs for your Vite app.
By following these steps, you’ve successfully added a new React project (Vite app) to your Turborepo monorepo and integrated it with the shared
packages/uimodule. You can now develop and build your Vite app alongside the other applications and packages within the monorepo, leveraging the shared UI components and benefiting from Turborepo’s caching and optimization features.
Caching in Turborepo
One of the key features that make Turborepo fast and efficient is its caching mechanism. Turborepo intelligently caches the outputs of tasks (such as build, test, and lint) across different builds, allowing it to skip redundant work and reuse cached results when the inputs haven’t changed.
Caching in Action
To observe caching in action, follow these steps:
- Navigate to the root directory of your Turborepo project.
- Run the
npm run buildcommand to build your project:
npm run buildThis command will execute the build task for all packages and applications within your monorepo, generating the necessary build artifacts.
- Run the
npm run buildcommand again:
npm run buildYou’ll notice that the second time you run the build command, it executes almost instantly. This is because Turborepo has cached the outputs of the build task from the previous run, and since the inputs (source files, dependencies, etc.) haven’t changed, it can reuse the cached results instead of rebuilding everything from scratch.
Exploring the Cache
Turborepo stores its cache artifacts in the node_modules/.cache/turbo directory within your project. You can explore this directory to see the cached files and their contents.
- Navigate to the
node_modules/.cache/turbodirectory:
cd node_modules/.cache/turbo- List the contents of the directory:
lsYou’ll see a list of files with names that look like hashes (e.g., 78awdk123.tar.zst). These are the cached artifacts for different tasks.
- To inspect the contents of a cached artifact, you can use the
tarcommand with theunzstdcompression program:
tar --use-compress-program=unzstd -xvf 78awdk123.tar.zstThis command will extract the contents of the 78awdk123.tar.zst file, allowing you to explore the cached outputs, including build artifacts and log files.
How Caching Works
Turborepo’s caching mechanism works by calculating a hash based on the inputs of a task (source files, dependencies, environment variables, etc.). When you run a task, Turborepo checks if a cached artifact with the same hash exists. If it does, Turborepo skips executing the task and instead replays the cached outputs, including logs and build artifacts.
If the inputs have changed since the last run, Turborepo will detect a cache miss and execute the task from scratch, generating new outputs and caching them for future use.
By leveraging caching, Turborepo can significantly reduce build times, especially in large monorepos with many packages and applications. It avoids redundant work and allows developers to iterate quickly, as only the parts of the codebase that have changed need to be rebuilt.
Clearing the Cache
If you ever need to clear Turborepo’s cache, you can simply delete the node_modules/.cache/turbo directory:
rm -rf node_modules/.cache/turboThis will force Turborepo to rebuild everything from scratch on the next run, as there will be no cached artifacts available.
Adding a Node.js App
1. Create the apps/backend directory
First, create a new directory for your Node.js app within the apps folder:
mkdir apps/backendcd apps/backend2. Initialize an empty TypeScript repository
Initialize a new npm package and set up TypeScript:
npm init -ynpx tsc --init3. Use the base TypeScript configuration
Replace the contents of the generated tsconfig.json file with the following configuration, which extends the base TypeScript configuration from the @repo/typescript-config package:
{ "extends": "@repo/typescript-config/base.json", "compilerOptions": { "lib": ["ES2015"], "module": "CommonJS", "outDir": "./dist" }, "exclude": ["node_modules"], "include": ["."]}4. Install dependencies
Install the required dependencies for your Node.js app, such as Express:
npm install express @types/express5. Create the src/index.ts file
Create a new file src/index.ts and add a basic Express server:
import express from "express";
const app = express();
app.get("/", (req, res) => {  res.json({    message: "hello world"  });});
6. Update the turbo.json file
In the apps/backend directory, create a turbo.json file to configure the build outputs for your Node.js app:
{ "extends": ["//"], "pipeline": { "build": { "outputs": ["dist/**"] } }}7. Install esbuild
Install the esbuild package, which will be used to build your Node.js app:
npm install esbuild8. Add the build script to package.json
In the apps/backend/package.json file, add a build script that uses esbuild to build your Node.js app:
{ "scripts": { "build": "esbuild src/index.ts --platform=node --bundle --outdir=dist" }}9. Build and run the Node.js app
You can now build and run your Node.js app using Turborepo:
# Build the appnpm run build
# Run the appnode dist/index.js
You should see the “hello world” message when you visit http://localhost:3000 in your web browser.
Integrating with Turborepo
To integrate your Node.js app with the rest of your Turborepo monorepo, you can update the root turbo.json file to include the apps/backend workspace:
{ "pipeline": { "build": { "dependsOn": ["^build"], "outputs": ["dist/**", ".next/**"] }, "dev": { "cache": false } }}Now, when you run npm run build or npm run dev from the root directory, Turborepo will also build or start your Node.js app alongside the other applications and packages in your monorepo.
By following these steps, you’ve successfully added a Node.js app to your Turborepo monorepo and configured it to use
esbuildfor building. You can now develop and build your Node.js app alongside the other applications and packages within the monorepo, leveraging the shared configurations and benefiting from Turborepo’s caching and optimization features.
Adding a common module
1. Navigate to the packages directory
First, navigate to the packages directory within your Turborepo monorepo:
cd packages2. Create the common directory
Create a new directory for the common module:
mkdir commoncd common3. Initialize an empty Node.js project
Initialize a new npm package and set up TypeScript:
npm init -ynpx tsc --init4. Change the package name to @repo/common
Open the package.json file and update the name field to @repo/common:
{ "name": "@repo/common", // ...}5. Export something from src/index.ts
Create a new file src/index.ts and export a simple value or function:
export const NUMBER = 1;6. Add @repo/common as a dependency in other applications
In the package.json files of the applications that need to use the @repo/common module (e.g., Next.js app, React app, Node.js app), add @repo/common as a dependency:
{ "dependencies": { "@repo/common": "*" }}7. Import and use the exported value or function
In the applications that depend on @repo/common, you can now import and use the exported value or function. For example, in a Next.js page component:
import { NUMBER } from '@repo/common';
export default function HomePage() {  return (    <div>      <h1>Home Page</h1>      <p>The number is: {NUMBER}</p>    </div>  );}
8. Run npm install in the root folder
Navigate back to the root folder of your Turborepo monorepo and run npm install to install the new dependencies:
cd ../..npm install9. Run the applications
You can now run the applications that use the @repo/common module, and you should see the expected behavior. For example, if you run the Next.js app with npm run dev, you should see the value of NUMBER displayed on the home page.
By following these steps, you’ve successfully added a common module (@repo/common) to your Turborepo monorepo. This module can be shared and used by both frontend and backend applications within the monorepo, promoting code reuse and consistency.
The common module can contain shared utilities, constants, types, or any other code that needs to be accessible across multiple applications. You can continue to expand the functionality of the
@repo/commonmodule as needed, and it will be automatically available to all applications that depend on it.