Week 15.3 Docker commands and DockerHub
In this offline lecture, Harkirat covers essential Docker concepts, including Docker commands, pushing images to Docker Hub, and using Docker Compose to define and run multi-container applications, providing practical examples and code snippets throughout.
Docker Commands
Docker provides a wide range of commands that allow you to interact with Docker images, containers, networks, and volumes. Here’s a brief summary of the most essential Docker commands:
docker run:- Used to create and start a new container from a Docker image.
- Example:
docker run -p 8080:80 nginx(starts an Nginx container and maps port 8080 on the host to port 80 in the container).
docker ps:- Lists all running containers.
- Use
docker ps -ato list all containers, including stopped ones.
docker images:- Lists all locally available Docker images.
docker build:- Builds a Docker image from a Dockerfile.
- Example:
docker build -t my-image .(builds an image tagged as “my-image” using the Dockerfile in the current directory).
docker pull:- Downloads a Docker image from a registry (e.g., Docker Hub).
- Example:
docker pull ubuntu(downloads the latest Ubuntu image from Docker Hub).
docker push:- Pushes a Docker image to a registry.
- Example:
docker push my-image(pushes the “my-image” to the configured registry).
docker stop:- Stops a running container.
- Example:
docker stop my-container(stops the container named “my-container”).
docker start:- Starts a stopped container.
- Example:
docker start my-container(starts the container named “my-container”).
docker rm:- Removes one or more containers.
- Example:
docker rm my-container(removes the container named “my-container”).
docker rmi:- Removes one or more Docker images.
- Example:
docker rmi my-image(removes the image named “my-image”).
docker exec:- Runs a command inside a running container.
- Example:
docker exec -it my-container bash(starts an interactive Bash shell inside the container named “my-container”).
docker logs:- Retrieves the logs of a container.
- Example:
docker logs my-container(displays the logs of the container named “my-container”).
docker network:- Manages Docker networks.
- Example:
docker network create my-network(creates a new Docker network named “my-network”).
docker volume:- Manages Docker volumes.
- Example:
docker volume create my-volume(creates a new Docker volume named “my-volume”).
These are just a few of the most commonly used Docker commands. Docker provides many more commands and options for advanced usage and specific scenarios.
Hands-on Experimentation
To gain a better understanding of Docker commands, it’s recommended to perform hands-on experimentation. Start by running simple commands like docker run to create and start containers, docker ps to list running containers, and docker images to list available images.
Experiment with different options and flags to see how they affect the behavior of the commands. For example, try running a container with different port mappings, attaching volumes, or specifying environment variables.
Pushing to Docker Hub
Docker Hub is a public registry where you can store and share Docker images. It allows you to distribute your images to others and also provides a centralized repository for your own images.
Here’s how you can push your Docker images to Docker Hub:
- Sign up for a Docker Hub account:
- Go to the Docker Hub website (https://hub.docker.com/) and create an account if you don’t have one already.
- Create a new repository:
- Once logged in, click on the “Repositories” tab and then click on “Create Repository.”
- Provide a name for your repository and set the visibility (public or private).
- Click “Create” to create the repository.
- Log in to the Docker CLI:
- Open your terminal and log in to Docker Hub using the
docker logincommand. - Enter your Docker Hub username and password when prompted.
- If you have enabled two-factor authentication, you might need to create an access token. Follow the instructions in the Docker documentation (https://docs.docker.com/security/for-developers/access-tokens/) to create an access token.
- Open your terminal and log in to Docker Hub using the
- Push your image to the repository:
-
Before pushing, make sure your image is tagged with the correct repository name and tag.
-
Use the
docker tagcommand to tag your image:Terminal window docker tag your_image_name your_username/your_reponame:tagname -
Push the tagged image to Docker Hub:
Terminal window docker push your_username/your_reponame:tagname
-
Creating a New Repository and Pushing to It
Let’s say you have a custom Docker image that you want to push to a new repository on Docker Hub. Here’s how you can do it:
- Build your Docker image:
-
Use the
docker buildcommand to build your image and give it a meaningful name:Terminal window docker build -t your_username/your_reponame:tagname . -
Replace
your_usernamewith your Docker Hub username,your_reponamewith the desired repository name, andtagnamewith a tag for your image (e.g.,v1,latest).
-
- Push the image to Docker Hub:
-
After building the image, push it to Docker Hub using the
docker pushcommand:Terminal window docker push your_username/your_reponame:tagname
-
- Running the image from Docker Hub:
-
Once the image is pushed to Docker Hub, you can run it on any machine that has Docker installed:
Terminal window docker run -p 3000:3000 your_username/your_reponame:tagname -
This command will pull the image from Docker Hub (if not already present locally) and start a container based on that image.
-
Image Tags and Versioning
When pushing images to Docker Hub, you can use tags to version your images. Tags allow you to have multiple versions of an image within the same repository. This is similar to using tags or branches in version control systems like Git.
For example, you can tag your images with version numbers or specific tags like v1, v2, latest, dev, etc. This helps in managing different versions of your image and allows users to pull specific versions based on their requirements.
To push an image with a specific tag, you can use the docker tag command before pushing:
docker tag your_image_name your_username/your_reponame:v1docker push your_username/your_reponame:v1Sharing and Collaboration
Docker Hub makes it easy to share and collaborate on Docker images. By pushing your images to Docker Hub, you can:
- Share your images with others, allowing them to use your pre-built images in their projects.
- Collaborate with team members by granting them access to your private repositories.
- Automate builds and deployments by integrating Docker Hub with CI/CD pipelines.
For example, if you have pushed an image to Docker Hub, others can easily run it on their machines using a simple docker run command:
docker run -p 3000:3000 your_username/your_reponame:tagnameThis command will pull the image from Docker Hub (if not already present locally) and start a container based on that image, making it convenient for others to use your pre-built images without the need for local setup or configuration.
By leveraging Docker Hub, you can streamline the distribution and sharing of your Docker images, making it easier for others to use and collaborate on your projects.
Docker Compose
Docker Compose is a powerful tool that allows you to define and run multi-container Docker applications using a single YAML file. It simplifies the process of configuring and managing multiple containers, networks, and volumes, making it easier to develop, test, and deploy complex applications.
Before Docker Compose, you would need to manually create networks, volumes, and start containers individually, specifying all the necessary options and configurations. This process could be tedious and error-prone, especially when dealing with multiple containers and their dependencies.
Problem Solved by Docker Compose
Docker Compose solves the problem of managing multiple containers and their dependencies by providing a declarative way to define and run multi-container applications. Instead of manually running multiple docker commands to create networks, volumes, and start containers, you can define your entire application stack in a single docker-compose.yaml file.
The docker-compose.yaml file allows you to specify the services (containers), networks, volumes, and their configurations in a structured and readable format. This makes it easier to understand the application architecture, share the setup with others, and version control the configuration.
Before Docker Compose
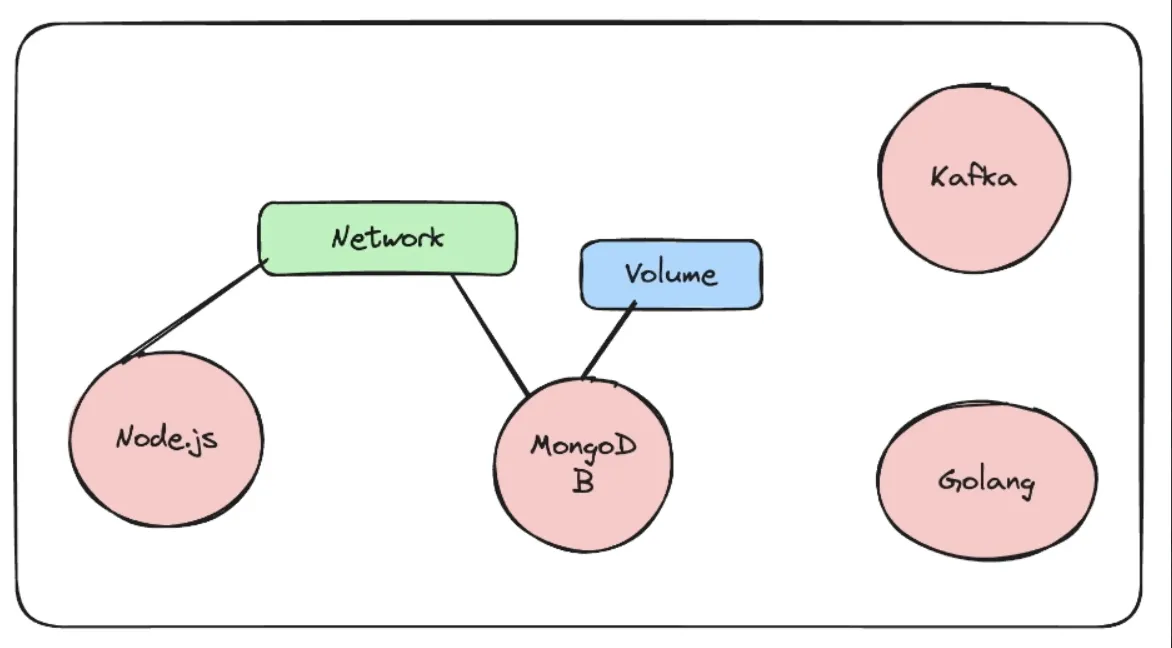
Before Docker Compose, you would need to perform the following steps to set up a multi-container application:
-
Create a network:
Terminal window docker network create my_custom_network -
Create a volume:
Terminal window docker volume create volume_database -
Start the MongoDB container:
Terminal window docker run -d -v volume_database:/data/db --name mongo --network my_custom_network mongo -
Start the backend container:
Terminal window docker run -d -p 3000:3000 --name backend --network my_custom_network backend
As you can see, this process involves running multiple docker commands, specifying the options for each container, and manually connecting them to the appropriate network and volumes.
After Docker Compose
With Docker Compose, you can simplify the above process by defining your application stack in a docker-compose.yaml file. Here’s an example:
version: '3.8'services:  mongodb:    image: mongo    container_name: mongodb    ports:      - "27017:27017"    volumes:      - mongodb_data:/data/db
  backend:    image: backend    container_name: backend_app    depends_on:      - mongodb    ports:      - "3000:3000"    environment:      MONGO_URL: "mongodb://mongodb:27017"
volumes:  mongodb_data:
In this docker-compose.yaml file:
- We define two services:
mongodbandbackend. - The
mongodbservice uses themongoimage, maps port 27017, and mounts a named volumemongodb_datato persist data. - The
backendservice uses thebackendimage, depends on themongodbservice, maps port 3000, and sets an environment variableMONGO_URLto connect to the MongoDB container. - We define a named volume
mongodb_datato persist MongoDB data.
To start the application stack defined in the docker-compose.yaml file, you simply run:
docker-compose upThis command reads the docker-compose.yaml file, creates the necessary networks and volumes, and starts the containers defined in the services section.
To stop the application stack and remove the containers, networks, and volumes, you can run:
docker-compose down --volumesThe --volumes flag ensures that the volumes are also removed along with the containers and networks.
Benefits of Docker Compose
Using Docker Compose offers several benefits:
- Simplified application definition: Docker Compose allows you to define your entire application stack in a single YAML file, making it easier to understand and manage the configuration.
- Easy sharing and collaboration: The
docker-compose.yamlfile can be version-controlled and shared with others, enabling easy collaboration and reproducibility of the application setup. - Reduced complexity: Docker Compose abstracts away the complexity of managing multiple containers, networks, and volumes, providing a higher-level abstraction for defining and running multi-container applications.
- Improved development workflow: Docker Compose enables developers to easily set up and tear down development environments, making it faster to iterate and test changes.
- Portability: The
docker-compose.yamlfile can be used across different environments (development, staging, production) and on different machines, ensuring consistency and portability of the application setup.
By leveraging Docker Compose, you can streamline the process of defining, running, and managing multi-container Docker applications, making it easier to develop, test, and deploy complex applications.