Week 10.2 Understanding Prisma
In today’s lecture, Harkirat provides an insightful overview of Prisma, discussing the role of Object-Relational Mapping (ORM) systems and how Prisma serves as a powerful ORM for modern application development.
The session later explores the use of Prisma with various databases, the functionality of the Prisma Client, and culminated in a hands-on demonstration of creating a first application using Prisma showcasing its ease of use and versatility in managing database operations.
ORMs
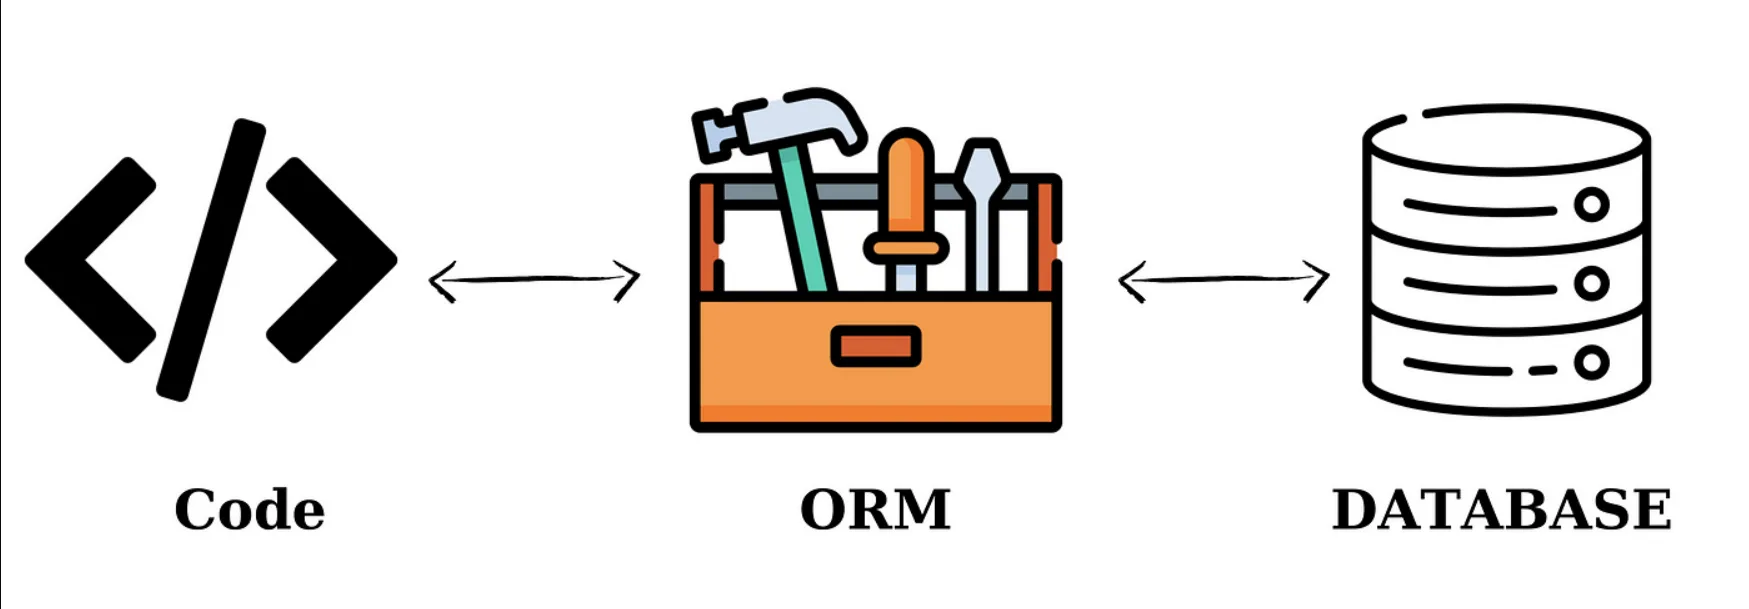
Object-Relational Mapping (ORM) is a crucial concept in modern software development, particularly when dealing with databases in object-oriented programming languages. Prisma is an ORM that exemplifies the use of this technique. Here’s an elaboration on ORMs, with a focus on how Prisma fits into this context:
What are ORMs?
Official Definition
- ORM: Object-Relational Mapping is a programming technique for converting data between incompatible systems using object-oriented programming languages. It creates a “virtual object database” that developers can interact with using their programming language instead of direct database queries.
- Abstraction: ORMs abstract the complexities of the database, allowing developers to work with database records as if they were objects in their code. This includes handling CRUD operations (Create, Read, Update, Delete) and managing database connections and transactions.
Simplified Definition
- Ease of Use: ORMs simplify database interactions by letting developers use the syntax and paradigms of their programming language rather than writing SQL queries. This can make code more readable and maintainable.
Prisma as an ORM
Prisma is a next-generation ORM that takes the concept of ORMs further by providing additional tools and features that enhance the developer experience:
- Schema Definition: Prisma uses a declarative Prisma schema to define the application’s data model. This schema is used to generate a Prisma Client that provides type-safe database access.
- Migrations: Prisma Migrate allows developers to define and perform database schema migrations in a controlled and versioned manner.
- Type Safety: Prisma ensures type safety by generating a client that is tailored to the schema, reducing the risk of runtime errors due to mismatched data types.
- Query Building: Prisma Client provides a fluent API for building queries, which can be more intuitive than writing raw SQL, especially for complex queries.
- Performance: Prisma is designed to be performant and efficient, with a focus on minimizing the overhead typically associated with ORMs.
ORMs, including Prisma, offer a high-level abstraction over database interactions, making it easier for developers to work with data in the context of their applications.
Why ORMs?
Object-Relational Mapping (ORM) frameworks provide a bridge between the object-oriented world of application development and the relational world of databases. They offer several advantages that make them an attractive choice for developers. Let’s delve into these benefits with explanations and code snippets to illustrate their impact.
1. Simpler Syntax
ORMs allow developers to work with high-level programming constructs instead of writing SQL queries directly. This means you can manipulate database entries using objects and methods in your programming language.
Without ORM: SQL Query
INSERT INTO users (name, email) VALUES ('John Doe', 'john@example.com');With ORM: Object Manipulation (Example in JavaScript using Prisma)
await prisma.users.create({ data: { name: 'John Doe', email: 'john@example.com', },});2. Database Abstraction
ORMs provide a unified API to interact with different databases, making it easier to switch databases if needed without rewriting your data access layer.
Prisma Example: The same Prisma client code works across different databases. Switching from PostgreSQL to MySQL, for instance, primarily requires changes in the configuration, not in the code that interacts with the database.
Prisma Schema for PostgreSQL
datasource db { provider = "postgresql" url = env("DATABASE_URL")}Prisma Schema for MySQL
datasource db { provider = "mysql" url = env("DATABASE_URL")}3. Type Safety/Auto-completion
Modern ORMs, especially those used in statically typed languages or with TypeScript support, offer type safety and auto-completion, reducing runtime errors and improving developer productivity.
TypeScript Example with Prisma: When you query the database, the Prisma client provides auto-completion for table names and columns, and the returned data is automatically typed.
// TypeScript understands the structure of the expected result,// providing auto-completion and type checkingconst user = await prisma.user.findUnique({ where: { email: 'john@example.com', },});4. Automatic Migrations
ORMs can automate the process of generating and applying database schema migrations, making it easier to evolve your database schema as your application grows.
Prisma Migration Example: Prisma Migrate generates SQL migration files for your schema changes, which can be applied to update the database schema.
Generate Migration
npx prisma migrate dev --name add_phone_numberThis command might generate a SQL file similar to:
-- Migration SQL generated by Prisma MigrateALTER TABLE "users"ADD COLUMN "phone_number" VARCHAR(15);Apply Migration Applying migrations is handled by Prisma Migrate when you run the above command, keeping your database schema in sync with your Prisma schema.
Prisma
Prisma is a next-generation ORM (Object-Relational Mapping) tool for Node.js and TypeScript applications. It simplifies database workflows by providing a robust set of features that enhance developer productivity and code quality. Let’s delve into the core components that make Prisma a powerful tool for modern application development.

1. Data Model
Prisma uses a Prisma Schema file to define the data model of your application. This schema acts as a single source of truth for your database structure, including tables, columns, relationships, and more. The Prisma Schema Language (PSL) is intuitive yet powerful, allowing you to define your database schema in a clear and concise manner.
Example Prisma Schema:
// schema.prisma
datasource db {  provider = "postgresql"  url      = env("DATABASE_URL")}
model User {  id        Int      @id @default(autoincrement())  name      String  email     String   @unique  posts     Post[]}
model Post {  id        Int      @id @default(autoincrement())  title     String  content   String?  author    User     @relation(fields: [authorId], references: [id])  authorId  Int}
This schema defines two models, User and Post, representing tables in the database. It specifies fields for each table, their types, and the relationship between users and posts.
2. Automated Migrations
Prisma Migrate is a feature that automatically generates and runs database migrations based on changes to your Prisma schema. This means that when you modify your data model, Prisma Migrate can automatically update your database schema to match, without the need for manual SQL migration scripts.
Generating and Applying Migrations:
npx prisma migrate dev --name initThis command generates SQL migration files for the current state of your Prisma schema and applies them to your database, creating or altering tables and relationships as defined.
3. Type Safety
Prisma Client is a type-safe database client generated based on your Prisma schema. This means that every database query you write is checked against the schema, significantly reducing the risk of runtime errors due to data type mismatches. The client provides full auto-completion and type checking in supported editors, making it easier to write and refactor code confidently.
Example Usage of Prisma Client:
import { PrismaClient } from '@prisma/client';
const prisma = new PrismaClient();
async function main() {  const newUser = await prisma.user.create({    data: {      name: 'Alice',      email: 'alice@example.com',    },  });  console.log(newUser);}
main();
4. Auto-Completion
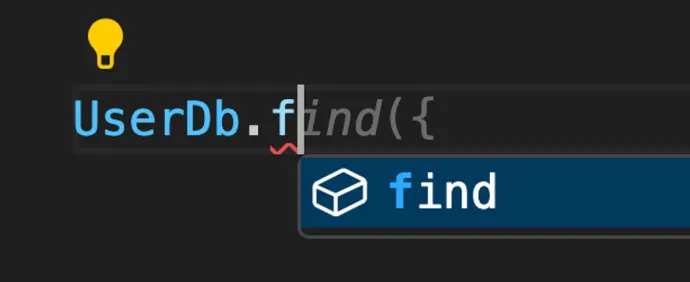
Prisma’s integration with code editors (such as VSCode) provides auto-completion for model fields, operations, and even potential query results. This feature not only speeds up development but also helps prevent errors by ensuring that ysrour queries align with the defined schema.
Auto-Completion Example: When writing queries with Prisma Client, your editor can suggest model fields, available methods, and more, based on the Prisma schema.
Installing Prisma
Creating a simple TODO app with Prisma in a Node.js environment involves several steps, from initializing your Node.js project to setting up Prisma. Here’s a detailed guide to get you started:
Step 1: Initialize an Empty Node.js Project
First, create a new directory for your project and navigate into it. Then, initialize a new Node.js project:
mkdir todo-appcd todo-appnpm init -yThis command creates a package.json file with default values.
Step 2: Add Dependencies
Install Prisma, TypeScript, ts-node (for running TypeScript files directly), and @types/node (for Node.js type definitions) as development dependencies:
npm install prisma typescript ts-node @types/node --save-devStep 3: Initialize TypeScript
Set up TypeScript in your project:
npx tsc --initThis command creates a tsconfig.json file, which configures TypeScript options.
Step 4: Configure TypeScript
Edit the tsconfig.json file to specify the root directory and the output directory for the compiled JavaScript files:
- Change
"rootDir"to"./src". This tells TypeScript to look for.tsfiles in thesrcdirectory. - Change
"outDir"to"./dist". Compiled.jsfiles will be output to thedistdirectory.
Your tsconfig.json should include these changes like so:
{ "compilerOptions": { "target": "es5", "module": "commonjs", "rootDir": "./src", "outDir": "./dist", "strict": true, "esModuleInterop": true, "skipLibCheck": true, "forceConsistentCasingInFileNames": true }}Step 5: Initialize a Fresh Prisma Project
Initialize Prisma in your project:
npx prisma init
This command performs several actions:
- Creates a
prismadirectory with aschema.prismafile inside. This is where you define your database schema. - Creates a
.envfile in the root of your project. This is where you set environment variables, such as your database connection string.
Next Steps
After initializing Prisma, you can proceed to define your database schema in the schema.prisma file. For a TODO app, you might define a Todo model like this:
modeldatasource db {  provider = "postgresql" // Or another database provider like "mysql", "sqlite", etc.  url      = env("DATABASE_URL")}
model Todo {  id        Int      @id @default(autoincrement())  title     String  completed Boolean  @default(false)}
Remember to replace "postgresql" with your database provider and set your database connection string in the .env file:
DATABASE_URL="postgresql://user:password@localhost:5432/mydb?schema=public"Finally, to create the Todo table in your database, run Prisma Migrate:
npx prisma migrate dev --name initThis command generates and applies a migration based on your schema changes.
You can start adding functionality to your TODO app, such as creating, reading, updating, and deleting TODO items using Prisma Client in your application code.
Selecting Your Database
Prisma supports a variety of databases, including relational databases like MySQL and PostgreSQL, as well as the document-oriented database MongoDB (in Preview). Selecting and configuring your database with Prisma involves updating the schema.prisma file and setting the database connection URL in your environment variables. Here’s how you can do it:
Step 1: Update schema.prisma for Your Database
The schema.prisma file contains a datasource block where you specify your database connection. You need to update the provider field according to the database you want to use.
For PostgreSQL
datasource db { provider = "postgresql" url = env("DATABASE_URL")}For MySQL
datasource db { provider = "mysql" url = env("DATABASE_URL")}For MongoDB (Preview)
datasource db { provider = "mongodb" url = env("DATABASE_URL")}Step 2: Set Your Database Connection URL
The url field in the datasource block references an environment variable DATABASE_URL where you should set your database connection string. This is done in the .env file in the root of your project.
Example .env Content for PostgreSQL
DATABASE_URL="postgresql://username:password@localhost:5432/mydatabase"Replace username, password, localhost, 5432, and mydatabase with your actual database credentials and details.
Example .env Content for MySQL
DATABASE_URL="mysql://username:password@localhost:3306/mydatabase"Example .env Content for MongoDB
DATABASE_URL="mongodb+srv://username:password@cluster0.example.mongodb.net/mydatabase"Step 3: Install the Prisma VSCode Extension
To enhance your development experience with Prisma, it’s highly recommended to install the Prisma VSCode extension. This extension provides features like syntax highlighting, formatting, auto-completion, and a visual overview of your Prisma schema.
You can install the Prisma extension directly from the Visual Studio Code Marketplace:
- Open VSCode.
- Go to the Extensions view by clicking on the square icon on the sidebar or pressing
Ctrl+Shift+X - Search for “Prisma”.
- Find the Prisma extension by Prisma and click “Install”.
Remember, when using MongoDB with Prisma, it’s currently in Preview, so it’s a good idea to keep an eye on the official Prisma documentation for any updates or changes.
Defining Models
Defining your data model in Prisma involves specifying the structure of your database tables and their relationships directly in the schema.prisma file. This schema acts as a blueprint for your database, allowing Prisma to generate the necessary code to interact with your data in a type-safe manner. Let’s walk through the process of defining a data model for a simple application with Users and Todos tables, and then generating the corresponding migrations to update your database schema.
Step 1: Define Your Data Model in schema.prisma
To add a Users and a Todos table to your application, you’ll define two models in your schema.prisma file: User and Todo. At this stage, we won’t worry about defining relationships between these tables.
// schema.prisma
generator client {  provider = "prisma-client-js"}
datasource db {  provider = "postgresql" // Or your database provider of choice  url      = env("DATABASE_URL")}
model User {  id        Int     @id @default(autoincrement())  username  String  @unique  password  String  firstName String  lastName  String}
model Todo {  id          Int     @id @default(autoincrement())  title       String  description String  done        Boolean @default(false)  userId      Int     // This will later be used to establish a relationship}
In this schema:
- Each
modelkeyword defines a table in your database. - The fields within each model represent columns in the table.
- Attributes like
@id,@default(autoincrement()), and@uniquespecify column constraints and behaviors.
Step 2: Generate Migrations
After defining your data model, the next step is to generate migrations to create these tables in your database. Prisma Migrate translates changes in your Prisma schema into SQL migration files, which are then applied to your database to update its schema.
Run the following command to generate and apply migrations:
npx prisma migrate dev --name initialize_schemaThis command does a few things:
- It generates SQL migration files that represent the schema changes (in this case, creating the
UserandTodotables). - It applies these migrations to your database, creating the tables.
- It generates or updates the Prisma Client, which you use to interact with your database in your application code.
Step 3: Inspect the Migrations Folder
After running the migrations, you can find them in the prisma/migrations folder in your project directory. Each migration is stored in a separate folder, named with a timestamp and the name you provided (initialize_schema in this case). Inside, you’ll find:
- A
migration.sqlfile containing the SQL commands that were run against your database. - A
README.mdfile with information about the migration.
Inspecting these files can give you insights into the exact changes made to your database schema.
By defining your data model in the
schema.prismafile and using Prisma Migrate, you’ve successfully created a Users and a Todos table in your database without manually writing any SQL.
This process not only simplifies database schema management but also ensures that your application’s data model is version-controlled and easily reproducible across different environments.
Exploring Your Databases
Exploring your database with psql after Prisma has created tables for you is a straightforward process. psql is a command-line interface for interacting with PostgreSQL that allows you to execute queries, view table structures, and manage your database. Here’s how you can use psql to explore the tables created by Prisma:
Step 1: Connect to Your Database
Open your terminal and use the psql command to connect to your PostgreSQL database. Replace localhost, postgres, and postgres with your database’s host, database name, and user, respectively, if they are different.
psql -h localhost -d postgres -U postgresYou might be prompted to enter the password for the PostgreSQL user.
Step 2: List Tables
Once connected, you can list all the tables in your database using the \\dt command.
\\dtThis command will display a list of tables, including those created by Prisma. You should see the User and Todo tables listed if you followed the previous steps to define your data model and run migrations.
Step 3: Describe Table Structure
To get detailed information about the structure of a specific table, use the \\d command followed by the table name. For example, to describe the User table:
\\d "User"This will show you the columns, their data types, and any constraints or indexes associated with the table.
Step 4: Query Data
You can also execute SQL queries directly to retrieve data from your tables. For instance, to select all records from the User table:
SELECT * FROM "User";Step 5: Exit psql
When you’re done exploring, you can exit psql by typing \\q and pressing Enter.
\\qUsing
psqlto explore your database gives you a direct view of the underlying structure and data. It’s a powerful tool for database administration and can be particularly useful for verifying the results of ORM operations, such as those performed by Prisma. Whether you’re developing, debugging, or simply curious about the state of your database,psqlprovides the necessary commands to interact with and inspect your PostgreSQL database effectively.
Prisma Client
What is a Prisma Client?
The Prisma Client is an auto-generated and type-safe query builder that’s tailored to your data model. It provides a fluent API that lets you compose queries in a way that is both intuitive and close to natural language. The client abstracts away the SQL layer, offering methods that correspond to various database operations, such as creating, reading, updating, and deleting records.
How Does the Prisma Client Work?
When you use Prisma Client in your application, you write code like this:
const newUser = await prisma.user.create({ data: { email: "harkirat@gmail.com", },});Under the hood, Prisma Client converts this operation into an SQL query similar to:
INSERT INTO users (email) VALUES ('harkirat@gmail.com');This conversion is handled automatically, so you don’t need to write SQL queries manually.
How to Generate the Prisma Client?
After defining your data model in the schema.prisma file, you can generate the Prisma Client by running the following command in your terminal:
npx prisma generateThis command reads your Prisma schema and generates the client code accordingly. The generated client includes all the necessary functions to interact with your database based on the models you’ve defined.
Using the Generated Prisma Client
Once generated, you can import and use the Prisma Client in your Node.js application to perform database operations. Here’s an example of how you might use the client in an async function:
import { PrismaClient } from '@prisma/client';
const prisma = new PrismaClient();
async function main() {  const newUser = await prisma.user.create({    data: {      email: "harkirat@gmail.com",    },  });  console.log(newUser);}
main()  .catch(e => {    throw e;  })  .finally(async () => {    await prisma.$disconnect();  });
In this example, we’re using the create method on the user model to insert a new user into the database. The Prisma Client provides similar methods for other CRUD operations and supports complex queries, including filtering, sorting, and joining data across tables.
Creating Your First Application
1] Insert
Creating a function to insert data into the Users table using Prisma in a TypeScript application
The provided solution defines an asynchronous function insertUser that takes four parameters: username, password, firstName, and lastName. This function uses the Prisma Client to insert a new user into the Users table with the provided details.
import { PrismaClient } from "@prisma/client";
const prisma = new PrismaClient();
async function insertUser(username: string, password: string, firstName: string, lastName: string) {  const res = await prisma.user.create({    data: {        username,        password,        firstName,        lastName    }  });  console.log(res);}
insertUser("admin1", "123456", "harkirat", "singh");
Here’s a breakdown of the key parts of this function:
- Prisma Client Initialization:
const prisma = new PrismaClient();creates a new instance of the Prisma Client. This instance is used to perform operations on your database. - The
insertUserFunction: This is an asynchronous function, indicated by theasynckeyword. It’s designed to insert a new user into the database. - Inserting Data:
prisma.user.create()is a method provided by the Prisma Client to create (or insert) a new record in theusertable. The method takes an object with adataproperty, which itself is an object containing the fields to be inserted into the table. - Awaiting the Promise: The
awaitkeyword is used to wait for the promise returned byprisma.user.create()to resolve. This is necessary because database operations are asynchronous. - Logging the Result: The result of the insert operation (the newly created user record) is stored in the
resvariable and then logged to the console. - Executing the Function: Finally,
insertUser("admin1", "123456", "harkirat", "singh");calls the function with sample data. In a real application, you would likely call this function in response to user input, such as a form submission.
2] Update
Updating data in the Users table using Prisma in a TypeScript application involves specifying the criteria for selecting the user to update and providing the new data for the selected fields.
The solution defines an asynchronous function updateUser that takes a username and an object containing the new firstName and lastName values. This function uses the Prisma Client to update the specified user in the database.
import { PrismaClient } from "@prisma/client";
const prisma = new PrismaClient();
interface UpdateParams {    firstName: string;    lastName: string;}
async function updateUser(username: string, {    firstName,    lastName}: UpdateParams) {  const res = await prisma.user.update({    where: { username },    data: {      firstName,      lastName    }  });  console.log(res);}
updateUser("admin1", {    firstName: "new name",    lastName: "singh"});
Here’s a breakdown of the key components:
- Prisma Client Initialization:
const prisma = new PrismaClient();creates a new instance of the Prisma Client, which is used to interact with your database. - The
UpdateParamsInterface: This TypeScript interface defines the shape of the object expected by theupdateUserfunction for the update operation. It specifies that bothfirstNameandlastNameshould be strings. - The
updateUserFunction: This asynchronous function is designed to update a user’sfirstNameandlastNamein the database. It takes ausernameto identify the user to update and anUpdateParamsobject containing the new values. - Updating Data:
prisma.user.update()is a method provided by the Prisma Client to update a record in theusertable. It requires two main arguments:where: An object specifying the criteria to find the record to update. In this case, it’s theusernameof the user.data: An object containing the fields to update and their new values.
- Awaiting the Promise: The
awaitkeyword pauses execution until the promise returned byprisma.user.update()is resolved, ensuring the update operation completes before proceeding. - Logging the Result: The result of the update operation (the updated user record) is stored in the
resvariable and then logged to the console. - Executing the Function: The function is called with a sample
usernameand new values forfirstNameandlastName. In a real application, these values would likely come from user input.
3] Get a User’s Detail
Fetching a user’s details from the database based on their username can be done efficiently using Prisma Client.
The solution defines an asynchronous function getUser that takes a username as an argument. This function uses the Prisma Client to find the first user that matches the given username.
import { PrismaClient } from "@prisma/client";
const prisma = new PrismaClient();
async function getUser(username: string) {  const user = await prisma.user.findFirst({    where: {        username: username    }  });  console.log(user);}
getUser("admin1");
Here’s a breakdown of the key components:
- Prisma Client Initialization:
const prisma = new PrismaClient();creates a new instance of the Prisma Client, which is used to interact with your database. - The
getUserFunction: This asynchronous function is designed to fetch a user’s details from the database. It takes ausernameto identify the user. - Fetching Data:
prisma.user.findFirst()is a method provided by the Prisma Client to retrieve the first record that matches the given criteria from theusertable. It requires an object with awhereclause:where: An object specifying the criteria to find the record. In this case, it’s looking for a user with a matchingusername.
- Awaiting the Promise: The
awaitkeyword is used to wait for the promise returned byprisma.user.findFirst()to resolve. This is necessary because database operations are asynchronous. - Logging the Result: The result of the fetch operation (the user record) is stored in the
uservariable and then logged to the console. - Executing the Function: The function is called with a sample
usernameof “admin1”. In a real application, this value would likely come from user input, such as a login form or a search query.