Week 15.2 Advanced Docker Concepts
In this lecture, Harkirat covers several key concepts and features of Docker that are essential for building and managing containerized applications. Through the lecture he explains layers for efficient image storage and caching, networks for secure container communication, volumes for data persistence.
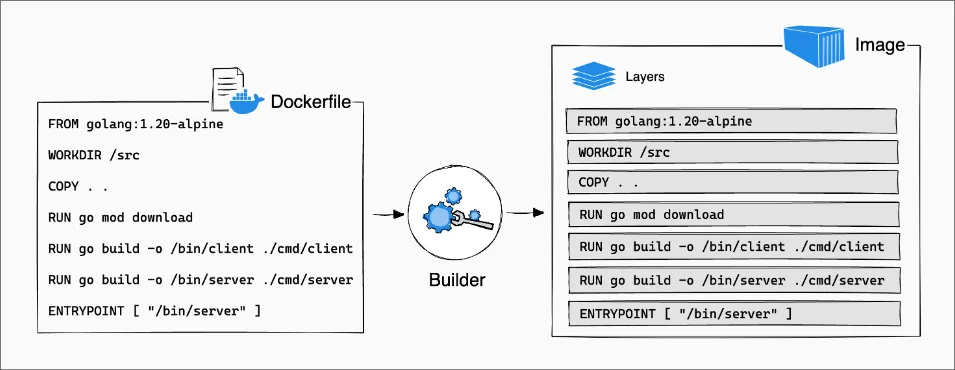
Layers In Docker
In Docker, layers are a fundamental part of the image architecture. A Docker image is essentially built up from a series of layers, each representing a set of differences from the previous layer. These layers are stacked on top of each other, forming the complete image.
How Layers are Made
- Base Layer: The base layer is the starting point of an image, typically an operating system (OS) like Ubuntu, Alpine, or any other base image specified in a Dockerfile. This base layer provides the foundation for the subsequent layers.
- Instruction Layers:
Each instruction in a Dockerfile creates a new layer in the image. These instructions include commands like
RUN,COPY,ENV, and others, which modify the filesystem by installing packages, copying files from the host to the container, setting environment variables, or making other changes. Each of these modifications creates a new layer on top of the previous layer.
Here’s an example of how layers are created in a Dockerfile:
# Base layerFROM ubuntu:20.04
# Instruction layer 1RUN apt-get update && apt-get install -y python3
# Instruction layer 2COPY . /app
# Instruction layer 3RUN pip3 install -r /app/requirements.txt
In this example, each RUN and COPY instruction creates a new layer on top of the previous one.
- Reusable and Shareable: Layers are cached and reusable across different images, which makes building and sharing images more efficient. If multiple images are built from the same base image or share common instructions, they can reuse the same layers, reducing storage space and speeding up image downloads and builds.
- Immutable: Once a layer is created, it cannot be changed. If a change is made, Docker creates a new layer that captures the difference. This immutability is key to Docker’s reliability and performance, as unchanged layers can be shared across images and containers.
Benefits of Layers
The layered architecture of Docker images provides several benefits:
- Efficient Storage: By reusing and sharing layers across images, Docker can significantly reduce the storage space required for multiple images, as only the unique layers need to be stored.
- Faster Image Builds: When building an image, Docker can reuse cached layers from previous builds, reducing the time and resources required for subsequent builds.
- Faster Image Distribution: Since layers are shareable, Docker only needs to transfer the unique layers when distributing an image, resulting in faster image downloads and deployments.
- Version Control: Each layer represents a specific set of changes, making it easier to track and roll back changes if necessary.
- Portability: Docker images are portable across different environments and platforms because they encapsulate all the necessary dependencies and configurations within their layers.
By understanding the layered architecture of Docker images, developers can optimize their Dockerfiles, leverage layer caching, and take advantage of the efficiency, speed, and portability benefits that Docker provides.
Practically Understanding Layers
Let’s analyze the layers created during the Docker build process for the simple Node.js application.
Dockerfile:
FROM node:18-alpine
WORKDIR /app
COPY package.json .RUN npm install
COPY . .
CMD ["node", "index.js"]
Build Logs:
Observations:
- Base Image Layer: The first layer is created from the base image specified in the
FROMinstruction. In this case, it’snode:18-alpine, which is a lightweight Alpine Linux image with Node.js pre-installed. This layer serves as the foundation for the subsequent layers. WORKDIRLayer: TheWORKDIRinstruction sets the working directory for the subsequent instructions in the Dockerfile. It creates a new layer on top of the base image layer. In this example, the working directory is set to/app.COPYLayer: TheCOPYinstruction is used twice in the Dockerfile. EachCOPYinstruction creates a new layer that adds files from the host system to the image filesystem.- The first
COPYinstruction copies thepackage.jsonfile to the working directory (/app). - The second
COPYinstruction copies the rest of the application files (.) to the working directory.
- The first
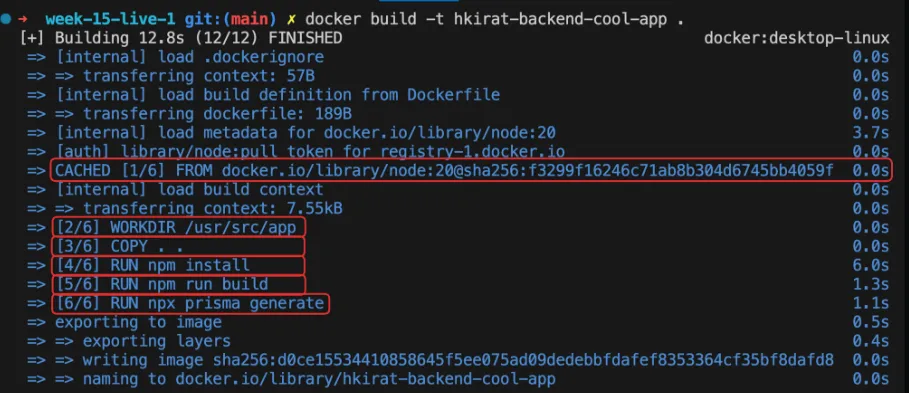
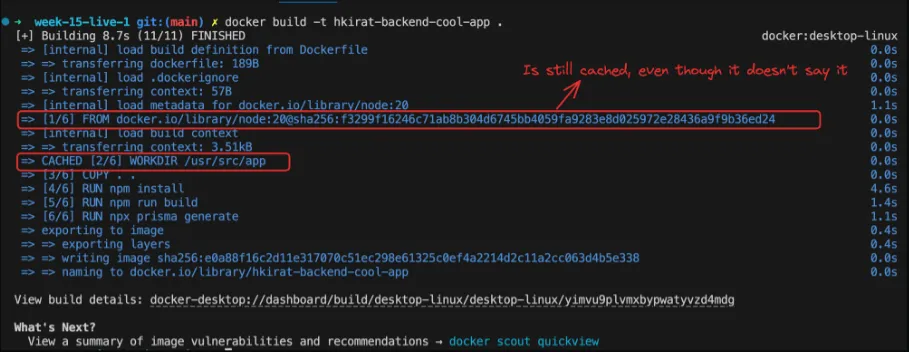
RUNLayer: TheRUNinstruction executes a command inside the image and creates a new layer with the results. In this case,RUN npm installinstalls the dependencies specified in thepackage.jsonfile, creating a new layer with the installed packages.CMDLayer: TheCMDinstruction specifies the default command to run when a container is started from the image. It doesn’t create a new layer but rather sets the metadata for the image. In this example,CMD ["node", "index.js"]sets the command to run theindex.jsfile using Node.js.- Layer Caching: Docker caches layers to speed up subsequent builds. If a layer hasn’t changed since the last build, Docker reuses the cached layer instead of rebuilding it. In the build logs, you can see
CACHEDnext to theWORKDIRinstruction, indicating that the layer was reused from the cache.
By understanding how layers are created and utilized in Docker, you can optimize your Dockerfiles to minimize the number of layers and leverage caching effectively. This helps reduce build times and image sizes, making your Docker builds more efficient.
Why layers?
Layers in Docker provide several benefits, including efficient caching and reusability. Let’s explore why layers are important and how they can be optimized to maximize caching and minimize rebuild times.
Reusability and Caching
One of the primary reasons for using layers in Docker is to enable reusability and caching. When you build a Docker image, each instruction in the Dockerfile creates a new layer. Docker caches these layers and reuses them in subsequent builds if the instructions and their inputs haven’t changed.
Case 1 - Changing Source Code

Let’s say you modify the index.js file and rebuild the image. Docker will reuse the cached layers for the base image, WORKDIR, COPY package.json, and RUN npm install instructions. Only the layer created by COPY . . will be rebuilt, as it includes the modified index.js file.
Case 2 - Changing Dependencies
Now, let’s consider a scenario where you modify the package.json file to add a new dependency. In this case, Docker will reuse the cached layers up to the COPY package.json . instruction. However, the RUN npm install layer and all subsequent layers will be rebuilt because the input to npm install has changed.

Thought Experiment
In a typical project, dependencies (specified in package.json) change less frequently compared to the application code. By separating the package.json copy and npm install steps into their own layers, you can cache the npm install layer and avoid reinstalling dependencies every time the application code changes.
This caching optimization becomes particularly valuable in larger projects with many dependencies. Reinstalling dependencies from scratch on every build can be time-consuming and resource-intensive. By leveraging caching, you can significantly speed up the build process and improve development efficiency.
Optimising Dockerfile
To optimize your Dockerfile for caching, you should structure your layers in a way that maximizes the reuse of cached layers. Here are a few best practices:
- Place instructions that are less likely to change at the top of the Dockerfile. For example, the base image and
WORKDIRinstructions are usually stable and can be cached effectively. - Separate the copying of
package.jsonand the running ofnpm installinto their own layers. This allows thenpm installlayer to be cached and reused as long as thepackage.jsonfile remains unchanged. - Copy the application code (
COPY . .) after installing dependencies. This ensures that changes to the application code don’t invalidate the cached layers for installing dependencies.
By following these practices, you can optimize your Dockerfile to leverage caching effectively. This reduces build times and saves resources by reusing cached layers whenever possible.
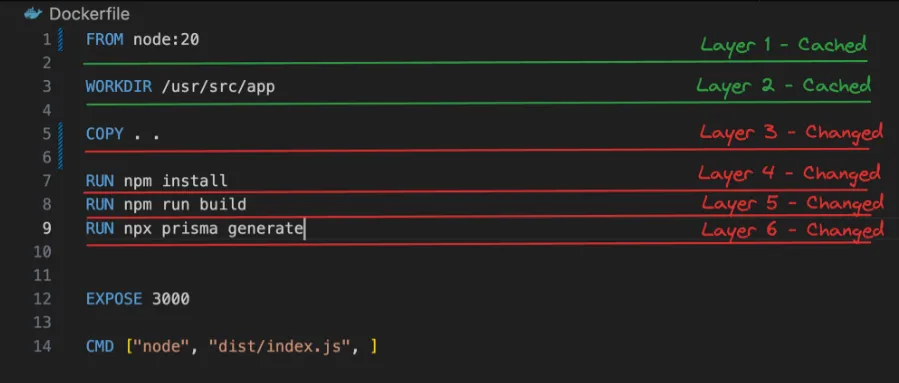
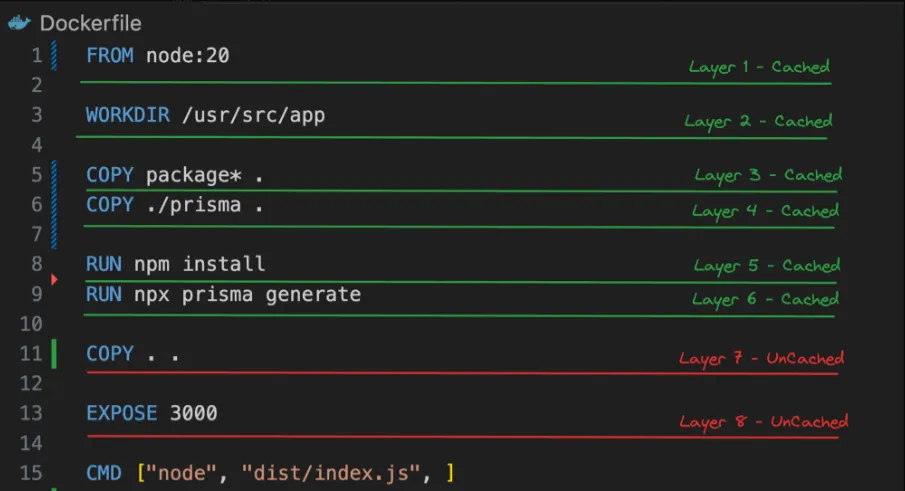
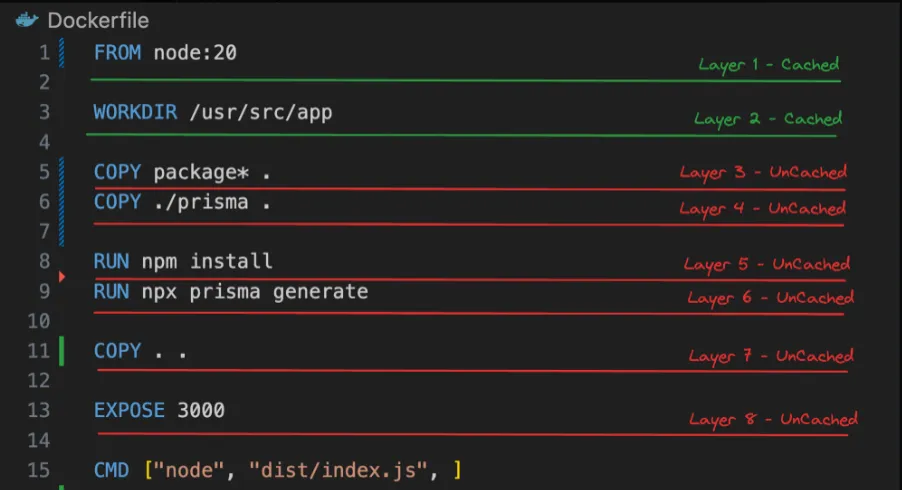
What if we change the Dockerfile a bit -
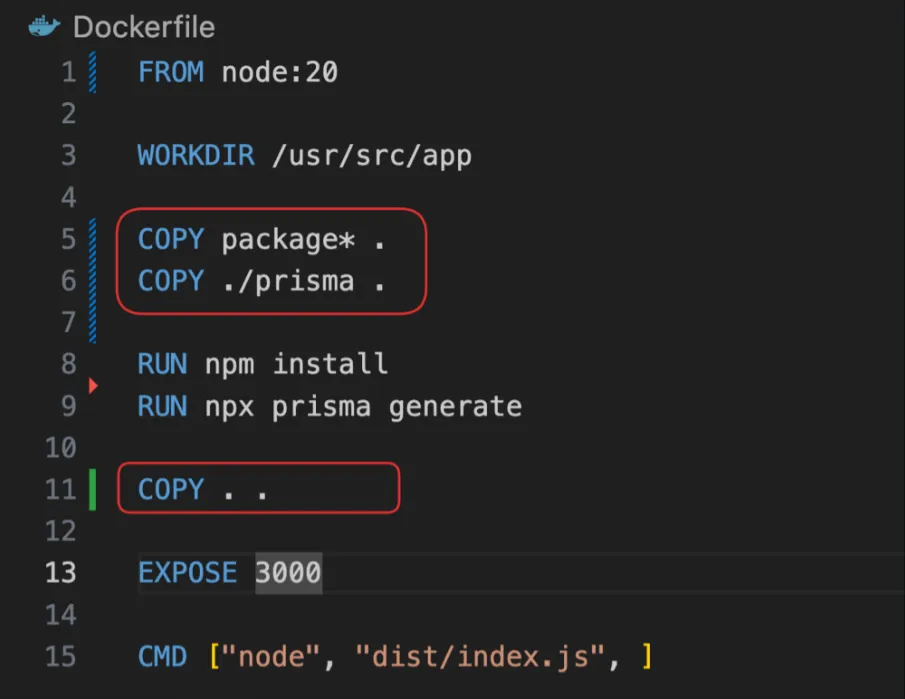

Dockerfile
FROM node:20
WORKDIR /usr/src/app
COPY package* .COPY ./prisma .
RUN npm installRUN npx prisma generate
COPY . .
EXPOSE 3000
CMD ["node", "dist/index.js", ]- We first copy over only the things that
npm installandnpx prisma generateneed - Then we run these scripts
- Then we copy over the rest of the source code
Case 1 - You change your source code (but nothing in package.json/prisma)

Case 2 - You change the package.json file (added a dependency)

Networks and volumes
Networks and volumes are essential concepts in Docker that enable communication between containers and data persistence across container restarts. Let’s explore these concepts in more detail.
Networks
Docker networks allow containers to communicate with each other securely and efficiently. By default, Docker creates a bridge network for containers to communicate within the same Docker host. However, you can create custom networks to isolate containers or enable communication between containers across different Docker hosts.
Here are a few key points about Docker networks:
- Default Bridge Network: When you start a container without specifying a network, it is connected to the default bridge network. Containers on the same bridge network can communicate with each other using their container names or IP addresses.
- User-Defined Networks: You can create your own networks using the
docker network createcommand. User-defined networks provide better isolation and allow containers to communicate using their container names as DNS names.
Example of creating a user-defined network:
docker network create my-network- Connecting Containers to Networks: You can connect containers to networks using the
-networkflag when running the container.
Example of running a container and connecting it to a network:
docker run --name my-container --network my-network my-image- Container Communication: Containers on the same network can communicate with each other using their container names as hostnames. Docker’s embedded DNS server resolves the container names to their respective IP addresses.
Example of container communication:
docker run --name container1 --network my-network my-image1docker run --name container2 --network my-network my-image2In this example, container1 can communicate with container2 using the hostname container2, and vice versa.
Volumes
Docker volumes provide a way to persist data generated by containers and share data between containers. Volumes are managed by Docker and are separate from the container’s filesystem. They can be used to store data that needs to survive container restarts or be shared among multiple containers.
Here are a few key points about Docker volumes:
- Creating Volumes: You can create volumes using the
docker volume createcommand.
Example of creating a volume:
docker volume create my-volume- Mounting Volumes: You can mount volumes to containers using the
vor-mountflag when running the container.
Example of running a container and mounting a volume:
docker run --name my-container -v my-volume:/app my-imageIn this example, the my-volume volume is mounted to the /app directory inside the container.
- Data Persistence: Data stored in volumes persists even when the container is stopped or removed. This allows you to preserve important data across container restarts.
- Sharing Data Between Containers: Volumes can be shared between multiple containers, enabling data sharing and collaboration.
Example of sharing a volume between containers:
docker run --name container1 -v shared-volume:/data my-image1docker run --name container2 -v shared-volume:/data my-image2In this example, both container1 and container2 share the same shared-volume, allowing them to access and modify the same data.
Importance of Networks and Volumes
Networks and volumes become crucial when you have multiple containers running and need to establish communication between them or persist data across container restarts.
For example, if you have a web application container and a database container, you would typically create a user-defined network to enable communication between them. The web application container can connect to the database container using its container name as the hostname.
Similarly, if you have a container that generates or processes data, you can use volumes to persist that data outside the container’s lifecycle. This ensures that the data remains available even if the container is stopped, restarted, or removed.
Volumes
Volumes in Docker provide a way to persist data generated by containers and ensure that the data survives container restarts. Let’s explore how volumes work and how they can be used to persist data in a MongoDB container.
Without Volumes
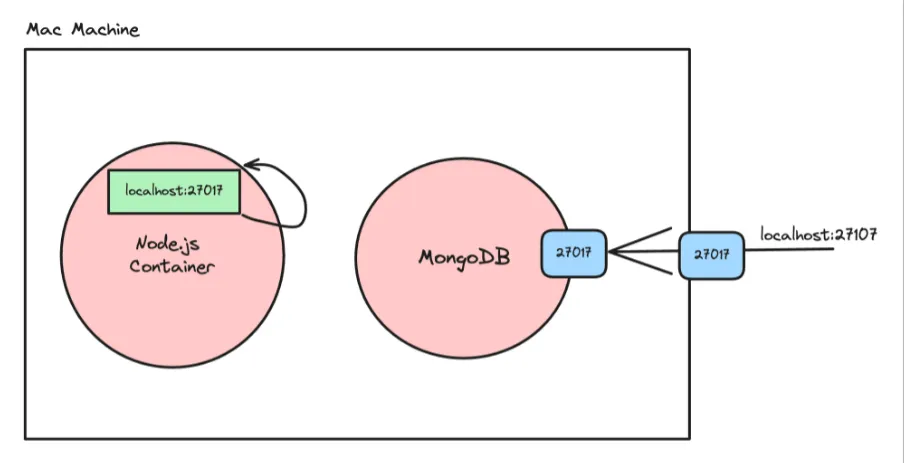
By default, when you run a MongoDB container without specifying a volume, the data stored inside the container is lost when the container is stopped or restarted. Here’s an example:
-
Start a MongoDB container:
Terminal window docker run -p 27017:27017 -d mongo -
Open MongoDB Compass and connect to the running container. Add some data to the database.
-
Kill the container:
Terminal window docker kill <container_id> -
Restart the container:
Terminal window docker run -p 27017:27017 -d mongo -
Open MongoDB Compass again and try to explore the database. You will notice that the data you added earlier is no longer present. This is because the data was stored within the container’s filesystem, which is ephemeral and gets destroyed when the container is stopped.
With Volumes
To persist data across container restarts, you can use Docker volumes. Volumes are managed by Docker and provide a way to store data outside the container’s filesystem. Here’s how you can use volumes with a MongoDB container:
-
Create a volume:
Terminal window docker volume create volume_database -
Start a MongoDB container and mount the volume to the
/data/dbdirectory (where MongoDB stores its data):Terminal window docker run -v volume_database:/data/db -p 27017:27017 -d mongoThe
-vflag is used to mount thevolume_databasevolume to the/data/dbdirectory inside the container. -
Open MongoDB Compass and connect to the running container. Add some data to the database.
-
Kill the container:
Terminal window docker kill <container_id> -
Restart the container, making sure to mount the same volume:
Terminal window docker run -v volume_database:/data/db -p 27017:27017 -d mongo -
Open MongoDB Compass again and explore the database. You will notice that the data you added earlier is still present. This is because the data is stored in the
volume_databasevolume, which persists even when the container is stopped or restarted.
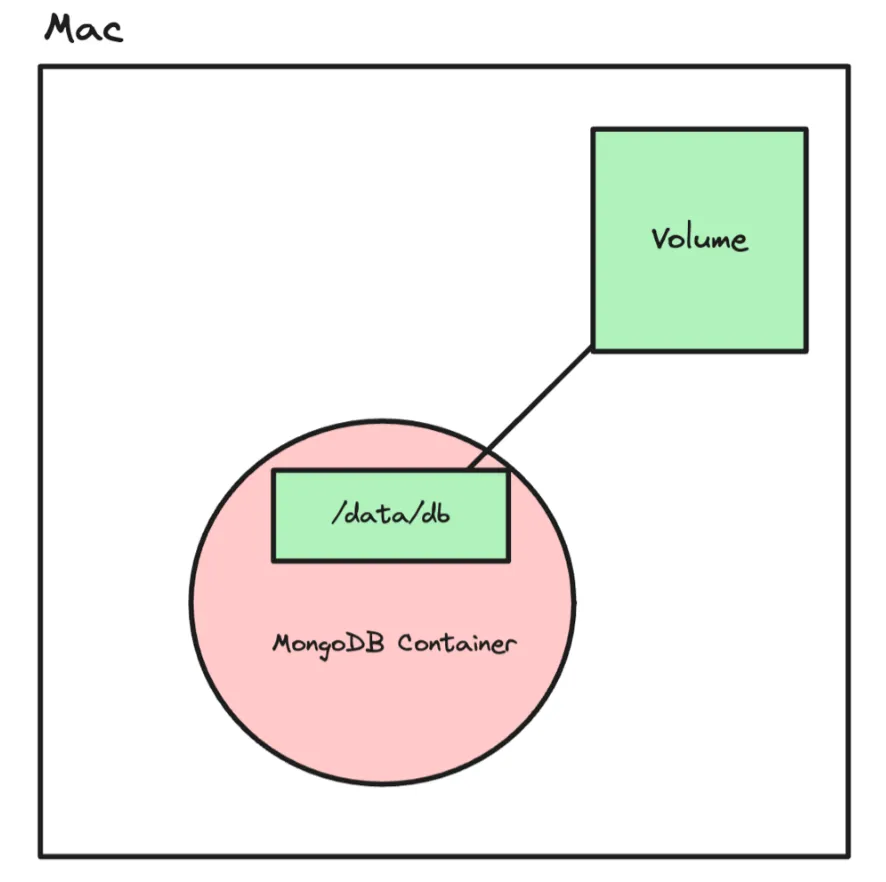
By using volumes, you can ensure that important data generated by containers is stored separately from the container’s filesystem. This allows the data to survive container restarts and enables data persistence across different container instances.
Additional Volume Commands
Here are a few additional commands related to volumes in Docker:
-
List all volumes:
Terminal window docker volume ls -
Inspect a specific volume:
Terminal window docker volume inspect <volume_name> -
Remove a volume:
Terminal window docker volume rm <volume_name> -
Remove all unused volumes:
Terminal window docker volume prune
It’s important to note that volumes are managed by Docker and are stored in a specific directory on the Docker host. By default, volumes are stored in /var/lib/docker/volumes on Linux systems.
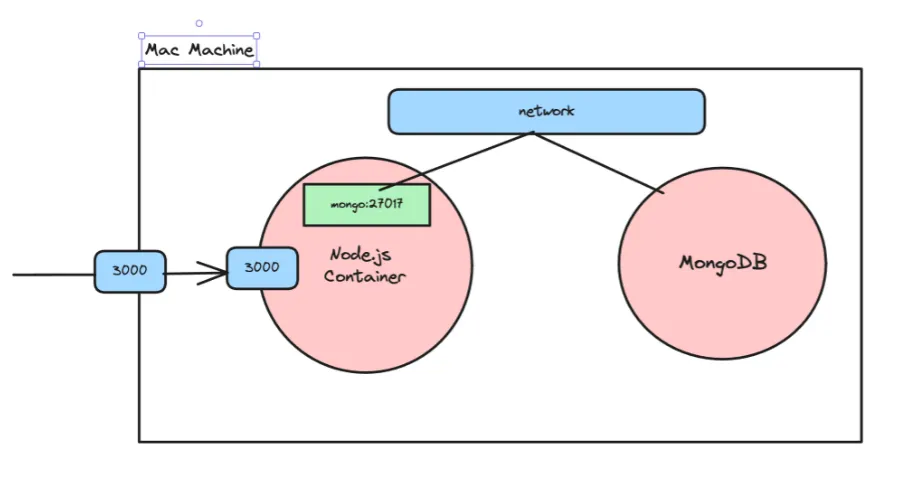
Networks
In Docker, networks provide a way for containers to communicate with each other and with the outside world. By default, Docker containers are isolated and cannot communicate with each other directly. However, by attaching containers to the same network, you can enable communication between them.
Understanding Networks
Let’s explore how to make containers talk to each other using Docker networks:
-
Clone the repository:
Terminal window git clone <https://github.com/100xdevs-cohort-2/week-15-live-2.2.git> -
Navigate to the cloned repository:
Terminal window cd week-15-live-2.2 -
Build the Docker image:
Terminal window docker build -t image_tag .Replace
image_tagwith a meaningful tag for your image (e.g.,my-app). -
Create a custom network:
Terminal window docker network create my_custom_networkThis command creates a new Docker network named
my_custom_network. -
Start the backend container with the network attached:
Terminal window docker run -d -p 3000:3000 --name backend --network my_custom_network image_tagThis command starts a container from the built image, maps port 3000 from the container to port 3000 on the host, names the container
backend, and attaches it to themy_custom_networknetwork. -
Start the MongoDB container on the same network:
Terminal window docker run -d -v volume_database:/data/db --name mongo --network my_custom_network -p 27017:27017 mongoThis command starts a MongoDB container, mounts the
volume_databasevolume to persist data, names the containermongo, attaches it to themy_custom_networknetwork, and maps port 27017 from the container to port 27017 on the host. -
Check the logs to ensure the database connection is successful:
Terminal window docker logs <container_id>Replace
<container_id>with the ID of the backend container. The logs should indicate a successful connection to the MongoDB database. -
Visit an endpoint in your application to ensure it can communicate with the database.
Note: If you don’t need to access the MongoDB container from outside the Docker network, you can remove the -p 27017:27017 port mapping.
Types of Networks
Docker provides different types of networks, each serving a specific purpose:
- Bridge: The default network driver for containers. When you run a container without specifying a network, it’s attached to a bridge network. It provides a private internal network on the host machine, and containers on the same bridge network can communicate with each other using their container names or IP addresses.
- Host: This network removes the network isolation between the container and the Docker host, and uses the host’s networking directly. Containers attached to the host network can directly access the host’s network stack, which is useful for services that need to handle lots of traffic or expose many ports.
Example of running a container with the host network:
docker run --network host my-image- None: This network disables networking for a container, providing complete network isolation. Containers attached to the “none” network have no external connectivity.
Example of running a container with no network:
docker run --network none my-image- Overlay: Overlay networks allow communication between containers running on different Docker hosts, enabling multi-host networking. This is useful in swarm mode for connecting services across multiple nodes.
- Macvlan: Macvlan networks allow containers to have their own MAC addresses and appear as physical devices on the network. This is useful for legacy applications that expect to be directly connected to the physical network.
By leveraging Docker networks, you can enable communication between containers, control network isolation, and architect multi-container applications effectively. Networks provide flexibility and scalability in managing container communication and connectivity.